Search the Community
Showing results for tags 'plug'.
-
I Just pulled a nail out of my fairly new Dunlop and had to put a plug in. Now home and seems to be fine. Question I have is it advisable to change the tire out soonest or should it be ok to run for a while with the plug in?
-
I am running stock NGK plugs in my 06 Venture. Would performance improve with a different brand of plug? How about plugs that run hotter? Comments and suggestions welcomed! Regards...........Boomer
-
2006 Midnight Venture........Left rear cylinder is now gas fouling the spark plug. I'm on the 2nd plug within 10 days now. Is there something specific I can do to eliminate this problem......and would switching to a hotter plug do the trick? I'm running NGK 4929 plugs in all cylinders now. Regards.........Boomer
-
Did a search and came up with an answer from last year, so I thought I'd check to see if anyone had an update. Just going through the new purchase (01 RSV), changing the oil, filters, etc. Also replacing the plugs. Well the back two are a piece of cake, left front was a bit of a challenge, but was able to get the plug wire out, pretty easily, by lifting towards the front of the bike, there's a little gap up there. The right front is another story. The answer I found was to just yank it out. Is that still the preferred method? Also found out that NGK plugs don't fit the 5/8" plug socket that the manual suggests you use. Kind of a pain in the butt, but the back two are easy to reach, my regular 18 mm socket doesn't have the rubber in it. After loosening the left front, couldn't get my meat hooks in there to grab the plug. Used a short length (4-5") of 3/8" fuel line, pushed it over the top of the plug, pulled it out. You can use the same method for the install, works pretty good.
-
I'm having trouble starting the bike up, as it didn't have any HT leads I had to buy a new set and I'm not sure that I've put them on correctly. Could someone please tell me how they should be set up? Left spark plug 1 = Front Left Coil, Right Spark Plug 1 = Front Right Coil 3 Left Spark Plug 2 = Rear Left Coil, Right Spark Plug 2 = Rear Right Coil 4
-
i've got an 07 venture that i tried to install the tri-star brake/running light module on. i found a harness under the seat that had 5 wires in it, blue,yellow, brown,dk. green and black......when testing these wires they corresponded to the tailight (blue), ...brake light (yellow),.... LT. turn (brown), ....Rt. turn (Dk. green) .....and ground ( black).....i made all the connections, tried it, everything worked.....turned the bike off...key off........and the rear turn signals were on, not blinking...just on...............is this the right harness......anyone have any experience with this module.........i spent all day on this...even went down to yamaha, got yamaha connectors so i could wire the module and plug it in....(i know how to disconnect the wires from the plug)........so i'm gett'in frustrated.....i have the yamaha service manual, and, i gotta say, it's on of the worse service manuals i ever seen when it comes to the wiring diagrams..........
-
Can anyone tell me how much trouble it is to install the road lamps on a 05 Vennture and is the wiring set up to just plug into exsisting harness. Thanks Big Ed
-
I tried posting in classifieds but maybe having problems.$1000 if anyone is interested.Can see pix here. http://good-times.webshots.com/album/558803476vqQKXk Firing on 3 cylinders but I have new plug wires.Needs rear tire and fork seals.E4 error code.Rear reflector is broken but I have a new one.
-
I personally would not plug a tire and ride it like it was never plugged. I don’t think it’s a safe thing to do, I only have two tires under me and I don’t want either one of them to blow out on my butt doing 75 or 80 on the freeways. Also my brother lost a leg years back when his front tire blew out, the investigation showed that it blew at the plug, he had a flat and just had it plugged. That being said what do you think, what are your experiences on this?
-
 My new plug wires arrived today...nice and yellow! However, my old plug wires have at least 1 to 3 layers of protective corraggated(sp?) plastic over them. Similar to trailer or truck wiring. It is usually split lengthwise, but this is not. Is this necessary or even original? If I use this again, there was no use in ordering yellow wires because they will all be covered up. Hope somebody replies soon so I can get back to installing wires LOL. Thanks.
 -
I have recently purchased a 1989 Venture and now have it home in my garage where I can crawl around in it. I have ordered and am waiting for the battery cable upgrade, and as well I ordered a new set of plug wires,caps and resistors. Being the curious type, I have removed the lower leg fairings, side covers and fuel tank cover, as well as rad cover and chin cover so I can see where everything is. Question#1. When I do the battery cable replacement, will I have enough room to also replace the plug wires? Or, will I have to remove more fairing etc once I remove battery box etc from the top? Question #2. While exploring, I found some oily, dirty areas. By removing the rubber covering for the clutch bleed screw, you can see down to it. From underneath, the wires and area directly above the sidestand switch appear to be quite grimey. Also, from underneath it seems to be above and maybe a little forward of the exhaust collection manifold. I have run the bike a few times in the garage and I see no oil on the floor. I think it is probably a small leak/seep that has been doing this for years...or maybe is more evident after a good run. I know most engines have a bit of area that collects oil and grime but I had to see it. Should I be concerned enough to start tearing this apart, or maybe this should be next winters project? Any ideas what it is and whats all involved? Thanks for replies, and I am sorry to get two different questions on one post.
-
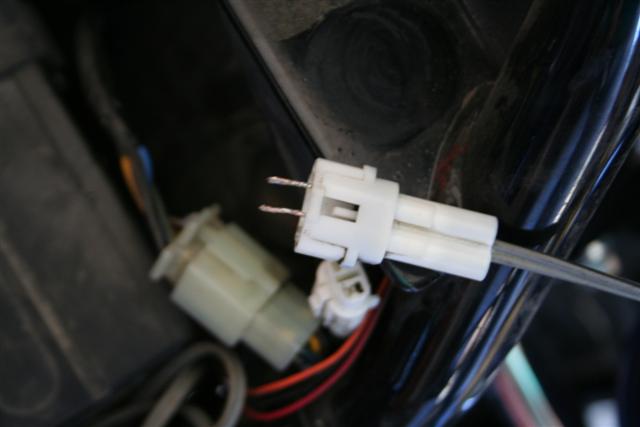
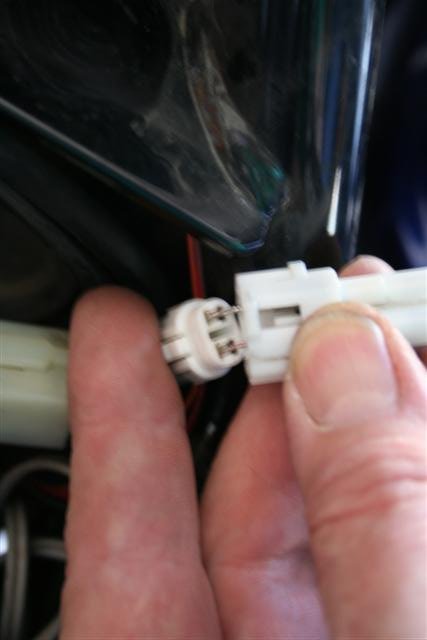
.thumb.jpg.4e1b3809c4633f365ba67afc212f21df.jpg) Hey y'all, I found an easy way to use that white aux power plug located just behind the battery on the left side. Even though the cap does not have the necessary pins in it to make a connection, the pin retaining clips work somewhat like wire clamps. I just stripped the ends from some 18 gauge zip cord and tinned it, then used hemostats (or small needle nose pliers) to insert the wire into the contacts in the bottom plug - they fit very snugly after tinning. Here are a couple of pictures - not the best, but you should be able to see what I am talking about: Just make sure you insert the wires into the metal contacts in the plug, not the empty spot next to them where the retaining clips are (I think that the second picture actually shows me holding the wires in the wrong hole)! The way the plug cap is designed, the wires are protected from accidentally touching once the cap is put back in place. Also, remember that this plug is only on a 5 amp fuse (located behind the right front cowling). Good luck, Goose
Hey y'all, I found an easy way to use that white aux power plug located just behind the battery on the left side. Even though the cap does not have the necessary pins in it to make a connection, the pin retaining clips work somewhat like wire clamps. I just stripped the ends from some 18 gauge zip cord and tinned it, then used hemostats (or small needle nose pliers) to insert the wire into the contacts in the bottom plug - they fit very snugly after tinning. Here are a couple of pictures - not the best, but you should be able to see what I am talking about: Just make sure you insert the wires into the metal contacts in the plug, not the empty spot next to them where the retaining clips are (I think that the second picture actually shows me holding the wires in the wrong hole)! The way the plug cap is designed, the wires are protected from accidentally touching once the cap is put back in place. Also, remember that this plug is only on a 5 amp fuse (located behind the right front cowling). Good luck, Goose
-
got e-mail from one of our members today (Venture87) and he is asking me does odyssey battery afeckt trouble light on dashboard, or work just plug and play. I have no idea about 1st gen. second gen just work. Thanks
-
I'm thinking I've read where some of you have taken the power plug off of the tank and put it somewhere else less unsightly. I'd like to know where some of you have put it.
-
Can someone offer advice? I have an 06 RSV. Yesterday I washed her, and when I fired the engine, it was apparent that I had a cylinder down. Turns out to be the right rear. Pulled the plug wire and plug. Plug was wet. Took another wire off and put the plug to ground. It fired hot. Exchanged the plugs and the problem is still with the right rear cylinder. I tested the plug wire cap to ground and got a momentary resistance of around 14K...tried a working wire and got the same result. I haven't pulled the coil yet because it is like 18 degrees outside! I have a hair dryer blowing warm air on the coil in case it got wet, but so far no change. Thanks for any help you guys might have. :confused24::confused24::confused24::confused24::confused24::confused24:
-
Mounting Gauges on the RSV General info The toughest thing about mounting gauges on the Royal Star Venture is finding a place to put them. As there is very little space available, smaller gauges are better. The vast majority of gauges are 2” in diameter or larger, and these do not fit well at all, but if you look long enough, you can find some that are 1 ½ “. JC Whitney sells a triple gauge set this size in black which I used on my 05 RSV, and I have seen other 1 ½” sets in various auto parts stores. O’Reilley Auto Parts sells the very nice iEquus Performance series gauges, and they have a white face 1 ½” triple gauge set at almost the same price as JCW. Unfortunately, you cannot get this set with an ammeter, so I just used the water temp and oil pressure gauges on my 07 RSV. If you want to get adventurous and modify your fairing, a three gauge set will fit nicely where the cassette door is. Just for reference, here are pictures of the dash from both bikes showing several mounting options for the gauges that do not require modifying the bike: Once you figure out how to mount the gauges you select, the rest is pretty straight forward. I’ll take them one gauge at a time. But first, here is a picture of the various additional parts to which I’ll refer in the detail: Oil Pressure The gauges I used are mechanical gauges, but the process would be essentially identical for electrical sending units. The oil pressure test point on the RSV is a huge 20mm plug on the right side of the engine next to the floor board and right above the header pipe. You will need a 10mm hex key or Allen wrench to remove this plug, and if the bike is on the side stand no oil will escape. While most gauges come with several size adaptors for both SAE and metric engines, none that I have seen have anything this big. The easiest solution is to buy an M20-1.50 oil drain plug at the local auto parts store and drill and tap it for the connection (I got my Oil-Tite! brand plug at the local O’Reilly Auto Parts). You will also need a standard brass “street elbow” in 1/8” male to 1/8” female pipe threads (I bought a Watts A-712 street elbow at Lowes). To complete this modification, drill an 11/32” hole in the center of the plug and use a 1/8x27 NPT tap to cut the threads for the oil line connection. Now wrap the male end of the street elbow with Teflon tape and screw it into the plug. Don’t make it completely tight yet; because, you will want to install the plug into the engine first and then finish tightening the elbow to face forward. Once you have the plug and elbow installed and pointed in the right direction, install the compression fitting used for the oil line into the female end of the elbow. The last thing to do is route the oil line from your gauge down to this plug. Some people like a braded stainless steel oil line, but I just use the small white nylon tubing that comes with the gauge. Although this white tubing is very visible when new, it virtually disappears as soon as you start the engine and it fills with dark oil. You can see in the picture below how I routed it along the wire bundle running up the right side of the frame. Just connect it with the supplied compression fittings at both ends and you are done with the oil pressure gauge. Ken Chapin (a.k.a. wuzfuzz) tells me you can buy a plug already drilled and tapped for $16 at www.cycleoneoff.com, but I have not checked this out myself. Water Temperature For the water temperature gauge, you need to be able to mount the sending unit or sensing bulb into the engine water jacket somewhere. Mechanical gauges have a long capillary tube and temperature sensing bulb permanently attached to the gauge, so you have to mount the gauge first and then carefully thread the bulb and capillary tube along the existing water return line to the mounting point for the temp sensor on the top of cylinder number one (left rear cylinder as you sit on the bike). If you remove the spark plug wire on this cylinder you will see a black hex key plug just inside of the spark plug and a little higher. Here is a picture of the cylinder head with the pug installed (but already loose) and then removed: And here is a picture of what it is going to look like when you are done: This plug has thread sealer on it which makes it quite hard to remove. You will need your 10mm hex key again, and you will probably have to tap on the wrench with a hammer to get the plug turning. There is NO need to remove the spark plug or drain the coolant, but you will need to remove the chrome covers on the head to give you room to get tools to the plug. These are just decorative and come off with the four small hex key bolts you see on top of them. Once the plug is out, you need to get a little creative to mount the temperature sending unit in its place. The plug is 18mm-1.50 threads, and no gauges I have seen come with a metric adaptor this big. Some metric bushing kits may come with an 18mm adaptor, and outside the US it may be easier to find one at an auto parts store. If you can't find one locally, you have three options – either find one to order from the internet (here is one source: http://www.egauges.com/vdo_indA.asp?PN=R7965), buy an 18mm oil drain plug and drill and tap it to the right size to fit your temperature sender, or use this neat little trick to modify an easily available brass fitting from any hardware store: To make an adaptor to fit the water jacket hole, you will need to purchase a brass ½” tube to ½” female pipe adaptor (I got mine at Lowes, Watts part number A-218). In addition, go to your local auto parts store and look for a Help! brand “Spark Plug Non Fouler, 18mm with gasket”, part number 42009. This will only cost about $2.00, and you want the one with the gasket instead of the tapered seat so you can use the gasket when you mount the adaptor into the cylinder head. Now take the ½” tube to ½” female pipe adaptor and take off and discard the nut and tube insert. The threads in the Spark Plug Non Fouler are identical to the threads in the cylinder head, and you will find that the brass adaptor “almost” fits – it will screw about half way into the hole before it binds up, and the steel non-fouler is the perfect tool to use to form the brass threads into the metric size needed. Just put the non-fouler into a vise and use a wrench to force the brass adaptor all the way into the threads, and presto, you have a perfect part! I use the non-fouler to do this so I don’t risk damaging the threads in the engine head while the brass threads of the adaptor are being reshaped to fit. Now all you need to do is select the appropriate ½” adaptor that came with the water temperature gauge and screw it into the metric adaptor you just made, then mount them both into the engine using the spark plug gasket that came with the non-fouler. Here are pictures of using the non-fouler to reshape the threads and the two adaptors screwed together and mounted to the temperature sending unit: I have found that the aluminum spark plug gasket that comes with the non-fouler provides an excellent seal for the connection in the cylinder head. The last thing you need to do is make sure the capillary tube is routed exactly as you want it and then mount the temperature bulb to the adaptors you already screwed into the cylinder head. Be very careful to not kink the capillary tube as you work to get it all positioned as you want it, and since you cannot shorten it, you will need to loop the excess and secure it somewhere. Here is a picture of how mine is routed and secured. This particular capillary tube is covered in rubber and looks like a wire harness (others are metal and covered with a spring). You can see mine strapped to the top of the coolant return pipe on the right side of the engine between the carbs and the air box, and the excess tube is looped around twice and secured in the wire strap under the plastic cover on the right side of the steering head: Ammeter First, let’s have a little discussion about ammeters. They used to be very common way back when (50s and 60s), but they have just about completely disappeared, replaced by the simple volt meter. Personally, I don’t believe you can tell nearly as much about the condition of the battery AND the charging system from a volt meter alone. Although I prefer to have both ammeter and volt meter, if I have to chose, I would go with the ammeter first. I guess I am just a bit strange. Anyway, hooking up an ammeter presents a bit of a challenge, and I suspect this alone has fueled the switch from ammeter to volt meter in most automotive applications. Whereas a volt meter can simply be connected to any main +12V power source, an ammeter must be connected between the battery and ALL loads. Virtually all automotive ammeters require that they be connected physically in series with the load instead of using a shunt, and this means that a single wire large enough to handle the maximum current draw of the entire vehicle be run from the battery to the ammeter and then back to the main power feeds. To be effective and accurate, the ONLY load that can be connected before the ammeter is the starter motor, and this is just for convenience, as a starter draws so much current it is impractical to connect it after the ammeter. In most applications, you need 10AWG wire for this primary loop to and from the ammeter. 10AWG is big wire, which is not particularly easy to work with. Now lets talk a bit about the specifics of the power circuits in the RSV. The schematic shows the battery power runs through the main fuse then splits into two wires to exit a plug, where the two wires are rejoined into one. The reason for this 1-2-1 configuration is that the pins in the plug cannot handle the full 30 amp load that this main power feed must support, so they need to split that current over two separate pins in the plug. Our ammeter must be connected somewhere between the main fuse and the first connection to any load. The only place to easily tap into this main power feed is at the plug connecting to the main fuse. This is located just behind the primary fuse block under the left side battery cover. To access it you must remove both the battery cover and the left side passenger floor board and then the plastic cover where the passenger floor board is mounted. Here is a picture of the plug connected in its normal position, then unplugged to make the wire modifications easier. All I have done at this point is unstrap the wire retainers to make it a little easier to see the plug. The main 30 amp fuse for the bike is on the right side of this plug and the one on the left is a spare (see page 7-32 of the owner’s manual). Disconnecting this plug removes all power to the bike, almost like disconnecting the battery. You can see the two large red wires coming out of the plug – these are the two wires to which I referred above, and this is the easiest place to tap into the circuit to add an ammeter. To connect the ammeter, you will need at least 12 feet of 10 AWG multi-strand wire. I prefer to use two colors, 6 ft of red and 6 feet of black, so that it is easy to distinguish between the wire going from the battery to the ammeter and the one returning from the ammeter. First, slit the tape back a few inches so you can access the wires. Now cut both red wires, being careful to not cut the two other wires in this plug that activate the starter motor. Now solder the red 10 gauge wire to BOTH of the red wires coming out of the plug, and connect the other end of the red wire to the battery side of the ammeter. Solder the black 10 gauge wire to BOTH of the red wires going into the wire bundle, and connect the other end of the black wire to the load side of the ammeter. Besides just connecting the black wire to the wire bundle, I suggest also soldering a 14 gauge wire to the same point for use in connecting any other after-market accessories that you would normally connect directly to the battery. Remember, for the ammeter to work correctly, no other load can be connected to the battery; it must be connected AFTER the ammeter in the circuit, and the only easy way to do this is to add an additional wire like I have described. In the picture below you can see a yellow wire connected with the black wire. This runs up to an in-line 20 amp fuse right in front of the battery (for easy access), and I use this power feed for my horn and driving light relays. This way they do not overload the stock circuits, but any current they draw is shown on the ammeter. After soldering the wires together, make sure you insulate them well. In the picture I just have heat-shrink tubing on the joints, but this is not enough, as it is quite thin and easy to tear or rub through with very stiff wires like these. After I took the pictures, I used liquid tape to heavily coat these connections, then re-secured all the wires with the original wire straps. That is all there is to it. Put the bike back together and start enjoying the new gauges and the information they give you about what is really going on with your bike. If you have any questions, feel free to contact me through the VentureRiders forum. Ride Safe! Kent (Goose) Maurer
-
 Had the seat off a month ago and noticed this plug and had nto thought about it again until today when I had the seat off to check battery. There is a white plug just above the battery on the left hand side. It has power when the key is on. Is this the power plug for the CD changer? Bronson
 -
I have a Roady 2 XM player left over from my truck (had an in-dash player installed). So, I'm thinking that I'll use it for my bike. I bought a mount from Hoon Hardware. Hooked the power to the cigarette style fairing plug and plugged in the stereo cable to the aux. plug in the cassette. Everything works great. Now I want to hide the wiring. The first question I have has to do with the 1/8" stereo cable. Do you know where I can get one with a 90 degree bend like the one shown in this picture? I'd like to find one that is right angled on one side and straight on the other. I'm guessing I'll need at least 2 feet of cable to plug it inside the fairing but longer is o.k. http://www.hoonhardware.com/assets/images/Roady.JPG Second question. I also want to plug this into the aux plug inside the fairing. Will I need to split the connection to keep the plug for the cassette active? I've read the great tech articles about splitting the fairing and installing an Aux line splitter. Just not sure if I need to do this or not. Third question. I'm planning to just plug the power supply into the plug in the fairing. Is there a cleaner way to do this and keep it so it's switched power? Thanks in advance, Bob
-
I'm hoping someone can help me with this. I was able to aquire a CB and amp etc out of a 90 VR to put into my 84 which comes with nothing. I got the AMP, the CB, front and rear controllers and SOME of the wiring. It appears I am missing something. Not sure how this goes together. I have one hole open on the AMP that has to go to one of the headsets. I have a wire with split in it that looks to go to the front and a headset can be plugged into it as well as a hand mic (which I got as well) but it dosen't have a wire to plug into coming from the AMP. This is the wire I think I'm missing. I also don't seem to have anything to plug the controllers into. There is a 3 point plug part way down the one cable that I do have coming from the AMP but the plug isn't the same. Question is can someone tell me what I need. Point by point what gets plugged into what so I can look for the missing parts. (maybe someone might even have the missing parts??) Any help would be appreciated... Wayne
-
 How involved is moving the passenger headset plug-in? I have read else where that some have moved the plug to the back of the drivers backrest. I was wondering how invovled that is. Does the trunk need to be pulled for this, and do you need additional cable? Just looking to place the plug in a more convient location for the passenger so they can plug in when already mounted on the bike. Thanks in advance SlimJim 04' white RSV
 -
Does anyone know the thread size on the oil drain plug? I was going to replace mine with a magnetic one if I could come up with the size. I came across this site.....prices are reasonable. They also list oversize plugs. http://www.cgenterprises.com/magneticdrainplugs/ Thanks Keith
-
I know some of you guys have done this already so I'm hoping you can give me some help here. I am going to break down and get head sets for the scoot. 84 blonde royale. So it has the intercom built in but I have nothing to plug into. I'm also looking to get a CB as soon as I can find a good one. The J & M headsets look good. Question is what do I need to get besides the headsets. I know I need some more cords and where to they plug in? Wayne
-
Well I think I have completed everything that I planned for the winter projects and it is just the beginning of December. Installed the Dyna 3000, Barons sub sonic tach on the brake reservoir, K&N air filters, new Avon on the front, auxiliary power plug behind the drivers seat, re-routed the wifes communication cable so that she can access it easier, and tightened all the bolts that I can get too. I don't think that there is too much more I can do exept get out and ride.
-
Well guys I did it. I ordered some 30 gauge multistranded teflon coated wire and sewed it in my jacket and WOW! It is great. I just ran it through a 10 amp fuse and a switch and plug it in and I have instant heat. I am going to try to ride all winter. Total cost was about $40.00. I bought a second hand work coat at the thrift store for $5.00 and the wire cost $28.00 and the plug and wire was $7.00 to hook up to the battery. I can't believe how warm it is and pulls less than 5 amps from the battery. This is alot cheaper than the $400.00 for a heated jacket.... :cool10:
-
Who has installed a Sat radio on their bike? What type did you get? What mounting system? Did you get the type that transmits to the radio, use the accessory plug or hard wire it? Any and all info would be appreciated. Thanks.-Jack