bongobobny
-
Posts
14,661 -
Joined
-
Last visited
-
Days Won
1
Content Type
Profiles
Forums
Gallery
Events
Store
Everything posted by bongobobny
-
OK here's what I just did for more clearance. The only area of tight clearance is on top of the shield where the pinch bolts for the upper triple tree swing. The bottom can come back quite far, so I cut to the front and down so that the bottom will swing back further than the front. Randy, I have a Silverstar in there now but I think I will try out one of the PIAA bulbs out! My cateract surgery is coming up in a month or two...
-
Back in the infamous "Blizzard of '77" the mayor of Buffalo advised us to settle in with a 6 pack and stay home...
-
OK I just tried the headlight and it fits about the same as it did stock, tight! I did upgrade to the MK2 headlight on the last rebuild. I can also gain a little more room by cutting the notches for the plastic water shield between the forks and the harness...
-
OK I finally finished the front wiring, and now on to the side. Hopefully the headlight will fit in OK with the extra room the loom takes up! Unfortunately when I spliced up the old harness I intregrated accessory lines into th harness so I have to rip the old one apart again to free it up. In the mean time I ran out of 1/4 inch chrome wire loom so I started rebuilding 2 shock link arms with new bushings, and am going to drill and tap for zerks (grease) fittings. I'm doing 2 of them because I am also rebuilding a '85 project bike I picked up for parts a few years ago and changed my mind about parting it out. It has less than 50K on it but looked like it was left out in a cow pasture for several years before I got my hands on it. I've already rebuilt a set of MK2 front forks and a complete MK2 brake system. I just need to buy SS lines for it. I am also planning on resoldering the pins on the dash even though I never had any problems with it. It's apart so may as well do it, and do the dash assembly that I bought from Old Goat for the '85. I hope to fire Goldie up before the end of the year bewfore I put in a brand new OEM swing arm I bought cheap on Fleabay several years ago, along with the rebuilt Shock lever arm thingie...

-
I agree with the title of this thread Monty! It could have been a lot worse!! Glad no one was hurt or worse. The wall can be replaced as well as the deck...
-
I wonder if with a little bit of McGuiver'ing you could put 12" wheels on it...
-
I have my original one from when I put the chrome one on. I was going to mount it on my trailer to make it look like a big RSV gas tank but I think I'll use it for this project instead. Want to finally finish (and probably sell) Goldie first...
-
I had thought of buying an A pillar pod mount from the local Auto Zone and hacking it up and fabricating it on to my ignition cover but never got around to it. This thread has renewed my interest in the idea. Primarily I'm interested in tach and water temp or voltmeter. Maybe this spring I'll get going on it...
-
Must be an analog camera, Drreb...
-
Old Goat, no, the dash is for the '85 that I am doing a complete frame up restoration on. Snagletooth, no the headlight setup is also going on the '85. Goldie was upgraded to a MK2 headlight and I'm considering a HID setup for it. Marcarl, did you forget that in a picture everything is reversed so left is right and in is out?????
-
Christmas lights!!! Here's ours and Motorcycle Tom's place 2 doors down!
-
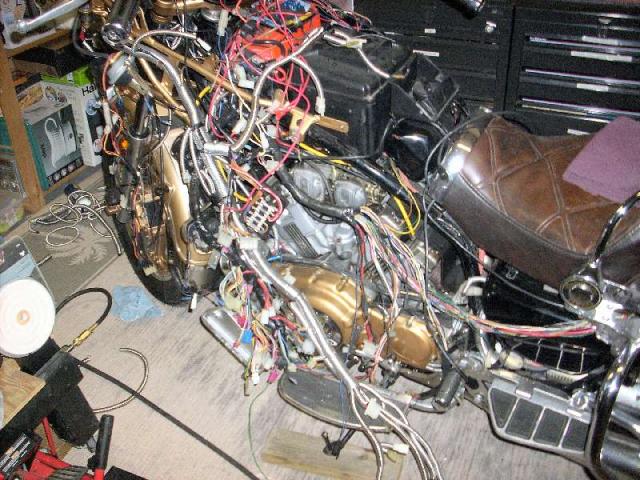
After all this time I'm finally getting around to reassembling the '84 starting with the wiring harness. Work is painfully slow seeing as I'm cleaning every connector and installing dielectric grease on every pin. I'm also adding bling to the harness even though it won't really show. Here's as far as I got tonight. I'll update every day or so that I work on it...
-

Easiest way to gain a few HP
bongobobny replied to shikano53's topic in Royal Star Venture Tech Talk ('99 - '13)
...or better still a VMax! The bottom line, more HP = less MPG. The stock 2nd gen will break the speed limit in all 50 states. If you want to go faster, buy a 1st gen MK1... -
I'm having a DUH moment
bongobobny replied to Brake Pad's topic in Royal Star Venture Tech Talk ('99 - '13)
Copper!! The insulation, on the other hand, is blue... -
If your wondering what to get me for Christmas....
bongobobny replied to SC89Venture's topic in Watering Hole
It definately has a high coolness factor, but as Freebird said, it would be used once or twice and it would get old really fast... -
I should mention that my first wife came from Philly, and I was stationed there in the Army for a while and lived there in the early 70's outside Philly. Loved the area especially Pa Dutch country and would return in a heartbeat if I had to. Also like Virginia especially the Roanoke area, but would like to retire in Ky /Tenn area but will probably end up stuck in WNY till I die...
-
...And Philly has the best cheesesteaks around!! Just like trying to find good wings anywheres besides Buffalo, you can't find a decent cheesesteak anywhere else!!
-
I'm thinking the track "flexes" so that then you turn the front the front of the track points towards where you want to go and the rest of the track follows but what do I know???
-
That is a nice looking kit!! Hope to ride with you some time!!!
-
How hard is wheel removal?
bongobobny replied to shikano53's topic in Royal Star Venture Tech Talk ('99 - '13)
Heh! Randy answered while I was typing away! -
How hard is wheel removal?
bongobobny replied to shikano53's topic in Royal Star Venture Tech Talk ('99 - '13)
The rear is the harder of the two to remove. You need to lift the bike up high enough to allow the wheel to drop down and out. The saddlebags need to be removed, and so does the left muffler so that the axle can come out. you remove the brake caliper, remove the nut on the axle, and push the axle all the way thru, and pay attention to the spacer between the caliper mount and the swing arm, and remember exactly where it goes. onve the axle clears the wheel the wheel will want to fall out. Now what I do is have the rear up in the air just enough so that the rear tire is just touching when I removew the axke, then jack up the bike until I can get the wheel out. When I reinstall, I put the wheel in, and lower the bike until I can get the splines on the rear end to line up with the wheel and reinsert the axle. You will probably need to use a drift pin to drive the axle out. The front is a little easier but has the same principal, remove the calipers, remove the nut, and drive the axle out. You don't have to raise the bike quite as far to get the wheel to clear. Overall the job is not that hard, and doesn't require am engineering degree in mechanics to perform so, unless you have a hard time removing and reinstalling bolts you should be able to handle it. You do need a torque wrench to set the specific tightness on the axle and caliper bolts to do the job right, and there is some other Preventative Maintenance you could do while the wheels are off. I'm sure others will put their 2 cents in and give their perspective on how to do the job, which is a good thing. You will save yourself a good chunk of change doing the job yourself and have the satisfaction of doing your own work as well. Check out the service manual to see what the factory has to say, and for the torque values. The service manual should be on site in PDF... -
83 MK1 no spark on #1 SORTA
bongobobny replied to The Cheese's topic in Venture and Venture Royale Tech Talk ('83 - '93)
Or the connector from the pickup coils to the TCI. Pressure washing may very well have gotten into the connector and it has since corroded. Unseating and a coat of dielectric grease should fix that issue. You will find the connector halfway up the frame behind the motor on the stator side... -
...AND scrapple, don't forget about the scrapple! Haven't had that for breakfast in years!
-
I agree! You can always give him a lower offer, but even at the asking price it is a good deal as long as everything works as is...
-
I'm curious about something
bongobobny replied to shikano53's topic in Royal Star Venture Tech Talk ('99 - '13)
I own both, and each has it's good points and bad points. The 1st gen is quicker and handles more like a sports bike, whereas the 2nd gen is much more comfortable. Both are BIG especially if you are vertically challenged. Sooo, bottom line, it depends on what you want out of a bike, performance or comfort. Each has both but lean more towards one or the other...