
Search the Community
Showing results for tags 'float'.
-
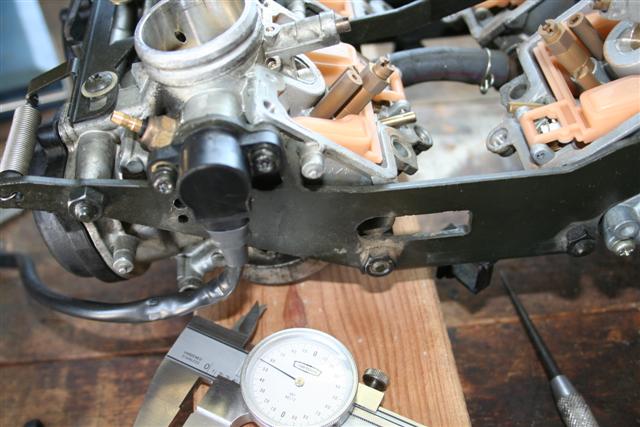
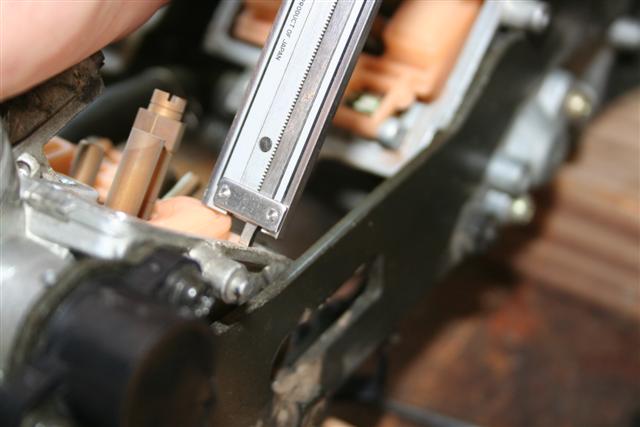
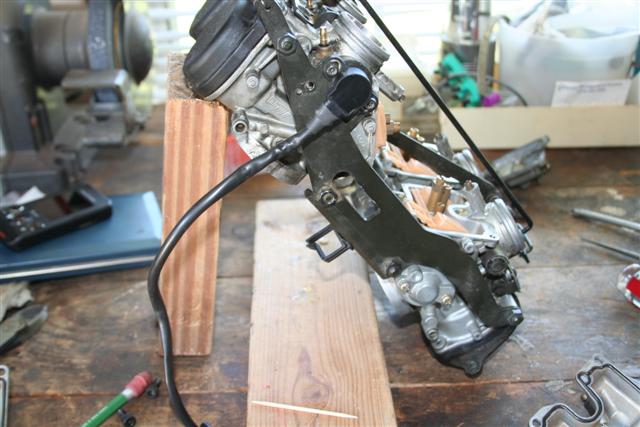
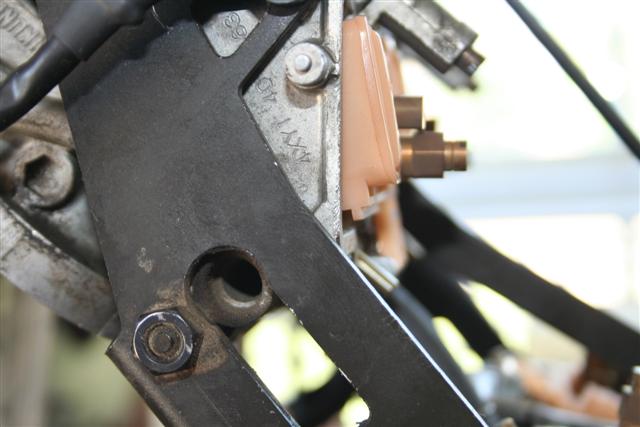
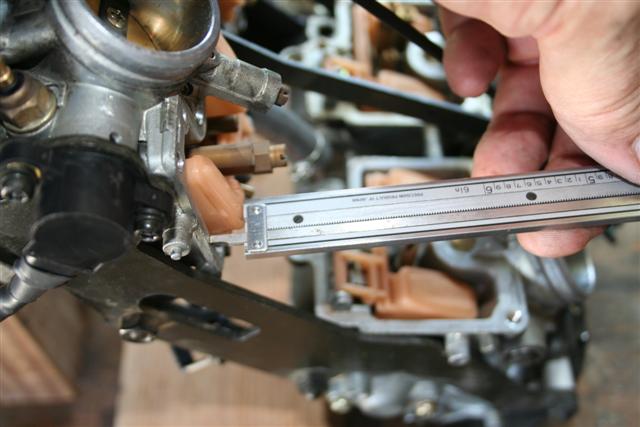
This post describes the proper way to set the carb floats on a 2nd Gen, as well as pointing out the errors in the factory shop manual. If you follow the manual as written, you CANNOT properly set the floats. ============================================================================================================ Today I decided to pull the carbs on my 05 RSV and check the float levels. My plugs looked perfect before I touched anything, so that doesn't sound like it was running rich. However, I ran down to Galveston and back yesterday (650 miles) and the chrome tips of my pipes collected a lot more black soot than I like. Even though my gas mileage is still running right where it always has (averaging 36 - 38), I decided to check out the float levels before my next big trip. I first tried the tube method to check the level while they are on the bike, but it just didn't seem to be working right or even close to an accurate way to measure them. So I bit the bullet and tore into it - Seems like a BIG job to pull that danged carb assembly out! The good news is, it really isn't that hard, just seems like it. Se the next post for tips on getting the carbs in and out. I was quite surprised to find that although all four carbs had the floats set very close to each other, they were WAY off the spec. Where the manual calls for .32 - .36", mine were all at either .133 or .285 (depending on how they were measured). That means the float level was set VERY high. And now to discuss the right way to measure the float height. The drawing in the shop manual clearly shows a carb being held upside down with the float bowl gasket surface level and the float height being measured with a caliper held vertical. Seems straight forward, no? But it is very wrong! Done that way, mine measured .133" instead of .34". The instructions even clearly state to "hold the carburetor upside down." But then the next thing is this NOTE: "The float arm should rest on the needle valve without depressing it." And that comment is the only thing correct about this procedure in the shop manual! Now having the float arm not depress the needle valve is a difficult thing to do with the carburetor upside down - in fact, it is virtually impossible; the weight of the float fully compresses the spring loaded plunger in the needle valve. When you lay the whole carb assembly flat on the bench, the carbs are already inclined quite a bit, but even then the weight of the float is still too much for the needle valve spring: Sooooo, I propped one end of the carburetor assembly on a short 2x4 so that the face of the float bowl was almost vertical. When you slowly raise the end of the assembly high enough you can see the float suddenly pop up from the spring pressure of the needle valve. Here is a picture of the carb assembly propped up and one of measuring the float height in that position: CAUTION: The floats have different shaped sides, and they are different heights too! The wide side of the float measures .04" higher than the other side. This means that you need to be careful to measure the SAME side of the float on all four carbs, and the wide side is the best one to use (note that the picture above is wrong, in that it shows me measuring the thin side of the float!). The most difficult part of the measurement is making sure the tool you use is held truly straight and perpendicular to the carb base, since any leaning at all will significantly change the measurement. On two of the carbs, you will find the choke rod or one of the carb mounting brackets in the way, so turn the caliper sideways a bit to clear the obstruction while still being held straight out from the carb base. I used this position to set all four floats at the mid point of the spec - .34" Bike ran great when I got it all back together, and the sync on the carbs was not changed by the procedure. I only put about 30 miles on it tonight, so I may not be able to report on the effect to my MPG calculation until I get on the road to Ontario next week. But I'll let y'all know how it changes, if at all. Goose UPDATE: OK everyone, the results are in, and this relatively straight forward maintenance procedure produced AT LEAST a 10% improvement in my fuel mileage! My carbs were in perfect sync before I adjusted the floats, and I made NO other changes. Although I have not had the time to check my fuel mileage under all conditions yet, I HAVE done about 2,000 miles of high speed, fully loaded, two-up riding. Under conditions that that have always resulted in about 32 MPG (80+ MPH and loaded, all day long), I now get 35-36 MPG. When running at an indicated 84 MPH, I can now get a full 200 miles out of a tank - never could get that far at those speeds before. And inside the chrome tips on my pipes look better now too - more brown than black. I expect it to get even better after I set the mixture screws soon.

-
Do you all want to get together for a maintenance day. I do. We can gather for a day of valve adjustment, beer, float adjustment, beer, bullsh*ting, beer and whatever else. PM me or someone and lets setup a time and get r done.
-
Dont know how else to title this and wanted all to know IF similar problems. OK Goose Remember we chatted about the Gas Smell and how I know of members that never have to use their choke? WELL, I no longer smell gas! Each day I have started the bike and have yet to use the choke! I guess either the Float resetting or the new plugs had something to do with it..I really think it was the float level as far off as that one was. ALSO,I do not think it has EVER ran smoother. I havnt given it a good run yet due to tring to gather screws I lost and now going to repair cracks in the fairing at windshield mount. Anyway Thanks,its nice to not smell the gas anymore! As far as the 44K goose mentioned in a previous post I have used it for 2 years or so and it is good stuff. My carbs on the inside were spotless.
-
 Hi, One of the issues my red bike came to me with is an intermittent brake fluid alert on the dash computer display, regardless of how much fluid is or isn't in the hydraulic systems front and rear. (The P.O. had disabled the red flashing light by cutting a wire on the back of the dash but I can't live like that.) When it happened to me today, I had forgotten, that I had previously (last fall) isolated this to the float switch in the front brake reservoir. Sometimes it seems to stick open circuit and nothing will persuade it otherwise. After a bit of headlight removing, wire tracing, continuity measuring and head scratching, it all began to come back to me so I popped the lid of the res and lifted the float by hand. NOPE still o/c on that float switch even with the float held at top of its travel. I just happened to have a very powerful magnet, from a computer disk drive, handy. When I held it close to the side of the reservoir casting, suddenly I had continuity at last. Remove the powerful magnet and bob the float and the alert comes back. The lessons here I think are that: A) a powerful magnet is a good but not obvious trouble shooting tool. B) that my float's magnet is weak or the reed switch has become unreliable or both. Questions I have come away with are: 1) Can the reed switch portion of the reservoir be changed? 2) Can it be done without removing the brake lever assy from the handle bar? 3) Is there any way to get a more powerful magnet into my float or perhaps rejuvinate the one already there? BTW, I also have a similar thing going on with this bike's engine oil level switch. I have in mind to replace that next oil change but it seems odd that two float switches would fail on the same bike. Is there any history of this? Do you think I should ask the P.O. if he experiences other odd phenomena like crops circles that might also have had an effect on the magnets on this bike? Opinions and advice welcome as always. Thanks, Brian H.
 -
 Most of my problems with my bike have been carb related. As in float problems. When I got the bike it had two bad floats that had sank. I found after many inquiries that NEW or even aftermarket floats were no longer available. So I ended up buying a used carbs off eBay and stripping out the floats then dried them for several days and gave them a coat of airplane dope. A recommended and workable fix but it does add some weight to the float causing serious adjustments to get the fuel bowl level close to specs. So when I finished my winter projects I swapped out the treated floats for another used set hoping for the best. It was fine for a couple of weeks until one of those sank on me to. Geesh! So it was back to the drawing board and I turned to Squeeze, our friend and member here on the site. Squeeze is the V-Max guy and he had a set of carbs on his bench from a VR. He stated he couldn't see the difference between the floats and the carbs were very similar body wise. Squeeze gave me a part # for a float for an '85 V-Max. I then got ahold of Rick at Buckeye Performance and he only had one in stocks so I bit the bullet and ordered a set of four. They arrived yesterday and they are an exact match for the VR 1st gen floats. Dead on! So maybe this will help someone in the future. The Yamaha part # 1FK-14985-00-00 Float Here are a few pics of the old and new side by side. Thanks to Squeeze and Rick at Buckeye for all your help in figuring out a solution. Mike
 -
Just makin' an offer here - If there are a couple of members that want to get together at my place near the DFW airport to do a little maintenance, we can do kind of a mini carb clinic. Things like set float levels, sync and fuel mixture. Synching carbs only takes 10 minutes or so, but if we set float levels that would be 3-5 hours, depending on drinking and bench racing time. I enjoy working on bikes, and especially with good company. I suggested a couple of members just because I'd like to maximize the efficiency - we could do two or three bikes at the same time, but not much more than that. All you need to bring is some beer and a willingness to work. I'm not offering to be your mechanic, just help you and provide some experience (but if you want someone to do it for you instead of with you, we can negotiate a fair charge)! Just lemme know if anyone is interested, Goose Oh, I also have a standing offer to help members change tires . . .
-
Hi everyone, I've got an absolute nightmare on my hands and need some ideas, suggestions or whatever. I've got a 04 RSV that has'nt been ridden in two years because of dealership games. About 2 years ago the bike began to seriously lose power while riding to the point where i could not get it above about 15 or 20 mph. Lots of backfires and lots of raw fuel coming from the pipes (most of it from the left). After some investigation i found out it was most likely a stuck float and took it to Powersports dealership on Craig Rd. in North Las Vegas where they worked on it for 2 days and said they had fixed it. They told me it was a stuck float valve due to "bad gas" and that that was not covered under the warranty. They said they had tried a workaround to free the stuck valve. After charging me for "services not covered under the warranty" to the tune of 300 bills I got about 3 blocks before it started acting up again. Shortly thereafter, I took it to another dealership who told me the same thing and after 200 bucks they said they had fixed it. The next day it started all over again. After going through an exhaustive move to northern Nevada (in July no less!) I took it to the only Yamaha dealer in town they said they would fix it. I told them, as I had told the others, that the bike was under warranty and I was not going to pay for it. Well, they "fixed" it and charged me 250 dollars for parts and services not under warranty. I got about 2 hours of riding before it happened again. I called Yamaha and told them my tale of woe. I told them how angry and displeased I was with Yamaha and it's dealers. They said they would look into it and get back to me. They called me back and said they "talked" to the local dealership and wanted me to take the bike back there. Before I could take the bike back there, they announced in the local paper that they would no longer be selling or servicing Yamaha products. I don't want to sell the bike but that's what I'm about to do. I'm so angry I want to park the bike in front of Yamaha North America and blow it up! I don't have the technical expertise to fix it or balance the carbs. My poor bike has been sitting out all winter is not doing very well. The warranty has now expired and I'm gunshy of dealerships now. I love my bike and want to save it but I'm frustrated and don't know what to do.ANY suggestions would be helpful. I'm just about at the end of my rope. Thanks and ride safe, Don NV_Trucker randdo67@gmail.com
-
 If so, I am in need of the "Low Fluid" magnetic reed switch assembly. I'm rebuilding a couple of them, and on one the O ring for the switch was "glued" on and I sort of destroyed the switch. The float is fine. If you have one, I can make use of it...
 -
.thumb.jpg.4e1b3809c4633f365ba67afc212f21df.jpg) Today I decided to pull the carbs on my 05 RSV and check the float levels. My plugs looked perfect before I touched anything, so that doesn't sound like it was running rich. However, I ran down to Galveston and back yesterday (650 miles) and the chrome tips of my pipes collected a lot more black soot than I like. Even though my gas mileage is still running right where it always has (averaging 36 - 38), I decided to check out the float levels before my next big trip. I first tried the tube method to check the level while they are on the bike, but it just didn't seem to be working right or even close to an accurate way to measure them. So I bit the bullet and tore into it - BIG job to pull that danged carb assembly out! I was quite surprised to find that although all four carbs had the floats set very close to each other, they were WAY off the spec. Where the manual calls for .32 - .36", mine were all at either .133 or .285 (depending on how they were measured). That means the float level was set VERY high. And now to discuss the right way to measure the float height. The drawing in the shop manual clearly shows a carb being held upside down with the float bowl gasket surface level and the float height being measured with a caliper held vertical. Seems straight forward, no? Done that way, mine measured .133" instead of .34". The instructions even clearly state to "hold the carburetor upside down." But then the next thing is this NOTE: "The float arm should rest on the needle valve without depressing it." Now that is a difficult thing to do with the carburetor upside down; the weight of the float fully compresses the spring loaded plunger in the needle valve. When you lay the whole carb assembly flat on the bench, the carbs are already inclined quite a bit, but even then the weight of the float is still too much for the needle valve spring: [ATTACH]19149[/ATTACH] [ATTACH]19147[/ATTACH] Sooooo, I propped one end of the carburetor assembly on a short 2x4 so that the face of the float bowl was almost vertical. When you raise the end of the assembly high enough you can see the float suddenly pop up from the spring pressure of the needle valve. Here is a picture of the carb assembly propped up and one of measuring the float height in that position: [ATTACH]19145[/ATTACH] [ATTACH]19146[/ATTACH] [ATTACH]19148[/ATTACH] I used this position to set all for floats at the mid point of the spec - .34" Bike ran great when I got it all back together, and the sync on the carbs was not changed by the procedure. I only put about 30 miles on it tonight, so I may not be able to report on the effect to my MPG calculation until I get on the road to Ontario next week. But I'll let y'all know how it changes, if at all. Goose
Today I decided to pull the carbs on my 05 RSV and check the float levels. My plugs looked perfect before I touched anything, so that doesn't sound like it was running rich. However, I ran down to Galveston and back yesterday (650 miles) and the chrome tips of my pipes collected a lot more black soot than I like. Even though my gas mileage is still running right where it always has (averaging 36 - 38), I decided to check out the float levels before my next big trip. I first tried the tube method to check the level while they are on the bike, but it just didn't seem to be working right or even close to an accurate way to measure them. So I bit the bullet and tore into it - BIG job to pull that danged carb assembly out! I was quite surprised to find that although all four carbs had the floats set very close to each other, they were WAY off the spec. Where the manual calls for .32 - .36", mine were all at either .133 or .285 (depending on how they were measured). That means the float level was set VERY high. And now to discuss the right way to measure the float height. The drawing in the shop manual clearly shows a carb being held upside down with the float bowl gasket surface level and the float height being measured with a caliper held vertical. Seems straight forward, no? Done that way, mine measured .133" instead of .34". The instructions even clearly state to "hold the carburetor upside down." But then the next thing is this NOTE: "The float arm should rest on the needle valve without depressing it." Now that is a difficult thing to do with the carburetor upside down; the weight of the float fully compresses the spring loaded plunger in the needle valve. When you lay the whole carb assembly flat on the bench, the carbs are already inclined quite a bit, but even then the weight of the float is still too much for the needle valve spring: [ATTACH]19149[/ATTACH] [ATTACH]19147[/ATTACH] Sooooo, I propped one end of the carburetor assembly on a short 2x4 so that the face of the float bowl was almost vertical. When you raise the end of the assembly high enough you can see the float suddenly pop up from the spring pressure of the needle valve. Here is a picture of the carb assembly propped up and one of measuring the float height in that position: [ATTACH]19145[/ATTACH] [ATTACH]19146[/ATTACH] [ATTACH]19148[/ATTACH] I used this position to set all for floats at the mid point of the spec - .34" Bike ran great when I got it all back together, and the sync on the carbs was not changed by the procedure. I only put about 30 miles on it tonight, so I may not be able to report on the effect to my MPG calculation until I get on the road to Ontario next week. But I'll let y'all know how it changes, if at all. Goose -
I dont really care for the manual's float adjustment for 1st Gens I have the carbs off is there a way to measure the float without the tube of fuel. Can measure it when your inside the carbs?
-
Well folks, as I posted a while back, my '99 RSV has just not been running right. Not only had fuel mileage really gone down last year but this year it also just didn't seem to have the get up and go that it once did. I have really been fighting with this trying to figure out the problem. Last weekend I decided to sync the carbs again and noticed that when I pulled the vacuum caps off to connect the Carbtune, the engine would also die when I pulled the caps off cylinder 1,2 and 4. One at a time of course. When I pulled the cap off number 3, it made no difference. So I decided that cylinder 3 was probably not firing correctly or at all. I changed the plug and it made no difference. I then removed my Dyna3000 and installed the old TCI again. That made no difference either so I re-installed the Dyna. I had bought a spare set of coils off Ebay last fall so went ahead and changed out the number 3 coil. That made a huge difference. It appeared to be firing after that. I could pull the vacuum caps off any cylinder and it would no longer try to die. So even though the coil ohms out OK according to the manual (well actually I found a mistake in the manual on testing the coils but I'll do another writeup on that), it appears to have a problem under load. So I took it for a ride and found that it runs better and idles better but guess what? Something was still not right. I could feel that it still didn't have the power that it once did and confirmed it by opening her up on a back road and 90 MPH was the absolute top speed. No good at all. I also noted a surging when I tried accelerating hard. Not really a miss or cutting out just surge then flat then surge again. I took it back home and put a new set of plugs in it but still no good. When I got home last night, I decided to use the clear tube method to check the float levels with the carbs on the bike. I found that I could not do that due to the fact that the last dummy who had the carbs off had put the float bowl covers on the wrong carbs, front to back, so that I could not get to the drain screws. (that dummy would be me last fall). So I ended up pulling the carbs again. Checked the float levels and found one to be a little high but not all that bad. I set them correctly, put the covers on the proper carbs this time and re-installed the carbs on the bike. The hardest part about this job for me is getting the rubber boots from the air box properly seated and tightened on the top of the carbs. I actually wonder now if I did not have one of them seated good and it was sucking air there. I made sure that I had them seated good this time. So, I fired her up and took a little ride. I knew immediately that my bike was back. Acceleration was strong again the way I knew it should be. I found an open stretch of road and hammered it. I took her to 110 MPH in 4th gear and she kept climbing when I hit 5th. Man it felt good to have her running right again. I backed off around 112 as I was out of good road. Note that I have my speedometer corrected with a Speedohealer so my speeds are accurate. So, all is good again. I'm not 100% sure what exactly corrected the problem. I feel that the coil was bad. I also know that one float was a little high. I suspect that I was sucking air at the top of at least one of the carbs. All I know is that it FINALLY runs like it should again. It will be interesting to see what my gas mileage does now. I'm anxious to fill it up and find out. Will report back. I have to believe that it will be back to normal now. I was also having a problem with some fume smells that were really bothering Eileen. I'm hopeful that will be resolved also.
-
Hey Folks, I have my '86 down and apart and decided since it's this far down I would take the carbs off and check the float levels to be sure they were in specs. This is where my problem lies, the manual doesn't give a measurement at where the float should be set at statically, it shows how you can check if they are high from the outside and together, but not a measurement internally. Does anyone know the measurment that they should be set at and where the measurment is taken from. I am glad I did this as someone has been into these carbs before and I had a screw fall out that wasn't installed properly. Any help would be greatly appreciated.
-
 My fuel gage went from working part time to not working at all. So over the weekend I done a last minute repair before vacation next week.The fuel float assembly is attached to a mechanical wiper arm that brushes across a wire wound resistor in the control unit. As the float bowel moves with a change in fuel tank level the resistance varies from 0 ohms Full to 330 ohms empty. 1. Place bike on center stand,remove seat,unplug the sender connector and clean around the 4 bolts holding fuel float and sender unit in tank. 2. Make sure there is less then a full tank of fuel before removing the bolts and lifting unit off of the seal. 3. Maneuver the assembly around as needed to lift the sender unit,and float rod assembly out of the tank.This can be done without removing the gas tank 4. Take the unit to a clean working area and dry off before working on the sender. 5. Take a small screwdriver flat blade and gently pry off the sender cover side housing. Be careful not to break the 3 metal tabs securing the cover. 6. Now remove all rust particles and loose debris trapped in the sender unit. Spray clean the mechanical wiper arm with an electrical contact cleaner. Using an ohm meter you can measure the resistance at the output terminals. Raising the float 0 ohms and dropping to empty open circuit.The wire wound resister varies from 0 to 330 ohms. 7. In my situation the wiper arm had to be gently bent to add tension so a better contact could be made. I even found the resister bowed in the middle and had to bend it back in to position. 8. When your satisfied with your repairs you can re attach the side cover and plug the sender back into the wiring harness,turn on the key and test your gage before re installing in the tank.Vary the float level and watch your gage indication change. Make sure your float is good before re installing. P/S For your comfort there is a small voltage/current flowing through the wiper arm from the fuel gage. So if your gage arc's while setting on 4 gallon you won't feel a thing. A new meaning to the term After Burners.
 -
I've got a stuck float valve. How do you remove it to clean/replace it ? Jim O'D. Darwin, Australia.
-
OK folks...I need some input here. I've seen several discussions on setting the float levels. I'm NOT much good when it comes to carbs. I can sync them and etc. but am always nervous about getting inside them. So yesterday, in my unending search to figure out my gas mileage problem, I decided to pull the carbs and check the float levels and etc. Several of you, including Cougar, Pegscraper and some others have done this and have reported that it's not a big job. WHATEVER...it took me about 10 hours to pull the carbs, set the floats and get it all back together. To make it worse, I'm now thinking that I may have done it wrong and need to pull them off again. The manual says that you set the floats at about .32 with the floats resting on but not compressing the needle valve. So, does that mean that with the carbs upside down that you lift the floats with your finger so that the tang is touching the needle and that is when you measure? Unfortunately, I set them with the carbs upside down and the floats at rest, not me lifting on them. I'm attaching a picture. You will see in the picture that the near side is laying way up in the housing. The far side I have adjusted and it is at about .32 with it just sitting there. I think I did it wrong but please tell me for sure. Here's the deal. Yesterday morning I check all four cylinders using my Colortune. At most all RPMS I had the nice Bunsen blue color as I should but had intermittent flashes of yellow. According to the color tune booklet, that is a sign of floats set too high. That is why I pulled them off. Finally got it all back together last night about 9:00 and fired it up. Now I have a definite backfire, pop, miss or something from the right side. Now I have not synced them yet and will do so but I really don't see where adjusting the floats would through the sync off. So.......HELP.
-
I just found this web site. Lots of information the basic operation of carburators, if anybody is interested. I was looking for info on setting float levels, when I just found the site. http://hondanighthawks.net/carbhelp.htm?
-
hey guys, my 06 venture is spewing raw gas from the left side exhaust, and the vent tubing under the right side air cleaner. I'm guessing a float is stuck. any ideas or thoughts ?
-
Hello All, Iam getting my carbs in shape on my '87. In the process of cleaning, testing etc., I wanted to make sure the floats and needles seem to be working right so I took each carb, put it in a shallow tub and hooked it up to the fuel pump on the bike, with the float bowl cover off, to see that the float would, in fact, float an shut fuel off. OK, I assumed the the fuel pump would just pump, and pump until the float shut the fuel off. Is there any reason why I would have to turn the key off, and then turn it on again to get the pump to pump a little more. It will pump for about 5 seconds and then turn off, until I turn the key off and then turn it on again. If this is a normal function, maybe a safety feature since the bike is not running or something than all and well, but if there is a problem with the fuel pump, or something, I just wan to know. Thanks a bunch D
-
New Guy Here from Knoxville My buddy and I both have pre-owned royal stars his being a 1997 tour classic with some popping and occasional backfire on deceleration issues. His carbs had been monkeyed with previously; pilot screws, float settings and throat sync all over the spectrum. Mine is a 99 with the standard gurgling sound and slight popping while decelerating that you get with most factory tuned royal stars and has yet to be fine tuned. Anyway, after learning what I could from you guys here at venture.org, I pulled my buddys carbs and cleaned all passages thouroughly, I set all float heights to 0.645 with calipers against base of float bowl, backed off throttle adjuster on carb #1 to close the throat and checked highest postion of throttle plate (closed) to bottom surface of throttle bore. I checked and rechecked measurement and kept getting conflicting measurements before I realized the hardend steel slide on my quality calipers would not measure the offset angle of throttle plate against the 90 degree angle of throttle bore. Remembering I had an old plastic caliper with a round pin slide I remeasured plate to bottom of bore facing with this tool and got consistent measurements every time and adjusted carb 2 exactly to carb 1, then #3, then #4. All throttle plates adjusted to 0.678. I adjusted pilot screws 2 1/4 turns out, put carbs , airbox, and tank on and... Whoops, I have a problem! Carb #3 popping thru exhaust while throttling off and snuffing type sounds while idling when warm. Pilot screw adjustment had no effect and exhaust gas was cool compared to carb 1,2, and 4. All other carbs and cylinders sounding perfect. This indicated to me that #3 was running very rich. After taking carbs off several times to see what the problem was and rechecking every measurement, my buddy and I devised a wooden jig to re-check float levels with clear plastic tubing with carbs fully assembled leveled and plumbed, and then mounted jig in my vice and set the carbs on top. Guess what, No 3 carb float level measured 1/8 high, while all the rest measured exactly at bottom circumference of main diaphram cover ( which is where I wanted them - high for quick low end throttle response). I took a wild guess and lowered float #3 by 0.035 and rechecked float level with plastic tube gage and it came out exactly level with bottom of radius of diaphram bowl. Now, can someone tell me why this one float would measure 0.035 lower than the rest but gage equally level with the other floats with tube gage? Could it be that float seat is lower than the others? Could it be the float seat is turned in deeper in this one carb? At any rate, we put carbs, airbox and tank back on bike and cranked her up. My God, It Sounds so Good and So In Tune - no backfire and no poping, and no snuffing, sound - Time for a little road check! At constant throttle the bike seemed much quieter than before, but what was amazing was the smooth but powerful and instant throttle response and acceleration from closed throttle to open and every position inbetween. No lug, no lag or hesitation whatsoever. We hit a long stretch of sweepers and mild twistys where I could keep power up in third and fourth gears, while mainly using engine deceleration for braking and all we could hear, other than that wonderful throaty whumping sound, while accelerating out of curve, was a corresponding cooking sound, kind of like hot coffee percolating fast with an underlying boiling sound while decelerating into it. And last but not least; Zero, pops, cracks, sniffles, or snuffles while riding for an hour and a half. We'll check the tuning with vacuum gage and tachometer next week but he and I agree, we'd be hard pressed to change a single thing.
-
I am just tickled pink today! as I am ALL DONE with my carb dilemma, I can not believe how much smoother she runs now! ALL Factory Settings were so far off I am not sure how the bike ever ran. FLOAT HEIGHTS were .125/.135/.120/.125 (highest setting possible) now ALL set @ .260 (book says .360 could not get them that low) PILOT MIX SCREW TURNS 1-1/4 > 1-3/4 > 2-1/2 > 2-3/4 now ALL set @ 3 turns out New Set of float bowl gaskets (4) $4.50 ea. New Set of Pilot Needle Valves (4) $10.21 ea. New Set of Float Needle Valves (4) $21.95 ea. Total Cost of new parts = $146.64 The O-Rings on the Pilot Screws were shot and the the ends of them read .30 the new ones read .34 This all started (end of last summer) when I could not turn my bike over when I tried to start it, What happened was the 1 and 2 carbs were flooding so much and filling up the cylinders with fuel the bike had a very hard time turning over. So I bought a new Odyssey Battery wanted one anyways! *lol* . I also ran 8 cans of sea foam though the tank even did the soak. (last summer) nothing helped Then I started to notice fuel spitting out of the left muffler after it did finely start. Then after the winter (a month ago) fuel starts pouring out of the overflow vent. I am so terrified of taking carburetors apart and never thought I could do this job especially looking at them all tucked under there on the RSV. So I did tackled the job (very easy) and messing with the carbs are not real bad (thanks to members on this forum) Just be careful with the springs and o-rings and washers flying out and when cleaning make sure there ALL out. (don't wanna talk about that part) I also could not believe how much better the carbs reacted to adjusting to the Carbtune. This is like a whole new world! The bike starts so easy now and runs so perfect I have never felt it run so smooth! And one other thing is that (MY WHINE) has even improved. Real nice power response now! Did I say I was Happy? this bike is a 2000 RSV with 7,948 miles on it. bought the bike 2 years ago with 4,200 on it and it never ran like it does today. AGAIN , THANKS SO MUCH FOR ALL YOUR HELP! Jeff


.thumb.jpg.176b2ebbe9863175975d94710375c414.jpg)