Search the Community
Showing results for tags 'upgrade'.
-
The brakes on my '83 VR aren't real flash. Has anyone done a mod to upgrade ? Jim O'D In the land of OZ.
-
My high beam does not seem give me any more light then my low. I am running driving lights as well. Is there an upgrade bulb or front head light I can go to. Thanks for the input
-
Ok it looks like a solid motor mount upgrade may fix the wobble problem on the first gens. That the feed back I'm getting from the poll on the subject and other thread research. Is this a Yamaha kit upgrade or an after market product? What about cost for parts? Is this a winter upgrade project or a weekend job? Any Pros and Cons to the upgrade or is everybody happy with the solid motor mounts? I need part #'s.Is the kit the same for an 84 and 89?
-
So after three different posts and multiple times veiwing Freebirds Barnett Clutch upgrade thread I finally pieced it all together why my new Barnett pressure plate wont work on my 1984 VR. BECAUSE ITS A 1984 VR and not a 1986 or newer LOL. So I now have a $150.00 dollar paper weight or an almost new (never rotated in the basket) Barnett Clutch spring upgrade for your 1986 or newer VR or VMAX. My bike shop special orderd this for me and are now refusing to give me a refund. My total cost was 147. and change. I will take $145 and I will pay shipping in the US to any one who is looking to upgrade. The bolts are a little worn and the washers are scraped a bit from the bolts but other than that it is still new. Please let me know if you are interested. Stay safe :225:MIKE
-
Kudos to ECK, Curt and Freebird for the great directions and post on the clutch upgrade. Bought the PCW upgrade kit, also bought new clutch disks. Everything went right as it should have. Noticed that the only two bolts that were different were at 2 and 10 o'clock, otherwise they were all the same. Wire came right out with a pair of long needle nose, and everything went right back in as planned. No need to adjust the clutch afterwards. Did notice it is slightly stiffer, and maybe does release a little latter, but a VERY noticable difference in that it no longer slips like it did! After talking to Curt, and for others future endevors, there is no need to use permatex or gasket sealer when replacing the gasket. I do see that I will have to buy a smaller torque wrench as mine only goes to 10 ft. lbs. Otherwise, thanks to all, this probably saved me a cpl. hundred bucks as I'm sure thats what my local stealer would'a charged me to do it! Anyomne close to Bremen that ever needs a hand doing one, now please feel free to call! Thanks again Freebird, Eck and Curt!!!!!!!!!!!!!!!!!!!!!!!!!!!!!!!!!!!!!!!
-
So, I will add it here. There used to be a little box where the rating column is now (same place where the paperclip is) for posts showing me what I was subscribed to (posted to). I do not see it anymore and I used to to quickly find posts that I wanted to keep up with. Has this moved to another place or not a part of this upgrade?
-
I finally have the Ebay Listings link working in the side menu. I think that pretty much has everything working again since the upgrade.
-
OK folks...I guess I'll upgrade the software here early next week. I will be going to PA on Monday and after I get checked into the hotel on Monday night, I will probably do it then. That is assuming that I get a good Internet connection at the hotel. This is a fairly major upgrade and will require that I shut down the forum for long enough to get the main scripts installed. If everything goes right, the site shouldn't be down for more than 15 minutes. I PROMISE to do a very good backup before starting. Once I have the major scripts installed, I can turn the forum back on and it will be functional but some of my customizations here will be missing until I get them all working again. There are a lot of changes in the programming and I am afraid that many of my customizations will not work without some major modifications to them. I really won't know what will work and what don't until I get started. So, you have been warned. I promise to keep the downtime as short as possible. Though I don't suspect any major problems with getting it installed and operational again, I expect a couple or more very late nights before I get things the way they are again.
-
I saw this on E-bay and I am curious. Has anyone tried it? Is it a worth while upgrade or is it money wasted? I am interested if it actually works and improves horsepower. http://cgi.ebay.com/ebaymotors/Yamaha-Venture-Royal-Star-XVZ13-Fan-Switch-UPGRADE_W0QQcmdZViewItemQQcategoryZ35594QQihZ015QQitemZ250236674191QQrdZ1QQsspagenameZWDVW
-
A lot of tire talk lately but have not heard anything about rear tires. I was wondering if anyone has put a 170/80/15 or 180/70/15 on. I'm interested but the clearance is so close to driveshaft on stock size I wonder how they will fit? I have read a number of people have installed the 170's and more interesting Metzler shows the stage 1 upgrade for the RSV to the 180's. My main interest to change is to get whitewalls other then Dunlop 404's. They claim better mileage, smoother ride and handling.
-
OK folks...it's that time again. I have some updating to do on our software here and it is pretty major. I may even have to back it up before I do it this time. First of all, in preparation of a major upgrade, I will be slightly changing the URL of the forum. This will affect you only if you have the actual forum bookmarked and come straight here instead of to the home page. The URL is now http://www.venturerider.org/forum the new URL will be http://www.venturerider.org/forums The only difference is the plural forums instead of forum. The reason for this is because about 4 years ago when I started this site, I used forum instead of forums and should not have done that. All upgrades and changes that I make assume the default is "forums" and it causes me a LOT of extra work having to change all the files. That is just the small part. There is a major upgrade coming in the very near future. Not sure yet about the exact date but I will give another warning. It could be a few days from now or a couple of weeks. The new upgrade will add a number of new features. There are some new features included that I will likely disable because I just don't know that I like them. One such thing is "social networking". It basically allows members to create their own custom profile pages, much like MySpace and similar where you can post pictures, personal interests, even public messages and responses. I don't know that I like that idea. I am afraid that it will take away from the general forum. If everybody is posting and swapping messages on their personal pages, I think it will take away from the "one family" feel that we have now. There are other features also though and some good reasons for doing the upgrade. More on all of this later. I will give another warning before making the changes and then will list the new features gained from it.
-
are the 1st generations speakers just regular speakers or are they weather resistant? What would be a good upgrade without adding an amp
-
 In the 12 years I have had my 83 Venture, I have tried several things to improve the headlight situation. The best thing I did was to upgrade to the headlight assembly from an 86 up. It is a big improvement. On ebay right not there is a 90 1st gen being parted that has good starting bid prices on these parts. For someone wanting to do a headlight upgrade, this might be a good oportunity to pick up all the parts needed. I am going to post the link to the headlight bucket and I hope I am not stepping on someone's toes by posting this, but this is the 1st time in a while I have seen these parts available. You will need the; headlight bucket adjustment assy headlight ring upper frame that holds the dash left side frame that mounts the adjustment assy bottom strip the connects the upper fairings that the headlight bucket sits in. If you could do a little welding and have a late 1st gen to go by, you could modify the frames off the 83/85 to accept the headlight mounts and the adjustment assy. RandyA http://cgi.ebay.com/ebaymotors/ws/eBayISAPI.dll?ViewItem&ih=013&sspagename=STRK%3AMEWA%3AIT&viewitem=&item=230204705320&rd=1
 -
Hey guys. Here is a cut and paste of a posting on another (Australian) motorcycle web site. An ADR is an Australian Design Rule. Yamaha XVZ1300TF Venture Discontinued in Aus For all those Venture owners out there, I have been told, and it has been confirmed by Yamaha that the Venture model will not be coming to Aus after 2007. The reason given - The speedo will no longer comply with the new 2008 ADR's and Yamaha is not willing to spend the money to upgrade it. It will still be sold everywhere else (especially in the US) - just not here. So if any one feels like I do about this, contact Yamaha and complain - like I have. If you want, please contact me to let me know your feelings. How'd you like to live down under and wanna upgrade?
-
As Anyone Tried A Linear On There Cb? I Have A 250 Watt Electronic One I Was Thinking About Adding With A Antenna And Coax Upgrade.
-
Hi everyone, I am considering doing the following upgrades to my 2006 midnight venture. 1) piston kit-bored out to 1400cc 2) dyna 3000 3) V-max gears 4) V-max cams 5) pilot and main jets upgrade 6) full exhaust upgrade 7) clean up heads This will bring the V-4 back to what it should be, I would like some feedback from you guys and any suggestions would be appreciated.
-
I bought my Zumo toward the end of June this year. I've been thinking about updating to the 2008 maps. A few weeks ago I was going through the Garmin site and decided to review the info in the MyGarmin account. Looked at the map updates in there and it said I was eligible for a free upgrade! I said yes, verified my info, and got it Friday. Installed it today. I haven't had a problem with my unit, but from what I hear, those that have had problems were promptly taken care of with service over and above what most were expecting. I think this free map upgrade is another example. If you own a Zumo and have it registered, you might want to check and see if you have a free upgrade coming.
-
Just to let you guy's know I'm Just finish upgrade on my Stratoliner . let me know what you are thinking :cool10:
-
Well, after getting everyone's urging I called PCW and ordered the parts to upgrade my 03 RSV Clutch. $168 plus change. All I can say is WOW PCW was great to work with on the ordering. Really make you feel like you are their most important customer. Something that seems to be really lacking from most companies now. They are shipping today and I might have them by Friday. If so, I am going to try to do it on Saturday or Sunday. If not it will be next week. I am very apprehensive about doing the upgrade, even with Tartan Terror's great article. I live under the cloud of Murphy's Law. I have learned to live with it . I wonder how big a Steak and how many beers it would take to get Chaos to come over and help me out?? PCW said I could call them along the way too, so maybe it will work out OK. We are going on our Annual Weekend get-away with another couple to Southern MO around Steelville on 7/6, so I want it done before then. Everyone keep their fingers crossed and stay close to your cell phones TT, Chaos and Freebird!! Jay
-
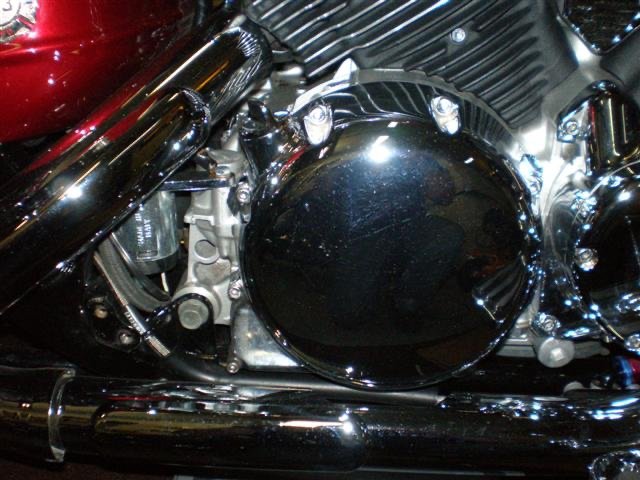
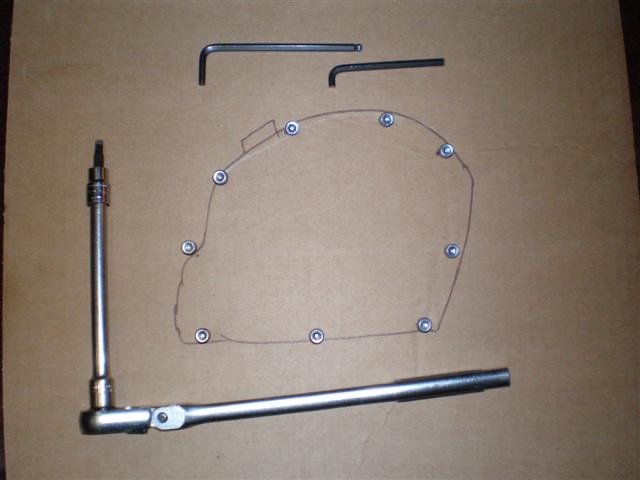
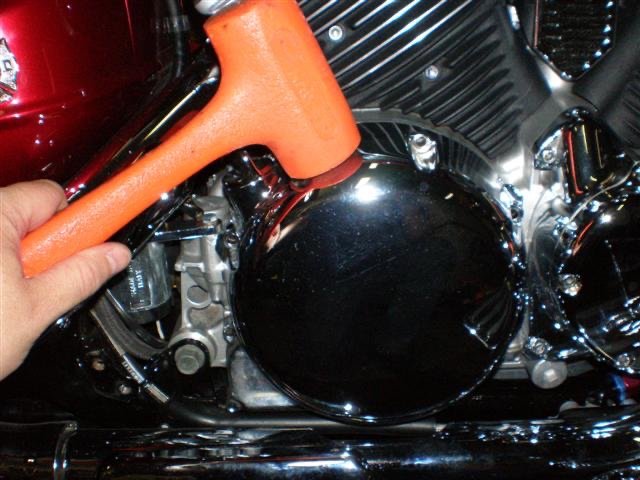
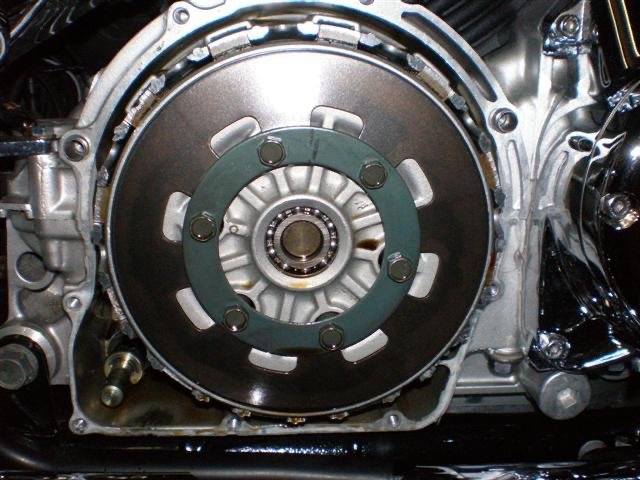
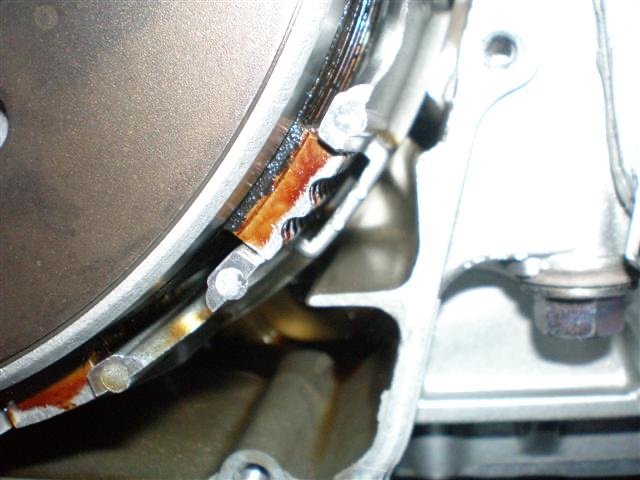
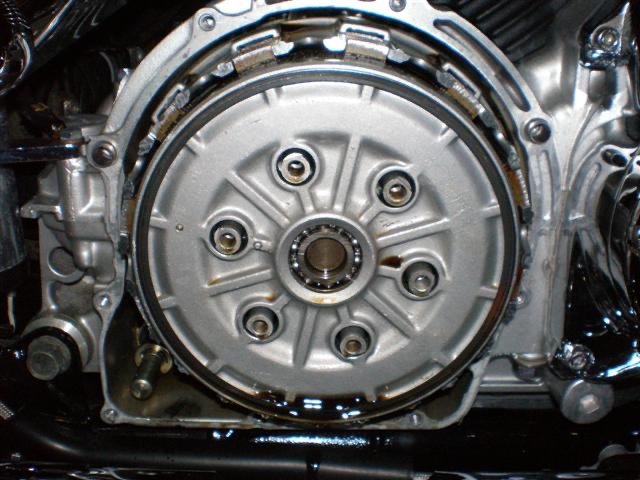
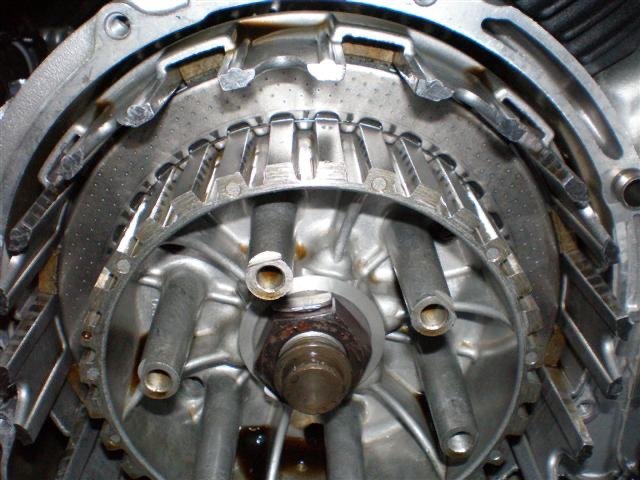
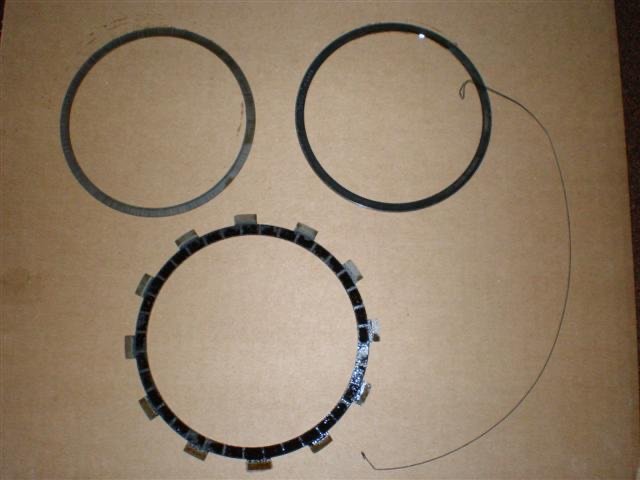
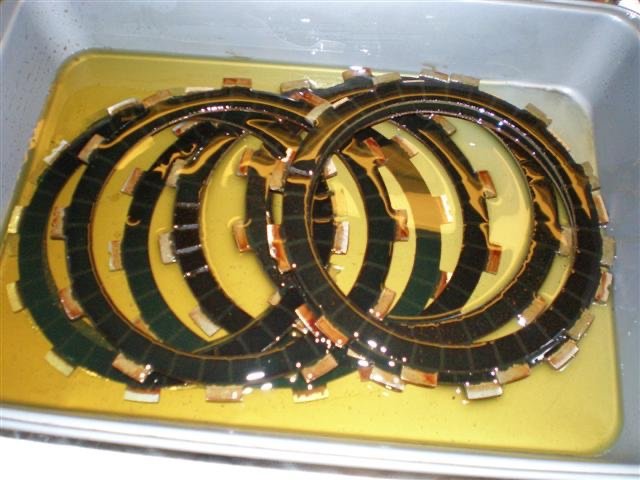
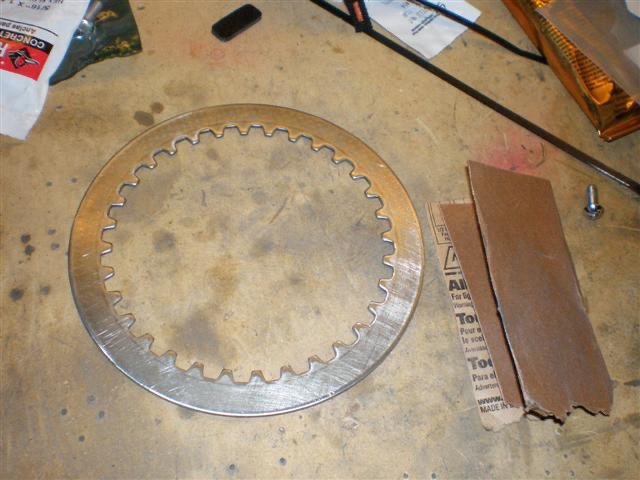
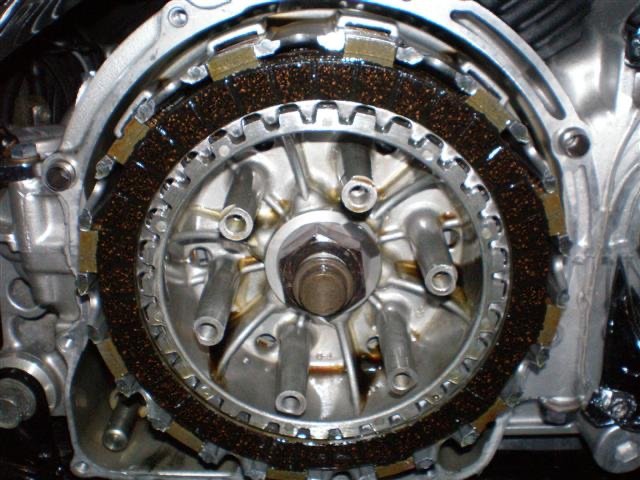
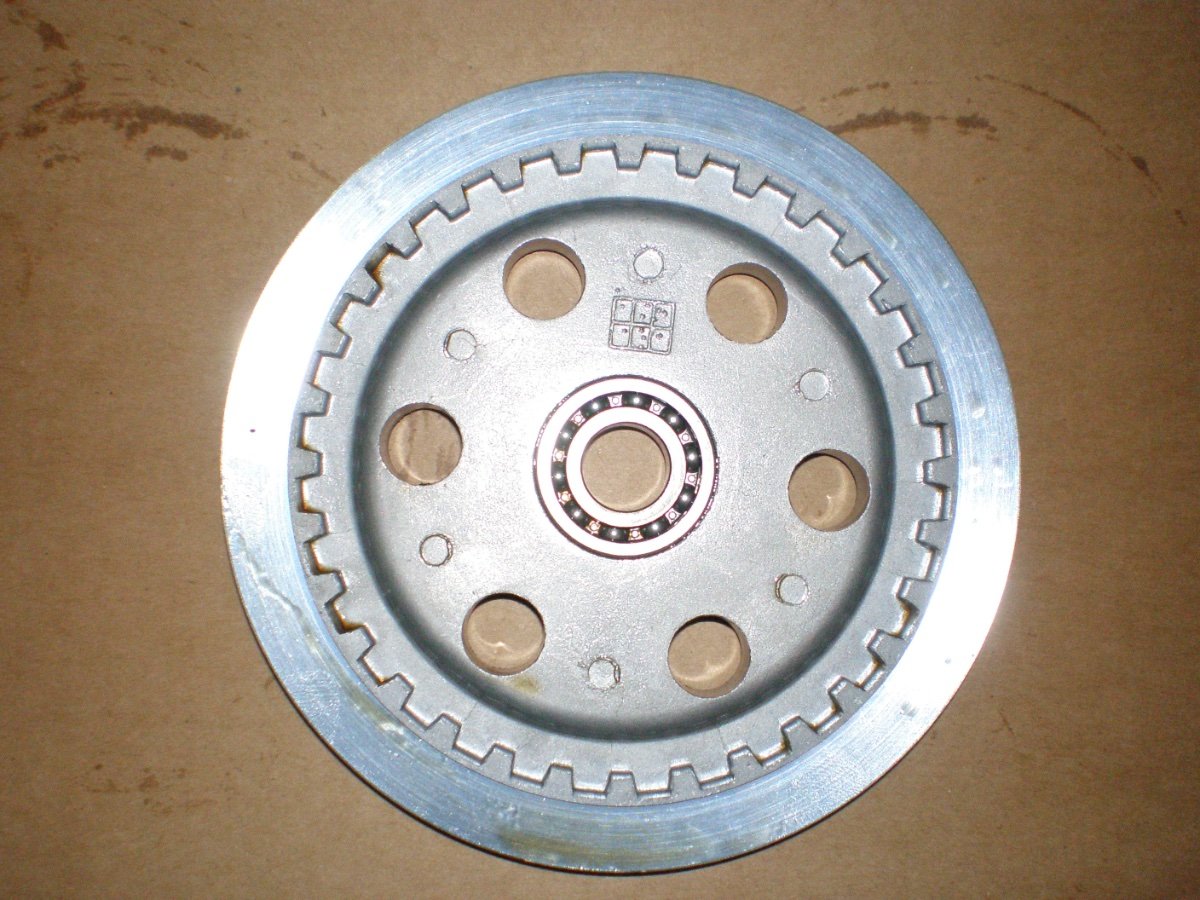
RSV Instructions for Clutch Removal, Install and Upgrade. Thanks to Tartan Terror for this GREAT article. These are instructions for replacing the clutch on a Royal Star Venture. As part of the install on my bike, I also did a clutch upgrade which involved removing several parts and installing an additional full size clutch disc. I found that with this upgrade, I was able to eliminate all of the slip that I was experiencing. At the time I did this upgrade, I also installed a heavier spring available from PCW Racing that also made the clutch more firm. With these instructions you will also be able to do a clutch on your bike completely to stock also. First you need to remove the cover located on the right side of the bike. It is the round cover just in front of the horn. You will need a 5mm Allen key to remove the bolts. In my case, I used a ratchet with a 5mm Allen bit and a ball head Allen key also. To make the removal easy, I also took an old 5mm Allen key and shortened it so that I could loosen the bolts behind the exhaust without removing or loosening the exhaust. When I removed all the bolts, I drew a shape of the cover on cardboard and place the bolts in holes placed in the cardboard so that the bolts will go back in the proper holes. Next you need to gently remove the cover. I did not need to drop any of the oil out of the engine. Although it is a wet clutch, when the engine is not running there is very little oil in the clutch area. Gently tap the cover with a dead blow hammer or something that will not mark your chrome. Remove the cover and clean the old gasket off the cover and surfaces on the block of the engine. When the cover is off, make note of the marks in the clutch basket and on the clutch friction plates. On the basket you will see at one point (5 o'clock position) there are two marks in the basket. You will also see that the with the discs in that all the discs have two marks also. At the 11 o'clock position you will also see one mark in the basket and the same mark on the friction plates. These marks are very important when you reinstall the friction discs. They MUST be lined up. Next you will need to remove the small plate on the outside of the clutch. It is held on by 6 bolts and you will need to use a 10mm socket or wrench. Remove the small plate and spring. Be careful because there is a small metal ring that sits in the pressure plate in a groove under the spring. You now need to remove the pressure plate. All you need to do is lift it off. After you do this, remove all the friction discs and steel plates from the clutch basket. All the way in on the cutch, you will see where you took the plates and friction discs out, a wire. Remove this wire. You will need to break it. This holds in a steel disc like all the others, a half disc and a spring washer. You need to take all of these out. These parts are the parts that you will trash if you choose to upgrade and put in a full size disc. If not, keep all these parts and take note how they come out so that you can return them as they came out. Make sure you get everything out. There is a flat steel washer in there that you have to work at getting out. It does come out and when you get it, the inner surface will be completely flat. Below is a picture of the parts that will be discarded in place of a full sized plate. The plate you will use is the same plate and part number as the rest. Whether you are installing new friction discs or just upgrading and installing one new one with all the others, they must be soaked in oil. As the RSV is a wet clutch, the discs are meant to absorb oil to work properly. Next you will need to prepare the steel plates to be reinstalled. At the recommendation of PCW Racing, I sanded the discs lightly in a crosshatch pattern so that the clutch has better grip. You can also bead blast them lightly as well. Now you are ready to reinstall the clutch. If you decide to use the original clutch parts (the small disc, washer and plate) do so now and install a wire in the groove to replace the one removed. If you are doing the upgrade like I did, you will now install the first friction plate, being careful to line up the grooves like specified so that the two notches match up to the marks on the basket at the 5 o'clock position and one notch at the 11 o'clock position. Install all the discs and plates alternating disc, plat, disc, plate. I also made it a point to spread extra oil on the discs and plates as I installed them. When they are all in, you will have a clutch disc on the outside and all the notches will line up. Next you will put on the pressure plate. The pressure plate has a punch mark on the front - make sure it lines up correctly with the single mark next to one of the bolt towers on the clutch basket. On the back side, you will see that the plate has splines that will match up with the teethe on the inner clutch basket. If these don't fit together correctly, the spring will not sit correctly. After you have this in then place the spring on next, making sure that the small ring is sitting in the groove on the front side of the pressure plate. Now install the spring. In my case, I installed a PCW spring which is heavier than the stock spring but of the same design. The stock spring is installed the same. If you use a Barnett pressure plate, follow the instructions that came with the kit. When installing the spring retainer plate and bolts, be careful not to tighten the 6 bolts too tight. Also, you will need to make sure that the spring is centered. There are notches on the towers that the 6 bolts tighten into that the finger on the center of the spring should rest on. Tighten evenly and crisscross your torqueing pattern. The torque is 5.8 ft lbs or 70 in.lbs. Reinstall the cover being careful not to crimp the new gasket and you are done. Like I said, I did the upgrade and I love it. It is better for pulling a trailer. One thing you will notice with the upgrade is the pull on your clutch lever is harder but not by much and you will adjust to it very quickly. I also recommend the upgrade if you are driving hard or have added stuff to get more power from your bike. Now get out and ride!!!

-
Santa brought me a GPS for Xmas, a Garmin c340. I was looking at the 2820 for the bike. I can take it back and upgrade, should I?
-
Hello everyone. Just bought me the '06 RSTD and love it. Well, maybe except for 1 small thing. Is it possible to ride this bike without the front cowling attached? Down here in Florida, we have been braking heat records lately and the heat from the engine on top of the 90 plus days is killing me. So, is it o.k. to remove the cowling or will it have a negative effect on the air filters? By the way, the bike is an upgrade from a Suzuki Boulevard!! And I do mean UPGRADE.