Search the Community
Showing results for tags 'carb'.
-
I have an 89 venture, and when I first got it I found it was idling around 1300 rpm. A quick look in manual for idling adjust and I mistakenly turned the carb sync screw on left side to adjust rpm. So, having just done a carb sync and found my folly (and fixed) what if any improvements will I see? I am mainly interested in mpg...hoping this would improve. I already know it idles much better! I really didn't notice any power changes, but perhaps just a slight improvement in vibration at highway speeds? This isn't a critical question as I will find out next run, but as it is raining anyway and I am housebound I thought someone would know. Thanks.
-
2007 Midnight Venture. Bike Hase 1600 Miles. Always Run Quality Gasoline. On Ride Sunday Started To Backfire On Decel, And At Idle. Then Started Pouring Gas Out Carb. My Guess Was Stuck Carb Float (i Am Used To Gold Wing Fuel Inj.) . I Turned Fuel Supply Valve Off To Run Out All Gas Out Of Carbs Then Turned Back On Several Times And It Corrected Itself. Rode Another 200+ Miles On Trip With No Problems (also Put Seafoam In Tank). My Question Is Did I Make The Right Moves To Correct And Should I Be Concerned Or Is This Something That Happens Sometimes.
-
Looking for any suggestions on this one (see my other thread). I have high vacuum in carb #2 on my 99 RSV. Other carbs are right in line. Idle is fine. Have not had any spark plug issues. Carbs 1, 3, and 4 have 10 in Hg and Carb 2 has 19?? I have gone through the entire synch process again... but I am stumped. I good suggestion was a closed throttle plate on #2 (Thanks Johnh).... and I am wondering if this is the case, how do I adjust the throttle plate on just carb #2??
-
O K Carb experts. When did Yamaha move the vacum line from the #1 carb and where did they move it? I got a set from E-Bay claimed they were 83 and no nipple to hook up vacum line. With out a nipple are they useless ( couldn't resist) What else is different on them? They looked the same didn't really check that close when I got them.
-
O K Carb guys when did Yamaha move the Ignition Vacum from the #1 carb I think it is and where did they move it to?? What else is different about thesse carbs. I got a set from E-Bay claimed they were 83 but no vacum line nipple on this one. Again without a nipple is it useless?? (couldn't resist) Useless for my 83 I mean..
-
How does an first gen act when there is a hole in the carb diaphragms? Would that cause it to run lean?
-
I have a 99 RSV. I was changing the spark plugs on the bike tonight and when I took the tank off I discovered quite a bit of gas on and around the air box on the top of the carbs. The only thing I could find was the boots on the top of the left carbs were quite loose. I don't know if I have a vacuum leak some where or why there would be gas hanging around up there. Oh and the bike has been running perfect. Any thoughts would be appreciated, not real familiar with carb works.
-
if you turn the idle air screw 1/4 turn COUNTER CLOCKWISE, are you A: increasing the amount of air flow into the carb? or B: are you increasing the amount of fuel, into the carb? i never have had a good explanation, as to what i was really increasing/decreasing. i figured , now is a good time to find out BEFORE i start monkeying around with them. thanks in advance. :confused24: just jt
-
I am looking for a missing screw on my carburetor. It is off a 1984 Venture Royale, in the service manual the screw is called the drain screw it faces to the outside of the bike lower right hand corner. Please if anybody has an old junk carb or extra screws around I am willing to buy. Itching to ride. Thanks Dave
-
Greetings. Can anybody tell me where the idle mixture screws are located on the 28mm Mikuni carbs (1998 Tour Classic)? Just cant seem to find these little buggers. I am having the exhaust popping and would really like to get rid of it. Have already run through a full tank of new fuel with cleaning additives (carb and injector cleaner) and it still pops. No holes in or around the Y pipe weld and all exhaust gaskets seem to seal perfectly. I plan to install the Dyna 3000 module in the near future but not at the moment. Any help or/and advice would be very much apreciated.
-
Just got these from South Seattle Sports Plaza (best price on the web for accessories)...went to remove screws from each carb to mount and only one moved...and came out...the others on in there solid as concrete...anyone here have a problem removing these carb screws?...If adding accessory or not...I may have already stripped one...Waiting till Saturday to take time and see what up....I thought I could just go take off....put on... A little help if anyone has some input... George In Virginia
-
Has anyone tried this kit? I want to re-jet my carbs, then I saw this this. is it any good? Thanks
-
 :sign09::sign09:Helpppppp. I'm trying to wrap up bike rebuild project in time to make it to Daytona. My Atl riding buddies pulled out this morning and Venturerider.org buddies are waiting and I'm still dealing with carb set up issues.:icon_smile_question:doh: So I'm asking, pleeding begging for help from you carb gurus in talking me through getting carbs set up. To help speed up the process I'm setting up the laptop in shop with web cam focused on project so those helping can see in real time video feed at the rate of 6 frames per minute. The link for video feed is http://Webcamnow.com/DragonslayerBob I will also be constantly monitoring this thread for feedback. Video cam should be online by 11:30am EST. To make it interesting and fun I'm make a contest out of it. The person most helpful in helping me get issues solved in time to make it to Daytona will win a prize of thier choice between Daytona Bike Week 2008 souvenier or a On Board Liquid beverage dispenser kit (My Invention and product) with on line instructions on installation. To get the ball rolling, this is where I'm at. The new motor is installed cranked and running, The air box is off, the diaphrams are all bouncing at different rates. The carbs have slow gas leak which is pooling around top lip of intake boots then dripping down. Choke is on. When I decrease choke and increase throttle engine bogs down and dies. During rebuild project I separated four carbs and installed new main diaphrams and coast enricher diaphrams, put back together and remounted to intake boots. What Do I Do Now?
 -
My 87VR always had carburation problems ever since I acquired her used at 40k miles. The last mechanic that worked on it before I gave up on other techs, and took over the full responsibility of being the only one to work on it told me that the intakes that were on the bike when i got it were the wrong intake manifolds. He said the ones on the bike were vmax manifolds that had a crossover port that the 87 xvz1300 did not have. He explained that the extra ports were sucking air that affected the air intake with the gas mixture to intake port causing the gas/air mixture feed to the spark plugs to be wrong. The end result was that the fuel burn was rich and the bike didn't idle properly and the fuel burn in the cylinder was not efficient causing poor ignition at the spark plug. It sounded reasonable to me so i gave him the OK to order the right intake manifolds. It ran a little better for a while but the same poor performance quickly returned. Then the bike died altogether. Note: The next few paragraphs are background describing my mental reference at the time If you not interested in my thought process and want to skip to the point scroll down to the paragraph heading "The Point". It was at that point that I started believing that i was the proud owner of a dinosaur too old for reliable professional service and abandoned by Yamaha since a lot of the parts i needed were no longer available. And the parts that were available were so cost prohibitive that I couldn't justify the expenditure needed to keep her alive. I was almost ready to part her out. In fact the Yamaha dealers wouldn't even talk to me about working on it since it was more than ten years old. Evidently Yamaha in their marketing strategy has decided to only stand behind their product for no longer than ten years. As much as that pisses me off I guess I can understand that they have to cater to the new money and twenty year old + bikes are past history, from their corporate point of view. But as a builder and contractor that has made my living built on my reputation of providing quality work and a man of character that stands behind his product, engineering, service and workmanship no matter how longs it been, I felt deserted and violated. So anyway I had a decision to make. Do I give up on her, Part her out and and commit her usable organs to Ebay. Or do I stand by the old girl and fight for her life even though she was on Life support and could possible already be dead. I started looking at new Goldwings, BMW 1200's, Victory Visions. The ride on the Goldwings somehow felt like a park bench, the BMW's had a nice ride but the saddle didn't fit my crouch, the vision took my breath the first time I saw it. As I was considering it as a option the reoccurring thought that popped into my mind was about if George Jetson rode a motorcycle it would be the Victory Vision. I was weighing out my options when I investigated ebay for the first time as marketing research to test the market for used 87 Venture Royal parts. My plan at that time was to generate the down payment on a new bike by parting out my 87VR. To my amazement I found out that ebay offered what Yamaha no longer did and what I needed could be won realitively cheaply on the internet ebay auction. The first Auction I won on ebay was a set of Carbs from Sean Hess (Hessforless ebay seller & member of VentureRiders.org) which I was sure was the root of my bike problems. During that transaction I talked to Sean on the phone and he told me about Venturerider.org God Bless you Sean. Well I BELIEVE THAT LIFE IS ABOUT TRIAL AND ERROR. Thomas Eidison was once asked about his failures in testing 300 and something different materials to use as the filament for the light bulb before he discovered that carbon tungsten worked. His response was, "None of those test were failures, in fact I succeed in all of those test by discovering what did not work". Dragonslayer philosopy: Failures are learning experiences you can profit by. Am I rambling? The carbs didn't fix the problem so I timidly entered a tech thread that seemed to be related to the problems that I was experiencing and asked for help as a newby to VR.org. GeorgeS (my VR.org hero) responded offering his assistance. Typical of what I have since discovered is the nature of this club and it's members he selflessly committed his considerable time addressing and walking me through troubleshooting and fixing my bike. God Bless you GeorgeS, God Bless you VR.org each of you one and all. With his help and others we breathed new life into her. With all of that said I'll get to the point. She ran better than she ever did. Well enough for me to feel good enough about her to break her down for a new paint job and going over which I completed just in time to make the Clay18 Bike presentation. Which was the first time I had met any of ya'll in person. Muffinman stepped up at that event to offer to sync my carbs in the parking lot. An offer I deeply appreciated and humbly accepted. Even though I felt that I had managed to get the sync fairly close judging by her improved performance. I was floored to discover from muffinmans carb sync that the intakes were still sucking outside air and as Muffinman explained it, meant that the current efficiency was equivalent of operating on 2 1/2 carbs instead of four. Evidently I still had some work to do. I limped thru last summer diagnosing low compression problems on one cylinder, chasing Ohm demons through the electrical and electronic systems then finally starter clutch failure on top of the never resolved carb problems. So I committed to another ground up going over including a new to me, used 9000mile 1990 model engine. During that process i won a ebay auction for a November 1986 issue of Cycle Magazine which evaluated the 1987xvz1300 Venture Royal with technical changes from 1986 to 1987. The Point One of the technical points the article mentioned was larger carb bores from the 34 mm mikunis to 35 mm mikunis in 1987. And I quote, "These measurements come from the carb's mouths- at the venturis, the jump is even bigger: 30.3mm in 85, 31.6mm in 86. To even out the mixture, both pilot and main jets grow larger this year yet fuel consumption remains remarkably close to the numbers from our last test unit." When I first read that information it didn't mean anything to me. During the history of my ownership and the foregoing background dialog I have ended up with three different sets of intake manifolds. All of which look exactly the same visually. But on the work bench they got mixed up. Then as I was preping carbs to mount on new motor I noticed that some seemed to fit tighter on carb mouths than others.:lightbulb:I Got out the ruler and guess what? There is a measurable difference in the opening (Where carb throat inserts in intake boot.) size between the three different sets of Intake manifolds/boots. is it possible that my problem all along was that the intake manifolds were not the same year as the carbs therefore the clamps did not fully constrict the boots around the carb throats and therefore not completely sealing or preventing air being sucked through that incomplete seal. I have no clue what year carbs I bought off ebay nor do I know what year each set of intake boots are. I figure that I will us the tightest fitting set to mount to this new (to me)1990 motor. Then the next question occurred to me that I would welcome some input on... I wonder how many internal carb changes might have occurred between whatever year carbs I have and the 1990 motor I'm getting ready to mount them to and to what degree will those changes adversely effect the performance of the 1990 motor potential performance. These carbs just got brand new diaphragms and fuel enrichment/air cut off diaphragms if I'm gonna need to change jets to match 1990 engine I rather do it now while they're on the bench instead of putting it all back together and having to do it later.
-
OK, here is one for ya. I took the mixture jet out of the carb and all be damm if I can't remember witch way they go back in. Is it spring, washer, o-ring, or spring o-ring, washer. Any help would be greatly helpful...
-
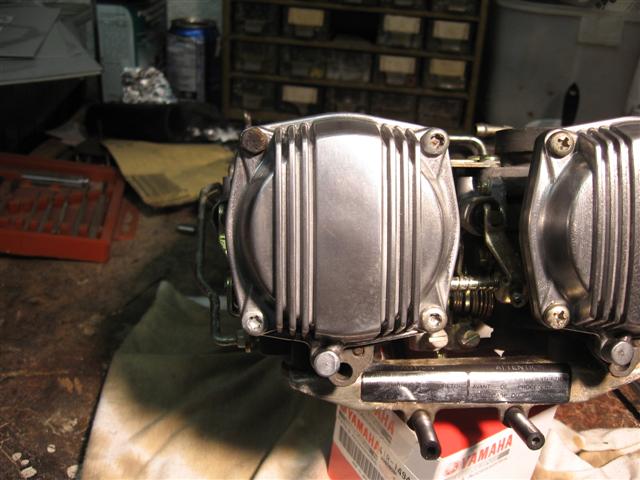
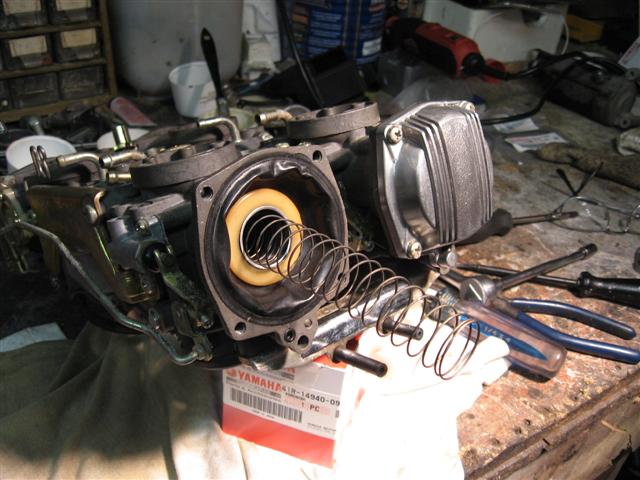
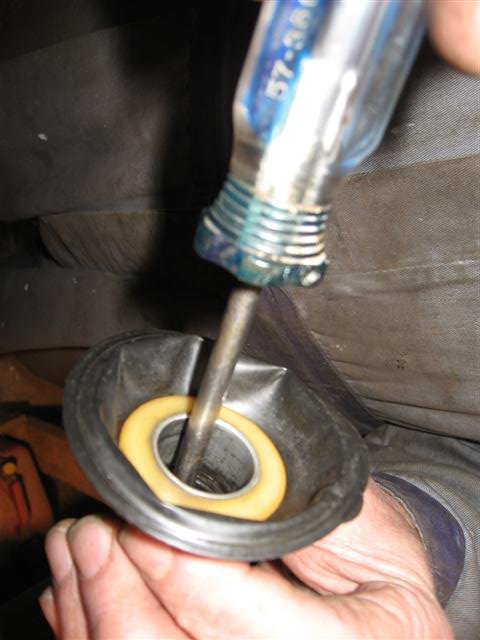
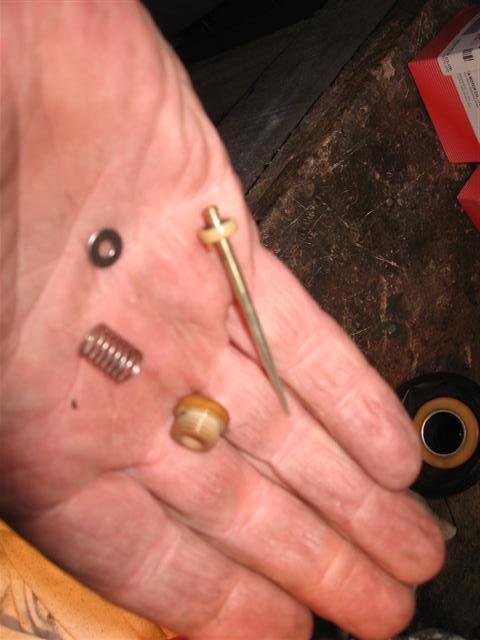
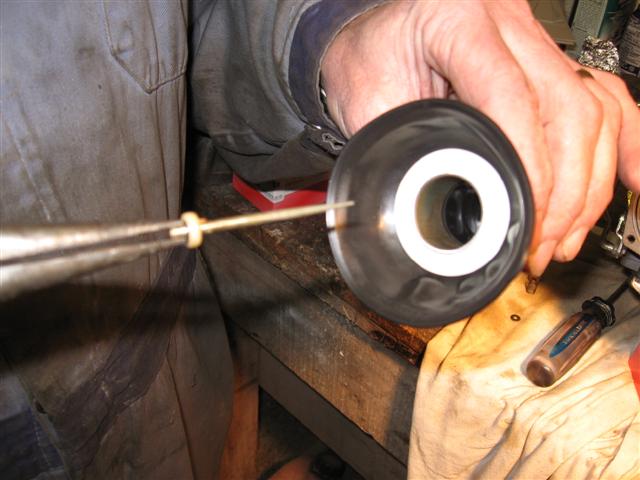
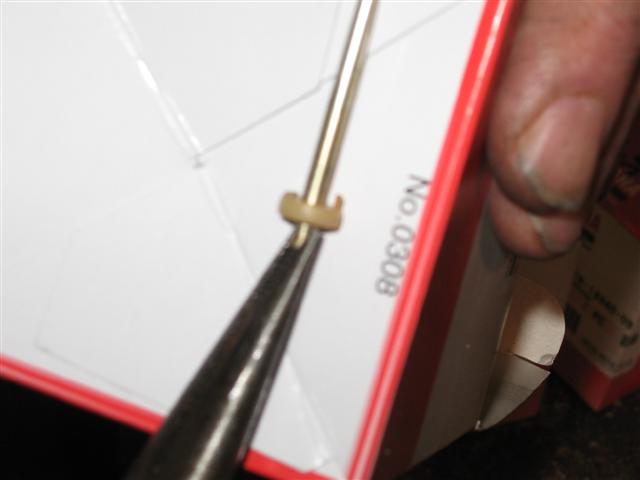
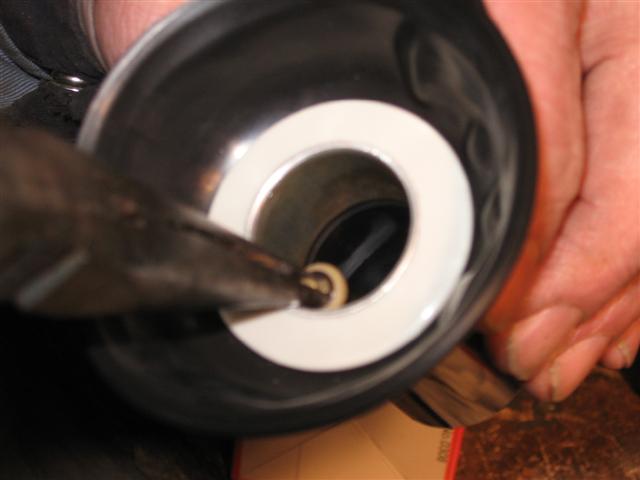
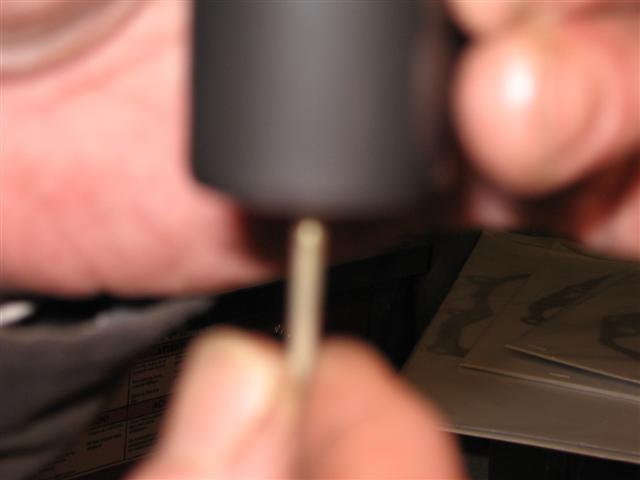
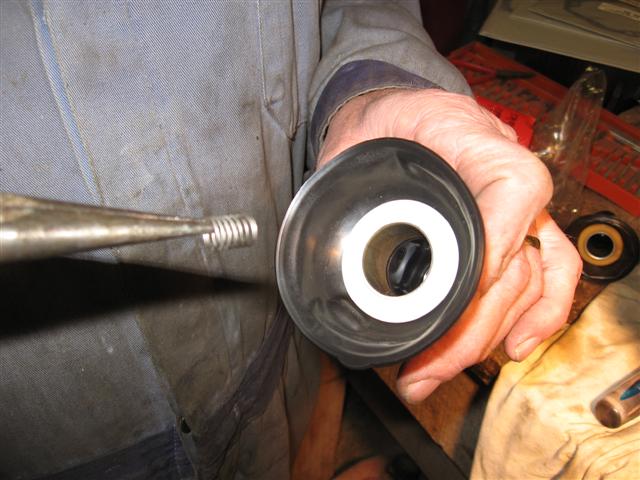
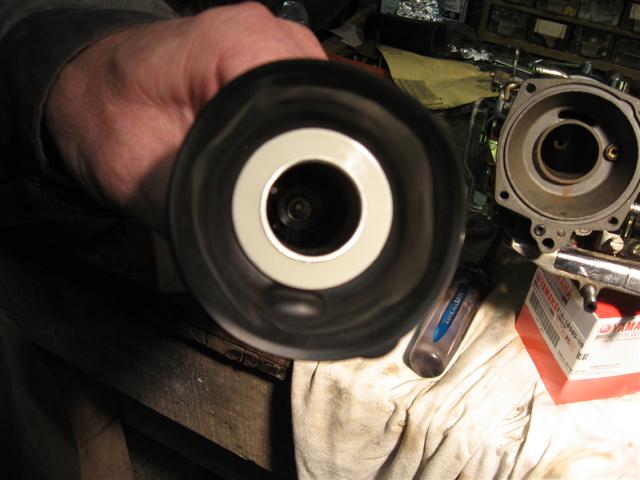
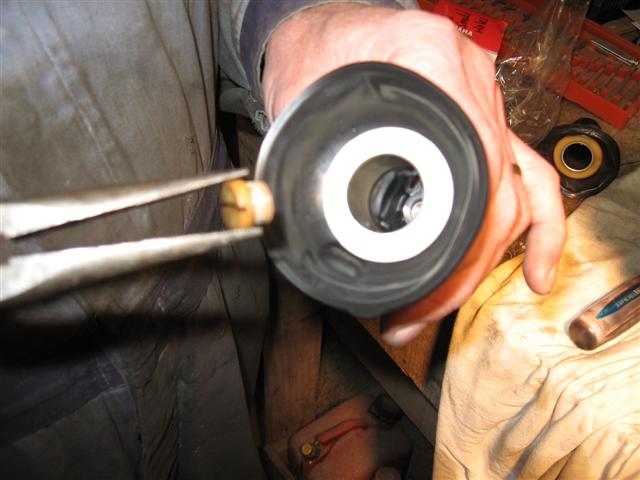
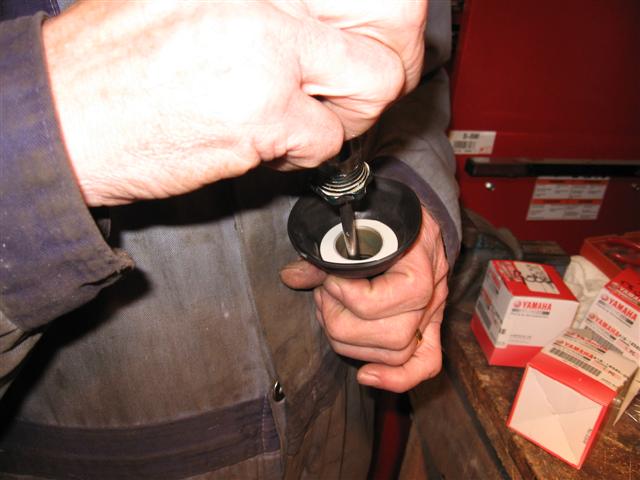
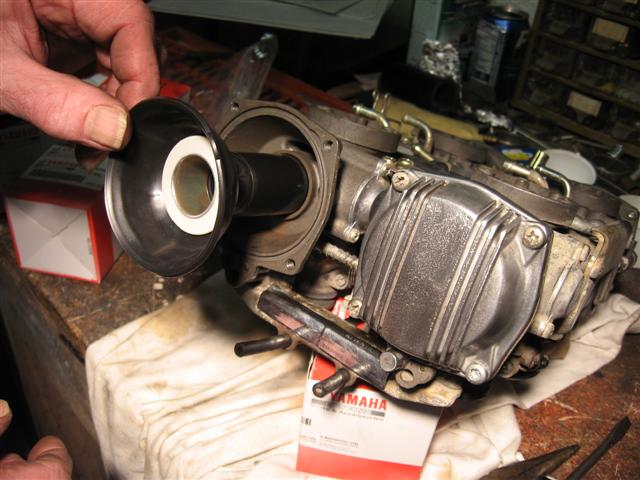
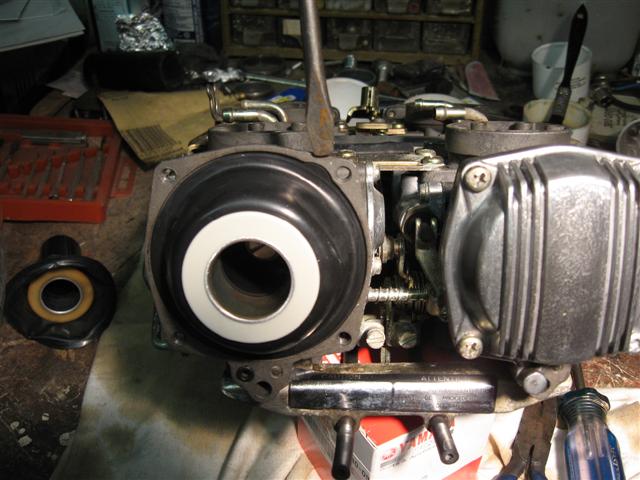
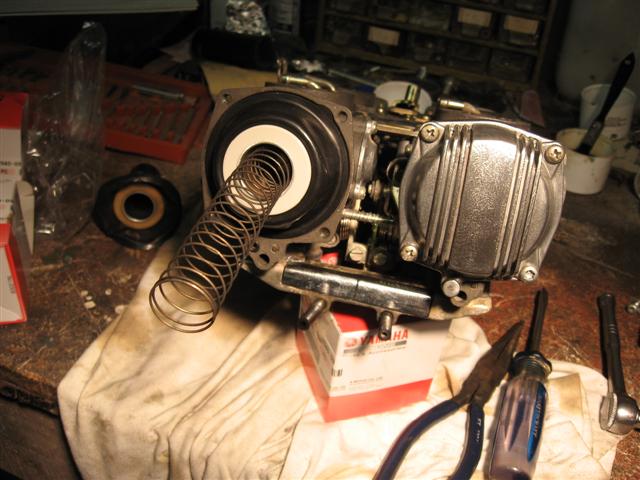
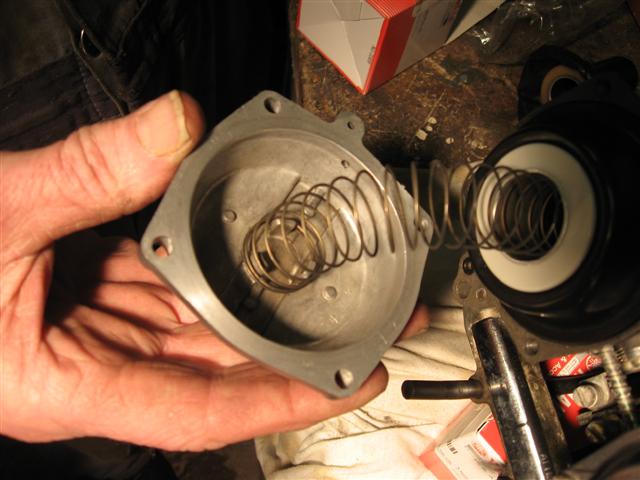
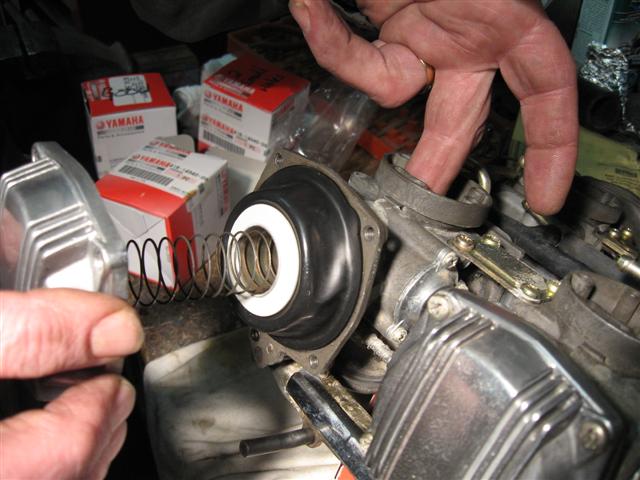
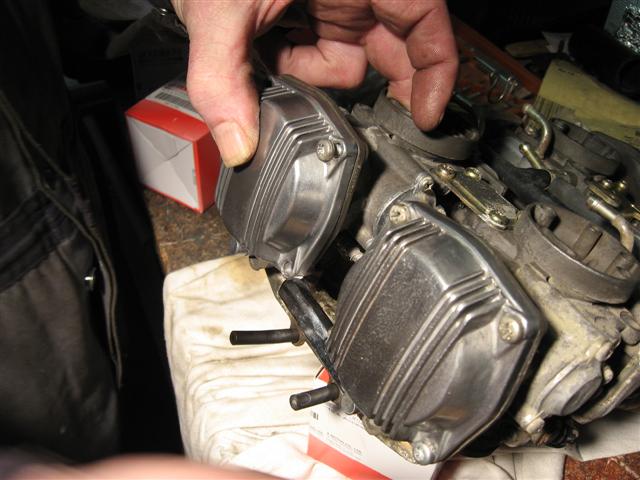
There's been some questions in the past as to how to replace the carb diaphrams, so when I did mine last night, I took some pictures, everybody always like pictures, RIGHT? Well here goes the write up: 1) Remove the false tank cover, side covers, side rad covers and loosen the lower faring. Remove the air box lid and the air filter. This would also be a good time to clean the air filter and the air box. You need to do this so you can reach into the carbs later. 2) Identify the part, the diaphragm cover, which has 4 torx screws, the one having a pin in the middle. This was done to make it hard, otherwise everything would be easy and any mechanic could do it. I didn't have one to show you, so you'll have to take my word for it. It can easily be snapped out by using a needle nose pliers or if it's stubborn a small punch. Just work it back and forth once or twice and it will come clean out. 3) Remove all the screws and the cover will pop out by it self, seeing as there is a spring behind it. Save the spring, it will come in handie when you put things back together. 4) Now that you have this area open, it's a good time to use some Carb Cleaner to clean the area, and all the little ports you can see. Finish by blowing out with air. At the bottom you'll see a little built out area that has a rubber ring in it. Be sure to save this ring as well, otherwise it's sure to get itself lost and then you'll have to wait longer for more parts. 5) Inside the diaphram body you'll find a plastic screw, turn it out by turning counter clockwise, that's the opposite way the hands on a clock turn. Under that screw will be another spring, not at all the same as the first spring, but a spring none the less. Keep it handy as well. Under the spring will be the needle assembly. This consists of the needle itself, a 'C' ring and a small washer. Best not to loose these either. They all need to go back in order in the new diaphram. 6) You are now ready to begin the installation of the new diaphram. Make sure that the little washer is mounted on the short side of the needle (#3) and then with a needle nose pliers insert the needle into the new diaphram (#1). Now comes the part where you pay attention. On the collar of the the needle you see a little plastic pin,(#2) this needs to seat in the hole provided for it in the base of the diaphram. Once the needle is inserted into it's rightful location you can very slightly push it back and then by turning it you'll have it find the hole (#5). Now you cannot turn the diaphram over again until the plastic screw is in place, but first you need to put the little spring back in on top of the needle (#6). Then with a needle nose pliers you drop the plastic screw down into the diaphram and with flat screwdriver wiggle it until it jumps into it regular spot, at which time you can gently attempt to turn it into the threads. Sometimes this goes easy, sometimes it takes a bit more time, but don't give up, it will happen. 7) Once you have the diaphram together you can slide it back into the carb. You'll find a tab on the outer edge of the diaphram and that seats into the cutout for in the carb. This is also a good time to remember to put the rubber O ring back in place at the lower end of the carb. To make things easy, fold the diaphram to-wards the carb and seat it in the grove provided for it. Next insert the long spring, that pushed the cover off in the first place, into the diaphram, but do not let it seat the plastic slide into the carb as this will cause it to unseat the rubber from the carb. Now seat the spring in it's approved place on the cover. Do not push it together just yet. 8) Now as you can see, I did mine while the carbs were off the bike, that was because the motor was already out and second gear was under construction. You really don't have to wait until second gear goes or you have to take the engine out for some other reason. This can all be done very nicely right on the bike. So now comes the final process: before you push the cover back into place, put your finger or have someone else place their finger, or use a piece of plastic or steel, (I wouldn't suggest wood as you may get dirt into the carb) into the throat of the carb to prevent the diaphram from sliding in. This will keep the bead seated in it's proper spot. Once the cover is in place and two screws have been inserted and tightened you can withdraw your 'finger' from inside the carb. Now, wasn't that easy?????

-

Carb Diaphram Replacement
Marcarl posted a topic in Venture and Venture Royale Tech Talk ('83 - '93)
There's been some questions in the past as to how to replace the carb diaphrams, so when I did mine last night, I took some pictures, everybody always like pictures, RIGHT? Well here goes the write up: 1) Remove the false tank cover, side covers, side rad covers and loosen the lower faring. Remove the air box lid and the air filter. This would also be a good time to clean the air filter and the air box. You need to do this so you can reach into the carbs later. 2) Identify the part, the diaphragm cover, which has 4 torx screws, the one having a pin in the middle. This was done to make it hard, otherwise everything would be easy and any mechanic could do it. I didn't have one to show you, so you'll have to take my word for it. It can easily be snapped out by using a needle nose pliers or if it's stubborn a small punch. Just work it back and forth once or twice and it will come clean out. 3) Remove all the screws and the cover will pop out by it self, seeing as there is a spring behind it. Save the spring, it will come in handie when you put things back together. 4) Now that you have this area open, it's a good time to use some Carb Cleaner to clean the area, and all the little ports you can see. Finish by blowing out with air. At the bottom you'll see a little built out area that has a rubber ring in it. Be sure to save this ring as well, otherwise it's sure to get itself lost and then you'll have to wait longer for more parts. 5) Inside the diaphram body you'll find a plastic screw, turn it out by turning counter clockwise, that's the opposite way the hands on a clock turn. Under that screw will be another spring, not at all the same as the first spring, but a spring none the less. Keep it handy as well. Under the spring will be the needle assembly. This consists of the needle itself, a 'C' ring and a small washer. Best not to loose these either. They all need to go back in order in the new diaphram. 6) You are now ready to begin the installation of the new diaphram. Make sure that the little washer is mounted on the short side of the needle (#3) and then with a needle nose pliers insert the needle into the new diaphram (#1). Now comes the part where you pay attention. On the collar of the the needle you see a little plastic pin,(#2) this needs to seat in the hole provided for it in the base of the diaphram. Once the needle is inserted into it's rightful location you can very slightly push it back and then by turning it you'll have it find the hole (#5). Now you cannot turn the diaphram over again until the plastic screw is in place, but first you need to put the little spring back in on top of the needle (#6). Then with a needle nose pliers you drop the plastic screw down into the diaphram and with flat screwdriver wiggle it until it jumps into it regular spot, at which time you can gently attempt to turn it into the threads. Sometimes this goes easy, sometimes it takes a bit more time, but don't give up, it will happen. 7) Once you have the diaphram together you can slide it back into the carb. You'll find a tab on the outer edge of the diaphram and that seats into the cutout for in the carb. This is also a good time to remember to put the rubber O ring back in place at the lower end of the carb. To make things easy, fold the diaphram to-wards the carb and seat it in the grove provided for it. Next insert the long spring, that pushed the cover off in the first place, into the diaphram, but do not let it seat the plastic slide into the carb as this will cause it to unseat the rubber from the carb. Now seat the spring in it's approved place on the cover. Do not push it together just yet. 8) Now as you can see, I did mine while the carbs were off the bike, that was because the motor was already out and second gear was under construction. You really don't have to wait until second gear goes or you have to take the engine out for some other reason. This can all be done very nicely right on the bike. So now comes the final process: before you push the cover back into place, put your finger or have someone else place their finger, or use a piece of plastic or steel, (I wouldn't suggest wood as you may get dirt into the carb) into the throat of the carb to prevent the diaphram from sliding in. This will keep the bead seated in it's proper spot. Once the cover is in place and two screws have been inserted and tightened you can withdraw your 'finger' from inside the carb. Now, wasn't that easy????? -
If 2 of the carb boots between the carb and air box are leaking how will the bike run?
-
My son inlaw called me last night and told me that when he started up his 07 R.S.V. it had fuel coming out on top of his radiator and he could not tell where it was coming from. He said he could not see because of all the stuff in his way. I would think carb. or fuel line. He just got it in september. the way things have come lose on mine I would say that it could very well be. Dave
-
Any one in SE Texas or a half days ride of Houston have a Carb Tune set, that wouldn`t mind helping me Sync my carbs... I don`t know of any slealers that I would truxt to do this... Thanks for any help K
-
The bike was down for approx. 4 mo. while I decided if I was going to ride again and also fixing all of the broken plastic. I did start it probably twice a month during that time. Now that it is all glued back together and ready to ride, it doesn't want to run for approx. 15 to 20 minutes after starting. It seems that after the motor gets a little heat in it, it seems to even out and will idle pretty smoothly. I have run about 1/4 can of Seafoam in the first full tank, but haven't run it all out yet. It starts good, but needs to have the choke on quite a while. Also, I get a strong smell of gasoline while riding. Does this sound like carb problems, or possibly something else? Any help will be appreciated. Don H.
-
I love my 07 Venture but I hate the sound of the exhaust. Sounds like it's missing all the time. I'm thinking of drilling some holes in the rear of the exhaust. The local stealer mechanic says it shouldn't cause any carb problems of any kind. I'd appreciate any info you can give me. Eddie:bighug:
-
A week ago last Saturday I sold Bertha to a collector in our area. Bertha is number 5 in his 'gen'. 1 Venture Royale collection. I have visitation rights. I had just pulled up to my ususal parking space at my home dealershihp. A gentleman walked up to me and asked if I would sell my bike. I told him that I was still having a minor carb. adjustment problems and I thought the bike was running pretty well but needed a little more work with the pilot screws.Muffinman, I was able to clear the running rich problem on carb. number 2. Any way I shot the guy a price...What I paid for Bertha 3 years ago. He said "I'll take it". I had sold my 98 V-max in December of 2006 and sold my 05 FZ1 in June of this year (to buy a car,..ugh). I have now replaced Bertha with 'Angelena' my new 2008 FZ1. I went back to my performance roots. I had a ball traveling on the Gen 1., better than any large bike I had ever owned. That includes my Goldwing, and Harley baggers. I know I'll miss all of her creature comforts. I would still like to hang around here from time to time, just to keep up with the 'goings on'...Jeff, I want to thank you for you efforts, and hope you and Mini are well.....I'm still here, if you guys need me......Tommy
-
I had two good rides last Monday and Tuesday so I figured the weather had turned cold again so it's finally time to look at my # 3 carb. It would leak gas after a ride one day and the next time it wouldn't. I tried the Seafoam many times and it still seeped out. So off the carbs came. Upon looking at the # 3 needle and seat I do see a ring mark on the needle but it's very hard to see and the light has to be just right. I have ordered new one's from Buckeye but my gut and experience tells me that may not be enough wear to cause the leakage. The question I have, is there any other vent lines or blocked ports that could cause pressure to build in the carb making it seep? Anything else that would cause it? Thanks. Spotsy
-
i know i've seen it posted here, a dozen times, but does anyone know off the top of their head, what the part number is for a first gen carb diaphragm? i tried a simple search, and came up with nothing. maybe i used the wrong "phrase". just jt