warthogcrewchief
-
Posts
239 -
Joined
-
Last visited
Content Type
Profiles
Forums
Gallery
Events
Store
Everything posted by warthogcrewchief
-
I must respectfully disagree with Don's and Carbon's statement. The engine does hang below the frame (just a little). Unfortunately, the forward exhaust pipes hang below the engine. In order for me to lift the front end up (as I don't have a MC jack yet), I have to use a 6' 2x4 with a 4" or 6" piece screwed on the 6' piece of 2x4 so that it doesn't leave the weight resting on the pipes, but on the engine. The 2x4 is held up by a couple of 12"x12" paving bricks on each side. It lifts the front end up just enough to take the weight off the front end. The back end is still suspended on the center stand. Safe, probably not, but it gets the job done! I do wish you could make a MC Jack adapter for the 1st Gen VRs. I'd have to get one if you did...especially if you could make an adapter with the legs for the 1st Gens!
-
How much does Larry charge for a lift adapter and how do I go about getting one? (I'm thinking about buying a lift soon for my '89 VR). Thanks, WHCC
-

Driving Light Issue
warthogcrewchief replied to 91nwl's topic in Venture and Venture Royale Tech Talk ('83 - '93)
Here's a great article written by a fellow venturerider member. The article is called Relays and Wiring 101, and it goes into the basics of relays. Towards the bottom of the article are wiring diagrams of how to and how not to wire in a relay. One of the examples used are 50w driving lights. http://venturerider.org/wiring/Relays%20101.pdf -
In addition to wearing a reflective/brightly colored vest, I also plan on increasing the headlight, tail light, and turn light output (with LEDs). Since I am currently rebuilding a '89 VR, I have a lot of options on how I plan to do it. As I continue to finish the new paint, I will paint this reflective clear over the trim stripes. http://www.duplicolor.com/products/nitelites.html
-
Link did not work...took you to the main website and no sign of a volt meter on their site when I did a search for "Voltmeter" or "volt meter".
-
Venture Royale rear brakes
warthogcrewchief replied to thetoyho's topic in Venture and Venture Royale Tech Talk ('83 - '93)
You could also install a bleed port at the top of the system (located near the steering head). It is similar to the '86-'93 VR bleeder port. I think it makes thing a bit easier, but even with my '89, it took me a while to bleed the rear system. -
CLASS problem
warthogcrewchief replied to bobcat's topic in Venture and Venture Royale Tech Talk ('83 - '93)
Before you open the CLASS computer, you should attempt to get a better connection (try to wiggle the connector a little further in). This works for me and I know that it works for others too. If this doesn't fix it, then you would want to look at re soldering the connector points. These corrective actions work for E1 & E4 codes on the CLASS system. -
Thanks for the great info! I'm looking to add two Wolo Bad Boy (air) horns onto my bike after she's road worthy. I'm looking to replace the stock horn units with these and am thinking the factory circuits have a relay built into it somewhere. Is this correct? If not, then I guess I'll have to use the factory wires connecting to the horns and connect them to new relays, and then connect the positive and negative connections of the new horns to the two remaining plugs. Any help on this would be great (I can read the schematics provided in the "Relay 101" piece). HINT: If you're looking to buy these horns, Amazon.com has them listed at about half the factory price!
-
PEIslander, If you're unsure of the color combination, like I was, have a small piece test painted to see if you like it. What I did was paint the cross-over piece that connects the two lower fairing pieces just in front of the bottom "chin" piece. It's small, so it won't require much paint or prep work. I tested two different color combos on that and I decided I liked the blue/silver combo. After that, I decided I wanted gold trim...but thought it might need an additional color in the trim. I also got red trim. Both trim tapes had two lines. I had a scrap piece of plastic (or you could use metal) I had painted, and practiced with different combinations of the trim tape until I found the one I liked. I used both gold lines with the thick red line in between. I went through about 3 or 4 different combinations until I found the right color combo. Instead of having your friend paint the practice piece, you can do it yourself. Just spray the primer, and prep it correctly (400 grit sandpaper works well for this) and just practice with some rattle-can paint that will be close to the color combo you want. Since you're not sure if you want gold/black or silver/black, paint all three onto one piece. GOLD/BLACK/SILVER. Remember to paint the lightest color first as the darker colors would bleed through a lighter top coat.
-
Why would Yammer like those colors? My bike was originally the two-tone blue. It was faded, peeling and had some shotty plastic repair and bad touch up paint spots...so, since I bought her as a rebuild, I thought I'd go ahead and give her a new look while keeping a similar paint scheme. I almost decided to go with a BRIGHT solid red and put a yellow Ferrari emblem painted onto each side of the front fairings. My better judgment prevented me from doing that. A touring bike should look good, but not like a sport bike.
-
forks
warthogcrewchief replied to clay18's topic in Venture and Venture Royale Tech Talk ('83 - '93)
I just rebuilt my forks and I got the copper washers for the main bolt on the bottom of the piston, the lower and the upper bushings, the oil seals, and the dust seals from bike bandit. However, if you call Rick at buckeyeperformance.com, he has a kit that has EVERYTHING you need to rebuild the forks (minus the tools, oil and progressive springs). Also, when you rebuild your forks, use Mobil 1 5w-30 full synthetic as it will increase the life of your forks and create a better ride. I order to hold the lower piston in place so you can remove the bottom bolt (after you remove the top cap and spring), you'll need a to make a tool. The tool is made from the following items: - two, 2-foot steel pipe, 1/2 inch diameter, threaded; one pipe cut in half (got mine at Ace Hardware and they even cut it for me!) - a steel "T" for the threaded ends of the pipe - a bolt that has a 24mm head - J.B. Weld or access to a welder. To install the oil seal, I used a two foot section of 1 1/2" PVC pipe. Here is a link on this forum for step by step on the rebuild...wish I had this when I did mine! [ame=http://www.venturerider.org/forum/showthread.php?t=496]Fork Seal Replacement - VentureRider.Org[/ame] Below are pics of the "tool" I made to hold the piston in place. If you decide to make the tool, I recommend having someone weld the bolt instead of using JB Weld, as the JB Weld started to break when I removed the piston. The other option is to use an air impact wrench to remove the bolt. When installing, be sure NOT to use an impact gun as the torque specifications for the bolt is low. Overall view of the "tool" to hold piston in place while removing lower bolt:[ame=http://www.venturerider.org/forum/showthread.php?t=496]http://i19.photobucket.com/albums/b160/warthogcrewchief/100_0831.jpg[/ame] Close-up view of the Bolt end of the tool: http://i19.photobucket.com/albums/b160/warthogcrewchief/100_0832.jpg -
fuses / headlight
warthogcrewchief replied to barend's topic in Venture and Venture Royale Tech Talk ('83 - '93)
I am, by no means, an expert with electricity, but I do know enough to get myself into (and sometimes out of) trouble. From what I have dealt with in my job (USAF fighter aircraft mechanic), I've seen LED flashlights that start blinking like a strobe just before the batteries die. We change out the batteries and they work perfect. I'm thinking that maybe you have a connection that isn't tight or maybe you need a better ground... Just my . -
I'm currently repainting my '89 VR and I'm doing it myself. Here is a pic of the front fender to give you an idea of the colors I chose. http://i19.photobucket.com/albums/b160/warthogcrewchief/100_0782.jpg http://i19.photobucket.com/albums/b160/warthogcrewchief/100_0828.jpg
-
Side Stand Extender
warthogcrewchief replied to 91nwl's topic in Venture and Venture Royale Tech Talk ('83 - '93)
It seems everyone has got a little cabin fever (not me, I'm in Arizona...but can't ride until my bike is complete for her rebuilt - hopefully in Dec/Jan). I'm thinking the idea of a side stand extender was to make it easier to lower the stand, and not so much as to have the bike sit at less of an angle. Couldn't someone just remove their sidestand, and have a piece of metal bar welded on... or possible as in the extender shown, drill two holes and bolt on a piece of metal to extend out the kickbar on the sidestand? This is a good idea, but not sure if I need it. I know that my '06 HD Low Rider had the problem of me trying to find the side stand...If my bike has this issue, I'll have to either weld or bolt on an extended kickbar. -
Active Duty U.S. Air Force here (if my name didn't already give me away).
-
Something to keep in mind is that you should not do any carb adjustments while having Seafoam in the gas as Seafoam will cause your mixture to be just a little more rich. IF you adjust the carbs with Seafoam in the system, then when you're running normal fuel, the mixture and idle settings will be off. So, if you must adjust your mixture or idle RPM, then be sure to do it again when you're running on straight gasoline.
-
Short of wrapping all the radio/comm wires in an interference shield material, I can only think of one thing: Look for that connector and see if you have a condesor installed. Unfortunately, I was unable to find one on my bike...nor was I able to find one in the exploded diagrams on Bikebandit Perhaps Rick at Buckeye Performance. I'm told that he is very knowledgeable about VR's and can usually find what we need. I here this from the people on this website and at venturers.org.
-
From the album: my Pics
-
-
-
1st Gen parts
warthogcrewchief replied to Dragonslayer's topic in Venture and Venture Royale Tech Talk ('83 - '93)
Thank you, but that's more than my wife will allow me to spend. -
83 VR Battery
warthogcrewchief replied to Tarl's topic in Venture and Venture Royale Tech Talk ('83 - '93)
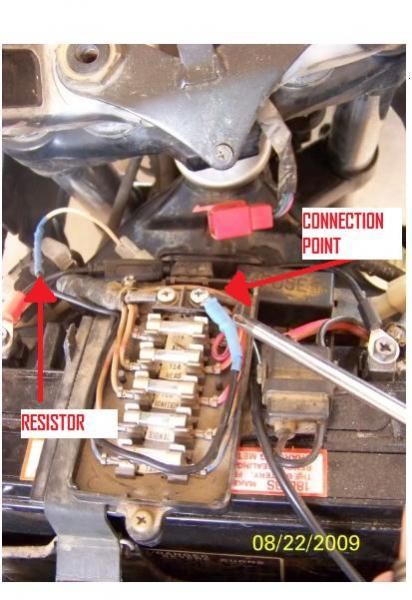
If you get a new battery that does not have the orifice for the sensor (as mine did...sealed battery), you can wire an in-line resistor from the negative (right) side of the accessory terminal on your main fuse box to your sensor (requires you to cut the sensor from the wire). This will trick the CMS into thinking you still have a sensor and will keep the idiot light off (at least for the battery icon). I used a 2.2K ohm resistor from Radio Shack. Here's a detailed step-by-step instructions on doing the resistor mod: http://www.cast-aways.com/yamahabatt.htm The only two things I did different was I used only the 2.2K resistor (the 1K resistor wasn't needed) and I soldiered on an eyelet which I connected in with the screw for the accessory side (as shown in the picture below). Hope this helps! -
From the album: my Pics
-
1st Gen parts
warthogcrewchief replied to Dragonslayer's topic in Venture and Venture Royale Tech Talk ('83 - '93)
Do you have driver's floorboards w/ required foot controls? -
I know that condensors are not obsolete (still used them on some older HD's). However, I was reading in the owner's repair manual that the resistor spark plugs are required to help prevent interference with the radio and the CB. So, if the spark plugs are the resistor type, then wouldn't a condensor just be overkill?
-
Well, then in that case, I'll just seal this connector off from the elements and tuck it away ( as the PO had done...with exception of sealing it off). I did some research and the condensors were not used on points after 1982 as they were then electronic ignition. Glad to hear I have nothing to worry about! Thanks for your help!