Search the Community
Showing results for tags 'gauges'.
-
I am confused, baffled, disappointed and so on and so on. Got my gauges installed and must admit, they look awesome. I was sooooooo careful with all the wires, the oil line and the temperature cable. No kinks, or sharp bends. Routed everything like a pro, well, at least in my mind. Everything hooked up, gas tank back on, fired her up. Lights come on, volt meter works and that's it. Temp gauge doesn't register anything. Oil gauge,,,,,,,,,,,nothing. Although I used the black tubing from Ponch to cover the oil pressure line, I can see that oil has started up the line however I can not see how far. I do know that it hasn't reached the gauge. Is it supposed to? Just turning the ignition on for power, not started, the oil gauge goes to just over 20 and that is where it stays when running the bike. WTF????? I was so careful. The only thing I did different is that I used the Equus 1.5" gauges. I think they look better and they match the speedo better than the white face gauges. I do want to say that Ponch's instructions are fantastic. There is no way in hell I would have been able to do this without them. THANKS PONCH! HELP!!!!!! Any idea what I could have done wrong? Wouldn't surprise me if it was somthing obvious. Go ahead guys/gals,,,,bombard me with your wisdoms. I will get all your replies on my blackberry so fill me with a pile of stuff to check when I get home Friday. I WANT TO RIDE! Do I sound desperate enough. Greg. (AKA Thor)
-
Well here are my gauges and tach. I designed both pieces with Cimatron E8.5 software and programmed the cnc for the cutter paths. Had them anodized, they did not come out as dark as I wanted, but I think they still look pretty trick. I am using Equus triple gauges and a Nitrous brand tach. Not hooked up yet, that's this weekends project, along with my Utopia backrest. Once this is done I am going to do the crashbar supports and add highway pegs. It's been pretty warm this past week in Michigan, so I gotta get this this back together and road ready.
-
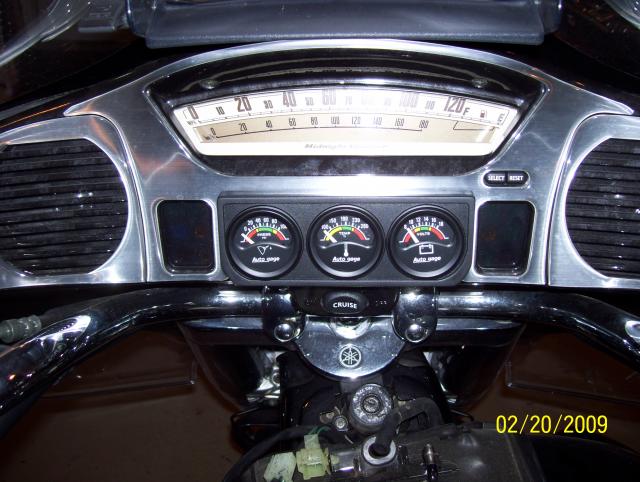
Well we finally got some nice weather and I was able to work in my shop and install the gauges on my 1996 Royal Star. I used the 2" Equus gauges because they were the closest match to the speedometer and you can change the colour of the background lighting. Everything working and no leaks so far. Many thanks to Ponch for the water temperature adapter swap. Doug
-
I finally installed my gauge set from Ponch. The actual install went pretty smooth, and took me about 5 hours. My hat is off to Ponch for his great work on this kit. First, I didn't want my needles to be orange, so I decided to disassemble the gauges and paint the needles black. This turned out to be a hassle, but I prevailed. Upon taking them apart, I broke one of the glasses. http://i74.photobucket.com/albums/i274/13thAFMonterey/IMG_3819.jpg You can't buy the glass by itself, nor did I want to purchase another set of gauges, so I went to Lowe's and bought a small sheet of glass, and a glass cutter. It wasn't easy to do, but I did it, and you can't tell the difference. Here are the gauges after I painted them. http://i74.photobucket.com/albums/i274/13thAFMonterey/IMG_3821.jpg Here are some pics from the install. I won't go into all of the details, as several writeups have already been posted here. Yes, cutting the dash has a pretty large pucker factor...lol. http://i74.photobucket.com/albums/i274/13thAFMonterey/IMG_3822.jpg http://i74.photobucket.com/albums/i274/13thAFMonterey/IMG_3824.jpg http://i74.photobucket.com/albums/i274/13thAFMonterey/IMG_3825.jpg http://i74.photobucket.com/albums/i274/13thAFMonterey/IMG_3827.jpg http://i74.photobucket.com/albums/i274/13thAFMonterey/IMG_3828.jpg http://i74.photobucket.com/albums/i274/13thAFMonterey/IMG_3830.jpg So far, I have no leaks, and everything is working great! Thanks again to Ponch, for making it easier. I made one additional mod that I really had to think about, before cutting another hole, but I went ahead and did it... http://i74.photobucket.com/albums/i274/13thAFMonterey/IMG_3831.jpg
-
the wife & I stopped in a Honda shop today, to buy her another visor, for her helmet so, I'm in paying for the new one, and I don't see the wife anywhere., so I slowly look around, as not to miss, the Little wife of 5 ft., I come around the leather jackets, and find the wife sitting on the back of a 2009 Goldwing, trying out the back seat. So I stepped back and just watched. she got off, opened the trunk, checked out the gauges, touched the fairing, walk around It one more time. Then started looking for me. of course, found me, in the leather section, looking at jackets..... I said NOTHING....... GOD!!!! I hope this is a start of a new relationship (For both of us)
-
38180.1 Three pencil and one dial gauge and they all read different. How about the digital gauges? Any brand better than the other, what are you guys using? Thanks in advance
-
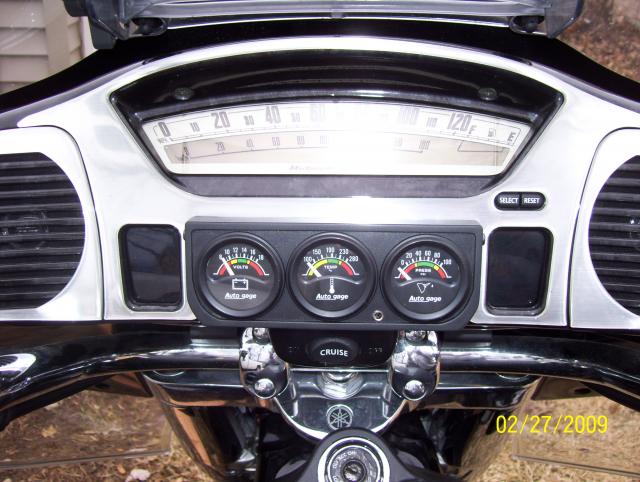
OK folks...I recently replaced my Sunpro gauges on the '99 RSV with a new faceplate from Ponch and a new set of Equus gauges. I liked the off white color of the new gauges better. So, I have a set of Sunpro gauges with the chrome faceplate available to one of you for free. You will have to pick up or make the adapters for the water sensor as we all do but everything else will be there. So who do I give them to? Let's try to have some fun with this. I want to hear your hard luck stories about why you need a set of free gauges. Your milk cow went dry, whatever. Just submit your best FICTIONAL story about how down and out you are and I'll choose a winner based upon what I think is the best submission.
-
Hey Don, Who won
-
Somebody PLEASE find me some gauges this color in 1 1/2" size. They would go GREAT with the RSV dash. http://www.autometer.com/cat_gaugedetail.aspx?gid=2950&sid=16
-
Awhile back there was a big rush to add gauges to their bikes prior to the riding season. Well I was one of those, and I stole an idea from AlbertaClipper and added a Voltmeter and and oil pressure meter to my dash (tank cover area) . Since I had to buy a three gauge set to get the two gauges I wanted I have the water temp gauge left over. I was cleaning out the garage and decided someone could put it to better use than taking up space in my garage. Is anyone interested in the water temp gauge (gauge plus mounting bracket for three gauges) or maybe I should give it to someone that shows up at the PIP? Well what do you think? SUGGESTIONS? and please keep it clean this is a family rated forum ya know. Bubber aka Steve
-
OK Trying to the Darkside and can't get past dusk. I got the Kumho, went to CurtisMiller's place since he knew of a tire shop that would install it, and them tried to complete the job at his friend's shop. Anyway, the tire shop wussed out at 100# and it wouldn't seat completely. We ran it up to 120# (we think - can't trust the gauges) and no luck. Tried numerous times to break the bead and start over. It's perfect on one side and about 80% om the other. Any ideas???
-

RSV gauge install - maybe I can help someone else?
ablumny posted a topic in GPS, Audio, Electronics
I followed jlh3rd's and V7Goose's posts on the subject. FANTASTIC data and THANK YOU to both plus everyone that added to their posts with tips, tricks and improvements. I started the project and have the 1/8" x 27 NPT TAP and the HELP! 42009 Spark Plug Non Fouler available to someone who needs it. (see V7GOOSE's post) Neither "tool" is particularly hard to find or expensive but I'll never use either again and try to give back where possible. I am willing to ship it to someone who needs them. PM me if you need it, I'll even cover shipping. Send it to someone else when your done!? Anyway: Everything is prepped on the gauges. Based on forum member tips: - Went with Mechanical gauges - Ordered 1/4" black ABS (from an eBay auction) to make my gauge bezel - Bought auto hose to cover the oil line to prevent an exhaust pipe issue I'll post a picture of the final product when done. In the meantime, if you're thinking about diving in, it was simple to get started: WATTS parts from Lowes and everything else from AID AUTO http://lh5.ggpht.com/_9EMyKcng_yA/Sj64PKtyDVI/AAAAAAAACK4/aVoDWufRPy4/s512/P6210533.JPG M20 Oil Drain plug, drilled and tapped with A712 elbow. Drill press comes in handy. Yep, Teflon tape b4 install. The rest from the gauge kit http://lh3.ggpht.com/_9EMyKcng_yA/Sj64PaRLU6I/AAAAAAAACK8/0UFeQIT9zkA/s512/P6210534.JPG A213 adapter (left), rethreaded with Non-Fouler. The rest came with the gauge kit http://lh3.ggpht.com/_9EMyKcng_yA/Sj64QC1kujI/AAAAAAAACLE/G3_qDtZPG_Y/s512/P6210537.JPG My personal pref. SunPro 1.5" gauge kit. Got these from PepBoys, $35 http://lh4.ggpht.com/_9EMyKcng_yA/Sj64QkYTREI/AAAAAAAACLI/5fv-PrSKjTA/s512/P6210539.JPG Unused parts. Far left are two Non-Foulers and the tap below http://lh6.ggpht.com/_9EMyKcng_yA/Sj642gKRNiI/AAAAAAAACLQ/qRpWORpAySA/s512/P6210540.JPG Hope this helps someone! -
 been working on this for a couple of weeks..........i added gauges where the cassette was...still kept the mp3 jack...........just did a test run....wadda ya think.......
-
 I stopped at the Herley dealer in Lawton this weekend. Wanted to check on a hand pump for my shock. But never did. they kept trying to sell me a new ultra. Got me to wondering about gauges tho. Has anyone or does any one know of a gauge package that works good with our ventures. I was thinking about removing the useless tape deck and trying to fit up some mini analog gauges in there. Temp, oil p, oil temp, and volt meter. Fishing for thoughts. Oh by the way it was 80 here on Saturday. Today we got freezin rain. Had to drive the pickup:cry:
 -
Seriously, I actually have a dead bug in my speedo. (See pic) Have no idea how it got there and I am not quite sure how to remove it. I assume I have to take the windshield off and the black cover off the gauges but now I get lost.
-
Well, I finally took the time to mount gauges on my 07 RSV. Same mix of gauges I put on the 05, but different look and very different mounting. Here are a couple of pix. I'll have a full writeup for the tech section in a day or two. Goose
-
Mounting Gauges on the RSV General info The toughest thing about mounting gauges on the Royal Star Venture is finding a place to put them. As there is very little space available, smaller gauges are better. The vast majority of gauges are 2” in diameter or larger, and these do not fit well at all, but if you look long enough, you can find some that are 1 ½ “. JC Whitney sells a triple gauge set this size in black which I used on my 05 RSV, and I have seen other 1 ½” sets in various auto parts stores. O’Reilley Auto Parts sells the very nice iEquus Performance series gauges, and they have a white face 1 ½” triple gauge set at almost the same price as JCW. Unfortunately, you cannot get this set with an ammeter, so I just used the water temp and oil pressure gauges on my 07 RSV. If you want to get adventurous and modify your fairing, a three gauge set will fit nicely where the cassette door is. Just for reference, here are pictures of the dash from both bikes showing several mounting options for the gauges that do not require modifying the bike: Once you figure out how to mount the gauges you select, the rest is pretty straight forward. I’ll take them one gauge at a time. But first, here is a picture of the various additional parts to which I’ll refer in the detail: Oil Pressure The gauges I used are mechanical gauges, but the process would be essentially identical for electrical sending units. The oil pressure test point on the RSV is a huge 20mm plug on the right side of the engine next to the floor board and right above the header pipe. You will need a 10mm hex key or Allen wrench to remove this plug, and if the bike is on the side stand no oil will escape. While most gauges come with several size adaptors for both SAE and metric engines, none that I have seen have anything this big. The easiest solution is to buy an M20-1.50 oil drain plug at the local auto parts store and drill and tap it for the connection (I got my Oil-Tite! brand plug at the local O’Reilly Auto Parts). You will also need a standard brass “street elbow” in 1/8” male to 1/8” female pipe threads (I bought a Watts A-712 street elbow at Lowes). To complete this modification, drill an 11/32” hole in the center of the plug and use a 1/8x27 NPT tap to cut the threads for the oil line connection. Now wrap the male end of the street elbow with Teflon tape and screw it into the plug. Don’t make it completely tight yet; because, you will want to install the plug into the engine first and then finish tightening the elbow to face forward. Once you have the plug and elbow installed and pointed in the right direction, install the compression fitting used for the oil line into the female end of the elbow. The last thing to do is route the oil line from your gauge down to this plug. Some people like a braded stainless steel oil line, but I just use the small white nylon tubing that comes with the gauge. Although this white tubing is very visible when new, it virtually disappears as soon as you start the engine and it fills with dark oil. You can see in the picture below how I routed it along the wire bundle running up the right side of the frame. Just connect it with the supplied compression fittings at both ends and you are done with the oil pressure gauge. Ken Chapin (a.k.a. wuzfuzz) tells me you can buy a plug already drilled and tapped for $16 at www.cycleoneoff.com, but I have not checked this out myself. Water Temperature For the water temperature gauge, you need to be able to mount the sending unit or sensing bulb into the engine water jacket somewhere. Mechanical gauges have a long capillary tube and temperature sensing bulb permanently attached to the gauge, so you have to mount the gauge first and then carefully thread the bulb and capillary tube along the existing water return line to the mounting point for the temp sensor on the top of cylinder number one (left rear cylinder as you sit on the bike). If you remove the spark plug wire on this cylinder you will see a black hex key plug just inside of the spark plug and a little higher. Here is a picture of the cylinder head with the pug installed (but already loose) and then removed: And here is a picture of what it is going to look like when you are done: This plug has thread sealer on it which makes it quite hard to remove. You will need your 10mm hex key again, and you will probably have to tap on the wrench with a hammer to get the plug turning. There is NO need to remove the spark plug or drain the coolant, but you will need to remove the chrome covers on the head to give you room to get tools to the plug. These are just decorative and come off with the four small hex key bolts you see on top of them. Once the plug is out, you need to get a little creative to mount the temperature sending unit in its place. The plug is 18mm-1.50 threads, and no gauges I have seen come with a metric adaptor this big. Some metric bushing kits may come with an 18mm adaptor, and outside the US it may be easier to find one at an auto parts store. If you can't find one locally, you have three options – either find one to order from the internet (here is one source: http://www.egauges.com/vdo_indA.asp?PN=R7965), buy an 18mm oil drain plug and drill and tap it to the right size to fit your temperature sender, or use this neat little trick to modify an easily available brass fitting from any hardware store: To make an adaptor to fit the water jacket hole, you will need to purchase a brass ½” tube to ½” female pipe adaptor (I got mine at Lowes, Watts part number A-218). In addition, go to your local auto parts store and look for a Help! brand “Spark Plug Non Fouler, 18mm with gasket”, part number 42009. This will only cost about $2.00, and you want the one with the gasket instead of the tapered seat so you can use the gasket when you mount the adaptor into the cylinder head. Now take the ½” tube to ½” female pipe adaptor and take off and discard the nut and tube insert. The threads in the Spark Plug Non Fouler are identical to the threads in the cylinder head, and you will find that the brass adaptor “almost” fits – it will screw about half way into the hole before it binds up, and the steel non-fouler is the perfect tool to use to form the brass threads into the metric size needed. Just put the non-fouler into a vise and use a wrench to force the brass adaptor all the way into the threads, and presto, you have a perfect part! I use the non-fouler to do this so I don’t risk damaging the threads in the engine head while the brass threads of the adaptor are being reshaped to fit. Now all you need to do is select the appropriate ½” adaptor that came with the water temperature gauge and screw it into the metric adaptor you just made, then mount them both into the engine using the spark plug gasket that came with the non-fouler. Here are pictures of using the non-fouler to reshape the threads and the two adaptors screwed together and mounted to the temperature sending unit: I have found that the aluminum spark plug gasket that comes with the non-fouler provides an excellent seal for the connection in the cylinder head. The last thing you need to do is make sure the capillary tube is routed exactly as you want it and then mount the temperature bulb to the adaptors you already screwed into the cylinder head. Be very careful to not kink the capillary tube as you work to get it all positioned as you want it, and since you cannot shorten it, you will need to loop the excess and secure it somewhere. Here is a picture of how mine is routed and secured. This particular capillary tube is covered in rubber and looks like a wire harness (others are metal and covered with a spring). You can see mine strapped to the top of the coolant return pipe on the right side of the engine between the carbs and the air box, and the excess tube is looped around twice and secured in the wire strap under the plastic cover on the right side of the steering head: Ammeter First, let’s have a little discussion about ammeters. They used to be very common way back when (50s and 60s), but they have just about completely disappeared, replaced by the simple volt meter. Personally, I don’t believe you can tell nearly as much about the condition of the battery AND the charging system from a volt meter alone. Although I prefer to have both ammeter and volt meter, if I have to chose, I would go with the ammeter first. I guess I am just a bit strange. Anyway, hooking up an ammeter presents a bit of a challenge, and I suspect this alone has fueled the switch from ammeter to volt meter in most automotive applications. Whereas a volt meter can simply be connected to any main +12V power source, an ammeter must be connected between the battery and ALL loads. Virtually all automotive ammeters require that they be connected physically in series with the load instead of using a shunt, and this means that a single wire large enough to handle the maximum current draw of the entire vehicle be run from the battery to the ammeter and then back to the main power feeds. To be effective and accurate, the ONLY load that can be connected before the ammeter is the starter motor, and this is just for convenience, as a starter draws so much current it is impractical to connect it after the ammeter. In most applications, you need 10AWG wire for this primary loop to and from the ammeter. 10AWG is big wire, which is not particularly easy to work with. Now lets talk a bit about the specifics of the power circuits in the RSV. The schematic shows the battery power runs through the main fuse then splits into two wires to exit a plug, where the two wires are rejoined into one. The reason for this 1-2-1 configuration is that the pins in the plug cannot handle the full 30 amp load that this main power feed must support, so they need to split that current over two separate pins in the plug. Our ammeter must be connected somewhere between the main fuse and the first connection to any load. The only place to easily tap into this main power feed is at the plug connecting to the main fuse. This is located just behind the primary fuse block under the left side battery cover. To access it you must remove both the battery cover and the left side passenger floor board and then the plastic cover where the passenger floor board is mounted. Here is a picture of the plug connected in its normal position, then unplugged to make the wire modifications easier. All I have done at this point is unstrap the wire retainers to make it a little easier to see the plug. The main 30 amp fuse for the bike is on the right side of this plug and the one on the left is a spare (see page 7-32 of the owner’s manual). Disconnecting this plug removes all power to the bike, almost like disconnecting the battery. You can see the two large red wires coming out of the plug – these are the two wires to which I referred above, and this is the easiest place to tap into the circuit to add an ammeter. To connect the ammeter, you will need at least 12 feet of 10 AWG multi-strand wire. I prefer to use two colors, 6 ft of red and 6 feet of black, so that it is easy to distinguish between the wire going from the battery to the ammeter and the one returning from the ammeter. First, slit the tape back a few inches so you can access the wires. Now cut both red wires, being careful to not cut the two other wires in this plug that activate the starter motor. Now solder the red 10 gauge wire to BOTH of the red wires coming out of the plug, and connect the other end of the red wire to the battery side of the ammeter. Solder the black 10 gauge wire to BOTH of the red wires going into the wire bundle, and connect the other end of the black wire to the load side of the ammeter. Besides just connecting the black wire to the wire bundle, I suggest also soldering a 14 gauge wire to the same point for use in connecting any other after-market accessories that you would normally connect directly to the battery. Remember, for the ammeter to work correctly, no other load can be connected to the battery; it must be connected AFTER the ammeter in the circuit, and the only easy way to do this is to add an additional wire like I have described. In the picture below you can see a yellow wire connected with the black wire. This runs up to an in-line 20 amp fuse right in front of the battery (for easy access), and I use this power feed for my horn and driving light relays. This way they do not overload the stock circuits, but any current they draw is shown on the ammeter. After soldering the wires together, make sure you insulate them well. In the picture I just have heat-shrink tubing on the joints, but this is not enough, as it is quite thin and easy to tear or rub through with very stiff wires like these. After I took the pictures, I used liquid tape to heavily coat these connections, then re-secured all the wires with the original wire straps. That is all there is to it. Put the bike back together and start enjoying the new gauges and the information they give you about what is really going on with your bike. If you have any questions, feel free to contact me through the VentureRiders forum. Ride Safe! Kent (Goose) Maurer
-
when you sync the carbs which screw do ya turn to do the adjusting and which hose do ya connect to for the gauges. I am a newbe, never done it before but I want to learn. thanks ( for a 89 VR non california )
-
Wife and I headed over to the local Indian Casino over the weekend to play some Bingo (shoulda stayed home and mailed them a check - so much for "cheap entertainment"). Anyway - parked next to a Millenium Edition RSV - white/tan with tan seats - a BEAUTIFUL color combination. anyway - built in to the chrome tank "cover" - on either side of the key were a couple gauges. Tach & water temp. i'd LOVE to add these to my 07. Anyone know if this was a special feater of that edition or are they available????