Motorpig
-
Posts
88 -
Joined
-
Last visited
Content Type
Profiles
Forums
Gallery
Events
Store
Everything posted by Motorpig
-
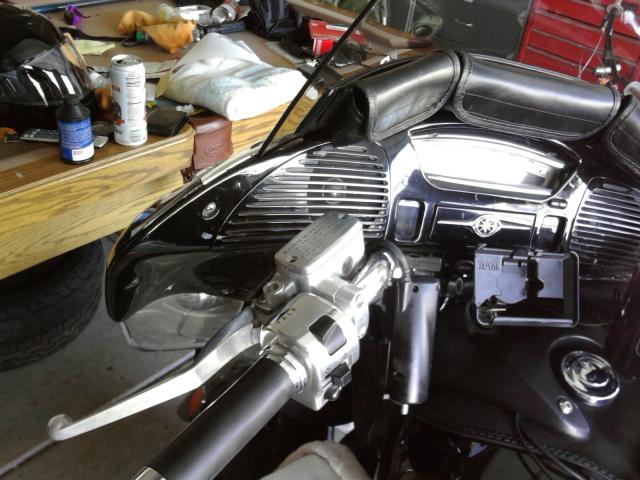
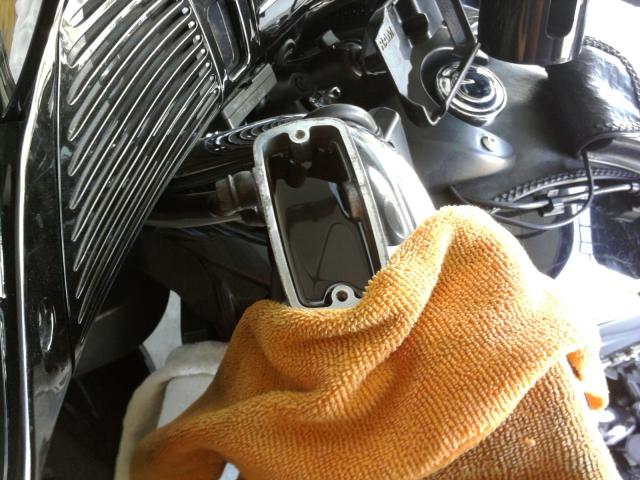
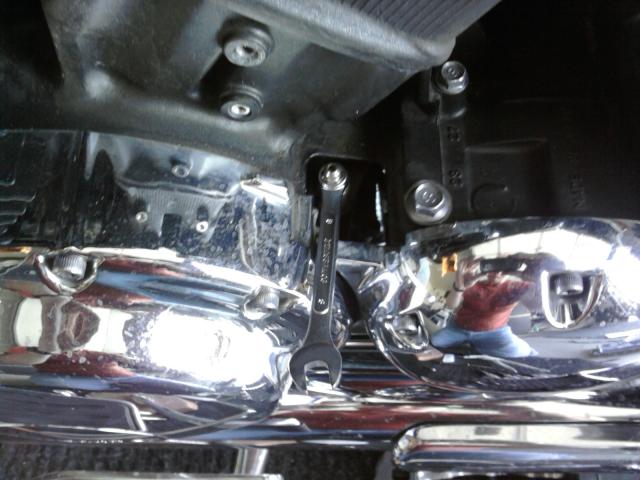
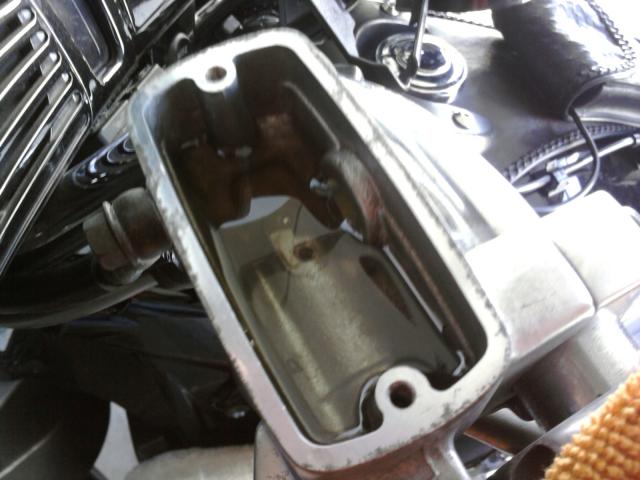
Further discussion on this article can be found here: http://www.venturerider.org/forum/showthread.php?t=54241&highlight=bleed+clutch After changing out my clutch with the Barnett Pressure Plate and Barnett Carbon Fiber Friction Discs, I also found my clutch release point was very close to the handgrip. As soon as I bled the system, all was back to normal. I decided to post the 2nd Generation Clutch Bleed to help anyone who needed it. First off, I put a brick under the kickstand to get my bike near level...then i gathered the tools needed. 5mm Alan Head (Hex) Bit, 8mm wrench, phillips head screwdriver, and a vacuum pump (not necessary but very helpful if you're doing it solo. Next step is to remove the left rear cylinder side cover. three 5mm bolts hold this in place. Unscrew and remove the resevoir cap and diaphram carefully. Cover your paint with a towel (I was probably a little overdue for a fluid bleed...) Suck out the old fluid from the resevoir using the pump (or a turkey baster) and refill with new DOT 4 brake Fluid (or DOT 3 or DOT 5.1) Attach a plastic tube to the clutch bleeder valve, set up your vacuum pump, and loosen the valve using an 8mm wrench. Now, get to pumping...watching the level in the resevoir as to not let it suck any air. When the fluid coming out of the valve is clear, the system is flushed. (NOTE: if you are doing this by hand, (1) loosen the bleeder valve, (2) squeeze and hold the clutch lever, (3) tighten the valve, (4) release the lever...then repeat 1 through 4 about 50 more times being sure to watch the fluid level in the resevoir) Once you are done, close the valve to 4.3 ft/lbs and refill the resevoir. Then replace the diaphram and resevoir cap. Put the rubber cover on the bleeder valve and re-install the left rear cylinder cover. Check the fluid is at the appropriate level... ...Then fire her up and go for a test ride! Hope this Helps! -Motorpig-

-
- 1
-

-
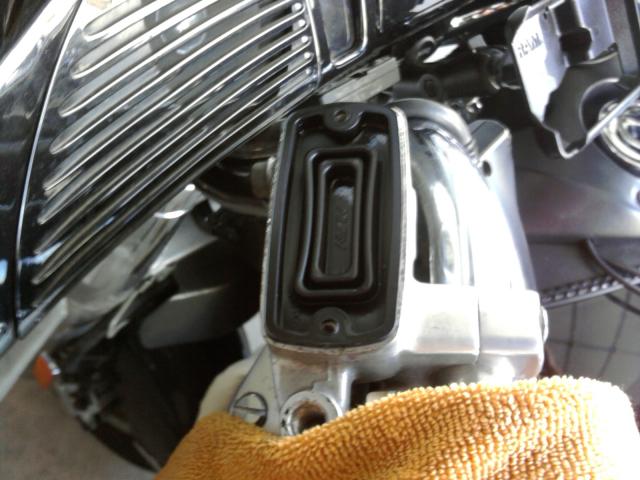
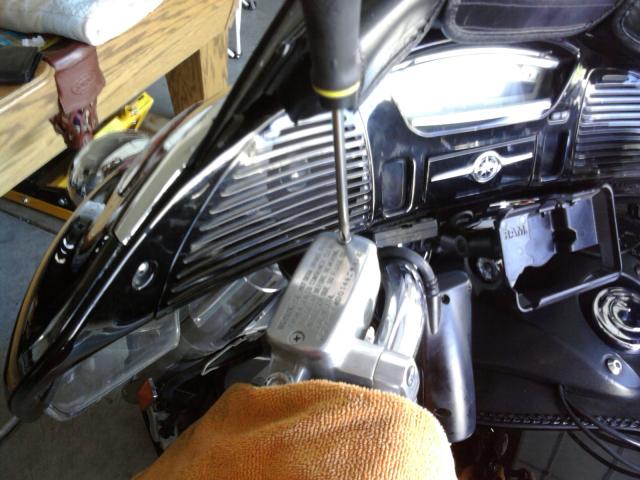
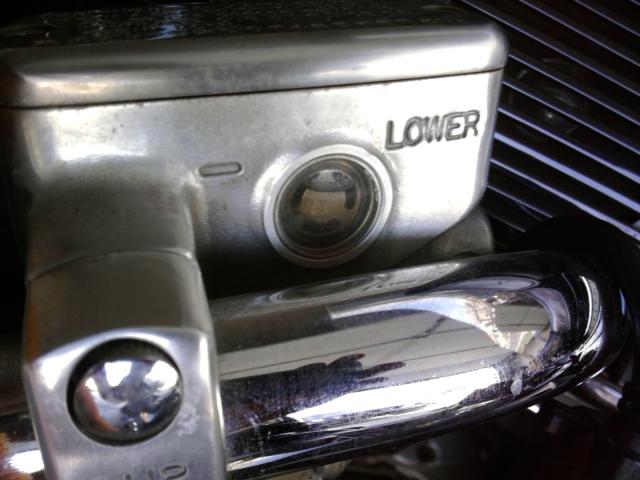
After changing out my clutch with the Barnett Pressure Plate and Barnett Carbon Fiber Friction Discs, I also found my clutch release point was very close to the handgrip. As soon as I bled the system, all was back to normal. I decided to post the 2nd Generation Clutch Bleed to help anyone who needed it. First off, I put a brick under the kickstand to get my bike near level...then i gathered the tools needed. 5mm Alan Head (Hex) Bit, 8mm wrench, phillips head screwdriver, and a vacuum pump (not necessary but very helpful if you're doing it solo. [ATTACH]51703[/ATTACH] Next step is to remove the left rear cylinder side cover. three 5mm bolts hold this in place. [ATTACH]51714[/ATTACH] Unscrew and remove the resevoir cap and diaphram carefully. Cover your paint with a towel (I was probably a little overdue for a fluid bleed...) Suck out the old fluid from the resevoir using the pump (or a turkey baster) and refill with new DOT 4 brake Fluid (or DOT 3 or DOT 5.1) [ATTACH]51706[/ATTACH][ATTACH]51707[/ATTACH] Attach a plastic tube to the clutch bleeder valve, set up your vacuum pump, and loosen the valve using an 8mm wrench. [ATTACH]51708[/ATTACH] Now, get to pumping...watching the level in the resevoir as to not let it suck any air. When the fluid coming out of the valve is clear, the system is flushed. (NOTE: if you are doing this by hand, (1) loosen the bleeder valve, (2) squeeze and hold the clutch lever, (3) tighten the valve, (4) release the lever...then repeat 1 through 4 about 50 more times being sure to watch the fluid level in the resevoir) Once you are done, close the valve to 4.3 ft/lbs and refill the resevoir. Then replace the diaphram and resevoir cap. [ATTACH]51709[/ATTACH] [ATTACH]51710[/ATTACH][ATTACH]51712[/ATTACH] Put the rubber cover on the bleeder valve and re-install the left rear cylinder cover. Check the fluid is at the appropriate level... [ATTACH]51713[/ATTACH] ...Then fire her up and go for a test ride! Hope this Helps! -Motorpig-
-

barnett clutch plate help
Motorpig replied to Motorpig's topic in Royal Star Venture Tech Talk ('99 - '13)
Absolutely...they will be posted by tonight...i want to put the clutch back together before i try to bleed anything. -
barnett clutch plate help
Motorpig replied to Motorpig's topic in Royal Star Venture Tech Talk ('99 - '13)
I was thinking about that ruffy..and truth be told, if the dang dealer doesnt call me real soon here i am going to do that. Any tricks with cutting your own? -
barnett clutch plate help
Motorpig replied to Motorpig's topic in Royal Star Venture Tech Talk ('99 - '13)
ur very welcome seeker. I will be doing the bleed tomorrow once i get my gasket on. I can do a photo post if you need me to...just let me know. -
barnett clutch plate help
Motorpig replied to Motorpig's topic in Royal Star Venture Tech Talk ('99 - '13)
Seeker...try this.. http://www.venturerider.org/forum/showthread.php?t=53963&highlight=bleeding+clutch As for my clutch...well...got everything open, wire out without a problem, new plates in...pressure plate on...all purty and purple...reached for the gasket that i picked up from the dealer and....!$!#QVW@$%#!^%!%#!(%!)%!(^)!#)@~$()!%#(@!((%#!)%#!(% The dealer gave me the wrong gasket...they gave me a gasket for cover #1 instead of Cover #3...so now i have to wait until either this afternoon or tomorrow to get the correct gasket and finish this job...i'll keep ya posted! -
barnett clutch plate help
Motorpig replied to Motorpig's topic in Royal Star Venture Tech Talk ('99 - '13)
Thanks again guys...the responses have been helpful. Since I posted last I took the time to speak to Ruffy on the phone as well as call Barnett directly. The posts that were on this site all show factory (yamaha) plates being installed. To be honest, I would have installed factory plates if my dealer could have gotten them to me within a few days but they gave me a 5 to 7 day wait. I called Barnett and had my plates within 30 hours (I live 3 hours away from the factory and UPS took a day). I have a ride scheduled this weekend and needed to have my bike up and running so i chose to go with the Barnett plates. The price was very close to the OEM plates too. SO...after speaking with Barnett, I was told that barnett Carbon Fiber plates do not have the "notches" that the factory plates have and there is no need for them with the Barnett plates. I will be starting this install in a few hours when i get off of work and will post after my successful completion and test ride is complete. Thanks for the info on the clutch bleed after install. I had already planned on doing that since my clutch fluid is a little on the dark amber side but this now makes it a mandatory step in the process. -
barnett clutch plate help
Motorpig replied to Motorpig's topic in Royal Star Venture Tech Talk ('99 - '13)
Thank you guys...i appreciate the help. I will definetely take some pics to refer back too. Seaking...I called Barnett directly and ordered from them. The part numbers and their prices are: 306-90-20082 (8 friction and 7 steel plates) $164.70 SR-2 (pressure plate with springs and bolts) $137.50 I ordered the gasket from the dealer (12.99). The friction plates are the carbon fiber one. Other than the fact they are not notched, not too much visiible difference from the OEM's. Other websites (Phat performance, Cruiser zone, Barons...etc) had better pricing but I really wanted to get this job done quickly so i paid a little more to the get the parts. (Ordered Monday at 8am....arrived tuesday at 1200) The Barnett plate kit comes with 7 regular discs and one "half disc". I did not account for this so i am going to be extra careful removing the wire so it can be re-used since i did not order a replacement one of those. If i screw that up then i'll be be waiting a week for the dealer to order me a new one. Hope this helps. -
i have a quick question for someone...i ordered the barnett kit (all friction discs, steel discs, and pressure plate w/ springs) and it arrived yesterday. I plan on tackling my clutch today or tomorrow but everything i read mentions to "line up the grooves at 11 oclock and 5 oclock". The problem i am having is...the barnett friction discs have no grooves on any of the tabs. I dont want to get the basket opened up only to realize i have the wrong discs. Can someone with some knowledge help me out here. Since i am replacing the pressure plate does it no longer matter about the grooves? Thank you all for your input. -Motor
-
You guys are funny...backhanded insults and nose thumbing at each other over a discussion about safety gear. The funny thing is...it is a personal choice. if "I" choose to do 100 mph wearing my speedo and skullcap "helmet" then that is my choice. If i choose to wear 7mm thick leather with kevlar armor, an airbag pack, neck support, riding only a motorcycle with ABS and an airbag...then that too is my choice... The biggest safety item we all wear everyday we ride is in between our ears. Be as safe as we can and never let your guard down. If the guy next to me is wearing flip flops...so be it...great thing about this country...we actually get to choose. There is no need to get snippy with each other because someone may not agree with the other person's views or beliefs. "Cant we all just get along?"
-
First and Last, I had the same issues. I tried the Kuhmo and put about 2500 miles on mine. Same issues...the wobble, the instablility on grooved highways. I went into the experience expecting to love it. My brother has been riding dark on his GW for years. I was disappointed that i couldnt get it to work for me. I loved the rear wheel braking and the acceleration boost it gave. I felt like I had my old bike back as soon as i put the Venom on the rear. I too and done with the CT at least on the RSV. Maybe in the future i will give it another shot on a different bike. Take care and ride safe! v/r -Motor
-
Front Wheel Removal questions
Motorpig replied to johnny-canuck's topic in Royal Star Venture Tech Talk ('99 - '13)
Dont waste your money...i carried one on my bike for a few years. I "finally" caught a screw and used my tire repair kit...needless to say, the mushroom stems are a pain in the butt to get seated and maintain a seal. I went to my neighbor (also an avid rider). He showed me his $5 kit http://www.doityourself.com/invt/tire-repair-kit-1480-704514958 I was up and running in a few minutes after that. The C02 cartidges would work great but you would need about 20 of them to inflate the tire. For the space (and money) buy a pocket compressor instead. One nice thing about the Tire repair kit you asked about...i was able to use the heavy duty bag for the tools, strips, and rubber cement! -
Run Turn Brake LED - problem
Motorpig replied to Mike G in SC's topic in Royal Star Venture Tech Talk ('99 - '13)
I have the same signals on my 04 and have no problems, i wired them myself. I had to play "trial and error" to find all the right wires but it was well worth it. I would suggest starting the wiring over and give it another shot! Let me know if you need any help -
Southern California to San Francisco, across the Golden Gate Bridge and back down...Hell of a day. I learned a valuable lesson though...dont lollygag around during the first few stops...push the mileage while you are fresh...my buddy and I took our sweet time and were forced to hit it hard the last 5 hours...but we did it!!!
-
my abs brakes wont panic when i do! Now thats a VERY Good point!!!
-
That makes perfect sense...i misunderstood what you meant so thank you for clarifying that. To add to "Motor cops are a bad example" (I was one for four years)...you take guys who ride more than the average bear and most of them wear cloth shirts and wool pants. With all the safety clothing out there, thats the best most departments can do. It's amazing. Side by side riding (Tandem) while it looks bit*hin'...you factor in another hundred variables riding two feet away from you...so i agree there. 3/4 helmet is necessary for duty purposes...HOWEVER...my modular helmet gives me all the benefits of the 3/4 helmet i used to wear but i now get to bring the shield down during rain/cold weather!
-
Your best braking ability happens right BEFORE you hit ABS...it's called "threshold braking". I have ridden bikes with and without ABS...while ABS is a nice feature for riders who dont practie threshold braking, if you are hitting ABS while braking it just means you've panicked. The answer to the original question posted is brake as hard as you (and your bike) can handle. Scrub as much speed as possible. Don't leave any skid marks since a sliding tire has a much lower co-efficient of friction that a braking tire does! (higher COF = better braking ability) For practice...measure out an area about 100 feet long...set up some cones at the beginning and create yourself an alley with cones down to 100 feet...go into this at about 40 mph...and as soon as you hit the first set of cones...brake with all you have. mark your stopping point. Do this a enough times (letting ur brakes cool after every couple runs) and you will see a huge improvement in your stopping distance. This WILL save your life one day...and whoever posted that motorcops have a differnet set of things to be concerned with...i disagree..we ALL have to worry about staying upright and ending our rides in the garage not the hospital!
-
Hummingbird, Not ruffling my feathers at all...out here in California, if you run 65 on the freeway you will get run over by a semi-truck, then run over again by the SUV being driven by the split-tail talking on her cell phone while putting on her make-up! But even above that, we all have our "comfort" zones and mine is around 80 to 85 mph on the freeways. For everyone who has mentioned this in the thread.... If you are new here and want to try a car tire, then by all means, do so! Give it a shot. I made my decision on my own...i used Footsie's set up and bought the Kuhmo and the Avon front tire. I even matched his tire pressure 32 rear/36 front. I rode that for 1000 miles and was happy excpet when i hit the wobble. I then changed the pressure to 54 rear after talking with hummingbird, the ride was smooth and i only got the wobble at much higher speeds (95+)....BUT the wobble was still there and i found the ride was very hard on my back at that PSI. I went back to the 32 PSI and started "experimenting" with the tire to see where its limitations were. I found that 85 to 90 mph gave me about a 25% chance of hitting the wobble. There were plenty of times i would run that speed with no wobble at all...but for me, 25% is 25% too much...i NEED my bike to respond safely and consistently at any speed! For those who are curious, I have been riding streetbikes for about 15 years. I have owned / ridden numerous bikes and rode a police motor for four years before buying my venture. I started keeping track about 7 years ago and have documented well over 200,000 miles since then. I wouldn't dissuade anyone from trying the car tire, but i also would be the first to the tell someone to switch it back immediately if you dont have 100% confidence in your bike...mistakes on motorcycles are very unforgiving. For me, my RSV car tire experience is over unless someone comes out with a different type/size of tire...then i might try it again. If not, then in a few years when i pick up a Goldwing i may try it again there, my brother has been running a C/T for years on his Wing and swears by it.
-
I had been trying to "diagnose" the wobble so i have been hitting different speeds to see if / when it starts...What made my decision very easy to get off the C/T was when i hit 95 (actual speed) and went into a very hard oscillation that was on the verge of going into a tank slapping wobble...it was the first time in years that i was scared on my motorcycle...I knew it was time. I could have very easily kept the speed under 80 mph and i would have loved every mile of the C/T experience, but like i said in my original post...that just isnt my style of riding yet.
-
The push/pull of the grooves is to be expected...but what i found is every now and then, it would set me into that "wobble"...I had it hit at 75 mph one time, then a few days later at 80 or 85...On roads without the grooves there would be no issue, but since i spend most of my commute to work on the I-15...just couldnt take the risk.
-
Well boys, I had a short run on the dark side...about 2500 miles total. I had the Kuhmo on the rear and enjoyed 95% of the experience. The traction was superb, the rear wheel braking was awesome, i didnt notice any difference in the twisties...BUT, where i had the bad experiences were on freeways. Out here in Cali, we have some pretty deep "rain grooves" that at higher speeds could cause a bit of an unpredictable experience. There were somedays i could be travelling at 80 to 85 with no issues then others I would go into a wobble. I checked and maintained the tire pressure often as well as the air pressure of the rear shock so i am certain there were no "outside" influences on my experience. Bottom line is, It just isnt stable enough for my personal riding style. With that said...I have a Kuhmo 165/80/15 with abt 2500 miles on it that is up for grabs...just pay shipping and its yours!
-
garagedoor opener
Motorpig replied to ToyOdie's topic in Royal Star and Royal Star Tour Deluxe Tech Talk
very nice indeed! -
i know you keep it there and are no doubt used to it...i gave it a shot and i liked it at first, but after an hour i was hurting. I also found that the 54 psi raised the rear conisiderably so its entirely possible my back pain was caused from how i was sitting since it didnt feel "normal" for me to be sitting that high. Either way, like has been said numerous times in here, you have to find what works for you.
-
As a suggestion, start with 32 psi. I started at 38psi and liked it but had the dreaded wobble, i went down to 32 for about 1000 miles with zero issues. I pumped it up to 54 for a couple hundred miles with no wobble BUT i found the ride to be very very stiff. In fact it was the first time i got off the bike and my back was sore as heck! I went back down to 32 and everything is great again! Good luck!