Search the Community
Showing results for tags 'needle'.
-
I have posted about this problem but I'd like your opinion. I have a gas leak. It appears to originate on the right rear carb area. The gas runs down the rear cylinder wall onto the crankcase breather. It leaks less than a teaspoon. A full tank of gas makes the leak worse and the leak disappears when the gas tank is at about 20%. Recently I changed the plugs, all were very good except for the right front cylinder which was gas fouled. Don't know if that's related to the leak. I took it in earlier to a mechanic for this issue and got it back with new jets, one was definitely corroded green, so it wasn't a complete waste. I took it to the same mechanic who says it is the needle valve/pin stuck. I looked around and found one reference to the needle valve sensitivity to alcohol and having the valve switched to stainless. Do you think he's right? I don't have much confidence in this guy because he didn't fix it the first time. The nearest certified Yamaha mechanic is 70 miles away. I should just bite the bullet and take it apart my self, but having never done it before I am not 100% confident.
-

Fuel leak and Carb Sync
archeryguy posted a topic in Royal Star and Royal Star Tour Deluxe Tech Talk
I have a 2007 RSTD pouring fuel. Searched the threads here and figue it is a stuck carb needle. The leak occured after utilizing seafoam. I guess some of the debris it loosened created the sticking needle problem. Dealer wants $648 to fix !! I'm all thumbs with tools so I really have no choice. Any other suggestions? Also, is there anyone in the Central Arkansas area (other than a dealer) than can sync the carbs for me? If so let me know where and when we could meet and a cost. Thank you !! archeryguy -
 Thought I would attack a few things this weekend. Vacuum test the YICS and hoses, blow out the carbs, FINALLY change out the speedo guts (got that done), fix the gas guage in the tank (tired of it being empty all the time), put on those nifty new seat screws from Rick Butler and just clean up again on the inside. Hope the speedo is somewhat correct since I had to remove the needle to change the gauge faces, The face plates were the wrong color. Polished up on the gauge lenses - lotsa finger work. My body hurts now, need some more beer! http://i17.photobucket.com/albums/b53/gigawhiskey/VR_Down1.jpg
 -
So, I've been trying to figure out why # 3 is not firing. I have spark, I can see fuel flowing into all 4 carbs from the needle which holds the slides while bike is running. If I drip a little gas into the carb for #3, the rpms come up and the pipe gets hot, so it def. a fuel problem ANyone know why I can see fuel flowing from around the needle seat which holds the slides in the carb, but cylinder doesn't fire unless I drip some fuel into it? I am planning to put back together and run it that way to see if the cylinder is firing under riding conditions. Maybe an idle circuit problem?
-
can anyone tell me if the needle valves from an 85 will work on my 86? i found a good deal on 2 but not sure if they will work. any help would be greatly appreciated. thank's bill:puzzled:
-
I have on ly had my 06' venture for a week. Today I put my Garmin gps on and went for a ride(I know my Garmins speedo is accurate) It showed anywhere between 3 and 5 mph to slow, it also is jittery instead of smooth, like a real needle would be. Any suggestions.
-
 I had a frikin mouse chew a hole in my air filter without realizing it. Ran the bike about 1000 miles or so before I got to seeing it and my carbs paid the price with lots of dirt in them. Funny thing is the bike ran great the whole time, no issues. My problem is now, after I had to disassemble all the carbs and clean them out, blew them out and double checked my work. Everything seems to work ok and no leaks, or damage except for 2 of the diaphrams that fell apart (inner sleeve thing) which I just reglued. The bike starts, chokes good, and idles fine, but will immediately bog down and bacfire through the carbs when I give it quick gas. A slower throttle gets the rms up, but still gives me blowback through the carbs. BTW, valves are set good also. I tried resetting the adjust screws back down to 2 turns and it got worse. When I originally took things apart, most screws were at 3.5 to 4 turns already, is that too much already? Does anybody know if I should mess with the slide needle at all? I do have a colortune coming so I can try a better A/F mix setting, but wonder what the factory setting is for the slide needle. Sorry for the long winded post, just trying to think of anything.
 -
Take a look at this guy's artwork! Biertijd.com // Media » Eye Of The Needle
-
.thumb.jpg.4e1b3809c4633f365ba67afc212f21df.jpg) Today I decided to pull the carbs on my 05 RSV and check the float levels. My plugs looked perfect before I touched anything, so that doesn't sound like it was running rich. However, I ran down to Galveston and back yesterday (650 miles) and the chrome tips of my pipes collected a lot more black soot than I like. Even though my gas mileage is still running right where it always has (averaging 36 - 38), I decided to check out the float levels before my next big trip. I first tried the tube method to check the level while they are on the bike, but it just didn't seem to be working right or even close to an accurate way to measure them. So I bit the bullet and tore into it - BIG job to pull that danged carb assembly out! I was quite surprised to find that although all four carbs had the floats set very close to each other, they were WAY off the spec. Where the manual calls for .32 - .36", mine were all at either .133 or .285 (depending on how they were measured). That means the float level was set VERY high. And now to discuss the right way to measure the float height. The drawing in the shop manual clearly shows a carb being held upside down with the float bowl gasket surface level and the float height being measured with a caliper held vertical. Seems straight forward, no? Done that way, mine measured .133" instead of .34". The instructions even clearly state to "hold the carburetor upside down." But then the next thing is this NOTE: "The float arm should rest on the needle valve without depressing it." Now that is a difficult thing to do with the carburetor upside down; the weight of the float fully compresses the spring loaded plunger in the needle valve. When you lay the whole carb assembly flat on the bench, the carbs are already inclined quite a bit, but even then the weight of the float is still too much for the needle valve spring: [ATTACH]19149[/ATTACH] [ATTACH]19147[/ATTACH] Sooooo, I propped one end of the carburetor assembly on a short 2x4 so that the face of the float bowl was almost vertical. When you raise the end of the assembly high enough you can see the float suddenly pop up from the spring pressure of the needle valve. Here is a picture of the carb assembly propped up and one of measuring the float height in that position: [ATTACH]19145[/ATTACH] [ATTACH]19146[/ATTACH] [ATTACH]19148[/ATTACH] I used this position to set all for floats at the mid point of the spec - .34" Bike ran great when I got it all back together, and the sync on the carbs was not changed by the procedure. I only put about 30 miles on it tonight, so I may not be able to report on the effect to my MPG calculation until I get on the road to Ontario next week. But I'll let y'all know how it changes, if at all. Goose
Today I decided to pull the carbs on my 05 RSV and check the float levels. My plugs looked perfect before I touched anything, so that doesn't sound like it was running rich. However, I ran down to Galveston and back yesterday (650 miles) and the chrome tips of my pipes collected a lot more black soot than I like. Even though my gas mileage is still running right where it always has (averaging 36 - 38), I decided to check out the float levels before my next big trip. I first tried the tube method to check the level while they are on the bike, but it just didn't seem to be working right or even close to an accurate way to measure them. So I bit the bullet and tore into it - BIG job to pull that danged carb assembly out! I was quite surprised to find that although all four carbs had the floats set very close to each other, they were WAY off the spec. Where the manual calls for .32 - .36", mine were all at either .133 or .285 (depending on how they were measured). That means the float level was set VERY high. And now to discuss the right way to measure the float height. The drawing in the shop manual clearly shows a carb being held upside down with the float bowl gasket surface level and the float height being measured with a caliper held vertical. Seems straight forward, no? Done that way, mine measured .133" instead of .34". The instructions even clearly state to "hold the carburetor upside down." But then the next thing is this NOTE: "The float arm should rest on the needle valve without depressing it." Now that is a difficult thing to do with the carburetor upside down; the weight of the float fully compresses the spring loaded plunger in the needle valve. When you lay the whole carb assembly flat on the bench, the carbs are already inclined quite a bit, but even then the weight of the float is still too much for the needle valve spring: [ATTACH]19149[/ATTACH] [ATTACH]19147[/ATTACH] Sooooo, I propped one end of the carburetor assembly on a short 2x4 so that the face of the float bowl was almost vertical. When you raise the end of the assembly high enough you can see the float suddenly pop up from the spring pressure of the needle valve. Here is a picture of the carb assembly propped up and one of measuring the float height in that position: [ATTACH]19145[/ATTACH] [ATTACH]19146[/ATTACH] [ATTACH]19148[/ATTACH] I used this position to set all for floats at the mid point of the spec - .34" Bike ran great when I got it all back together, and the sync on the carbs was not changed by the procedure. I only put about 30 miles on it tonight, so I may not be able to report on the effect to my MPG calculation until I get on the road to Ontario next week. But I'll let y'all know how it changes, if at all. Goose -
I noticed the other day a wet spot under the bike and it was gas, it doesnt do it all the time and I smell gas alot on it since it was new. I stopped by dealer and talked to them and they said that they do that alot and uptil this year if they change the needle in the carb and something else it has been taking care of it, but he said since they have changed the formula on gas he is seeing more of it this year than before. Anyone have this problem? Thanks Kevin
-
 Hi y'all, When I pulled the rear wheel on my Venture the inner race of the needle bearing on the LH side fell out, exposing the needles. I want to clean up the bearing and put in fresh grease. However, I can't get the needle bearing and its cup (outer race) out of the wheel without damaging it. Any ideas on how to clean the bearing while installed in the wheel? I wonder why Yamaha elected to use a needle bearing there instead of a sealed ball bearing like on the other side? The rear wheel on my Virago has no needle bearing. Seems like a strange solution. Jeremy
 -
Can anyone verify for me where the shim placement is for the needle valve modification. I want to make this mod. I read the article in the tech section but it is not clear to me where to move or add the shim. I think it goes under the plastic piece on the needle but want to be sure before I do this. I also was hoping to hear from some people who have made this mod without jetting the carbs. Is it worth the effort? thanks for the help
-

Carb Diaphram Replacement
Marcarl posted a topic in Venture and Venture Royale Tech Talk ('83 - '93)
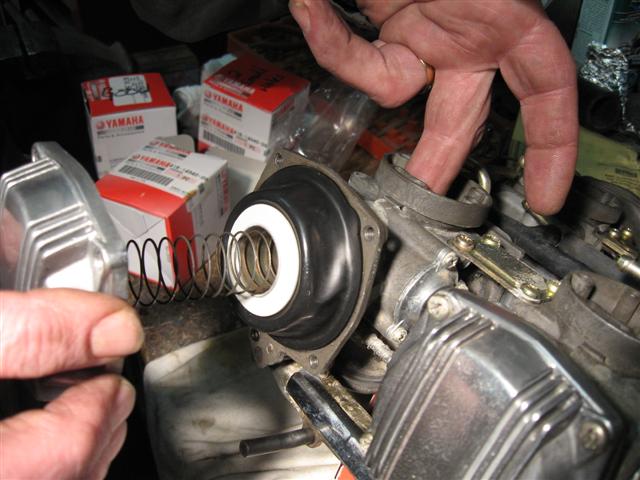
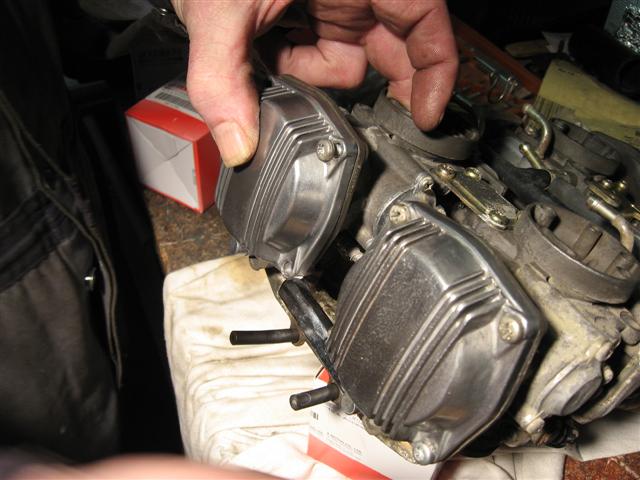
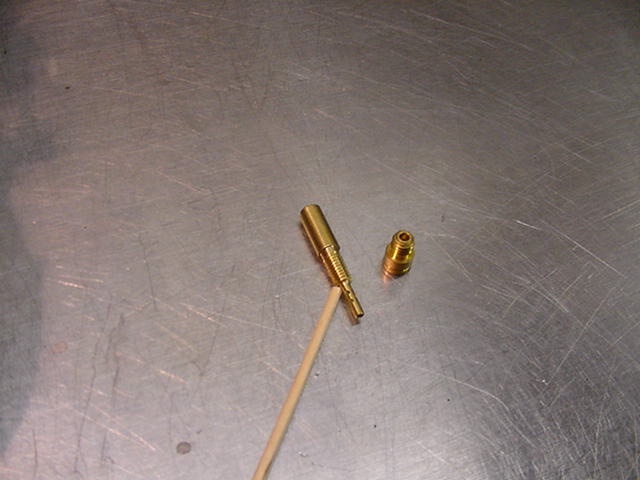
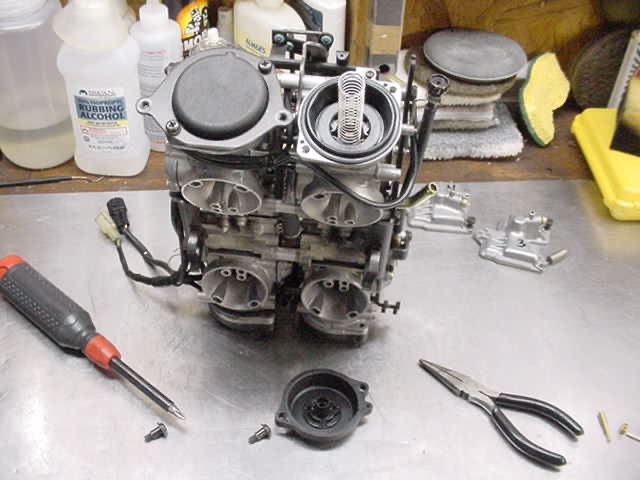
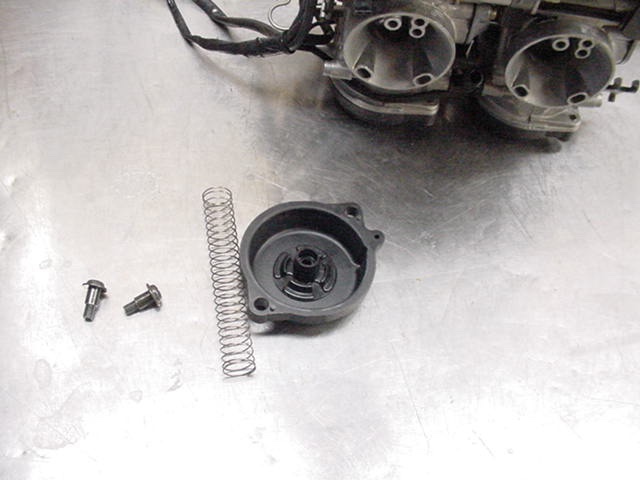
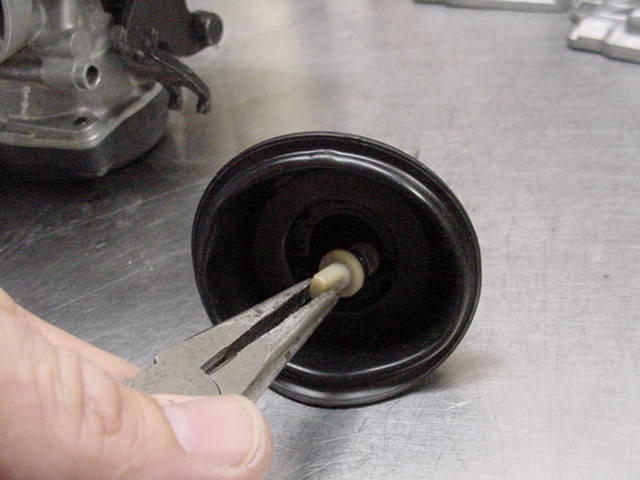
There's been some questions in the past as to how to replace the carb diaphrams, so when I did mine last night, I took some pictures, everybody always like pictures, RIGHT? Well here goes the write up: 1) Remove the false tank cover, side covers, side rad covers and loosen the lower faring. Remove the air box lid and the air filter. This would also be a good time to clean the air filter and the air box. You need to do this so you can reach into the carbs later. 2) Identify the part, the diaphragm cover, which has 4 torx screws, the one having a pin in the middle. This was done to make it hard, otherwise everything would be easy and any mechanic could do it. I didn't have one to show you, so you'll have to take my word for it. It can easily be snapped out by using a needle nose pliers or if it's stubborn a small punch. Just work it back and forth once or twice and it will come clean out. 3) Remove all the screws and the cover will pop out by it self, seeing as there is a spring behind it. Save the spring, it will come in handie when you put things back together. 4) Now that you have this area open, it's a good time to use some Carb Cleaner to clean the area, and all the little ports you can see. Finish by blowing out with air. At the bottom you'll see a little built out area that has a rubber ring in it. Be sure to save this ring as well, otherwise it's sure to get itself lost and then you'll have to wait longer for more parts. 5) Inside the diaphram body you'll find a plastic screw, turn it out by turning counter clockwise, that's the opposite way the hands on a clock turn. Under that screw will be another spring, not at all the same as the first spring, but a spring none the less. Keep it handy as well. Under the spring will be the needle assembly. This consists of the needle itself, a 'C' ring and a small washer. Best not to loose these either. They all need to go back in order in the new diaphram. 6) You are now ready to begin the installation of the new diaphram. Make sure that the little washer is mounted on the short side of the needle (#3) and then with a needle nose pliers insert the needle into the new diaphram (#1). Now comes the part where you pay attention. On the collar of the the needle you see a little plastic pin,(#2) this needs to seat in the hole provided for it in the base of the diaphram. Once the needle is inserted into it's rightful location you can very slightly push it back and then by turning it you'll have it find the hole (#5). Now you cannot turn the diaphram over again until the plastic screw is in place, but first you need to put the little spring back in on top of the needle (#6). Then with a needle nose pliers you drop the plastic screw down into the diaphram and with flat screwdriver wiggle it until it jumps into it regular spot, at which time you can gently attempt to turn it into the threads. Sometimes this goes easy, sometimes it takes a bit more time, but don't give up, it will happen. 7) Once you have the diaphram together you can slide it back into the carb. You'll find a tab on the outer edge of the diaphram and that seats into the cutout for in the carb. This is also a good time to remember to put the rubber O ring back in place at the lower end of the carb. To make things easy, fold the diaphram to-wards the carb and seat it in the grove provided for it. Next insert the long spring, that pushed the cover off in the first place, into the diaphram, but do not let it seat the plastic slide into the carb as this will cause it to unseat the rubber from the carb. Now seat the spring in it's approved place on the cover. Do not push it together just yet. 8) Now as you can see, I did mine while the carbs were off the bike, that was because the motor was already out and second gear was under construction. You really don't have to wait until second gear goes or you have to take the engine out for some other reason. This can all be done very nicely right on the bike. So now comes the final process: before you push the cover back into place, put your finger or have someone else place their finger, or use a piece of plastic or steel, (I wouldn't suggest wood as you may get dirt into the carb) into the throat of the carb to prevent the diaphram from sliding in. This will keep the bead seated in it's proper spot. Once the cover is in place and two screws have been inserted and tightened you can withdraw your 'finger' from inside the carb. Now, wasn't that easy????? -
There's been some questions in the past as to how to replace the carb diaphrams, so when I did mine last night, I took some pictures, everybody always like pictures, RIGHT? Well here goes the write up: 1) Remove the false tank cover, side covers, side rad covers and loosen the lower faring. Remove the air box lid and the air filter. This would also be a good time to clean the air filter and the air box. You need to do this so you can reach into the carbs later. 2) Identify the part, the diaphragm cover, which has 4 torx screws, the one having a pin in the middle. This was done to make it hard, otherwise everything would be easy and any mechanic could do it. I didn't have one to show you, so you'll have to take my word for it. It can easily be snapped out by using a needle nose pliers or if it's stubborn a small punch. Just work it back and forth once or twice and it will come clean out. 3) Remove all the screws and the cover will pop out by it self, seeing as there is a spring behind it. Save the spring, it will come in handie when you put things back together. 4) Now that you have this area open, it's a good time to use some Carb Cleaner to clean the area, and all the little ports you can see. Finish by blowing out with air. At the bottom you'll see a little built out area that has a rubber ring in it. Be sure to save this ring as well, otherwise it's sure to get itself lost and then you'll have to wait longer for more parts. 5) Inside the diaphram body you'll find a plastic screw, turn it out by turning counter clockwise, that's the opposite way the hands on a clock turn. Under that screw will be another spring, not at all the same as the first spring, but a spring none the less. Keep it handy as well. Under the spring will be the needle assembly. This consists of the needle itself, a 'C' ring and a small washer. Best not to loose these either. They all need to go back in order in the new diaphram. 6) You are now ready to begin the installation of the new diaphram. Make sure that the little washer is mounted on the short side of the needle (#3) and then with a needle nose pliers insert the needle into the new diaphram (#1). Now comes the part where you pay attention. On the collar of the the needle you see a little plastic pin,(#2) this needs to seat in the hole provided for it in the base of the diaphram. Once the needle is inserted into it's rightful location you can very slightly push it back and then by turning it you'll have it find the hole (#5). Now you cannot turn the diaphram over again until the plastic screw is in place, but first you need to put the little spring back in on top of the needle (#6). Then with a needle nose pliers you drop the plastic screw down into the diaphram and with flat screwdriver wiggle it until it jumps into it regular spot, at which time you can gently attempt to turn it into the threads. Sometimes this goes easy, sometimes it takes a bit more time, but don't give up, it will happen. 7) Once you have the diaphram together you can slide it back into the carb. You'll find a tab on the outer edge of the diaphram and that seats into the cutout for in the carb. This is also a good time to remember to put the rubber O ring back in place at the lower end of the carb. To make things easy, fold the diaphram to-wards the carb and seat it in the grove provided for it. Next insert the long spring, that pushed the cover off in the first place, into the diaphram, but do not let it seat the plastic slide into the carb as this will cause it to unseat the rubber from the carb. Now seat the spring in it's approved place on the cover. Do not push it together just yet. 8) Now as you can see, I did mine while the carbs were off the bike, that was because the motor was already out and second gear was under construction. You really don't have to wait until second gear goes or you have to take the engine out for some other reason. This can all be done very nicely right on the bike. So now comes the final process: before you push the cover back into place, put your finger or have someone else place their finger, or use a piece of plastic or steel, (I wouldn't suggest wood as you may get dirt into the carb) into the throat of the carb to prevent the diaphram from sliding in. This will keep the bead seated in it's proper spot. Once the cover is in place and two screws have been inserted and tightened you can withdraw your 'finger' from inside the carb. Now, wasn't that easy?????

-
I had two good rides last Monday and Tuesday so I figured the weather had turned cold again so it's finally time to look at my # 3 carb. It would leak gas after a ride one day and the next time it wouldn't. I tried the Seafoam many times and it still seeped out. So off the carbs came. Upon looking at the # 3 needle and seat I do see a ring mark on the needle but it's very hard to see and the light has to be just right. I have ordered new one's from Buckeye but my gut and experience tells me that may not be enough wear to cause the leakage. The question I have, is there any other vent lines or blocked ports that could cause pressure to build in the carb making it seep? Anything else that would cause it? Thanks. Spotsy
-
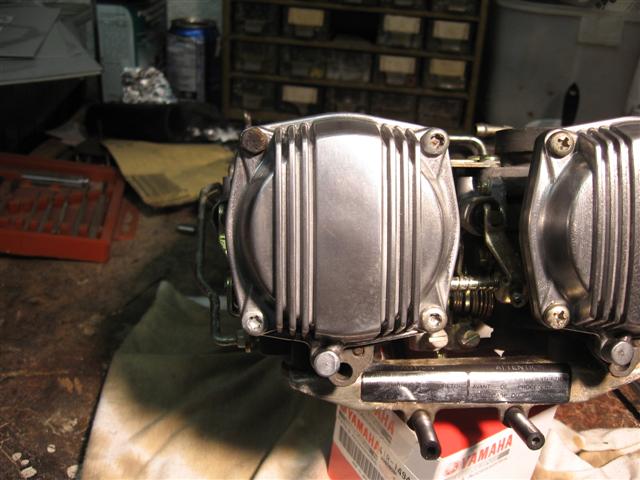
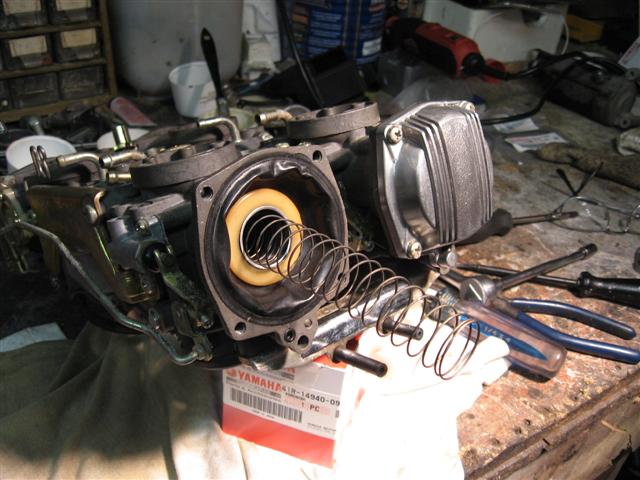
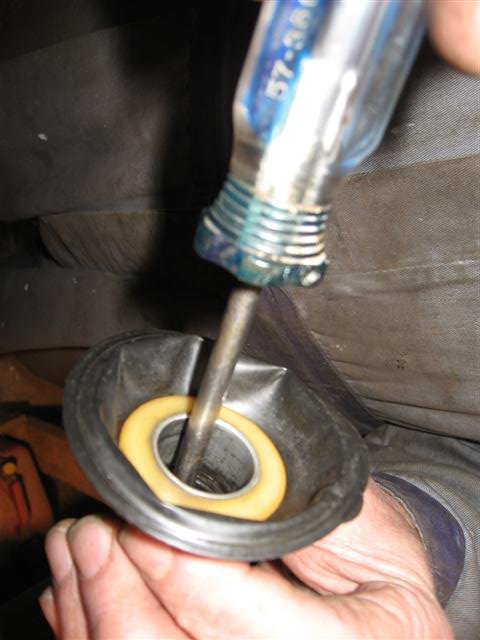
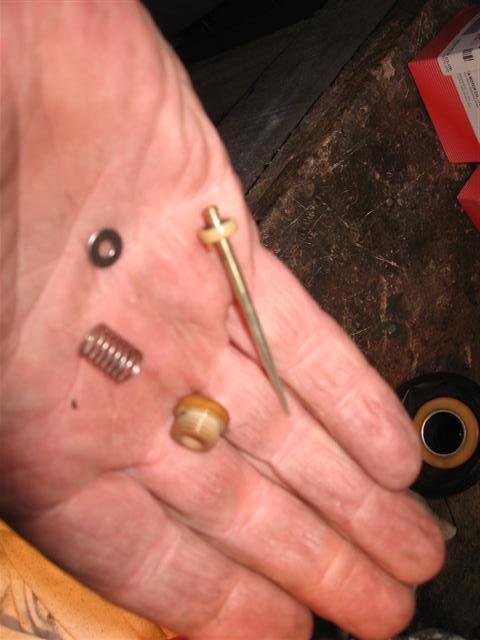
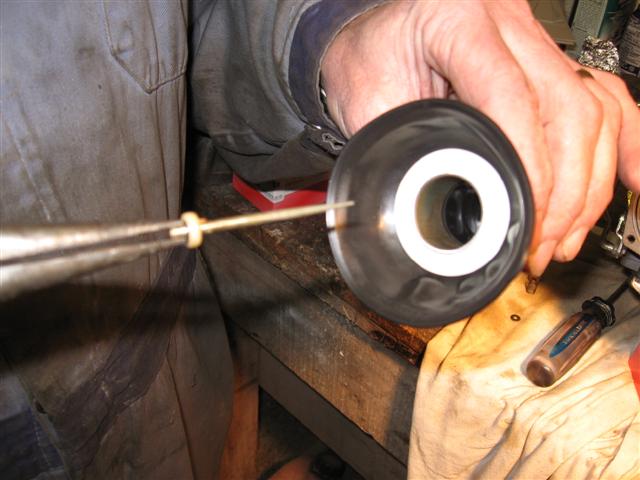
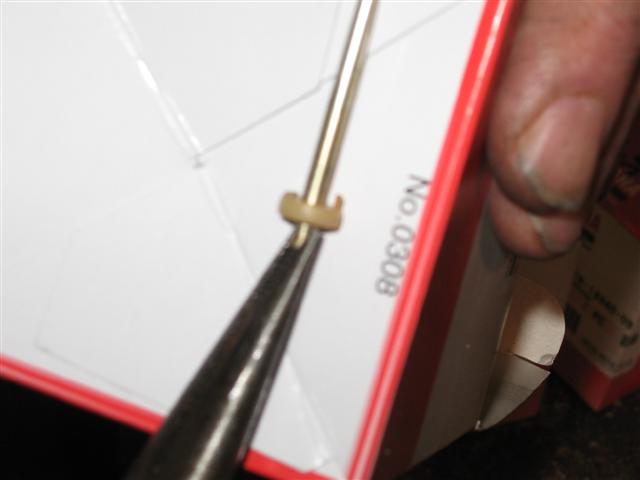
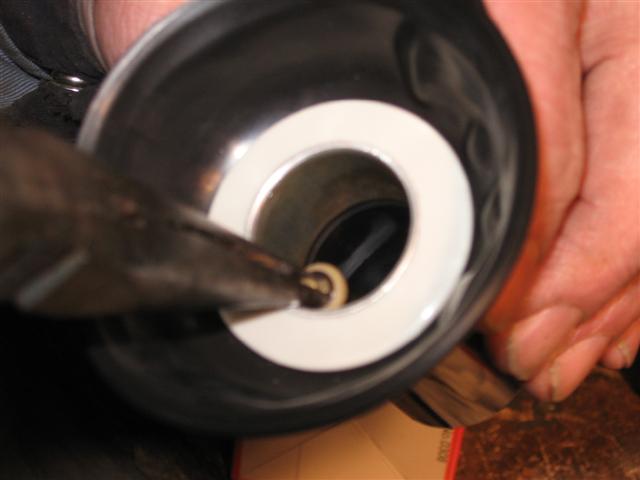
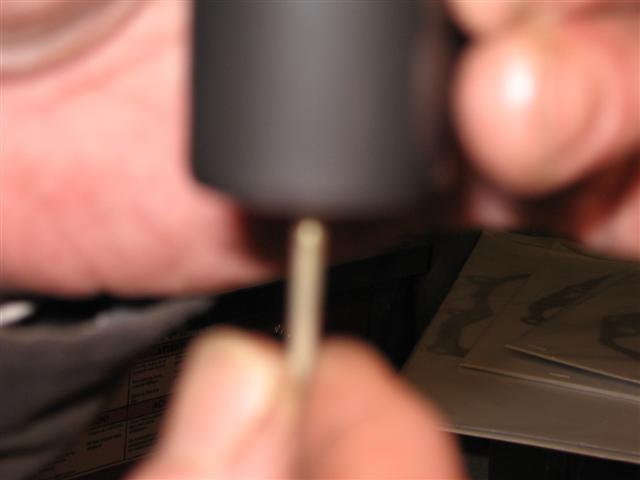
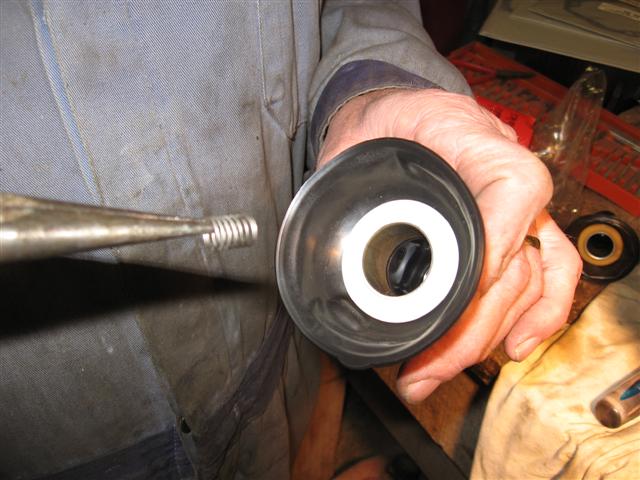
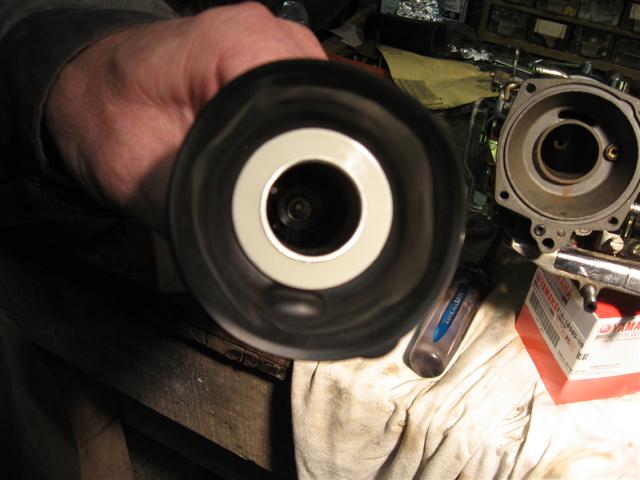
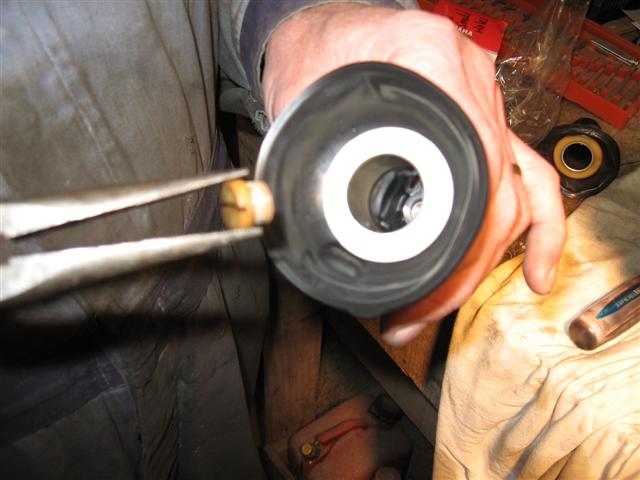
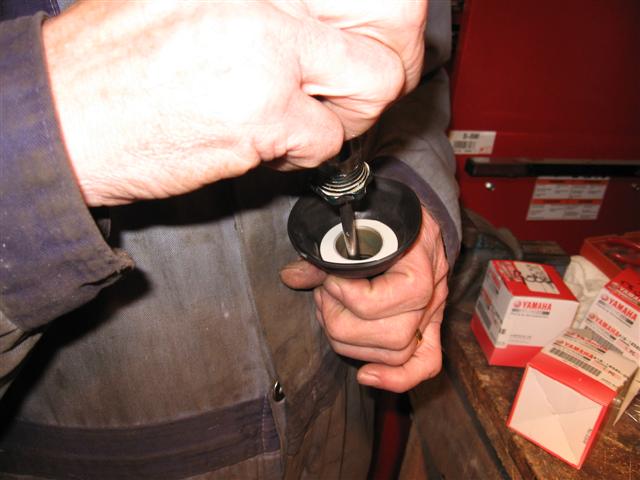
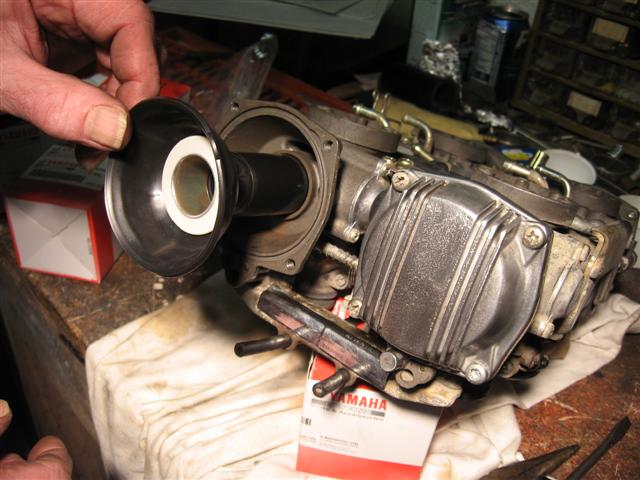
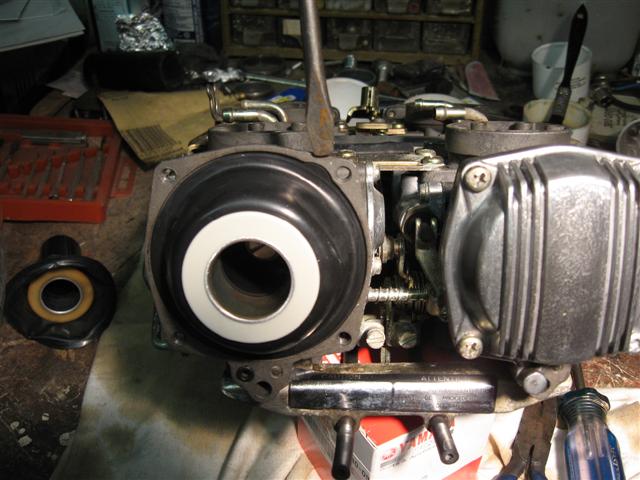
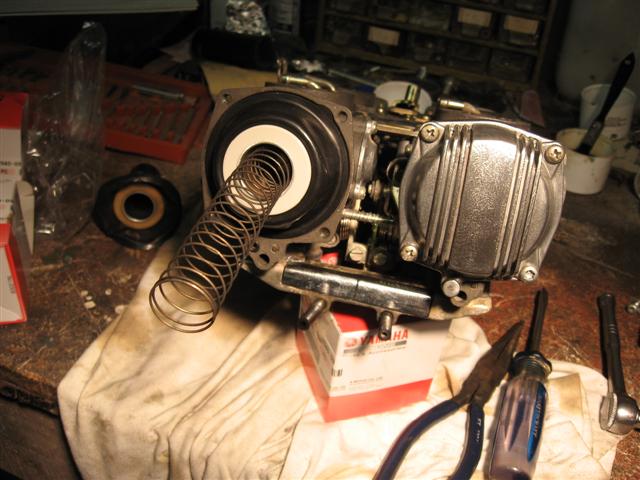
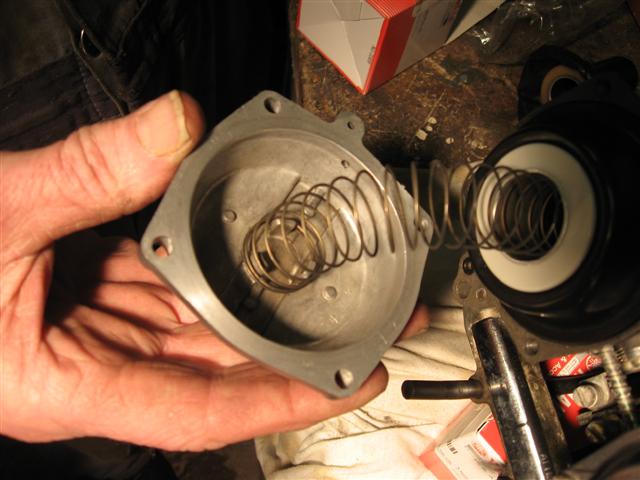
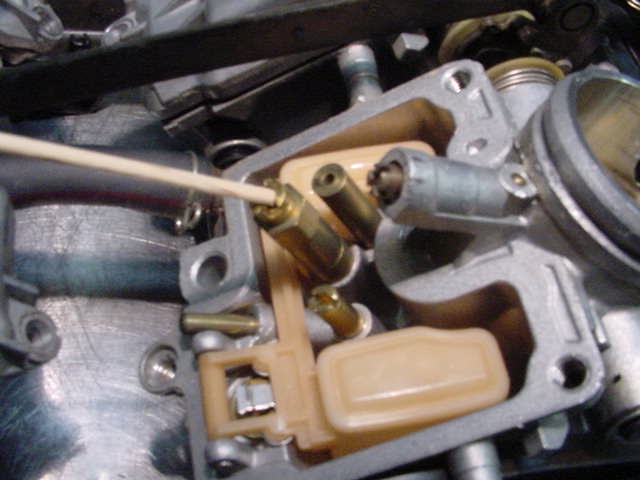
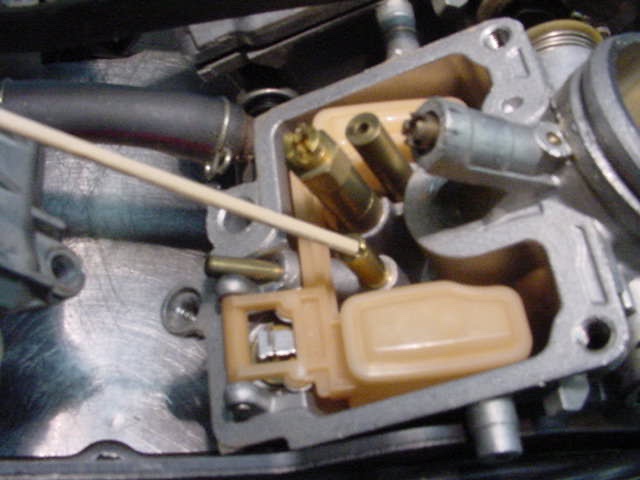
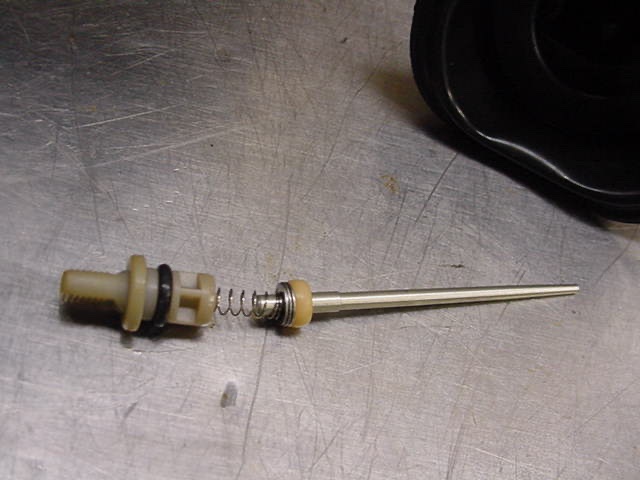
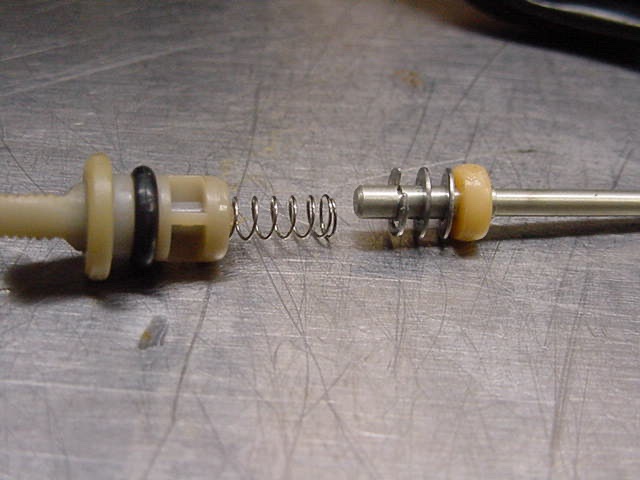
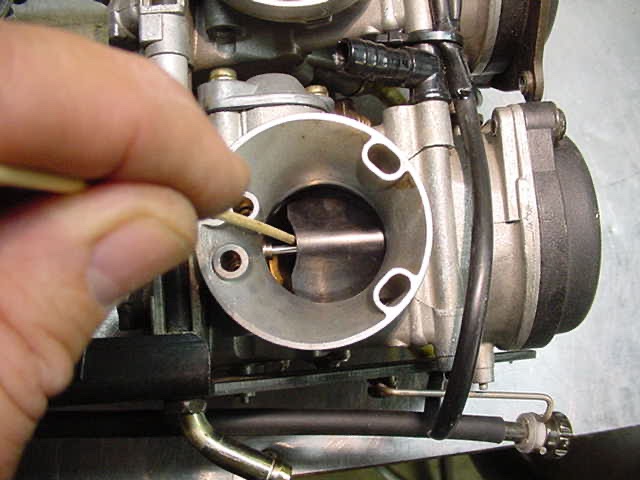
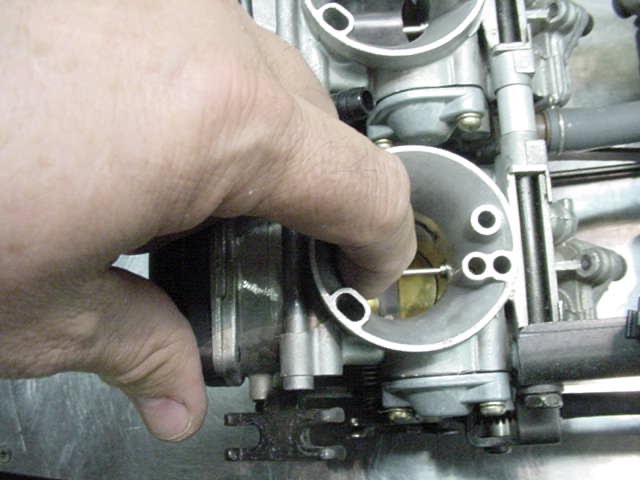
Preface by Don Nelson (Freebird) When Don Murray told me that he was tackling this project, I asked him if he would take some pictures so that we could add them to our tech library. He not only agreed to do so but did a fantastic job of it. Now....is this something you want to do? You'll just have to decide for yourself. The last I heard from Don, he had gone a jet size larger and though he liked the way it ran, a sparkplug inspection seemed to indicate that it was running a little rich. So..he then went a size smaller and didn't feel that it ran as well. So I think he has now gone back to the original main jets and in his case, feels that only the size larger on the pilot jet was needed. That and shimming the needles. Don did a great job so if you find any errors here they are probably my fault in editing. Let me know and I'm make any corrections needed. Re-Jetting the Venture Carbs Thanks to Don Murray for this great write-up After you have removed the carbs and cleaned them set them on a table facing the way you see them in the first picture...it may help you to number them as you see in the picture...you will need to refer back from time to time to make sure you're working on the right carb. The reason I say this is because only two carbs use the same size jets.(1.) Now you'll want to remove the bowls, it may help keep you organize to only remove the bowl of a single carb at a time so you don't install the wrong jet in the wrong carb....don't ask how I know....okay you'll need a #10 allen wrench with a ball end if you don't want to mirer up the bolts...after you get the bowl(s) off this is what you'll see....(2.)(3.) This jet is the main jet! From the factory (stock) it is 122.5 carb #1 122.5 carb #2 117.5 carb #3 120 carb #4 now do you see why I said only remove one bowl at a time....now this only matters if you're changing jets. Here is the main jet after it is removed. It is the one being pointed to with the stick. Okay lets say you want to increase the fuel consumption and maybe increase the HP's (maybe).....without a dyno it's anybody guess if you increased your HP. Okay here's what Joe had said about the correct jet sizes and it worked for me.... carb # 1 up 125 carb # 2 up 125 carb # 3 up 120 carb # 4 up 122.5 along with this jet size increase you should also be using K&N air filters and the "D" cutout in the air filter holders. Now what I found to be a big change was to change the pilot jet....the stock one is 15..replace it with a 17.5 (5.) Here is what the Pilot Jet looks like after you remove it. Again, it is the one pointed to with the stick. The next thing is shimming the needle valves. This is relatively simple and can be done without removing the carbs from the bike if this is the only thing you wish to do. What it will give you is quicker throttle response. Not much commentary here. The pictures tell the story pretty well. Fist thing is to remove the black cover that covers the diaphragms. The spring will just lift out. This is what you have at this point. This is the needle plug holder. Pull it straight out and the diaphragm, slide and needle will lift out. There is an O-Ring here for the vacuum to the diaphragm. Be sure not to lose it. Now...pull straight out on the holder to remove the needle. Here is what the needle assembly will look like. You will want to add some washers to the needle and diaphragm. Now I don't know what Don Murray did but I simply removed one of the washers from the top and and slid it up from the bottom. That shims the needs a bit and is where you get the quicker throttle response. Just disassemble the unit and move one of the washers or buy extra washers from your dealer. Okay...now you just need to put it all back together. After it's back togeher, check the slide. Move it up and let it fall. Use your finger to run this test. If they fall fast rather than just float down as they should, then you probably didn't get the diaphragms back in properly, no sealed. Remove and reinstall them. And that folks, is about it. Reinstall the carbs and go for a ride. If it doesn't run to suit you, just start all over. Jetting is NOT an exact science and unfortunately, it sometimes takes two or three tries to get things the way you want them. Is it worth all the trouble? I don't honestly know....if you try this, maybe you can tell us.


.thumb.JPG.3f1849be2171e599daf53751f716091f.JPG)