Search the Community
Showing results for tags 'tank'.
-
Has anyone tried removing that blasted air box and installing 4 individual K&N style filters? When I changed my plugs, I looked at how deep the air box is and looked at the cutout in the tank. Me thinks there might be enough room for some small stand up filters.
-
Wife and I went for a ride today. Stopped a half hour from home and filled the tank. Went out a little later to put the bike away and no gas. I have checked the lines on the filter and fuel pump and they appear fine. Then I checked the main feed line coming from the tank to the fuel pump and it seems fine. The line coming off of the reserve tank appears fine. The overflow tube is dry at the end. I see no gas on the ground and I do not smell any gas and the wife didn't smell any while riding. Everything I have checked seems fine. I haven't removed the tank yet. What haven't I checked or where do I go from here?
-

Quick Question, maybe
matt73ander posted a topic in Venture and Venture Royale Tech Talk ('83 - '93)
I just got an 83 venture yesterday. so far after buring up the gas that was in and filling with 91 octane i got about 115 miles on this tank and the fuel is at the last bar. Its been missing and backfiring a little so i'm assume the carbs need a good cleaning and make sure they are all in sync. real question is about how far should you be able to get on a tank. -
 Don't ask how I destroyed my fuel tank cover but I need a replacement. If anyone has one that they would want to sell let me know please. Tim
 -
I saw 2 ventures the other day and they both had a cable coming up from the front of the tank over the tank with an L-shaped piece of plastic that stuck under the tank bib holding the cable in place. I presume this was used to plug something in for power. Is this a factory piece or aftermarket and where can I get something like this? Thanks Ya'll Bob http://smileys.smileycentral.com/cat/5/5_2_110.gif http://www.smileycentral.com/sig.jsp?pc=ZSzeb096&pp=ZNxmk393BBUS
-
I just got thru reading an interesting article in one of my boat mags about the use of ethanol added fuel and water. California being one of those states that require ethanol laced fuel brought the article close to home. It might also apply to your state as well. Apparently Ethanol attracts water and octane is actually increased because of it. As long as the gas/ethanol/water stays mixed. The problem occurs when the H2O content rises to over 3% by volume. Then the water will seperate from the fuel/ethanol and settle to the bottom of the tank. Lots of ugly things can happen when it does. Poor running conditions to plain stalling, rusting tanks, loss of octane are a few. It you are storing your scoot over the winter months it might be prudent to keep the tank topped off...reduces air circulation...and use a dry gas product to keep things mixed. It's something I'm going to start doing......
-
I'm not really sure where to post this, so moderators, move it it ya need to. :-) My Father-In-law has a 1974 Yamaha RD200 Electric that he left garaged for 15 years. he parked it when the tires went flat and never bothered with it again. I snagged it out of his shed a few years back and with the help of a friend of mine we've got it back in running order.. the only problem we are faced with now is the gas tank. He left gas in it for those 15 years.. I'm sure you can all imagine what we were met with when we opened it up. We've run several of those tank cleaning kits through it (you know, the three bottles of goop) and it's still pretty bad off... It's at least usable now, but here's the issue. On each side of the saddle there's a small 90 degree pipe that comes down that is supposed to be connected with fuel line so that fuel from the side away from the petcock can be used... at some point both pipes have become filled with gunk. I"m not sure if it's from the tank cleaning stuff we used or if it's just from having sat for so long with fuel in it, but they're clogged pretty good. We've tried everything we can think of from drill bits to get as much as we can to pipe cleaners to try and clear around the bend, but we can't get it to punch through on either side. so I've decided to look for a new tank. SO, any of ya'll know where i can get a new tank for a '74 RD200? I've been watching e-bay but I can't seem to find a tank. I tried a few cycle salvage yards but haven't been able to find one there either, at least not one that's in serviceable condition. Thanks in advance guys!
-
Hello All, I have been looking around on the internet for tank bibs, I have found a couple I like ,but not sure if they would fit my 06 RSV. Would you all be willing to post photos of yours and where you purchased it. I really like the look of the tuxedo tie (pouch,ostrage braid), but prefer real leather. If I do not see one I like, I may just purchase the tuxedo tie. please post photos of yours and/or where purchased Thank you, Brianwgn
-
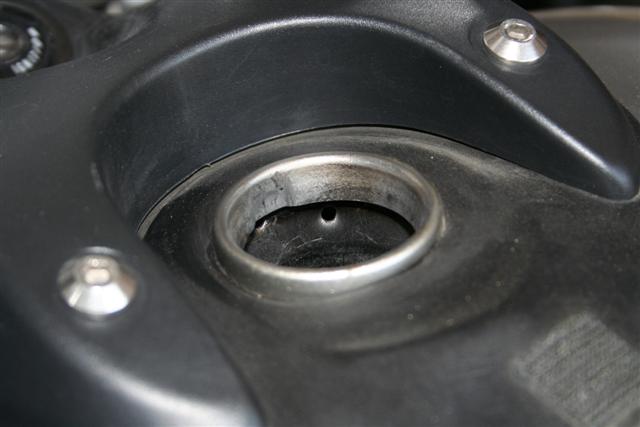
If you are tired of not being able to completely fill the gas tank and having the bubbling air escaping from the tank blow gas all over the tank top, you can solve this by adding a few air vent holes to the tank filler neck. I had to put 4 fairly good sized holes in the front and right side. The process is simple - just use a punch awl and ball-peen hammer to make the holes, as shown in the picture. Here are a few more tips: NEVER NEVER NEVER drill! Not only will that dump metal shavings into the tank, but all electric drill motors create sparks! When you use a punch awl, just put the tip in contact with the filler neck and hit it enough times to make the hole as large as the awl shank (not just a little hole from the tip). You will need a MINIMUM for four large holes to make a big difference. I have seen a suggestion to use wax paper between the awl and the tank neck to reduce the chance of sparks - no idea if that provides any value at all, but it can't hurt. I personally think there is no real risk of sparks from using this method. I also suggest putting a thick towel or something over the tank near the awl head so you do not accidentally slip and mar the tank with the hammer. A dead blow hammer would be an excellent choice for this job - less chance of slippage, and they are all covered in plastic. Several folks have said to do this with a full tank - I disagree. If it is too full, the vibrations from the hammer blows will splash gas all over you. If you have to do it with a full tank, place a rag over the opening. I think that any level below the filler neck is probably OK. And some important information about filling your tank AFTER you do this mod: You now have a CHOICE how full to make it, and that choice is important. If you fill it all the way to the top and then park it in the sun while you go have lunch, the heat will cause the fuel to expand and run out the overflow hose into a big puddle under the bike! Even just the engine heat can cause this, so my recommendation is simple - if you are going to ride at least 10 miles right after filling it up, put as much in as you want. But if you are just around the corner from home, or planning to take a break before getting back on the road, either wait to gas up until after the break, or keep the fuel level down near the bottom of the filler neck.

-
 FAULTY IGNITION SWITCH Temporary Repair A few weeks back I stopped for gas, and when I turned the key on there was no electrical power, except for the radio. There was no lights on the dash, no headlights, or any other power, except for the radio. After checking all the fuses, which were okay, it was suggested the ignition switch could be the problem. To get to the ignition switch wires you will have to remove the seat and the top cover by the key (two Allen head bolts), and then remove the Fuel tank, by first removing the breather tube on the top of the tank, the electrical connection and the fuel line (under the tank). There are two Allen head bolts at the front on each side of the tank, and one bolt near the seat, before you can remove the Fuel tank. After removing the fuel tank there are two plastic covers on each side of the switch, which are held on by a small Phillips head screw and a plastic plug. http://www.venturerider.org/switch/image001.jpg Referring to the manual, Section 8 page 2 stated that switches could be tested for continuity. The manual states, on the main switch there should be continuity between the brown/blue wire and the red, and between the blue/yellow and blue/black wires, when the switch is turned on. I used a multi meter and started checking the wires for continuity. This should be done on the backside of the plug, to prevent damage to the plug connections. I found that I had continuity between the Blue/Yellow Wire and the Blue/Black Wires, however I did not have continuity on the Brown/Blue Wire and the Red wires. I used a 10-gauge wire and inserted it on the backside of the plug between the Brown/Blue Wire and the Red wires and then I had power on the dash and fuel pump started clicking. Therefore, I spliced the Red wire and the Brown/blue wires and connected a 10-gauge wire to the spliced ignition switch wires. I ran this new 10-gauge wire to the handlebars and connected these to a 50-amp single pole toggle switch, which I taped to the handlebars. Please note the 50-amp switch is most likely much larger than required. http://www.venturerider.org/switch/image003.jpg http://www.venturerider.org/switch/image005.jpg New Switch http://www.venturerider.org/switch/image007.jpg Wires (on new switch) http://www.venturerider.org/switch/image009.jpg When there is no continuity between the Brown/Blue wire and the red wire there will be no power, except for the radio. These wires close the circuit to the main fuse, battery, starter relay, starter motor, and the Start Switches (including the clutch, neutral, side stand, and stop switches).
 -
What are you folks doing for winterizing? Are you filling up the fuel tank and putting in a product like Stabil or are you draining the carbs and filling the fuel tank and putting in Stabil. Or something else?
-

Removing Gas Tank 2007 Rstd
newman posted a topic in Royal Star and Royal Star Tour Deluxe Tech Talk
Hi Everyone, Going to take my gas tank off so I can have it airbrushed. Is there step by step instructions for the (not so handyman) so I can take it off.... I guess I should drain it too....eh! I was hoping it was pretty easy/straightforward so If anyone has some information or can point me in the right direction it would be appreciated. Thanks -
Does anyone have a tank bag on their RSV? I am looking for somewhere to put a pair of sunglasses , without having to pull over, when the sun goes down during a ride. Any other recommendations are appreciated. Pictures definitely help. Thanks, Mark
-
Has anyone put a aux tank on a VR..and where did ya put it?,,,,Thanks Fred
-
Does any one have a leather tank pane for a 2006 rstd. I brought one from yamaha and I cant get it to fit.
-
Saturday, I rode up to Anamosa, Iowa with a friend (mostly in a hard down pour for more than an hour) to see the motorcycle museum and go to J & P Cycles. I looked for a tank bag for my 89 Venture but it seems they are hard to fit. What tank bag favorites do others use for their 1st gen? I'm looking for a small to medium size bag. Tim
-
Gas Tank Removal Removing the gas tank on the RSV or the Royal Star Tour deluxe is very simple. The question does come up here from time to time though so here are some simple step by step instructions. RSTD may vary slightly. http://www.venturerider.org/gastank/tank1%20(Small).jpg Step 1: Remove the cowling around the gas cap. http://www.venturerider.org/gastank/tank2%20(Small).jpg Step 2: Use a pair of pliars to squeeze the tabs to unplug connector from metal tab. http://www.venturerider.org/gastank/tank3%20(Small).jpg Step 3: Unplug the connector. http://www.venturerider.org/gastank/tank4%20(Small).jpg Step 4: Remove the vent hose. http://www.venturerider.org/gastank/tank5%20(Small).jpg Step 5: Remove single bolt on rear tang of tank. http://www.venturerider.org/gastank/tank6%20(Small).jpg Step 6: Remove push pins that hold bib in place. http://www.venturerider.org/gastank/tank7%20(Small).jpg Step 7: Rubber covers just pull off front mounts. Remove covers and then allen head screws. http://www.venturerider.org/gastank/tank8%20(Small).jpg Step 8: Turn fuel petcock to "OFF" position and them remove gas line. http://www.venturerider.org/gastank/tank9%20(Small).jpg Step 9: Simply lift tank off and set it aside. You are done.
-
A big thanks to Cougar for his excellent work on this article. ETCHING the 6 gal RSV tank First of all this Job Sucks. I had purchased my 2K mm RSV last year with only 5k on it. You would think that the tank would not be rusty inside of it. (WRONG) The Previous Owner apparently never topped his tank off during our very cold winters in Iowa! That was one thing that I always did on my past bikes and never had a problem with RUST! So this is how I went about doing this project if you ever decide or have to do it. Here is a picture of my first Filter change about 4 months Before the ETCH Process http://www.venturerider.org/kreem/thumbnails/1.jpg http://www.venturerider.org/kreem/thumbnails/2.jpg http://www.venturerider.org/kreem/thumbnails/3.jpg http://www.venturerider.org/kreem/thumbnails/4.jpg http://www.venturerider.org/kreem/thumbnails/5.jpg #1- Drained all of the fuel #2- Remove tank #3- I brought the tank down to my local car wash put my Quarters in and flushed the tank out for about 5 Min's. BOY did a lot of rust pour out then! I figured that I had Over a full cup of RUST in my tank from the start. #4- Remove tank and place it on a towel up-side down #5- Remove the Sender (most likely it will be rusty) http://www.venturerider.org/kreem/thumbnails/6.jpg Mine was always reading (NOT FULL) every time I filled it up.... should have been my first sign! So I order a new one at Yamaha the part # is 4XY-85752-00 and the cost is around $56.00 . #6- Take that old sending unit and HACK it up! with a dermal and a pair of cutters http://www.venturerider.org/kreem/thumbnails/7.jpg what you want to end up with is this http://www.venturerider.org/kreem/thumbnails/8.jpg this will be your first (PLUG) Then you will place that part (the old sender) over the hole http://www.venturerider.org/kreem/thumbnails/9.jpg and bolt it on! #7- Now remove the fuel pet-cock and make a plate and bolt that on with the same screws that hold the pet-cock on. Use some gasket sealer or make a rubber gasket.. http://www.venturerider.org/kreem/thumbnails/10.jpg http://www.venturerider.org/kreem/thumbnails/11.jpg NOTE::: DO NOT USE DUCT-TAPE (it will NOT work) Now that all the EASY stuff is done! http://www.venturerider.org/kreem/thumbnails/12.jpg OK the FUN PART! , I used product called KREEM You will probably hear horror story's about the product , but I have always had pretty good luck with it.. Its far better then paying $1200 for a new tank. or I guess you could eBay one for about $125 and have it painted. What I did was WAX the tank real well, then I put a good amount of VASELINE all over the tank.. this will save your paint job. as it worked excellent for my project! (when all done with the project I went back to the car wash and washed the VASELINE all off with the high power soap and water) THE RSV Tank took TWO bottles of KREEM. My results are awesome and the Kreem Stuck Real well I also bought a minnow battery power pump at Wally-World for about 6 bucks and had the air line in the tank for about 3 days or so. Another NOTE: after I took off the Plastic and the Bib. there was also RUST around the top part of the tank where stuff bolts onto, I used some Auto Touch-Up Paint to stop the rust after a I cleaned those parts off to be rust free again. the bib and plastic Cover will cover the mismatched color anyways. ---------- these are some other people that have done this ----- Coating Your Gas Tank Interior: The kit is a 3 solution (bottles) program. Before you start, first degrease the tank with your own dish washing soap. I used regular liquid dish soap, then did it again with Simple Green. You would be amazed at the amount of rust and crap I got out of the tank just by doing this. This is a good time to drill out the breather hole in the tank neck. With all the gas fumes gone, I increased that little hole to almost ¼ inch and added another one, opposite, on the other side. This was discussed here many times. Now the hard part is to seal up the tank for the acid bath. These chemicals are NOT paint friendly and you have to be extremely careful using them. You cannot pour them in and out without getting some on the tank. The tank has to be covered with plastic & plastic tape to prevent contact. The pickup tube hole is easily plugged by taking a small piece of metal and drilling a couple of holes to line up with the ones in the tank. A rubber gasket under the metal plate does the trick. The hard one is the tank filler hole. I tried a few different methods with not great results. I even used an automotive expansion plug in the hole. Everything leaked. Finally, I took a double layer of heavy plastic bag and pushed in into the hole. Then I forced the gas cap in while holding the key open and slid it into position, released the key and wiggled the cap it to set the locking prongs. That worked. I was ready to start the kit. The first part is an acid bath that I kept in for about 24 hours with agitation every once in a while. Tilting it this way and that got the solution to all interior parts. There was still rust in the filler hole area, so I used an old toothbrush to get that clean. Dumping this out revealed a lot more gunk. This stuff must have grown in there because I was very careful with what went into that tank. A good rinsing out and draining was next. There was still a lot of water sloshing around in the tank even after through draining from both holes. I used an aspirator and some oxygen tubing to suck the rest of the water out. The next bottle is a conditioner/water remover. This was sloshed all around the tank to absorb the excess water and coat it with solvent to receive the tank coating. A couple of minutes of this and it was dumped and aspirated out. Finally, the white paint like, Kreem coating was dumped in the tank, and the tank sealed. The tank was rolled every direction possible to get this stuff all over in insides. The tank was opened up and aired per the instructions and then re-agitated for another coat. The Kreem was dumped back into it’s original container (about half came out). There was still some liquid inside and the tank was rolled around every hour and placed in a different position so the coating wouldn't puddle in one place. After a day of drying, this process of coating the tank with the white liquid was done a second time. After a good drying, the holes can be cleaned out and the petcock reinstalled. I have a nice clean white interior now. These tanks are bare metal. The only manufactures that coat their tanks are Harley and BMW. Go figure. Chuck C. ----- MORE----- I have used Kreem w/ v good success, but as with most things in life, the preparation is the most important part. Four important fine points to consider: #1 - Tank preparation: The inside of the tank should be completely free and clear of all loose particulate (i.e rust, dirt and sludge). Even more importantly, it must be totally devoid of any and all hydrophobic (oily) substances, including any and all traces of gasoline, oil and grease. To achieve this, I drop two 8" lengths of medium size linked chain into the tank, then pour a small bottle of liquid degreaser full strength in and slosh vigorously with all the openings capped off. Do this good and long, and don't forget to invert the tank and get all of the surfaces degreased up around the filler neck, as well as the very top of the inside of the tank. Next, add about 1/2 gallon of the hottest water you can get, and add this to the degreaser and the chains still in the tank (don't pour out the degreaser yet... leave it in there) and slosh it around again. The degreaser will emulsify (turn milky white) and hold all of the oils in suspension... this is a good thing. After you are quite certain that you've degreased all surfaces... give it one more slosh just for good luck. Then, pour out the entire mixture and fish out the two chains. After that, pour about a TBSP of hand dishwasher detergent and about a gallon of very hot water into the tank and slosh thoroughly (note: you can use automatic dishwasher detergent here, but as it is formulated to be very low sudsing, it is more difficult to determine when all of the residue has been removed via rinsing.) If you degreased properly in the last step, this wash should produce mongo volumes of suds... also a good thing, as suds are an indication (in this case) that the oily residues (read gasoline) have been successfully removed. Follow by as many cold water rinses as necessary to remove all traces of detergent. Only now are you ready to phosphate etch the metal in the tank with Kreem kit bottle #1 (Phosphoric acid). Although the directions call for a specific quantity of hot water to be added to the quantity of acid provided, IMO it is better to have a FULL tank of etching solution than to have the exact proportion of acid to water. In the case of an XS650 tank, this amounts to adding perhaps 3.75 gallons of HOT water (3.25 for early tanks) to the acid, as opposed to 2.5 gallons, which (I believe) is the quantity specified in the directions. Again, as in the degreasing step, it is vitally important to have the etching/phosphating solution come in intimate contact with ALL inside surfaces of the tank, including up and around the filler neck. Seal all the tank openings and slosh that bad boy around, but after you're through sloshing, don't forget to slightly crack open the stopper on the filler neck, or the hydrogen gas evolved from the chemical process will blow it out of the hole and across the room, probably splattering phosphoric acid solution on your nice new paint job (don't ask). #2 - Dewatering: The small bottle of solvent (Kreem kit bottle #2) is MEK (a close cousin to acetone) and is a very good water remover. After you have thoroughly rinsed the phosphate solution out of the tank, it is time to get things dried up and ready for the polymer coating step. Actually, "Dry" may be a bad word to use here, because the intention is NOT to get the inside of the tank dry from all liquid residue, but rather only to get all WATER residue out. The inside of the tank will still be wet when you are done with this step, but it will be wet with MEK, which is perfectly fine, because that is the same solvent which is used in the polymer to keep it dissolved. Caution: do not dawdle after using the dewatering solvent. IMMEDIATELY go on to the polymer coating step. If you wait too long before you go to the next step, you may "flash rust" the inside of the tank, which will require starting over. If the inside surface of the tank begins to physically dry out, you're taking too long and are in danger of forming flash rust. Get you ass movin' boy! #3 - Coating: Conservatively speaking, there is enough polymer in bottle #3 to do AT LEAST two (probably three) XS650 tanks. What this means is that, unless you have two or three tanks prepped all at once, you are going to not use all of the polymer provided in the kit. You must remove the excess polymer from the tank that you are working on. Follow the instruction very carefully here, rolling the tank around for a few minutes, then letting it set on one side, followed by rolling around again and letting it set on another side, repeating until you are secure in the fact that all interior surfaces have been thoroughly coated. After that, you MUST pour out any remaining polymer, or you will have a puddling problem. Even after you pour out the excess, you must continue the process of rolling the tank and then letting it set on alternating sides, while the remainder of the polymer still in the tank forms a non-moving film. #4 - Drying/curing time: Probably the one most crucial mistake leading to premature failure of Kreem coatings (after improper degreasing) is insufficient drying or curing time before putting the tank back into service. After you are satisfied that the majority of the polymer in the tank has skinned over, follow this procedure: Remove all stoppers from all openings, both top and bottom (filler & petcock holes). Turn the tank upside down (preferably on a hot surface like your black asphalt driveway at noon in July (January if you're in Oz) and block it in place so the filler neck is facing vertically straight down. Then, rig up a small air pump and hose and stick the hose into the tank from the underside through the filler opening, being careful not to allow the hose to touch the inside surfaces. An air pump from a fish tank fits this bill perfectly. Turn on the pump and let the forced air dispel the vapors from inside the tank, which will aide drying and curing. After a few hours, you will no longer be able to smell vapors coming from the tank. It is then safe to move the tank, but DO NOT use the tank yet. Move the whole rig up into your hot, oven-like attic and allow the air pump to run for another two days minimum, with the hose still in the tank. One day is probably enough, which is why I always do it for about a week just to be sure. It pays to watch the weather and plan to Kreem the tank on a day that is going to be sunny, hot and dry, if at all possible. If you add the above tips to the (already pretty good) instructions included with the three part Kreem kit, you will end up with a well sealed, carefree fuel tank for many years to come. Good luck! Bill in Yardley, PA I really hope nobody has to go through this Yucky Job,. but at least now some will have some idea of what will take place if ever you need to do this job! Jeff
.thumb.JPG.a7ecab44ca5a487b6c43626aaa290fcc.JPG)