pbjman
-
Posts
427 -
Joined
-
Last visited
Content Type
Profiles
Forums
Gallery
Events
Store
Everything posted by pbjman
-
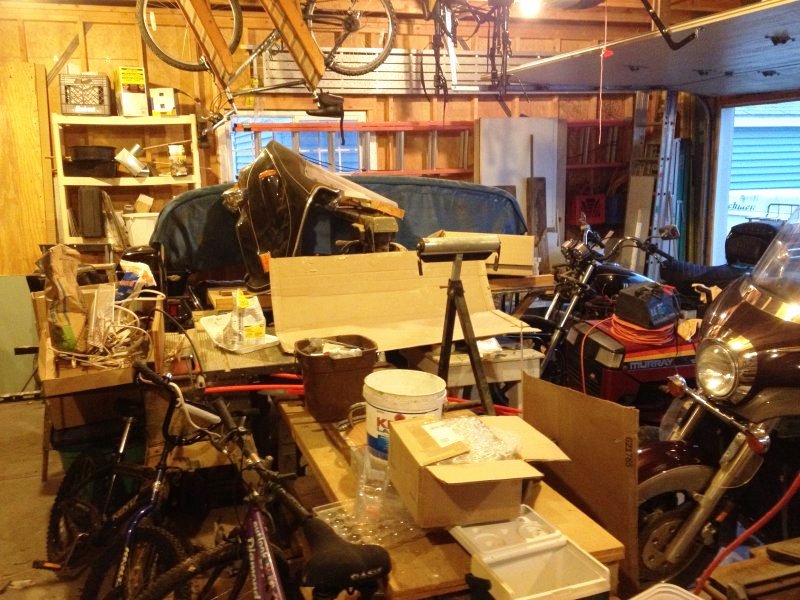
Here's mine..... how many motorcycles do you see?

-
 So far it's hard to fairly evaluate the feel of the pillow tops because I haven't ridden on them for a long day in summer temps. For a 4 hour ride on a cold day with oversized insulated jeans over my draggin jeans, the pillow top was fine. It might be a while before I get a chance for an all-day two up road test and can share a his-n-hers opinion.
 -
pic please!
-
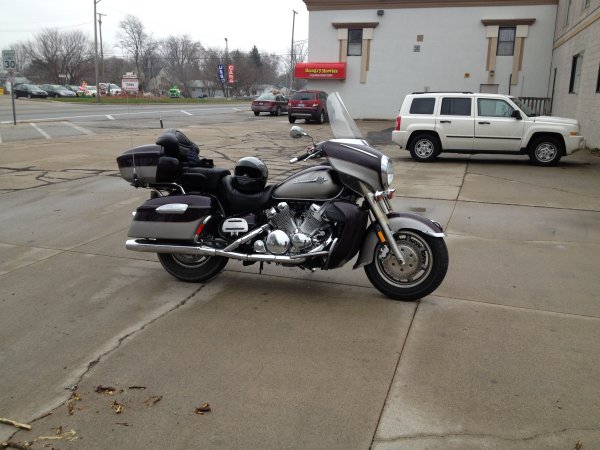
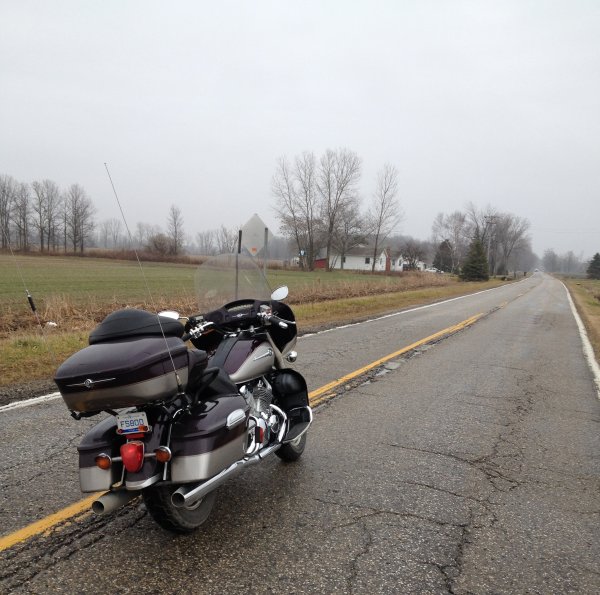
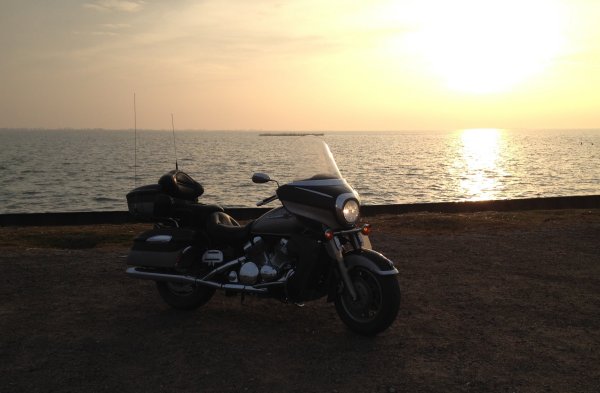
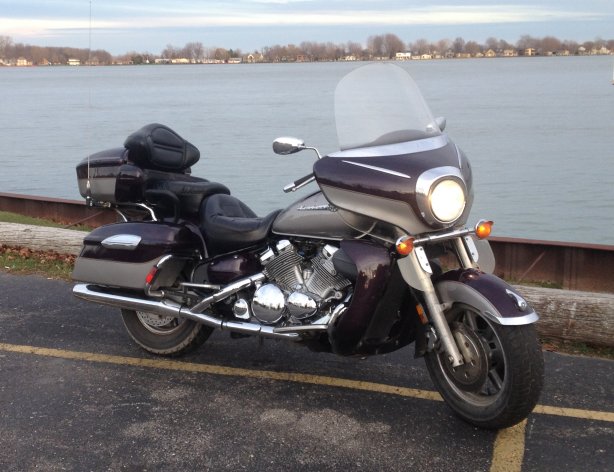
Mid 40's in southeastern MI today, so around noon I took off for a ride. I had been wanting to get some saddle time in on the new-to-me pillow top seats and put the rebuilt fuel pump through an extended test ride. Heck, those are just excuses.....I just wanted to ride. After the first 15 or 20 minutes, I pulled over in Marine City to check the fuel pump leaking gas and all was good. So, like a good VR always should, I snapped a pic of the bike. Notice the grey sky and the dampness of the concrete. The roads were a bit damp in places, dry in others. I continued on along M-29 through St. Clair and north toward Marysville. From there I went through places such as Smiths Creek, Wadhams, Goodells, and Memphis, as I made my way to Capac. I went up into town to see what was going on and turned back toward home, stopping for gas having gone 100.2 miles so far. Away from the towns, I had the roads mostly to myself. You know, time to stop in the middle of the road for a photo op. I backtracked only as far as Memphis and from there went toward Richmond so I could take a different way home. Cuz you aren't supposed to do much backtracking! From there I zig-zagged to and fro on two lane roads to extend the miles rather than head home on a direct path. I ended up on M-29 again, but almost 20 miles south of home base. I was riding along Lake St Clair, and the late afternoon sun had finally made a brief appearance, so I pulled over for another pic. By the time I got to my street, I was at 196 miles, so of course I went up the road for 2 more miles and then came back and was at 200.3 when I parked in the garage. It was a good day! I love this pic!
-
Nice! We're you solo? What was the temperature range you rode in? I went for a bit today, but only did 80 miles. 'Twas chilly at 36-40 degrees and cloudy. I believe I would like them electric clothes of yours!
-
Said a prayer of thankfulness that it wasn't worse, and for full recovery from injuries for both of you!
-
I would like to see it if you do it!
-
I made a thread in the 2nd Gen Tech Discussion about a bunch of fuel pump related stuff, including quite a bit about this Ebay fuel pump. http://www.venturerider.org/forum/second-generation-venture-tech-talk/92128-pbjmans-thread-fuel-pump-rebuilding-gravity-feed-cheap-ebay-fuel-pumps.html But a quick summay is that the fuel inlets are bigger, so to use it you would have to be able to cram them into the fuel lines on the motorcycle (which I did not attempt) or make small adapters to fit (I did do this, see the thread). Also, the one I have does not prevent the fuel from passing through when bike is parked (no check valve) so it would be a good idea to turn off the petcock when parked if you are using this pump. For me, I have decided this is a good temporary/spare pump and will probably keep it packed on the bike somewhere in case I, or someone else on a group ride, have need for it.
-
I have tested the low-cost pump for fuel flow-through today. I hooked it up as described above, but before I even did that I had my answer.... I blew into the inlet and it offered no resistance this time; the air went right through. Maybe it had only 'honked' before I had installed it and driven with it because it was dry inside? I don't really know, but, when hooked up the fuel pump inlet to the petcock with a straight peice of fuel line and the pressure of a full tank of gas, the fuel was flowing through it and out the second tube. (I'm glad I set up a catch pan!) So if you use this pump, I would advise turning off your petcock when you are parked.
-
Is This the Right part
pbjman replied to Chaharly's topic in Royal Star Venture Tech Talk ('99 - '13)
I think you'll need two of those and two of these (joint, carburetor 2) 4XY-13596-01-00 YAMAHA JOINT, CARBURETOR 2 -
This is my wonderful black Lab, Eli. Pic is from around 1997. He was such a good natured dog, eager to please, and loved people! And, obviously, able to hold a pose!
-
That was totally hilarious. Thanks for posting!
-
Good question. The pump didn't come with any documentation, so I honestly don't know. What I can say it that by blowing into the inlet it takes a similar amount of force and it honks similar to the OEM pump. I think the honk is from air pushing past the diaphragm. So it's seemingly not open or free flowing when at rest. I will set up a test tomorrow. If I put a piece of fuel line on the inlet of the new pump and put the other end on the petcock, with a full tank of gas, I can turn on the flow and see if there is enough pressure for the gas to flow through the pump or not. If gas comes out of the other tube of the pump I'll have my answer. Anybody see a problem with this in theory?
-
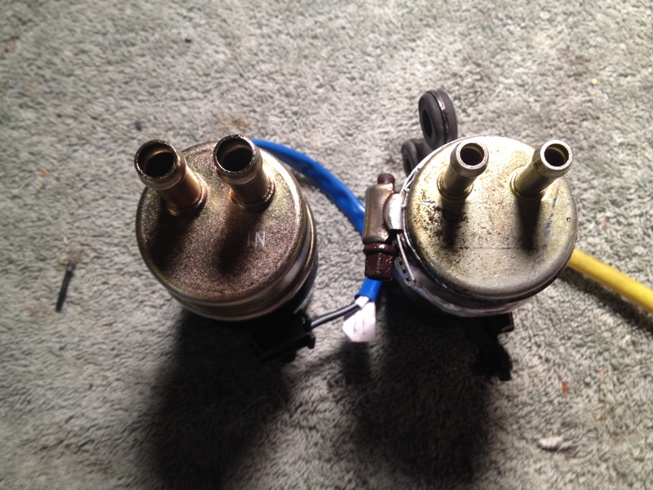
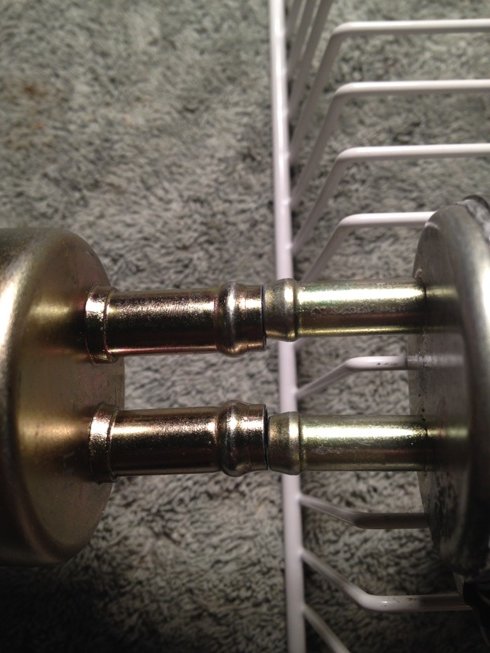
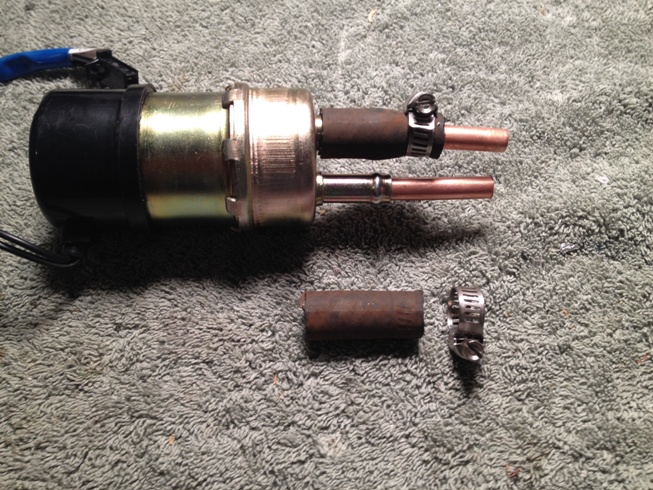
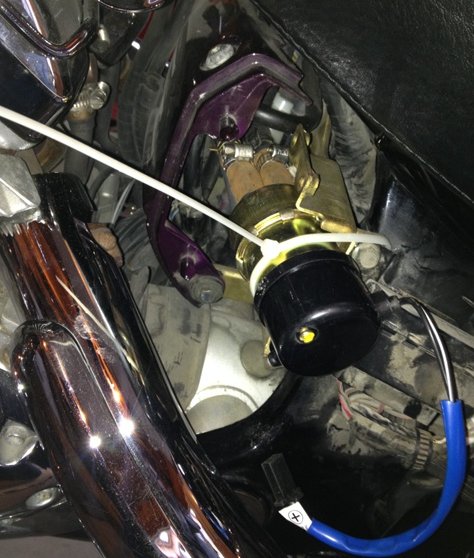
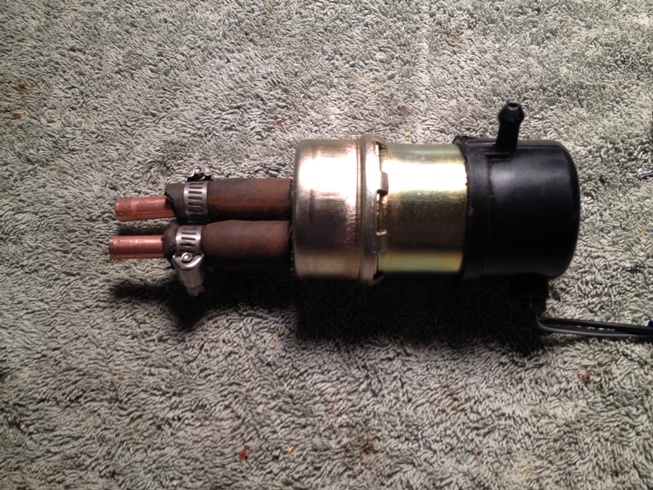
Now we come to the Ebay fuel pump that can be had for $24.98. It is sold as a direct OEM replacement with 10mm inlet/outlet pipe diameter, current draw of 0.8-1.0 amp. And 1 year warranty. It looks like the OEM pump but with a blue wire. Here’s the link to the one I purchased: http://www.ebay.com/itm/291268226096?_trksid=p2059210.m2749.l2649&ssPageName=STRK%3AMEBIDX%3AIT#ht_3516wt_1041 I see that the price has since changed to $29.99. Although it is billed as a direct OEM replacement, there is something I missed, and it was there all along. You may have missed it too… That’s the new one on the left, with the FAT tubes. So the stock tubes are about 8mm and the tubes on this one, as stated, are 10mm. OOPS. I wanted to keep this to be a cheap spare, so I came up with this: I found that the 5/16 copper tubing (had a small cutoff peice that was left over from the bypass tube experiment) fits into the ends of the fat tubes on this pump, so I cut two short pieces of 3/8” fuel line and put them onto the fat tubes. They fit very snugly no clamp needed! I then inserted two short pieces of 5/16 copper through the rubber and into the tips of the tubes, and hose clamped them into the rubber hose. I don't know what that little stem is for....so I did not do anything with it! From there, the copper tubes go easily into the hoses on the bike. This makes it a little longer, so make sure you are not creating a kink in the fuel lines of your motorcycle as you push this into place. I didn’t bother to bolt it on, as this was just a quickie test ride so I zip tied it into place, plugged it in, and went for a ride. If I was going to ride for any length of time, I would use screw-type hose clamps where the copper tubes insert into the hoses on the bike, since the copper tubes don't have a barbed end and you don't want them popping off and spraying gas everywhere.. The test ride for the Ebay fuel pump was right after the test ride with the bypass tube, and it felt sooooo much better. It ran perfectly and I will be packing this in as a spare for any long road trips or group rides. my bike:
-
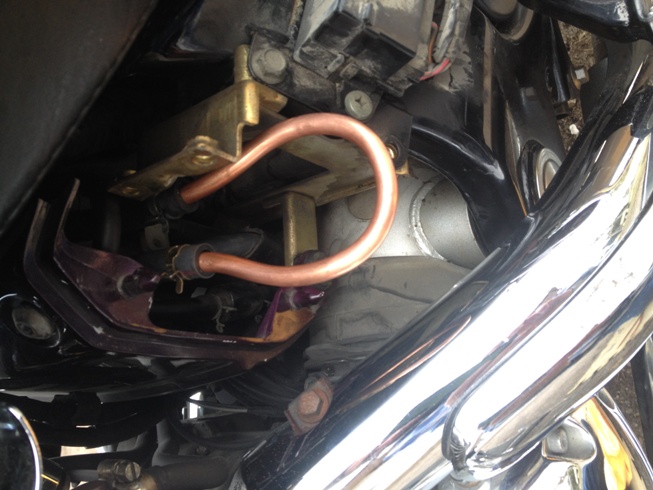
While researching fuel pumps I came across a few threads mentioning ‘gravity feed’ or ‘pump bypass’. This is a method of temporarily running your bike without a fuel pump. It has gotten some riders off of the roadside when their pump failed. How it works, is simply the weight of the gas in the tank alone will push gas into the carbs, though not as effectively as with a fuel pump, and it will only work down to a certain level in the gas tank. When the tank is half full or ¼ full, there may not be enough to push gas throught the system well enough to run the motorcycle. Since I was already working on the fuel pump, I decided to experiment with bypassing the pump. I went to the local plumbing supply place for a pc of 5/16 flexible copper tubing and was just going to buy 1ft but the guy was interested in what I was doing and bent it for me! I had the pump with me so he made the total length to be not longer than the fuel pump and was able to get the two ends in closer to each other than with a simple U shape would allow. If you bend it yourself, you will need the little tubing bender tool or need to bend it around a curved object so it doesn’t kink. So I simply inserted the ends into the fuel lines on the bike where the fuel pump would go, set the petcock to reserve, and fired it up. After warming for a few minutes I went for a test ride. I only went about 6 miles. I was at ¾ tank and I would say you could ride like that if you had to, but you might not want to. There was a lack of throttle response and a little popping, but it did almost seem normal at a steady, easy, pace. It reminded me of that last 30 seconds before you realize you need to switch to reserve. So if your fuel pump dies and you aren’t low on gas, this seems like it should get you home. (Note: there is another way to bypass, where you go directly from the petcock to the carbs with a piece of hose, but I have not tried that. If you go that route give consideration to adding a small inline filter to your bypass hose, because you will be bypassing the main fuel filter with this method.)
-
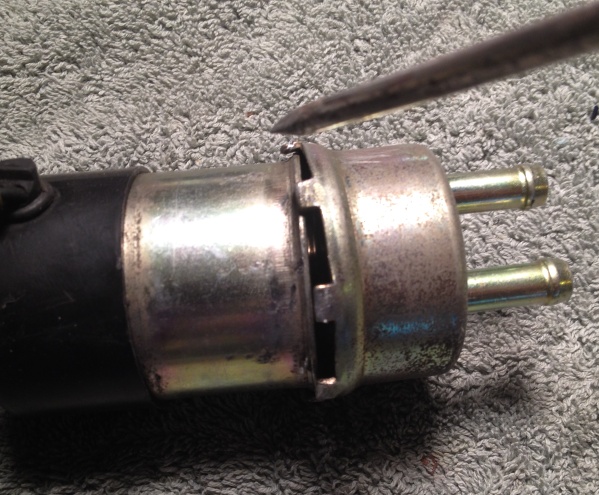
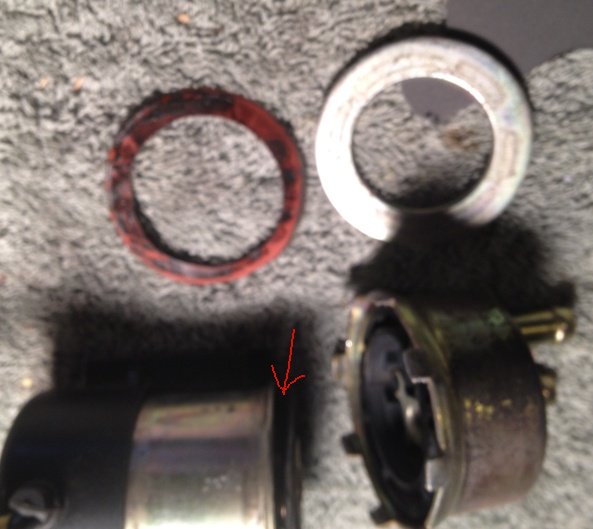
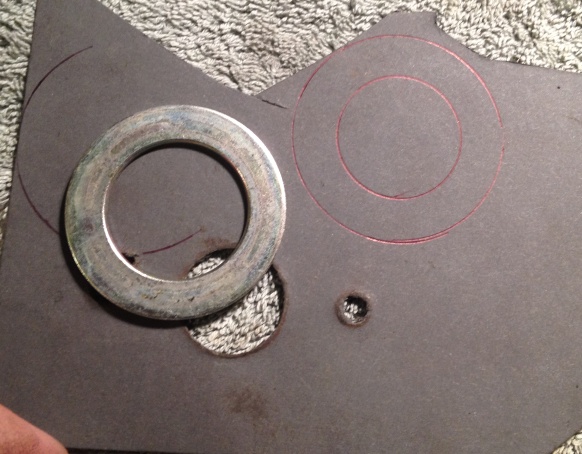
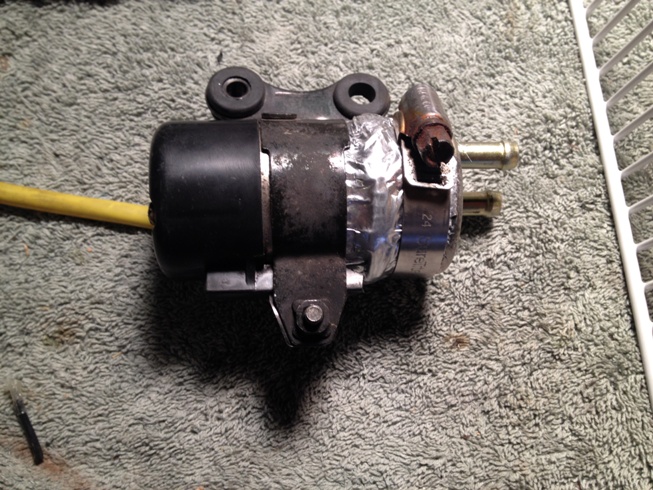
This will be kind of a long one, so read the first paragraph then you will see if you want to skip the first section on fuel pump rebuilding. The other two sections are not very long. If you want to read about gravity feed (fuel pump bypass) go to my next post in this thread. If you want to read about the Cheap Ebay Fuel Pump, go to my third post in this thread. Last week my RSV was leaking lots of fuel while I had it running to warm up for a ride so I had to abandon my ride and figure out what needed fixing. It turned out to be the fuel pump; it was leaking lots of fuel from the seam where the two halves come together. Apparently this is not a common failure and I could not find a diagram of the fuel pump exploded into component parts. It is only listed as a complete assembly, although you can replace the points if needed. New pumps cost approx. $200 for OEM so I began researching what my alternatives would be: Repair, replacement, or bypass Since I could not find a diagram of what’s in the pump, I decided to see if I could have a look for myself. Hopefully I would see something that can be tightened, patched, or replaced! Nothing to lose right? I removed the pump from the bike and took off the metal mounting clamp that secures the pump onto the bike. I wiped the pump clean and concluded that what holds it together are the little tabs that are bent over the middle seam. In this pic I have already pried them open to separate the two halves. (Now I wonder if the first thing I should have tried was to just hammer all the tabs down tighter!) The next pic shows the two halves apart, and a large washer and very thin gasket that were inside. The half on the left has a rubber diaphragm that is ‘pinned’ to the unit at its center, so the metal washer and gasket had to be pulled up from under the diaphragm by flexing the diaphragm through the hole in the washer. I hope I explained that well enough, because I don’t have a good picture of that. Anyway, the washer and gasket went where the red arrow points, with the flimsy little gasket going between the metal washer and the metal pump body. After looking things over, I decided it seemed that the most likely cause of the leak was the little gasket. Did I mention it was really thin, floppy, and flimsy? I tried to put it back together but couldn’t get the washer and gasket over the diaphragm again without distorting or wrinkling the gasket. It looked like it needed to be seated perfectly and in such a tight space, I wasn’t sure I had done it. (To shorten this part of the story up….it didn’t work. Gas still came out of the seam so I took it apart again, still pretty sure the gasket was the problem.) Next, I went to the local Napa and asked if they had thin, gas-proof gasket material, and showed the guy my pump. He went in back (they are an auto repair shop also) and came up with a partial sheet of 1/32 gasket material that he said should work, and gave it to me for free. I traced the washer on the gasket sheet and then cut it out with a razor. I reassembled the pump and hammered the tabs back down. I gently blew into the ‘inlet’ stem and it made kind of a honking noise, which I took as a good sign because no air was coming out of the seams as far as I could tell. I installed it and turned on the key. It made the usual clicks for a moment, then stopped once pressurized, and did not appear to be leaking. I started it and let it run for a few minutes and then turned it off. I felt around the pump and my fingers did not get gas on them. I let it sit for a while longer then felt it again and there was a very small drop on my finger from the underside of the pump. I pulled it out again and looked it over. I wiped it off and blew in it but still no obvious air leak and a good ‘honk’. Then looked at all the metal tabs and realized some of them could be tapped down a little tighter and more evenly. Doing this did seem to tighten things up and may have been good enough, but I decided to do one more thing. I have some metal HVAC tape so I wrapped the pump body with it twice around. I put the mounting clamp around the middle of the pump, which helps tighten the tape like a hose clamp would and put a hose clamp on the other side. See pic I went for a 30 mile test ride, stopping frequently to feel for gas on the pump, and so far it is working. I’ll leave that side cover off next time I ride so I can keep checking until I am satisfied it will hold.
-
Wow; can't imagine the loss of one of my children. Freebird and Puc have said it well and I'll say a prayer for you.
-
Mine came yesterday; have you played with yours yet? The stems on mine are for a larger diameter hose than the stock pump, but I have done some fiddling around with things and I will make a new thread about that soon!
-
Thanks for the suggestion and yes, except when they are back ordered until April. (Partzilla/boats.net are the same company.)
-
So what did you go with? Years ago I used to wear a velcro/elastic kidney belt for snowmobiling. I didn't have back problems; it was just that a long day of spirited trail riding would leave you feeling beat up and sore inside, especially when the trails were rough. The kidney belt really helped with this A LOT. Only thing was, when you wear it all day and take it off, you feel wierd for a little while, like you are made of jelly in the middle! Maybe I'll dust it off before my next all-day ride on the bike and see how it feels.
-
Petroleum Based Solvents?
pbjman replied to Chaharly's topic in Royal Star Venture Tech Talk ('99 - '13)
Showin yer age! I added some items for context, in case some of the kids don't know what a 'typewriter' is. -
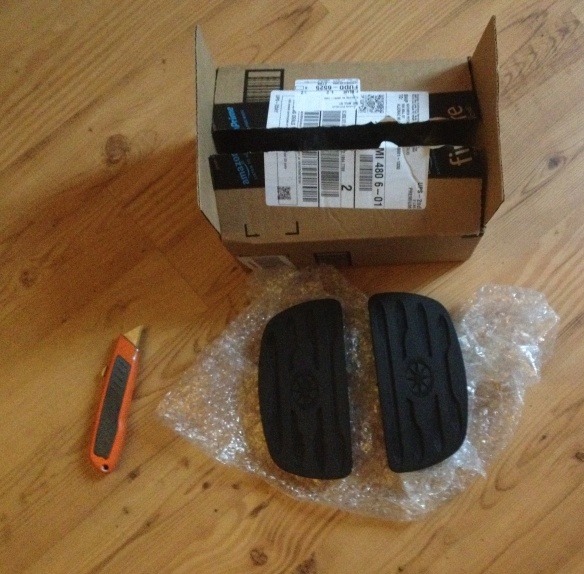
Yippee! They showed up from Amazon; got here quick using the fast shipping option with Prime. Order total was $26 and change, and we had enough 'points' stored up to cover the price!
-
Must be a big shower!
-
Anybody ever use this jack? (Duralast/Autozone $69.99 online)
pbjman replied to pbjman's topic in Watering Hole
When I was looking up threads about lifts I saw mentions of that several times; it's just the way they work. I guess it's one of those "once you know the trick......" kind of things. -
Thank you Larry for the info! If it weren't for the fuel pump fiasco distracting me I might've been ready to order the adapter. It's gonna be on my Christmas list.