M61A1MECH
-
Posts
2,339 -
Joined
-
Last visited
-
Days Won
18
Content Type
Profiles
Forums
Gallery
Events
Store
Everything posted by M61A1MECH
-
Fuel gauge segments flashing are probably a faulty code, I know when the sending unit goes bad it flashes a code using the gauge segments. Watch them to see if there is a pattern, like a few flashes then pause and then 2 or 3 more flashes, those codes are in the repair manual in the troubleshooting section.
-
Going to the VR international in WVA , leaving on the 10th back around 18th. I got more of out of the rocket blowing up at the cape that from the storm, when that big Roman candle went off it shook the whole house, and I about 35 miles north of the Cape.
-

trying to go through the steps
M61A1MECH replied to rbig1's topic in Royal Star Venture Tech Talk ('99 - '13)
So maybe I missed it, but what is the symptoms of the issue you are having? When does the noise occur? If it is under hard acceleration or when a load is put on in higher gears, it could be pre-detonation of the fuel. That could be caused by a few things. 1) Summer gas sometimes has a slightly lower octane rating than winter gas, I have had per-ignition knocking on my 07 in the heat of the summer months, normally a tank of mid grade gas will clear it up. 2) Could be carbon build up in the cylinders or on the heads, a small bit of red hot glowing carbon can ignite the fuel mixture before the spark plug fires, that will cause pre-detonation, normally a god dose of Seafoam or other top end cleaner will loosen the carbon and flush it out the exhaust. Just a few thoughts, changing the timing would best be done using an after market ignition system like he DYNA2K that allows you program the timing as you like, but I do not think they will allow you to retard the timing, normally they are programed to advance the timing. -
I was just looking at the reviews of the E4s over on the Goldwing forum, everyone likes them with one exception, one guy is saying he is getting a vibration or wobble in tight twisties from the front with the E4 that was not there with other tires. Currently he is investigating things like air pressure and head bearings, so the jury is still out on whether it is the tire or not. Other than that one issue everyone likes them and says they are great in the rain. I am thinking of trying them next time around, but with the little time I have for riding anymore that could be a ways off.
-
That is a distinct possibility I had not considered, the last time I had it apart, I took a big wad of cat fur out of the cooling fins and screen, it runs a lot cooler.
-
it running windows 7, upgraded from Vista , running a 32 bit system. I went to the Acer web site and downloaded the Vista driver, there is no option for a Windows 7 driver for this unit on the Acer site. Tried to run the setup from he driver file, and it reports no Bluetooth device installed. That is one reason why I think the installed hardware has just died of old age. Just like the web cam that is installed the computer no longer sees it, but it there. If you do find something I willing to give it try.
-
OK immediate problem solved, Bluetooth still does not work, but I was able to find that a driver was missing to connect my laptop to the printer via wireless router in the house. So I can now print remotely from my laptop in the kitchen, which was the biggest issue I was having. I think the Bluetooth hardware in my laptop died, the computer does not even list it as an installed device, there is a slider switch on the front of the laptop for turning the Bluetooth on and off, it did work at one time and the light would go on and off with the switch, now sliding the switch has no effect at all. Could not find any hidden key stokes in the manual for turning the Bluetooth on from the key board. May have to open it up and see if there is a broken lead wire or something obvious. It is an old ACER aspire 5100 laptop, probably fortunate that it is still working after all these years. Thanks for the suggestions, I going to keep poking at it , never know the dead horse could wake up if you poke it enough.
-
My tired old lap top had Bluetooth connectivity on it at one time, but now it does not work, recently I have had need of Bluetooth connection and miss it a lot. Is there a good plug in adapter I can get to replace the built in Bluetooth that quit working? I am hoping for something that plugs into a USB port. I saw some on line, but not sure how well they work. Thanks
-
I did something similar, dropped an almost new and fairly nice point and shoot camera, broke the screen. Found a video on Youtube, watched it, saved it for later and ordered an inexpensive one off Ebay, had to wait a few weeks for it to arrive from China, but it was the correct part, followed the video and it was all good in about 20 minutes. Also been having trouble with an intermittent shift key on my lap top, could not for the life of me figure out what I needed to take apart to get the keyboard out, found a Youtube video on the same model and I had it out in 10 minutes, problem is it is all sealed, so no fixing it, lucky there are two shift keys on the keyboard. Good luck, let us know how it works out.
-
Strange Noise:
M61A1MECH replied to Rob Swallows's topic in Royal Star Venture Tech Talk ('99 - '13)
I had one of those heat guards on top of the valve covers, you know the ones you burn your leg on if you ride with shorts, break one time, the break was so clean you could not see it unless you pulled on it and opened the gap. The broken ends would rub together at certain speeds and RPMs and just drive me crazy with a high pitch squeal. Could be something like that, fractured or just loose enough to vibrate and rub against the opposing surface. Screw or bolt may feel tight may be tight, but if it is not tight against what ever it is holding down, that part will still vibrate and make noise. Also sometimes wearing ear plugs while riding will change what frequencies you hear, maybe wearing ear plugs will remove some of the other noise and help isolate the noise source better, also if you ride with ear plugs for a few hours then remove them and continue riding you will (at least it happens to me) hear a lot of things you did not hear before, that also may help to locate the source more precisely. Just some thoughts, your mileage will vary, as the car folks say. -
ABS repairs
M61A1MECH replied to Big Auggie's topic in Venture and Venture Royale Tech Talk ('83 - '93)
Heard good things about this stuff over on the Goldwing forums, I have not tried it. http://www.micromark.com/same-stuff-professional-plastic-welder-refill-2-fl-oz,9002.html -
Did you try contacting Addon Accesories, they may know or be willing to accept a return if he ones here do not work. https://addonaccessories.net/footres...nger-pegs.html Worth asking he question.
-
Grommets
M61A1MECH replied to Big Auggie's topic in Venture and Venture Royale Tech Talk ('83 - '93)
Try here, http://wingstuff.com/shop/?keyword=GROMMETS -
Buyers do not need your PayPal account information, all he needs to do is tell Pay Pal to send you the money from his account to what email address you have set up. Craig's list is full of scammers especially when it comes to vehicles. I do not think I would allow such a large purchase on Pay Pal. My bet , it is a scam of some type, he can get Pay Pal to send him his own money and he can then send you a certified check, that you cash and wait for it to clear the bank before turning over the title and keys to the bike. Be very careful.
-
Two PMs sent, second one has phone # of gentleman with a couple sets.
-
Yep, you should have seen the look on his face when I pointed out to him that the one we were looking at, which happened to be on a display bike at the Yamaha factory tent in Daytona during bike week, was on the wrong side of the bike to do any good. I asked; Why this one was on the right while mine was on the left? He scurried right off to get a technician, I came back later in the day and it had been swapped to the other side.
-
The heat shield part is there "according to Yamaha rep" I spoke with once is to deflect fuel that could get spilled when filing the tank away from the motor, just telling what I was told. The wire thingy is there to remind not to wear shorts when riding a motorcycle, because that little bugger will burn the crap out of you if you do, don't ask me how I know that.
-
Tranfering Microsoft Streets & Trips froutes to Garmin GPS
M61A1MECH replied to M61A1MECH's topic in GPS, Audio, Electronics
Well at least it did not get you lost. I have many times had basecamp do that , to me base camp is just not user friendly. -
I am not sure if this has been discussed before or not, I did not find any threads when I searched for it. I have never figured out Base Camp, but I am pretty good with Streets and Trips, but until now had not found a concise set of directions for doing a file transfer from S&T to a Garmin. I just ran across a very clear concise set of instruction to import Streets & Trips routes to a Garmin. I can tell you that the process works as far as getting the GPX file imported to the Garmin and when using the preview function in the Garmin the route on the GPS it looks correct. I have not done any trips using this file transfer method, so I cannot vouch that the route that Garmin GPS uses is exactly the route I planned. In the post I saw on the Goldwing rider forum a few years ago someone mentioned needing to use multiple waypoints in S&T to force the Garmin software to follow the route you want. As soon as I can I will test this process out and report back, in the meantime here are the instructions I found. Try them out and let us know how it works. IMPORT STREETS AND TRIPS TO GARMIN.pdf
-
The caliper only needs to be relocated if the rear end is lowered with something like the Baron's kit, but I have heard of folks not using the relocation kit when lowered. And Feebird is correct on the visuals of the links, after market ones will likely not be dogbone shaped
-
If the bike is to tall for you, try to confirm if the previous owner put leveling links on the bike, those are a common modification and they raise the rear end by about 3/4 inch If the PO is not available to talk to or no maintenance log available, the only way to be sure is to get down and measure the dog bone links on the rear suspension, I am sure some one here has the measurements for the stock and modified links. Barons makes a lowering it for the rear.
-
Those are Korean bikes, they have been selling them around Daytona for a few years I forget which model it was they have, but it visually resembled a Harley V-Rod so much I think Harley filed a suit against them. Did not know they were using Suzuki V-twins. To me that one looks a lot like a Yamaha V-Star 250 0r 650. I think this is the one I am thinking about, http://www.motorcyclenews.com/bike-reviews/hyosung/gv650-aquila/2006/
-
One habit I have gotten into over the years of suffering from CRS is when I am doing maintenance on the bike or car that if the vehicle were started or moved could cause serious damage, I take the key out of the ignition or out of my pocket and hang it on the wall. That way if I am half way into something and get interrupted I cannot just jump on the bike or in the car and roar off with out going and retrieving the key, that is when the brain says , "Why is the key on the wall?" It is just enough of a reminder to cause me to pause and review what I had been doing before being interrupted. Remove before flight tags are also great reminders, I have one on the string attached to my side stand plate I use when parking on soft soil or hot asphalt parking lot. String with remove before flight tag are attached to the left grip, hard to forget.
-
Chuck, Thanks , pm sent
-
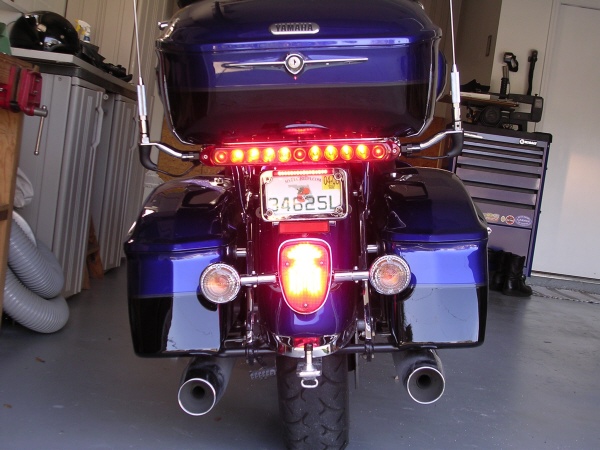
A friend in north Georgia is putting a Venture trunk on his Stratoliner, the "wing" that goes around the trunk lock and extends left and right is damaged, he looking for a replacement. If anyone has de-badged their Venture and has one they want to get rid of, I would be happy to put the two of you in touch. I have already told him to check Pinwall, so he may find one on his own. The part he needs can be seen in the photo.