luvmy40
-
Posts
1,728 -
Joined
-
Last visited
-
Days Won
40
Content Type
Profiles
Forums
Gallery
Events
Store
Everything posted by luvmy40
-
A little off topic, maybe... A little remembered factoid. The term suicide shift is actually a flawed evolution of the term suicide clutch; The jockey shift motorcycles of the '40's and '50s(maybe even the '30s?) had foot pedal operated clutches. In the factory configuration, they had a solid linkage from the pedal to the clutch actuating arm. They could be locked into the engaged position by pushing the pedal over the top. Chopper builders tended to replace the solid linkage with a chain, which eliminated the ability lock the clutch out. That coupled with the lack of front brakes on the vast majority of custom choppers made taking off from a stop on hill very difficult. A lot of chopper riders would run lights on hills regularly. Thus, the Suicide Clutch. Here is a good short essay on the subject. https://sturgis.com/blog/suicide-clutch-a-definition
-
Hah! That was my first real motorcycle. That little beauty tore up the mountains of Pulaski, VA and burned itself into my soul!
-

Battery Bypass, Right Wire?
luvmy40 replied to clint_1985's topic in Venture and Venture Royale Tech Talk ('83 - '93)
Personally, I'd tie it to the accessory connection. I've seen where people have just tied it straight to the battery and claimed it worked. I've also heard of the twelve volts direct doing bad things to the monitor board. I've seen all kind of different resistance values bandied about but the one I see the most is 22K ohm. It may not(and probably IS not) critical. I never worried about it. I just made a habit of acknowledging the alarm every ride. -
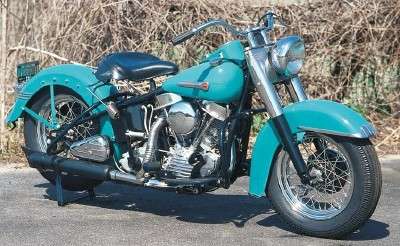
The V Max is at the top of my rider list. Don't really care about the vintage. I just want one and I plan on riding it like I stole it. I would love to have a 1949 Harley Hydra Glide. I think these may be the most beautiful motorcycles ever made. I had a home built chopper with the '49 pan head for a few days back in the late eighties. I was buying it from Barnett in El Paso, TX where I worked occasionally transporting bikes on a flat bed. They took my Sportster in trade as the down payment and let me ride the Pan Head home. Two days later, the bank decided they wouldn't float the $3K on a home built title even though the bike was worth twice that. I got the sporty back and cried myself to sleep for a week. I wouldn't say it's on my list, but if I ever find a really cherry '81 Yamaha Seca 750, I'd have to buy it. That is a great bike and I put many thousands of miles on one, then gave it to my son who put another hundred thousand on it before it gave up the ghost. In the end it was the Phoenix heat that did her in.

-
Battery Bypass, Right Wire?
luvmy40 replied to clint_1985's topic in Venture and Venture Royale Tech Talk ('83 - '93)
I have absolutely no idea if this is why the head light warning is coming on, but that resistor for the battery water indicator should be 22K ohm, not 2.2K ohm. That's 22,000 ohm -
It's just easier to get the air chuck on the 90 deg fitting under the side bags and past the front rotors. It's a "nice to have" rather than a "must have" kind of thing. I do think there is a little more clearance, both front and rear on the Gen 2 than the Gen 1.
-
My EDC is the first gen PPS and I have been eyeballing the HellCat. How's the trigger on that critter?
-
I just did a short check on the '06. 9.6 miles on the GPS. 9.5 mi. on the bike's odometer. I'll check it tomorrow on a longer run. I used a -7.2 setting on the SpeedoDRD and the speedo is dead on with the GPS at any speed.
-
Is this a fair price? 87 VR
luvmy40 replied to Pasta Burner's topic in Venture and Venture Royale Tech Talk ('83 - '93)
Seems a bit steep to me, but it's hard to say without seeing it in person. I picked up an '86 in extremely good condition with about 23000 miles on the clock for $2300.00. It had been sitting in a garage for for quite a long time but needed nothing but a battery to be road worthy. Granted, the head cover gaskets seep just a tiny bit. I also got extremely lucky with an '06 RSV with about 4 times the miles but also very well maintained for the same $. I would definitely want to see it in person and take a test run. Not sure I could justify $3900.00 unless it is truly immaculate though. -
New dimension to an old hobby-or-Where's my Kilt?!
luvmy40 replied to luvmy40's topic in Watering Hole
How's the Maxim coming? I'd love to see some pics when she's back on the road. -
The FOBO Bike 2 arrived today and is up and running. Super cool! As for the Tee fittings, they will have to wait til I put new rubber on as I hadn't thought about the fact that the current stems are rubber. I'll install the short steel stems that came with the FOBO when I do the new tires and then install the Tees. In retrospect, I should have ordered the hard mount Tees. That's what I get for buying stuff spur of the moment!
-
Glad I stopped by this thread again! I was feeling a little down as the last time I checked the fuel economy of the '06, I was only seeing 36MPG rather than the 41MPG that I got the first few tanks. I had completely forgotten the Speedo DRD would effect the odometer. Next trip I'll run a GPS odometer and check to see what the differential is.
-
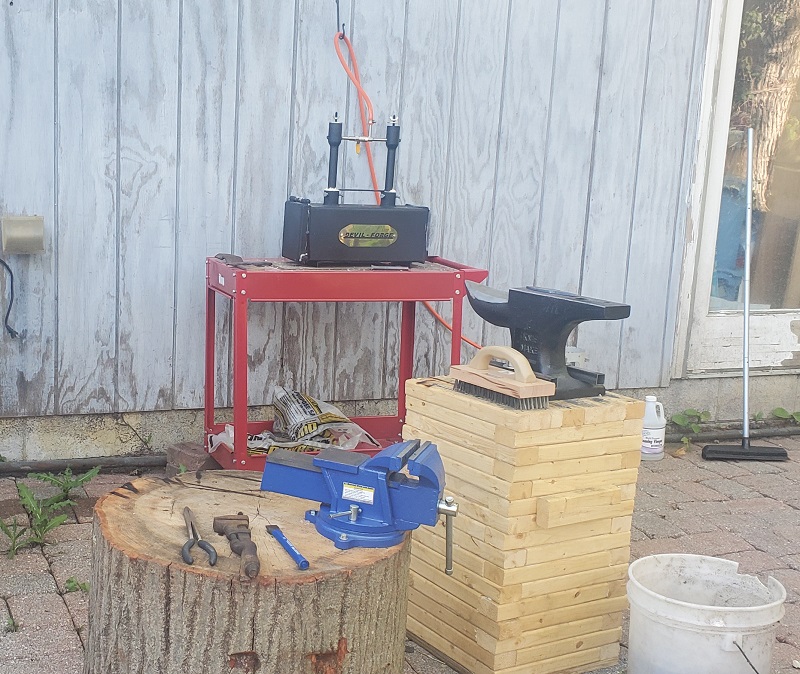
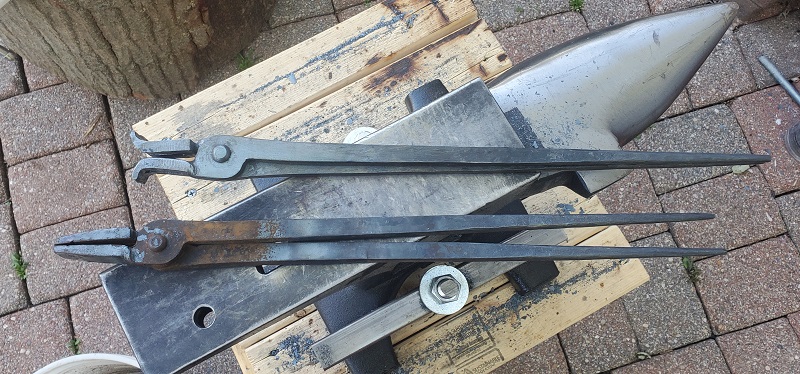
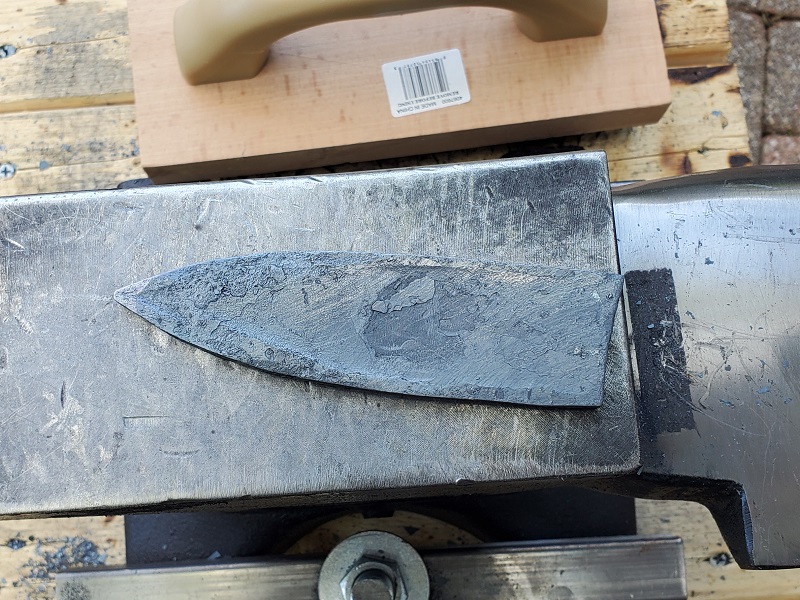
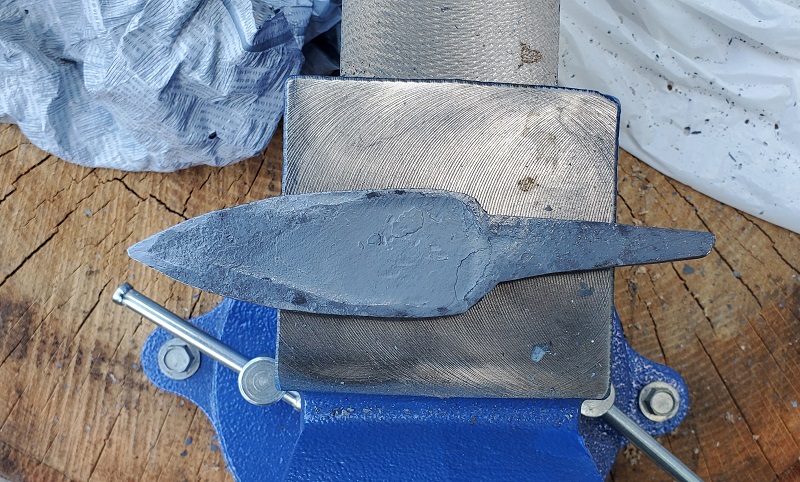
I have dabbled at knife making for many years. I'm sure I've posted pictures of some of my past projects up here from time to time. I have always used what's known in the industry as the stock removal method, i.e., I start with either a piece of flat bar stock or a pre cut flat blade blank and remove everything that isn't a knife. Then I make and attach the handle or scales. It has been a very rewarding hobby and I've even made a dollar or two here and there selling a project when I get bored with it. The whole family became obsessed with the Forged In Fire series a few years ago and we all started watching Youtube videos from Alec Steele and Jason Knight around the same time. About a month ago my son asked me when I was going to build a forge. My wife looked at me and said "Yah, when are you going to build a forge?" That was a mistake. As it turns out, I could buy a two burner propane forge from a builder in Ukraine for less than I could build one. Thank you ebay! Anvils are, evidently made of solid gold. after perusing ebay and craigslist for a few weeks and finding nothing but hunks of rust for $1,500.00-$3,500.00 I gave up on finding the deal of the century and ordered a nice 70 lb. knife maker's anvil for $400+/- from Centaur Forge in NC. Then I found out that black smith tongs are fairly expensive as well. This time Amazon was my savior. I found a set of pre cut blanks to make five sets of tongs from Ken's Custom Iron on Amazon, all 5 were about the cost of one good pre made set. I remembered a youtube video Alec Steele did a few years ago about making a good smithing hammer from a cheap Harbor Freight hammer. Off to HF to corner the market on hammers. 2 ball peen hammers, 2 one hand sledge hammers and a cross peen hammer, a couple flapper discs for the right angle grinder and about 3 hours labor and I have a decent set of hammers for the forge. Then a trip to the local welding supply store for a leather apron, some wire brushes, soap stone, etc, etc. Last weekend my wife and I went down to Logan OH for a beginner's Blacksmithing class at The Southern Ohio School of Black Smithing with Doug Lockheart and family in lieu of the Rally at the Shores(Thanks Bro Cuomo!) We had a great time, made some new friends and learned some basic smithing skills. While we were at the class, my son built the anvil stand and set up up the forge on the back patio. Yesterday I got to work and made a couple pairs of tongs which I used today to forge my first knife from 1095 bar stock. I am STOKED! I am now, truly a knife maker! Granted, it is far from perfect and will need some serious work on the slack grinder, but it is still a hand forged blade that I MADE! All this so I could post up some pictures. The forge: The Tongs: The blade before I forged the tang: And with the tang: u Like I said, it will need some work on the slack grinder but all in all, I think it turned pretty good for my first serious smithing attempt. The knife, when finished will be a Scottish Sgian Dubh(pronounced "skiːən ˈduː/ skee-ən-DOO") to accessorize the utility kilt my son talked me into buying, and I actually rather like to my surprise. I like it so much I ordered another one. To anyone who actually made it through this epic, long winded post to see the pictures, THANK YOU!
-
Wow! That's a great deal. Sure wish I had that kind of scratch laying around. It would be kind of cool to a have Gen 1 MK1, a Gen 1 MK 2, a Gen 2 and a Gen 3 together in the garage!
-
1st Gen. refers to the original Yamaha Venture made from 1983 to 1993 and is also broken down further to MK1('83-'85) and MK2('86-'93) These are a more traditional Touring styled bike along the lines of the Honda Gold Wing 2nd Gen refers to the more American Cruiser styled Ventures produced from 1999-2013 and includes the Royal Star Venture and the Tour Deluxe Both have the water cooled V4 engine that also, in a modified version powers the Vmax power sport bike. In my mind, passing lights and driving lights are the same equipment but can be wired differently. I.e., only on with low beams or always on, etc.
-
New to me 2007 royal star venture
luvmy40 replied to Jpratt1991's topic in Royal Star Venture Tech Talk ('99 - '13)
The Morgan Carbtune Pro seems to be the most popular one around here. I have it and have had no problems with it. I've used it for many years on many different bikes. https://www.carbtune.com/ -
That doesn't promote their agenda. The people pulling the strings couldn't care less about Black Lives, White Lives or any lives but their own. eliminating Black on Black crime does nothing to hold the masses under their thumb.
-
That almost looks like someone was running 2 stroke oil in the fuel. Dirty 2 stroke oil.
-
Working Class controller Needed !!
luvmy40 replied to ken5124's topic in Venture and Venture Royale Tech Talk ('83 - '93)
I've got two that need re soldered. I'm just too darned lazy to do it! I can usually putz with the one installed right now and get it to work long enough to set or check the pressures. -
2007 RSV overheating
luvmy40 replied to N2MQK_PA's topic in Royal Star Venture Tech Talk ('99 - '13)
just throwing stuff at the wall:banana: I'd start by checking the fan switch. If the over heat indicator came on but the fan wasn't running, it's either the switch or the fan itself. Of course it is possible that the water pump is shot. You did say that it was low on coolant. Water pumps typically leak when they go bad. That would not account for the fan not running though. -
If you look in the accessories section, there are two different styles of T fitting. One is installed in place of your valve stem and the other just screws onto your existing valve stem. I ordered the ones that screw on. I put angled valve stems on The beast to make checking and filling easier. I am going to try these Ts on the '06. They look to be about an 1-1/2" long with a side stem, so you mount the TPS sensor on the top leg and fill through the side leg, 90 deg. opposed from the standard stem.
-
Thanks! I just order a set of these and the T fittings for the '06.
-
https://www.tonnopro.com/just/tonno-pro-hf-360-tonno-pro-hard-fold-tri-folding-truck-bed-cover I have the soft tri fold from Tonno Pro on my '08 F150 and it is a great cover for the money. Installation is stupid easy and fast. I bought mine through Auto Zone when I worked there.
-
I used these on my '83 and they worked perfectly. https://www.ebay.com/itm/311235893434 Oops! It looks like those aren't available from that seller any more. Still a google search for '76- '87 Honda GL1100 caps should do the trick.
-
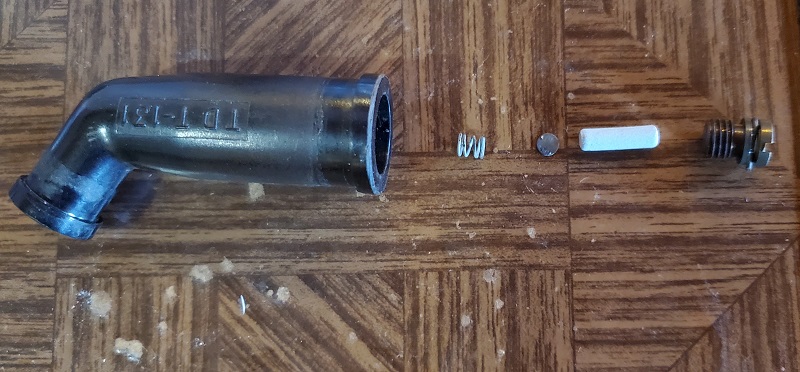
Here is the correct assembly