Rick Butler
-
Posts
681 -
Joined
-
Last visited
Content Type
Profiles
Forums
Gallery
Events
Store
Everything posted by Rick Butler
-

Steering Wanders
Rick Butler replied to ToyOdie's topic in Royal Star and Royal Star Tour Deluxe Tech Talk
Well good deal, I can't explain it, but these Royal Star frames seemed to make a big difference on the head bearing torque compared to what we had to deal with on any of the 1st Gens. They just like it to where the forks move smoothly to the stops with a little friction. On a 1st gen you wanted the forks to move smoothly off center, but stop before they hit the stops....or more friction? Rick -
Series vs mosfet vs shunt voltages on regulators
Rick Butler replied to iphlue's topic in General Tech Talk
Glenn,I've attached a fault finding diagram I found on the ElectroSport site that explains what you are asking on checking voltage. It basically boils down to GT 50VAC across each of the 3 white wires (phases) from the stator......and GT 13.5 at 2,500 rpm and LT 14.8 VDC at 5,000 rpm and the stator is just fine. Electrical fault-finding-diagram.pdf -
Steering Wanders
Rick Butler replied to ToyOdie's topic in Royal Star and Royal Star Tour Deluxe Tech Talk
Yeah Rich, If you had a 1st gen, I would say that tightening the head bearing a bit is a good thing. But I have discovered that with these new frames on the 2nd gen, doing this will give you adverse effects. In fact riding the bike after torquing the head bearings is the final test.....if it won't ride straight, then they are too tight and if the head shakes at 70mph when you lock the cruise and take your hands off the bars, too loose. And it doesn't take much of a movement in the nut to make a change either way. But I don't think you will need a Plan B, as I'll bet good money it's the head bearing......did you also pack them real good when you replaced the bearings? Good luck, Rick -
BJ, It's been a long time, but yes I have taken a coilover 1st shock apart but I did it with a Dremel and had to cut it apart. And there is nothing that is rebuildable in this shock without considerable machining, which would cost the same as a replacement shock. You had the good judgement to install RaceTech Cartridge Emulators in your forks (and hopefully replace the springs and bushings), but would you want to buy them or make them yourself? I would suggest a Hagon, but looking at their application list it doesn't appear that they have one for the 86-93 Royale. But I would call them and see if they could build one with their components. You might send them yours to evaluate/prototype and maybe they would discount it? Regardless, they still make the best shock for the money. http://www.hagonshocksusa.com/ Hope this helps, Rick
-
Steering Wanders
Rick Butler replied to ToyOdie's topic in Royal Star and Royal Star Tour Deluxe Tech Talk
Rich, With everything you have done to this bike and it's still wondering, I really feel you have the head bearings too tight. Too loose, the head will shake on deceleration and too tight it will constantly wonder trying to correct the tracking between the front and rear wheel. I would pull the top tree and back off the castle nuts 1/2 a castle and put her back together and see if that makes a difference. Good luck, Rick -
Seat bracket
Rick Butler replied to eagleeye's topic in Royal Star and Royal Star Tour Deluxe Tech Talk
Take a look at this fiche: http://www.stadiumyamaha.com/oemparts/a/yam/5004684bf8700209bc796349/seat It's #10 and cost around $30 or so Hope this helps, Rick -
Eck, I only need your seat for a couple of days and since you don't have a heated seat, the cost is the same as any other seat. And that would work perfect to drop it off with me and I'll have it ready for you when you head back home. However I do have a few days already scheduled to be away from the house in November....the weekend of Nov 1st and Sunday Nov 8th. Just keep informed as to when you are coming, Rick
-
Eck, I think you will really like what I do for a GL1800 seat. I started doing these seats a couple of years ago with a couple of local bikes and after I finished it, the guy asked if I minded if he posted my work on his GL1800 forum. Well for about a couple of months, I was covered up with GL1800 seats so I pretty much have them nailed down where I still do a few every year. You won't believe this, but I use 2" memory foam (the same foam I use on pillowtop seats) which really turns out great. I guess I need to post just a GL1800/1500 classified ad. And the heating elements are not an issue, it just takes me longer because of the extra time involved in removing and re-installing the elements......where I also charge more. The only problem is finding or building a 34X19X13 box to ship it to me. Let me know if I can help
-
Russell Seat Comfort
Rick Butler replied to bwk's topic in Royal Star and Royal Star Tour Deluxe Tech Talk
Wayne, Russell builds their seats on your stock seat pan, so for the most part you are limited to the distance from the tank to the convergence of the fender. Now Russell will build a taller seat (to give you a "Day Long" seat) which in fact will allow them to move you back further, which should help. Rick -
Josh, Your request is perfect timing as Rick Butler is back from a 2 month injury to start reworking seats for you guys. In fact I just completed a 96 Royal Star seat that really works out well. Take a look at my classifed ad which explains what I do and pretty much everything you need to send me s seat (s). [TABLE=width: 82] [TR] [TD=class: xl24, width: 82]http://www.venturerider.org/forum/photopost/showproduct.php?product=21&title=butt-butler-seat-mod&cat=16[/TD] [/TR] [/TABLE] Let me know if I can help, Rick
-
Ok Folks, A couple of weeks ago I got the clearance from my doctor that my collar bone and ribs are healing up and I could start getting back to using my right arm......but to take it easy for another month. So I have done a few local seats since then, to see how it went and for the most part, I'm ready to go. Now I can't do more than one set of seats in a day, so I won't be able to turn them around like I have in the past. So, if you have been waiting to send me a seat, go ahead and get with me and we'll get something going. Thanks for being patient, Rick
-
Thoughts on brake pads
Rick Butler replied to YamahaLarry's topic in Royal Star Venture Tech Talk ('99 - '13)
Larry, If I were you I would put EBC FA179 HH Copper sintered pads on the front and FA123 Organic pads on the rear. The organic pads use Kevlar or Aramid which Skydoc told me doesn't really grab hard until they get real hot........which helps in keeping the rear brake from locking up with occasional hard rear braking. Now the HH pads grab good and have a nice smooth feel and do not gouge the rotors. Hope this help, Rick -
Chuck has it right, If you get a set of oem pads too hot they will fad.... bad. But my question is WHY are you using the rear brake to scrub off speed......that's what your front brakes are for, where they load the front tire and give you a bigger contact patch. You get 70% of your total stopping power from the front brakes. Hope this helps, Rick
-
Hey Ron, I have a cracker jack painter down here in north Garland on Buckingham at 78 that is real good and inexpensive. He did a front fairing for me for $200. I'm guessing your 01 is the cherry and burgundy somaybe your damage is just in one color where he is real good at taping up the pen strip and painting the second color and you will never know that it was repainted. Rick 214-926-3905
-
Is 77k too many miles
Rick Butler replied to volmann's topic in Royal Star Venture Tech Talk ('99 - '13)
No, That's low mileage for an 87 -
Pulsing Back Brake
Rick Butler replied to Wizard765's topic in Royal Star Venture Tech Talk ('99 - '13)
Wayne, They should be able to put a runout gauge on the rotor to check for warpage or whether the wheel has issues? Then he might think about changing pads to sintered copper HH pads rather than the oem organic, which are much smoother? Rick -
Has anyone seen this one? I saw it on Facebook where they said rumors are this is a spy shot of a new design of the Royal Star Venture. Looks somewhat interesting?
-
I use a small lock washer between the screw head and the flat washer which helps keep them tight by just snugging them up hand tight. I also use longer screws with the Clearview screen. Hope this helps, Rick
-
2nd Gen Valve Adjustment
Rick Butler replied to V7Goose's topic in Royal Star Venture Tech Talk ('99 - '13)
Kent, I've used a couple of 2" O rings on each side which seal up this junction pretty good. Rick -
Passenger Headset/RC Wires
Rick Butler replied to Donvito's topic in Venture and Venture Royale Tech Talk ('83 - '93)
Sorry Vito, I didn't see your post until now. But I have exactly what you need and it's been laying in a drawer for years and you can have it for the cost of postage. Let me know, Rick -
Sorry Guys, But I already have a commitment for a 10 day trip with my guys down here around that same. After last year getting canceled, I had kinda taken my eye off of it for this year. But I'll try to make it back up there next year. Rick
-
Sorry to hear this Don, I've met him a couple of times and certainly had more than conversation with him where I thought he was good guy. I know he will be missed by his close friends, Rick
-
What is your winter project for this year?
Rick Butler replied to Venturous Randy's topic in Watering Hole
Folks, I don't means to sound self-serving, but if you plan on doing some long rides next year.....you might consider sending the "Butt Butler" your seat (s) to rebuild.....that is if you have not already done it. This is usually my busy time of the year to rework seats, but I'm still surprised and the number of folks who wait until later in the Spring when I'm getting ready to take off on a long ride myself. So if you have already put your bike up for the season, this is the perfect time to turn loose of your seat (s) to let me make them better for you. [TABLE=width: 103] [TR] [TD=class: xl24, width: 103]http://www.venturerider.org/forum/photopost/showproduct.php?product=21&title=butt-butler-seat-mod&cat=16 [/TD] [/TR] [/TABLE] Let me know if I can help, Rick -
Charging system 99 RSV
Rick Butler replied to hmlemons0608's topic in Royal Star Venture Tech Talk ('99 - '13)
Henry, I've attached a fault finding diagram I found on the ElectroSport site (one of the manufactures of motorcycle stators and rectifiers), which I've found to be very helpful in situations like this. And they also provided a diode testing procedure for testing the diodes in the rectifier which I've also attached. Hope this helps, Rick Electrical fault-finding-diagram.pdf Diode-testing-guide.pdf -
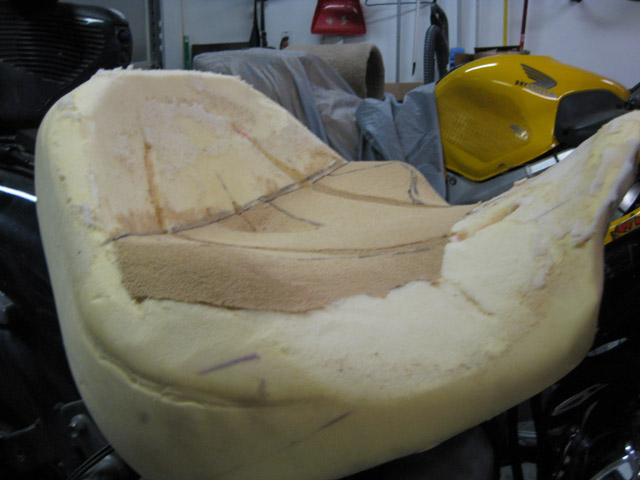
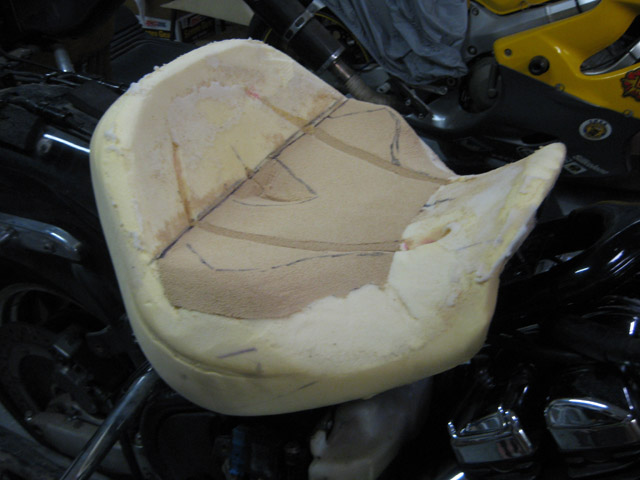
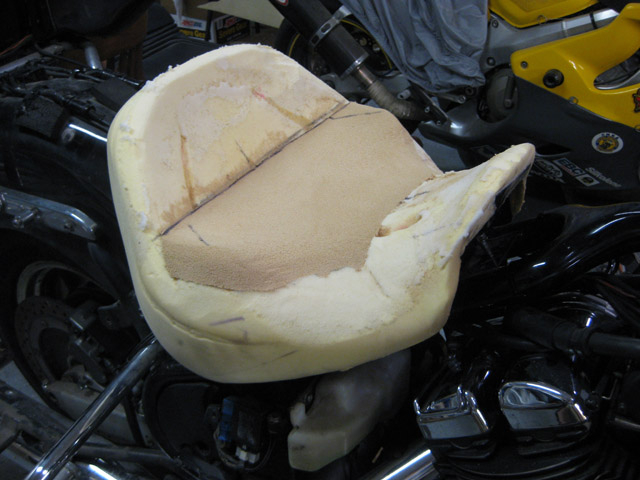
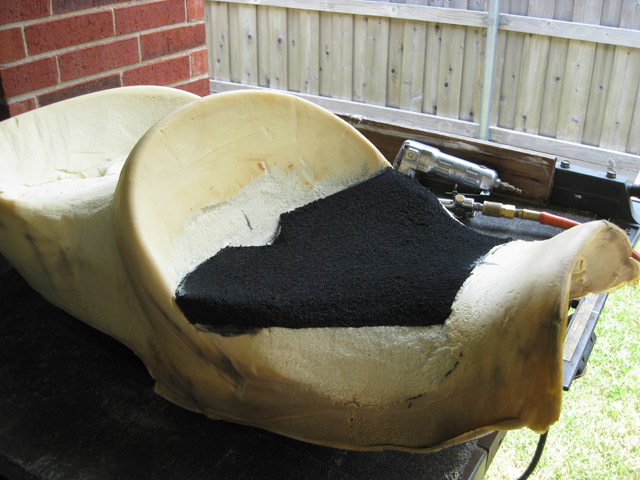
Hey Folks, Recently I had the opportunity to make a unique followup second change to a pillowtop seat for a customer who wanted me to raise the seat level back to the original seat height. On all of my modifications, I remove material from the foundation foam to remove pressure points and create a pocket for the rider to sit into, rather than sit on. This customer had a special situation with one leg where I need to change the angle of the legs and the only way I could do that was to bring the seat height back up to the original height. This meant I had to ad foam, and to do this I did what I have done on several sport touring and adventure bike seats, and that was to cut out a flat section of the seat bottom and glue in a layer of firmer foam and then rework the shape. I first started doing this on older seats where the foundation foam had deteriorated and it needed to be build back up to let me reshape the seat as needed. Then I adapted the process to allow me to provide a firmer seat foundation that I could provide a better shape for sport touring and adventure bike seats. I have found a closed cell foam that is used for gym mats in 1 and 2" thicknesses that has really worked out nice for applications like this where I need to rebuild a seat. I have always felt that a firmer seat is a better seat and this change has allowed me to control the shape of the seat more to where I can usually even make it wider and still stay with the stock cover. Then I still cover the entire seat with a layer of memory foam to help reduce pressure points. And it still allows the rider to settle down to the firmer foundation. Now when I test fitted this seat on my bike it really felt nice and my first thought was that this was a change that that I needed to to do with my Butt Butler Pillowtop? So I've attached a few pictures of what I did to this pillowtop. And for you folks that would like a firmer seat, this may be a addition I may make to my Butt Butler seat mods. Now like I do for covers that are attached with pop rivets and seats with heating elements, I will charge a modest fee to my base price. So let me know what you think of this. Rick