Geobob
-
Posts
219 -
Joined
-
Last visited
-
Days Won
1
Content Type
Profiles
Forums
Gallery
Events
Store
Everything posted by Geobob
-
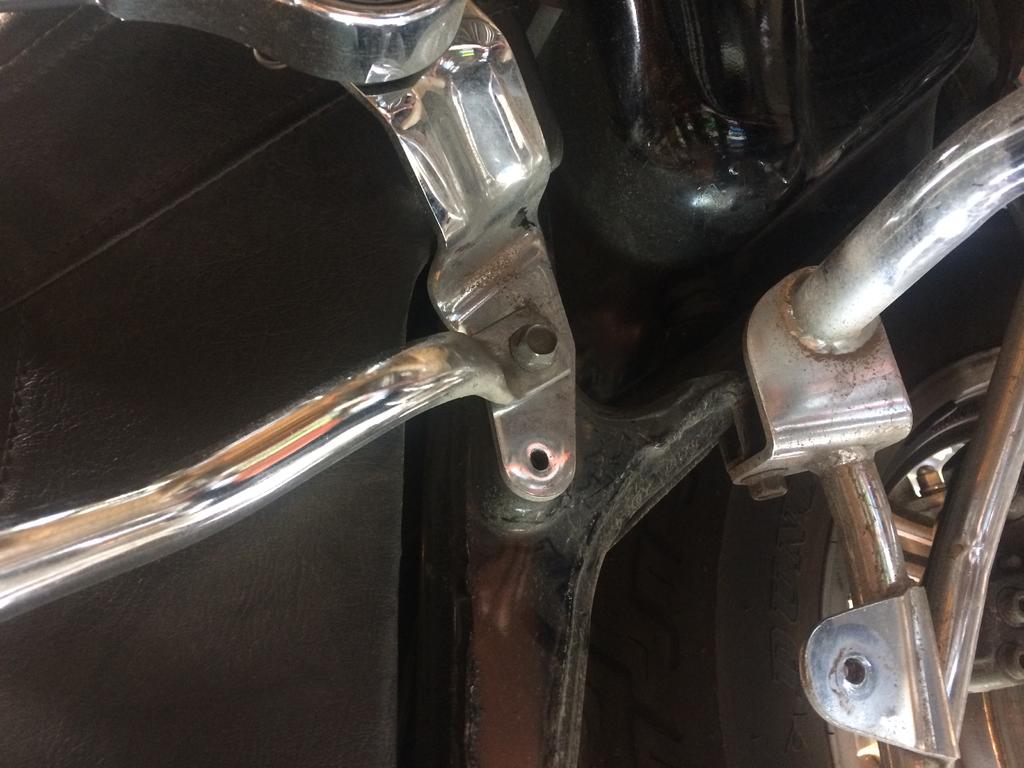
Just in case anyone else runs across this problem. I have a vetureline back rest on the bike and I was using as a safty line lifting point while I had the bike up on the stand. Regardless of that I believe the bracket puts stress on the small positioning screw that is one of three that hold the black plastic side cover on below the seat on each side. I think I have had this problem in the past. The back two screws always just come right out. The front one has always given me a problem. This time I started drilling on it and was about to run off to the hardware store to buy a better drill bit before I stopped and check myself. I gave up on the one side and went around to the other side and while dealing with the same issue I got to thinking about what was going on. I took the weight off the back rest and loosened the 12 mm bolt. After that the screw came out with little effort but the threads were a mess. I went back to the other side and did the same and even with the screw head all messed up from the drilling attempt I was able to get it to turn after loosening the 12 mm bolt. Hopefully the photo helps show the issue. Happy wrenching.

-
Note to self: The ignition switch needs to be bolted to the back of the top triple clamp way before you put everything else back on. Dam. I am guessing 4 hours of disassembly and reassembly I kind of figure this would happen some how since the front end has been apart for months and I was bound to forget something and loose a few screws. ok time to get back at it.
-
steering head bearings
Geobob replied to Locomotive's topic in Venture and Venture Royale Tech Talk ('83 - '93)
When I get done with the front end I am moving to the rear. I have newer rear rotor to put on and I plan on pulling the drive shaft to grease the splines. I have grease fittings in the swing arm and believe it is still good. I had it apart last year and I thought it looked good but I take a closer look this time. I know I have one slightly corroded sleeve/bushing that I should look at replacing but its been that way since I put the grease fittings in 10 -15 years ago. -
This is exactly what I was thinking about today as I looked for that cold weather leak. I have replace all of the o rings that I thought were the cause of leaks that I had in the past so I assume they are good. This winter sure enough every time the temp would drop below freezing or something the bike would take a piss. I was going to forget about it but since I have the front end apart I thought about taking the radiator off and taking to a shop to have them pressure test it. Is there a simple way to do this myself with some nifty air fitting installed in a cap or something?
-
steering head bearings
Geobob replied to Locomotive's topic in Venture and Venture Royale Tech Talk ('83 - '93)
Thanks for the advice. So the upper ring nut is used to find tune the torque on the lower nut. I got mine apart last night and the bearings and races looked good and well greased. It also felt snug before taking it apart. I am left with assuming my wobble was the result of the fork oil levels not being correct. I should have measured what came out but I did not so we will just have to hope it was. -
steering head bearings
Geobob replied to Locomotive's topic in Venture and Venture Royale Tech Talk ('83 - '93)
I suspect this is all in the manual but I am a bit lost about what is holding things in place. The two lock type ring nuts under the top triple tree seems to be the adjustment while the nut on top of the triple clamp holds the adjustment in place. There are two ring nuts with a lock ring between them. I would assume the bottom one is what you would adjust to the proper torque and then the lock washer and top ring tightened down to hold the lower. Then the lock wash tabs keep the two in place. I guess the top nut on the upper triple clamp would also keep the whole thing in place but I wonder if it also does not put additional pressure on the bearings. I guess I need to read through the manual to see what Yamaha thought about the process. It does sound like a good idea to clean and grease just to check it out for where. It was replaced but it was many years ago. -
Progessive springs
Geobob replied to dna9656's topic in Venture and Venture Royale Tech Talk ('83 - '93)
For all those who are servicing their forks I decided to replace my fork oil after some 10+ years. I had a shop put progressive springs in which allowed me to get rid of the front air assist which was leaking. The springs along with a new head tube bearing made a huge difference. So I have the front wheel off and the forks exposed. Opened the drain plug and pulled the cap and spring out. Worked the tubes up and down so I think I have most of the oil out that is going to come out. What is interesting is that the manual says there is something like 14 oz of oil in each fork. There is no way there is anywhere close to 28 oz of oil in the pan I collected oil in. Can you loose fork oil over the years just from riding. I realize complete disassembly might get more oil out but I have them free enough that I can take them out and dump them over to see if any more will come out. I am just wondering how the bike could have been riding as well as it was with what looks like about half the oil in the forks that it was supposed to have. -
Hello Guys. Once again its wrenching season and this year we are replacing breaks. In the process I took everything off up front to clean and inspect and deal with my RLU. So far that sounds simple enough after the video and the info here but what got my attention is the idea of "over powering" my LED head light. I installed the LED headlight last year and while it is better, it is not outstanding. I thought about replacing it with one from Superbright but thought I might want to just try cranking this one up first. I did some searching on the web and so far I am not finding the information I thought might be right here. Am I just looking at the wrong thread?
-
Well this tread ended abruptly. Must have something to do with the better brakes. So Earl has enlightened me about this swap and his kits. Since I had a couple of FZR rotors hanging around and some old braided steel lines I thought I would dive in to this one myself. The one thing I could not find was the front master cylinder for the 1990 or 1989 FZR brakes. I see that initially Earl was using R1 parts but he pointed out that the FZR calipers are also bolt ups and I think that is what he is using in his kits. So it sounds like the initial swap used the stock Venture master cylinder and it apparently worked very well. Is it safe to assume this is still the case since I would rather leave it. It probably looks and fits better than the FZR unit but I have not looked closely. I suspect I would find something that needs tweaked if I changed out the master cylinder so we will likely give it a go with the stock one to begin with. And thanks to Earls help with other items he has helped with.
-
Greasing rear wheel pins and splines
Geobob replied to frankd's topic in Venture and Venture Royale Tech Talk ('83 - '93)
I did not want to start a new thread so I am posting on this one. Hope that is the best way. Please let me know if there is a better thread on the subject. I looked and could not find what I was looking for. I think I have had to do this previously. I took my rear wheel off to replace the tire and the drive splines on the wheel were rusty and almost gone. Why, well maybe I did not use the good moly paste that is $20 a ounce. So now I am shopping on ebay for replacement. Are the first gen and second get drive sprockets interchangeable. And dose anyone have an idea why the splines went dry, rusted and wore down. It was only a 6-7K miles since I greased it last. -
Sidestand Switch
Geobob replied to Donvito's topic in Venture and Venture Royale Tech Talk ('83 - '93)
Has anyone found a replacement for this switch. I am going to look at cleaning mine and re attaching the wires. I had them off and crimped together with no issues other than occasionally riding off with the stand down. Last weekend for some reason the wires must have been grounding or separating inside the crimp connector since the ignition was cutting off with the bike in gear. In neutral all was fine. I moved the wire from where ever it was tucked in and the problem was solved. This had my wife (who is now riding our newer Victory Vision) telling me I need a more reliable or newer touring bike if we are going to take these longer overnight trips. I kind of agree but I still think this bike is every bit as nice as any of the newer rides. On another note, has anyone notices how many fist gen Ventures are for sale on Craigslist. I was kind of shocked to see so many and some with really low mileage. -
Loss of power since the timing would not advance. It would also get hot. It is easy enough to test even with the unit on the bike if I am not mistaken. I think these guys on here diagnosed my problem just based on my symptoms. Once I pulled it off and bench tested it with a vacuum pump and volt meter it was confirmed. The TCI was just and after thought. That goes back to my old saying of if its not broke don't try and fix it. I my ex wife got me a door mat that said "if it an't broke don't buy it" I have stopped buying old non-running bikes.
-
I tried to respond to the initial post but it got lost some how. I just wanted to add my 2 cents. I tried the repair path because I just wanted to give it a go. I had previously repaired the compressor control board but that was just broken connections. Maybe I did get most of the diodes in but as Flinfool pointed out, my board was bad and I could not really see that. I would keep an eye on ebay for another TCI while you work on the one you have. This forum is one of the best. The amount of experience with these bikes is vast. It make owning and keeping one running much more rewarding that frustrating. My bike is running stronger than it has for a long time suggesting my vacuum advance has been failing slowly over the past few years. I can not help you with the transistor but I bet someone on here can. These guys are the best. I need to get to one of the rallys.
-
That was extremely helpful. I have to get more proficient with that. If a picture is worth a thousand words a video is worth a million. I am thinking all you did was post up a utube video and then copy and past the link in your post. Putting a face to a poster is one thing but that video was the best. I had the bike out tonight for the first real ride of the season and was just so impressed with how good it ran but then I always am when its running right. The new vacuum boost clearly fixed the original problem and the new TCI had it running on cylinders again. Disconnecting all the accessories charges also seems to have ended the battery drain also. Now I am thinking of all the other things I wanted to do like the new brakes or vmax heads and nitros. Well maybe we will wait on that but when everything is working I just love this bike. I had to laugh when I saw your bike. i guess with all the stickers you not much worried about cleaning the bugs off. I saw the sleeping bag tied to the seat and had to laugh since my wife and I travel with self inflating air mattresses tied on to the luggage rack. People ask us if we are traveling and we have to tell them no we just like to nap comfortably during our day trips.
-
1st Gen LED Headlight
Geobob replied to videoarizona's topic in Venture and Venture Royale Tech Talk ('83 - '93)
My wife and I love the 1300 but surprisingly it does not have the power of the Venture. I pull away from her in every gear and I know I out weigh her and so does the bike. I had the Venture out tonight to check out my LED headlight. Fortunately it was aimed correctly because I lost my adjusting nob years ago. Anyone found a good replacement for that. I found that I could not turn the adjuster with my fingers so something needs to be applied. I suppose that used part should not be that hard to find but you never know with these bikes. I was once again struck by just how nice this bike is. I might get a new bike this year but I am really thinking that I just keep this thing. I can never get over the sound and feeling of a V8 motor in there. -
1st Gen LED Headlight
Geobob replied to videoarizona's topic in Venture and Venture Royale Tech Talk ('83 - '93)
Is that a Vstar 1300 sitting next to your venture. I had to laugh because I bet we have the same model and color. -
You need ask, of coarse a video would be helpful because I have been in there but don't recall seeing anything like that. Of coarse there is a lot there to look at.
-
Can you get to the RLU by just pulling the wind shield off. I am at a loss for where this board is.
-
Thanks Flinn, that is where I got the idea from. We were talking one day about it and I realized I had the calipers already from another project so all I need to do is make up the lines. It is actually very easy to make your own lines if you have the correct parts. The most work will be in rebuilding the calipers. They are not bad but they have been sitting in a box for the last 15 years or so. He claims the braking improvement is outstanding. I took your suggestion and tried to fit the TCI in there but I really did not think it would work. Maybe if you really played around but I just wanted to get the thing road worthy so I dropped the Lithium battery in and the TCI on top of it. So far so good. Thanks again for all the help. What I really need to know is what do do about that light on the dash. Maybe I should just unplug it if that is possible. Or we could just use the black electrical tape method.
-
Come to think of it, I have have had a leaking battery at least once in the recent past. I fought with a hard starting problem for a way longer than I should have before I looked at the battery and yes it was leaking I think. So now that its running I did notice the white headlight indicator light on the dash is flickering. If I recall that suggest the voltage or amperage draw on the new LED headlight is not high enough. So what is the trick here. Do we just get a couple ohm resistor and put it inline. I'll do so searching around on here. For anyone else relocating the the TCI on a 1300 or at least an 88, it appears that it cannot be fitted into the left side of the fairing with the stereo. I also could not fit it on top of the air box. I resorted to putting the little Lithium Ion battery back in. I believe Flinfools rational for why not to use them but dam it, I have three of them. It left plenty of room on top of it for the TCI and the fuse box (soon to be replaced with the new upgraded one. I did make up a longer battery cable but so far so good. It has been sitting for a week and the battery is holding a charge. I suspect on of my USB plugs might have been draining the battery down. I will have to make sure they are all on circuit that are off when the bike is off. Next project will be the replacement of the front calipers and separating the linked system. Anyone have a suggestion for where to buy braided steel brake line and fittings. I have made up line in the past but that was using a local parts shop at an airport that sold Areoquip stuff. That was handy but I don't live close to them anymore.
-
Just thought it would be good to update the thread. So Jeff Borowski was kind enough to take a look at my TCI and confirmed that it was the problem. Lesson learned was don't fix it if its not broken. Apparently it was probably likely to fail soon anyways so replacing it with another used one worked out. It was only something like $75 off of ebay. Plugged it in and all four cyclinders fired. I took it out for a spin and it feels like the new used vacuum boost is also working. So now I just have to work the wires through the inner fairing wall so I can mount the TCI next to the radio some place. I might also put it on top of the battery if put the new fuse block on top of the air box. I could not get the TCI to fit on the air box. I think someone mentioned that it would not fit on the 1300s. I am very happy to have it running again now that the weather is getting better.
-
The TCI came out when the fairing was off and now it sits on top of the air cleaner and the fairing is back on. I am so glad I put it all back together before trying to start it. Honestly getting the coils out even with the faring off did not look that simple and since I saw no need to, I never touched them. That is why I have a hard time believing the problem lies there. But you never know. And isn't that what makes working on mechanical things so much fun.
-
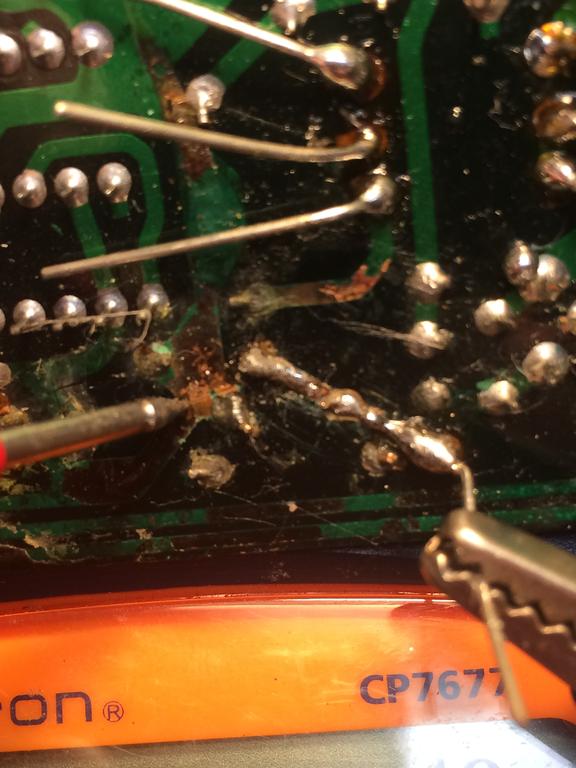
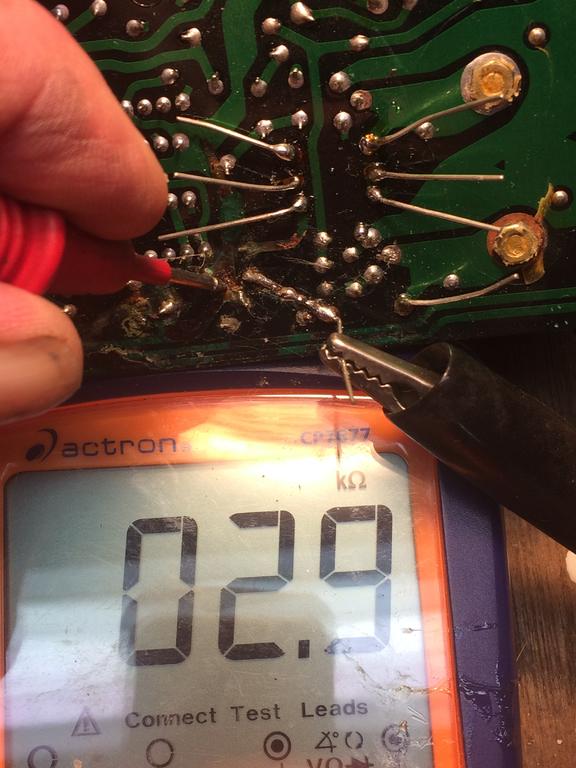
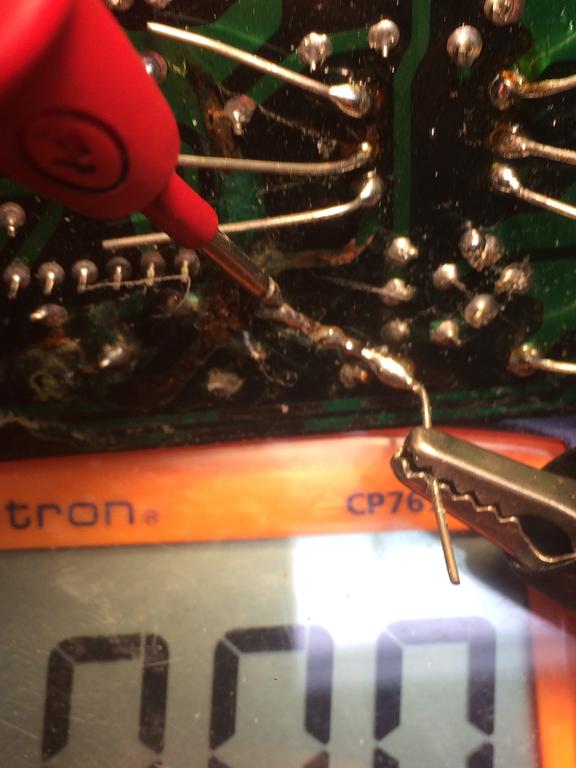
Hi Rick, thanks for the help. Unfortunately I have checked for spark on 2 and 4 with a park tester. It is one of the ones you can adjust the gap and what the glass tube and witness the park jump. I clearly shows good strong spark on 1 and 3 and nothing on 2 and 4. While I have often made the mistake in assuming something like this is definitive, I have all to often been proven wrong. Its like looking for something lost. Check the most obvious place first and was sure it was not there. Then look everywhere else and repeat. Eventually I have found it where it was mostly and just over looked it. The problem here may be similar but in light of my soldering the new diodes and having some messed up connections (one in particulate) I think its time to swap TCIs. Thanks to Flinn mine is in the mail to him for a cross check. The photo below is the connection that I suspect is giving me issues since I cannot really see where the copper plating leads to. As a result it is difficult to determine if the circuit is good while checking with the meter. I laid down some solder on the copper plating leading from the one end of the diode in the photo. The problem I have is where does that plating lead to next. Testing continuity from the end of the repair to its next location is where I end up with a lost continuity. It could be the problem and without a schematic of the board or another board to look at, I just cannot see a clear path of copper. I do hope anyone in the future can use this thread to help them with their project. And if anyone want to speak to the removal of the coils and just what they had to do to get at them I'd love to here it. I am waiting on that task until we determine if the board is good or bad. I did pull the battery box and was able to get at two of the coils and might be able to do some more detailed investigation but the front two coils look like another story.
-
I disconnected the kickstand switch a couple of years ago if memory serves me. I looked at the wires when I had it up on the stand I did not notice anything coming apart. I believe I sealed them up with shrink wrap. I would say so far it consistently sends spark to 1 and 3 and nothing to 2 and four. I opened the TCI up for you and it should make in the mail tomorrow. We will have another answer soon enough.
-
I checked all of the wires and they all had the correct resistance. Regarding the other wire, black and white or black and yellow it had nothing. I might have been looking at the wrong wiring diagram. It looked like it went to the vacuum boost. So they all tested ok. Now what does that tell us. I just checked the wiring diagram and yes there is a black and white wire leading to the side-stand switch (which by the way is disconnected) It did actuall run for a short time last night on two cyclinders or maybe one but i did notice that the tach worked. I llulled the battery box and got a look at two of the coils for what it was worth. I guess i can check resistance through the wire and cap on number 4. It was loose so maybe thet is the problem. Not sure if you can get at coil 2 very easily but maybe if i take the radiator off. (And a bunch of othe stuff) none of which fits perfectly anymore. I worry every time i pull some panels that some mounting point will crack.