.JPG.97d34da93fc67655234eb6371e3710e9.JPG)

Prairiehammer
-
Posts
3,621 -
Joined
-
Last visited
Content Type
Profiles
Forums
Gallery
Events
Store
Everything posted by Prairiehammer
-
 If you are talking about the rubber boots on the bottom of the air box (and not the rubber intake boots between the carbs and head), then yes, the sealant around the boots was a dealer applied fix for oil leaking from the air box onto the carbs. The fix was spelled out in Tech Bulletin M84-017. M84-017 Air Box Oil Leakage .pdf
 -
Front forks wobble
Prairiehammer replied to Tattoolimbo's topic in Venture and Venture Royale Tech Talk ('83 - '93)
Not to put too fine a point on this, but there IS a difference between the 1983 front wheel and the 1989 front wheel. I don't believe it is relevant to the issue, but the 1983 front wheel/rim is narrower (2.15 inches) than all subsequent years (2.50 inches). -
Crush washer size?
Prairiehammer replied to Patmac6075's topic in Venture and Venture Royale Tech Talk ('83 - '93)
You can reuse the old washers IF you anneal them (heat to red and quench) or you can find them cheap in quantity at McMaster Carr or go to your local stealer or the local auto parts store. Check out this thread: https://www.venturerider.org/forum/showthread.php?59155-Copper-crush-washer-alternate-source-for-brakes-1st-amp-2nd-gens -
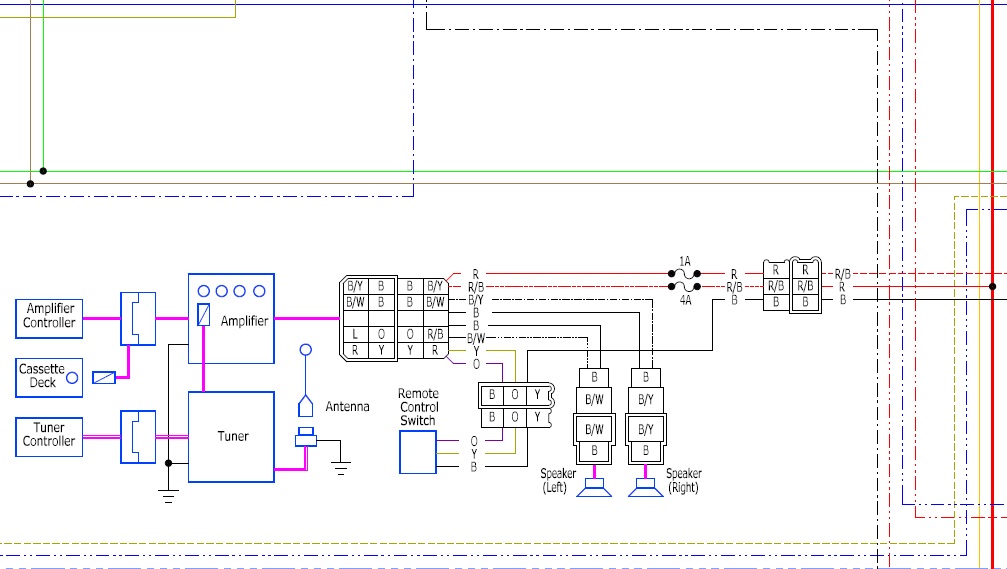
That three wire connector is for the audio system on the XVZ12TDK (Royale)

-
Carb Setup suggestions
Prairiehammer replied to dkaiser's topic in Venture and Venture Royale Tech Talk ('83 - '93)
The "air bypass diaphragms" (I've never heard the coasting enrichment diaphragm called that before) that ssparks905 referred to are in fact, the coasting enrichment diaphragms aka air cutoff valve. If you did not disassemble and examine the diaphragms for tears, swelling, cracking or stiffness when you "cleaned" the carbs, you did not get the entire carb cleaned or properly rebuilt (if rebuilding was your intention). Air Cut-off how it works.docx
-
Teardown and rebuild into something a little more... Me
Prairiehammer replied to Loy's topic in Videos
So basically, you are adding a custom sized "Main Air Jet" on top of the pressed in OEM Main Air Jet? Is there a size designation for this restrictor? -
Standard? It is a Royale.
-
Losing the saddle bag lids on the 1986-1993 Ventures is an age old lament. Very early on (1987 or so), the solution has been to tether the lids to the lower part of the saddle bags with stout cord (shoe strings, braided nylon cord, spiral wound lanyards, etc.) One may attach the cords with crimp-on electrical eyes or thread the cord under the loosened latch hardware and secure when tightening the hardware mounting screws. For the best protection, use two tethers per lid (one at each end) and adjust the length of the tethers to allow the lid to hang comfortably alongside the lower bag when the lid is opened (not too long and not too short). In addition to saving the lids if they unlatch, it is very convenient to simply unlatch the lids and let them hang along side the bags, as opposed to removing them and setting the lid on the seat or on the ground while accessing the saddle bag. I have added tethers to all my MKII Ventures as soon as I have acquired them, even though I am fairly diligent about LOCKING the lids, because **** happens.
-
Fork Overhaul
Prairiehammer replied to dna9656's topic in Venture and Venture Royale Tech Talk ('83 - '93)
A bit of Vaseline on all the pieces should hold them together enough to reassemble. -
Fork Overhaul
Prairiehammer replied to dna9656's topic in Venture and Venture Royale Tech Talk ('83 - '93)
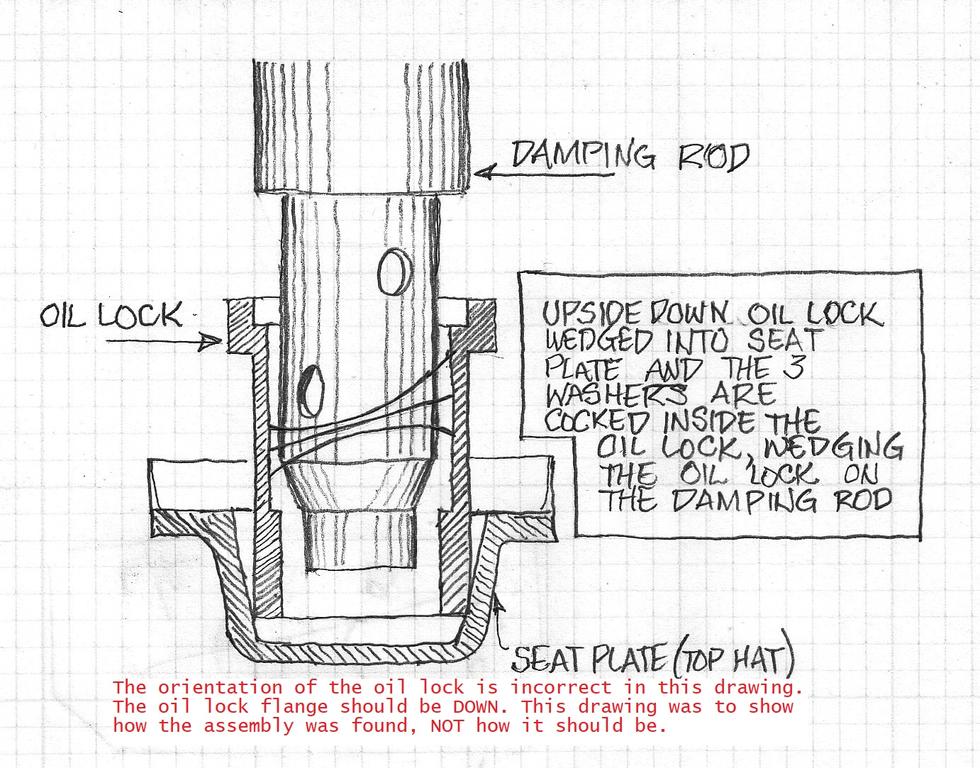
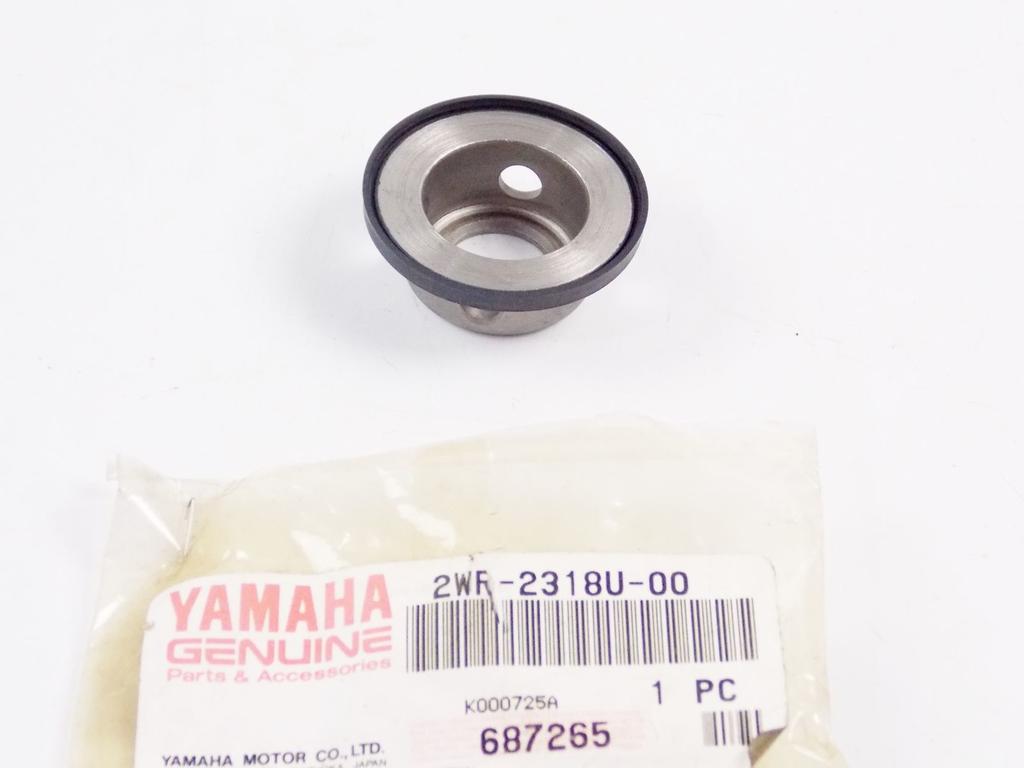
NO! Not like that! The seat plate must be flipped around, so the seal is UP!, not down like you have pictured. Concerning the drawing I made of the damping rod with oil lock and seat plate; there may have been some confusion about that drawing and the orientation of the various components depicted. To be clear: the drawing reflects the IMPROPER orientation of the oil lock AS FOUND, not as it should be. I have edited the drawing to add disclaimer and clarification. The correct assembly is depicted in this drawing:
-
Teardown and rebuild into something a little more... Me
Prairiehammer replied to Loy's topic in Videos
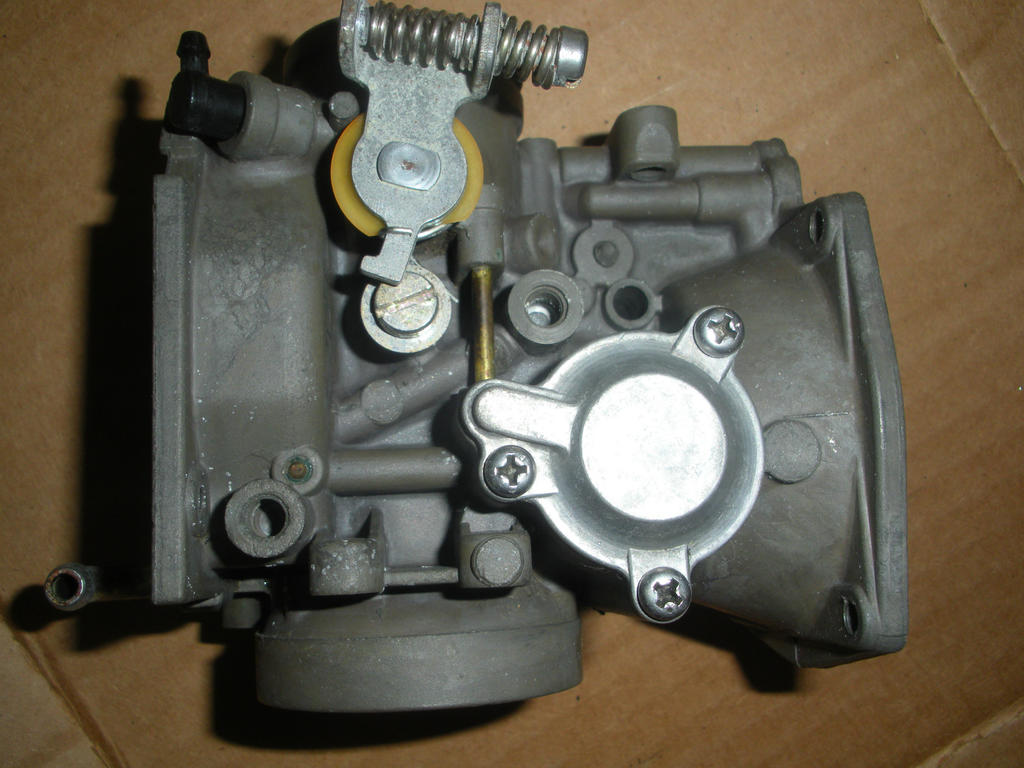
I'm not surprised that the fuel in that tank smelled, it has been in there since 2002! The frozen (inoperable) petcock is a common 1983 malady. Yamaha changed the petcock the next year to one that could be operated with the hand and also provided a reserve position. The 1983 had no reserve and a tool was required to operate it, thus it remained in one position (ON/open) for its entire life. As for the carbs LOOKING clean, don't be fooled, they are most likely gummed up inside. Again, 16 year old fuel! Good luck. -
Fork Overhaul
Prairiehammer replied to dna9656's topic in Venture and Venture Royale Tech Talk ('83 - '93)
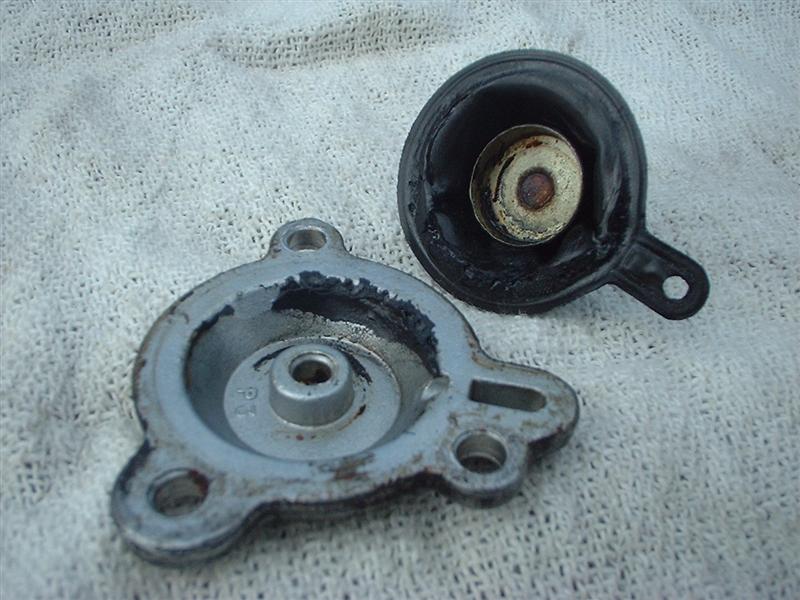
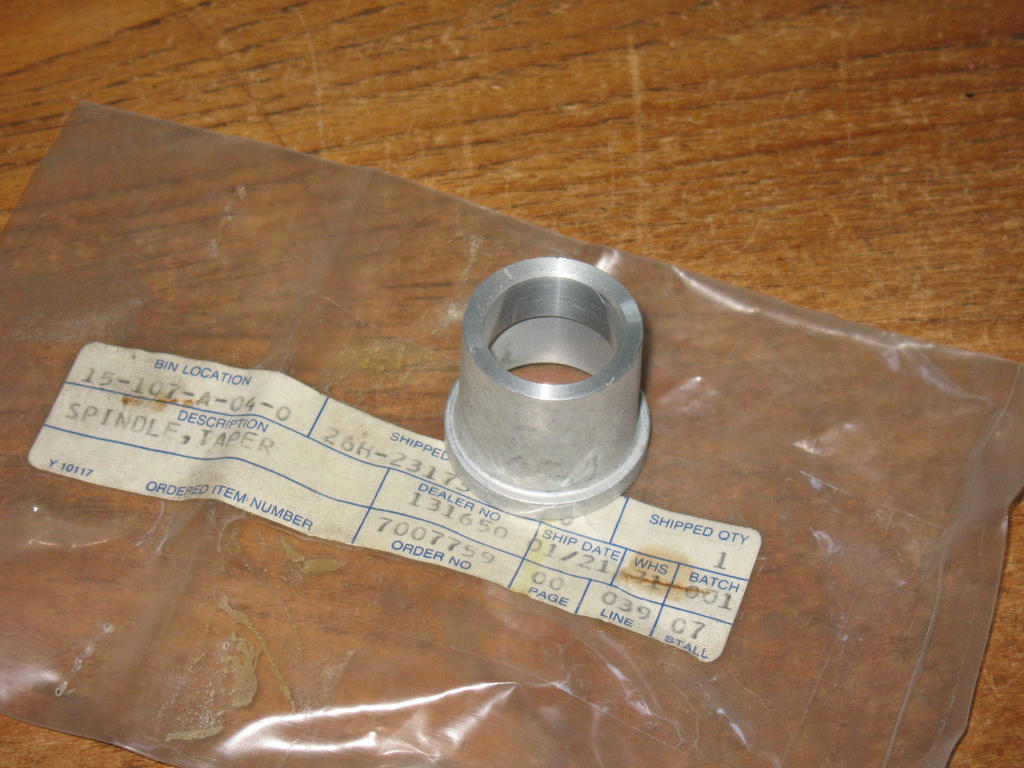
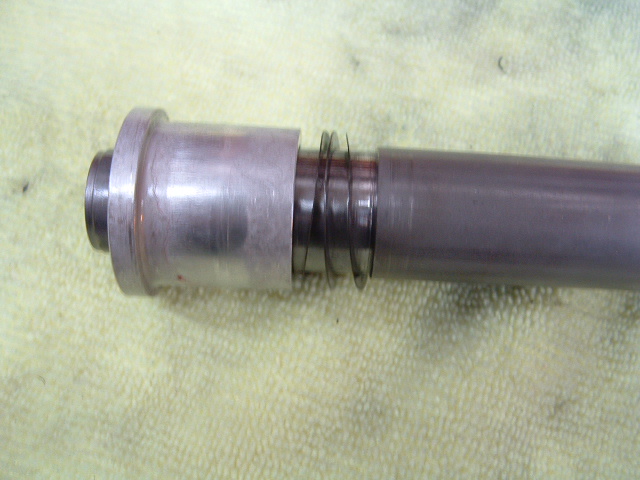
Doug, Doug, Doug. The Oil Lock is the aluminum thing. The seat plate, "top hat" is the steel and rubbery seal thing. And NO, my drawing reflects how your set up is NOW, NOT HOW IT IS SUPPOSED TO GO BACK TOGETHER! The correct way is: damping rod> wave washer>flat washer>wave washer>oil lock (FLANGE DOWN)>seat plate (seal UP). Just like this photo, with the addition of the seat plate: Did you not read the tech article on VRO, that I linked too? The ONLY difference between how the article describes the process and your 1988 is the addition of the seat plate ("top hat") with the SEAL UP!
-
Fork Overhaul
Prairiehammer replied to dna9656's topic in Venture and Venture Royale Tech Talk ('83 - '93)
Doug, right here on THIS site is a tutorial for rebuilding the forks with lots of good self explanatory pics: https://www.venturerider.org/forum/showthread.php?496-Fork-Seal-Replacement -
Fork Overhaul
Prairiehammer replied to dna9656's topic in Venture and Venture Royale Tech Talk ('83 - '93)
26H-2319L-00-00 is the part number for the FLAT washer; 26H-2319M-00-00 is the part number for the WAVE washer! I hope you just mistyped. You said that the seat plate would not come off the damping rod. Since the oil lock was installed upside down, I wonder if the three washers have fallen down inside the oil lock where you can't see them. I also wonder, because the oil lock was installed upside down, that the small end of the oil lock has been rammed into the seat plate (top hat), effectively wedging the two together.
-
Fork Overhaul
Prairiehammer replied to dna9656's topic in Venture and Venture Royale Tech Talk ('83 - '93)
OK, I am not correct in telling you the damping rod will come out the bottom. It will come out the TOP of the inner/upper fork tube. Please excuse me, for I have erred. But after all that, you needn't remove the damping rod to complete the fork rebuild, but it might behoove you to pull (push) it out to examine the oil seal at its top. If that oil seal is bad, then the fork damping will be compromised. Also, you may find the errant wave washers and the flat washer that are supposed to be at the lower end of the damping tube, although I can't imagine anyone was that incompetent. If the oil lock was installed upside down (as in your photos) then damping would be severely compromised. Again, very sorry to mislead you about the direction the damping rod can come out of the upper/inner fork tube. Mea culpa. -
The zinc and phosphorus are precisely why Rotella is good for motorcycle engines with transmission lubed by motor oil. The zinc and phosphorus are beneficial for the transmission gear mesh.
-
Fork Overhaul
Prairiehammer replied to dna9656's topic in Venture and Venture Royale Tech Talk ('83 - '93)
Just pull the damping rod out of the upper tube. It looks like the damping rod is cocked a bit; wiggle it and pull it out. What is holding the seat plate and oil lock onto the damping rod? Usually those items, along with the two wave washers and the flat washer between the wave washers, just FALL OFF the damping rod. -
Letf side saddle bag won't open!
Prairiehammer replied to luvmy40's topic in Venture and Venture Royale Tech Talk ('83 - '93)
Check out this thread about the same problem (with solution). https://www.venturerider.org/forum/showthread.php?105470-side-bags-won-t-open -
Fork Overhaul
Prairiehammer replied to dna9656's topic in Venture and Venture Royale Tech Talk ('83 - '93)
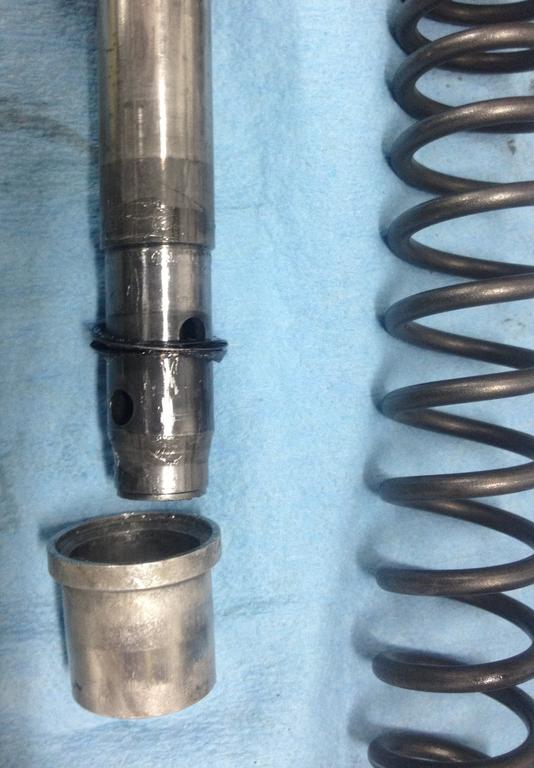
No. As I illustrated, they are supposed to be on the lowest end of the damping rod, but may have fallen off when you separated/removed the lower fork tube from the upper fork tube. The Allen socket cap screw that you removed from the bottom of the lower fork tube, secured the "plate, seat" (top hat piece), the oil lock, and the three washers in place at the end of the damping rod. When you removed the Allen socket head cap screw and slid the lower tube off the upper tube, the aforementioned pieces were now loose and unsecured to the damping rod and may have remained in the lower fork tube. Since the seat plate and oil lock are now on the damping rod in the picture, you must have retrieved them from the lower tube? Or did the oil lock and top hat stay attached to the damping rod? Since you removed the Allen head screw that held all those pieces together, I don't see how the oil lock and top hat could have remained on the damping rod. The "skinny tube" is the damping rod (or "cylinder" in Yamaha parlance). The top of the damping rod is fitted with an oil seal. The oil seal creates a friction fit with the interior of the upper tube. Simply pull the damping rod out of the upper tube. A picture of the "skinny tube"/damping rod/cylinder: Note that there SHOULD be a rebound spring as pictured. It is loose on the damping rod.
-
The proportioning valve is located on the rear master cylinder, not at the high point. Perhaps you meant the metering valve? It IS at a high point, but can be bled by way of the bleed valve above it. No need to mess with the fittings on the metering valve.
-
Fork Overhaul
Prairiehammer replied to dna9656's topic in Venture and Venture Royale Tech Talk ('83 - '93)
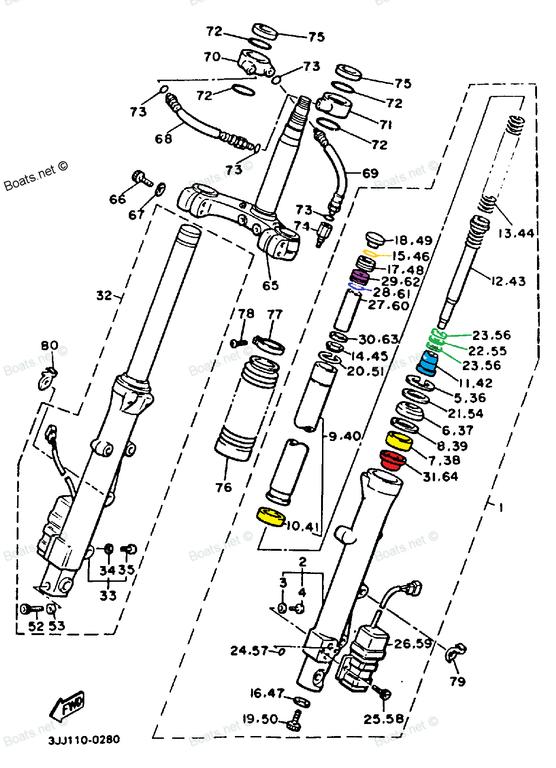
Doug, you haven't stated what year/model these forks are from, but since I see the "plate, seat" on the "cylinder" (more commonly called the dampening rod), you must be rebuilding the 1988 forks. The "plate, seat" was used on the 1988-1993 forks. That "plate, seat" is no longer available, so treat it gently. The rubber lip/seal on the "plate, seat" is easily damaged. While we are talking about the "cylinder"/damping rod, I should point out a couple things: Those three washers that are mentioned in an earlier post by you (26H-2319L-00-00 WASHER FORK 1 EACH SIDE, 26H-2319M-00-00 SPRING WASHER AKA WAVE WASHER**** ) are located above the oil lock aka "taper spindle", at the bottom of the cylinder/damping rod. There should be two wave washers (Yamaha calls it "Spring, valve" PN. 26H-2319M-00-00) with a flat washer (PN 26H-2319L-00-00) between them. This stack of washers acts like a valve spring for the oil lock, oil lock acting as a valve for the fork oil. Here are couple pics showing the three washers on the damping rod Please note that second illustration photo shows the oil lock upside down. Your pics of your forks also show the oil lock upside down. The spring, valve/wave washers 26H-2319M-00-00 are still available if you are missing any, but I would look for them still remaining in the lower/outer fork tube. The flat washer, 26H-2319L-00-00, is no longer available. This illustration is of a 1988-1993 fork assembly. Green items are the three washers (2 wave, 1 flat) that make up the stack acting as a valve spring for the oil lock. The oil lock is blue. The "Plate, seat" is red. The bushings are yellow. The lower "bushing", part number 3JJ-23171-00-00, (Yamaha calls it a "Piston") is still available from Yamaha and the normal OEM parts outlets, albeit not cheap. https://www.boats.net/product/yamaha/3JJ-23171-00-00 The upper "bushing", part number 3JJ-23125-00-00, (Yamaha calls it a "Slide, metal") is also still available from Yamaha, Partzilla, eBay, etc. https://www.boats.net/product/yamaha/3JJ-23125-00-00 I've never made bushings. In an earlier post in this thread from Earl, HE mentioned making the bushings. (I don't know why he said the bushings are no longer available.)
-
Fork Overhaul
Prairiehammer replied to dna9656's topic in Venture and Venture Royale Tech Talk ('83 - '93)
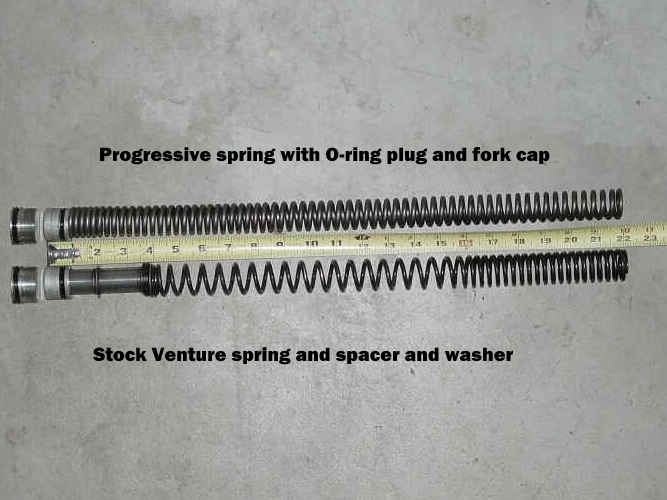
Doug, the stock Venture springs are somewhat "progressively" wound in appearance. Some folks categorize the stock springs as "dual rate". The Progressive® Suspension springs for the Venture are longer (thus negating the need for the stock spacer) and heavier gauge wire is used for a higher spring rate. Pictured is a comparison of stock springs and Progressive® springs as for a MKII Venture. Most have found the preload offered by the use of the stock aluminum plug under the fork tube cap is sufficient (no need to use any of the Progressive® supplied PVC spacer). All of this information is applicable to MKII forks only, the MKI forks have other needs.
-
Yep! Rare bird. At least on my database, but there were at least 38 others built, I just don't have a record of them.
-
Yes, I know about the thread sticky, I was just wondering about the Excel file, if it could be put "on top" somewhere so it would not get buried in this thread.
-
Justin, you sure picked a doozy of a question for a start. I don't know what the speedometer ratio is, but I know of at least a couple Ventures that are running non OEM speedos. @zagger . Justin, I thought you were going to retain the original Venture appearance? Replacing the instrument panel is gonna open a very large can of worms. I suggest you hold off on modifications until you get the Black Beastie running well, stopping well and riding well. THEN do some mods.