coolwind57
-
Posts
37 -
Joined
-
Last visited
-
Thought I'd share a pic of my newly completed TCI relocate job today. For the benefit of others who are considering this, here's what I did: 1. Removed battery, battery box and complete air box. There's two bolts holding on the battery box, 10mm. The air box has two hoses coming up and connecting to the bottom, so expect them when you're trying to pull the lower box from the carbs. 2. I used the ol' hacksaw blade method of removing the TCI. I was relocating it anyway, so I didn't bother with trying to remove it via the hard-to-get-to screws on the bottom. I simply ran my hacksaw blade along the channel that you'll see at the top of the mounting tabs. I cut nearly all the way through but you probably won't get 100%. I snapped it off the tabs with a flat blade screwdriver. 3. I unplugged and cleaned the contacts. I removed the lid to the TCI and baked the unit in my stovetop oven using the convection setting at 200-degrees F for 90-minutes. This was to completely dry out the unit, which I suspected some dampness inside due to a dumb washing I performed a while back. 4. Installed battery box, battery and air box. Fished the TCI harnesses (2 of them) along side the air box. There was just enough length to do this. The TCI fit nicely inside the battery box between it and the air box. THe PO had put in a more narrow battery, so I took advantage of the open space. With the factory battery hold down securing it along with the battery, she's nice and secure. My TCI is now much safer from water now. And much easier to get to the next time it needs attention.

-
Dealing with CMS gremlins
coolwind57 replied to coolwind57's topic in Venture and Venture Royale Tech Talk ('83 - '93)
Happy to report that I've got two days so far with ZERO indicators on my CMS display! I've got my fingers crossed that they won't come back. After writing my last post, I also swapped out my stereo--soldering and sealing up all my connections. I don't know what I may had done to fix this issue other than just the process of messing with and jostling the wiring throughout the bike. Wish I could point out one magic thing that did it. Anyhow, no low-battery warning, no-low engine oil. For the first time in a looooong time, I'm NOT seeing a red flashing LED in my face. Feels good. So if you too have CMS gremlins, the solution is very simple fellas: Just put in a different stereo. haha -
Looks like you'd have very little room to get your key in your Yamaha trunk to open it. Do you have a solution or is it not a problem? I like what you'd done. I'm sure it's functional and works for you. You're making it yours, man and that's cool.
-
Well I've had my 83 standard xvz1200 for going on two years now, 1-1/2 riding seasons here in Southern Indiana. Since I've had her, I've been plagued with CMS issues--always something going off on the display, causing that annoying red LED to fire. In the past, it's intermitten kickstand. After going LED on the headlight, I jumpered the low and high headlight within the CMS, so that took care of that one. I would occasionally get the "Brake Fluid Level" symbol as well, although fluid levels were fine. My "Remaining Fuel indicator" worked about 50% of the time, coming off and on whenever it felt mischievous. Last Month, I picked up a used low-mile instrument cluster on eBay for cheap. I swapped the CMS as well as the temperature gauge and clock, both of which were not working. I changed the oil last week, but I've begun to receive the engine oil level indicator on occasion....especially during the first few minutes of a fresh ride. I find that that it usually goes away after I'm up at cruising speed. But it sometimes returns in idle traffic and usually starts it's irritating cycle again once I park and restart again. I have the factory oil filter setup, so no adapter. I used a new K&N oil filter, new spring washer (Previous Owner must had lost the old one, so there wasn't on in there when I took it apart--I read this is common unfortunately). I properly filled with dang-near 4 quarts of 10w-40 motorcycle synthetic oil. Today, I jumpered the CMS just as I had done the last one. That took care of the high and low headlight indicator. I also removed the RLU and soldered the correct wires as advised by folks here on the forum. I'm reading that the RLU unnecessarily robs some electric--again, I had went to an LED headlamp last Summer anyway. I'm kinda praying that the RLU removal will help matters. Ok, so now I have a first: My battery fluid level light is coming on about 50% of the time. I did do the 20k ohm resistor fix last year and that eliminated indicator back then. I'll unwrap the resistor it tomorrow and see if perhaps it became compromised. So I'm very happy that I seem to have gotten most of my old problems solved today. But after my work, I still have these new issues: 1. Engine Oil Level--on 75% of the time when I start engine. 50% of the time, it goes away at cruising speeds. Double-checked my brand new oil levels in site glass window. All good. 2. Battery Fluid Level--Sometimes comes on at starting, sometimes just randomly during cruise. Alltogether, I see it on about 50% of the time. Does everyone else suffer like this? I've disconnected nearly every #@!% connector I can find on this bike. cleaned as best I could with electronics cleaner. Do we have ground issues on these 1Gen bikes? Should I be adding a ground somewhere, perhaps? Do these CMS just age and act crazy like this and we should just accept them being nutty at this age? Any particular ideas for the two new items I am now plagued with? My bike as 30K original miles. Appreciate any enlightenment, fellas.
-
I haven't yet pulled them. I will probably do so this weekend. I was thinking the same way on all those joints. If I can go steel, I will but I'm thinking they're likely barbed under there. If I have to use rubber, I'll certainly run a single piece. That metal 90 that the PO used seems a bit unnecessary. Cowpuc: I see what you're seeing in the picture, but I don't recall seeing a viewing window when I inspected the reservoir live. I'll look again tomorrow, as I've retired for the night. By the way, I feel like I'm talking to a celebrity....you're kind of famous Cowpuc!
-
Ok, Mark called me back today. He says he still has the equipment to do the 1Gen collector and is willing to do them if anyone's interested. He uses stainless steel and they're $295 (I'm almost positive of that price, but I left my notes at work...just check with him to confirm). He said that everytime he goes to get rid of his 1Gen Venture collector maker due to unuse, he gets another call for one. Says calls for them are few and far between these days, which is unfortunate. Anyhow, timelines vary. At the present moment, he's really far behind--as in like 5-6 weeks. Over Christmas, he joked that he could've had one out the door in a day or two. Again, it all depends on his present workload. The guy is really nice, down to Earth and took a huge amount of his time talking motorcycles with me, even though I made it clear that I was just looking in to budgeting one of his collectors at this time and not placing an order. I strongly suggest those interested in Mark's collector to get one soon before he decides to no longer do them for our bikes. I'm still trying to come up with a budget plan, but I'm definitely interested in one by the Summer anyhow. Let me know if others are interested and maybe he'd be willing to knock out several at once and save us all a buck or two.
-
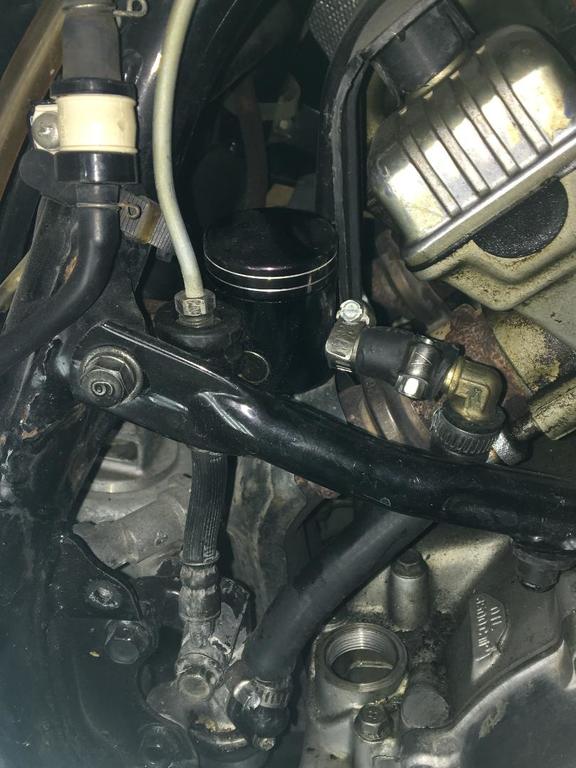
Yes, I believe it is rubber fuel line and it does appear to be breaking down. I see some aging, dry rot-like appearance. I was thinking the same thing on that metal joint. Rather unconventional! I think his intent was to provide for a more precice 90-degree turn than what rubber hose itself would do. The reservoir itself appears to be of nice quality, perhaps painted billet aluminum if my guess is correct. It does have internals, so it appears legitimate inside. I've not see one like it. Seems to work well, so I think I'm ok with it. I'll ask around to find and correct brake fluid compatable hose and get that old one off of there. I'll see if I can rig up a heat shield as well--but according to my manual, the original reservoir is mounted in about the same spot....is this not correct?
-
Just wanted to share a photo I took today after I performed my oil change. I remember the PO telling me that the rear master cylinder resevior had been replaced. Here's his aftermarket solution. Curious of your opinions, fellas....
-
This is a very old post, but I thought I'd share something that helped me with dash glare for those that experience this discomfort. I took my gauge face off and sprayed it with flat black paint. Hardest part (slowest) was taping the clear and warning/turn signal areas up. It helps considerably. I will still get some glare from the clear areas at times, but it is minimal. I was getting the majority of the glare from the black areas of the entire gauge face and this really helped tremendously.
-
Dude. I'm in awe. Freakin' love it.
-
I left a message to Mark, but he hasn't returned my call in several days. I didn't replace gaskets because the collector itself is broken at the joints. I'd tried sealing up with weld (while still installed) as a half-@ss fix, but not so successful. I really ought to just buy a used one and install it right if I can't get Mark to fab one for me.
-
So, I struggle with getting good search results here. But I just ran across an older post on Mark's custom collectors. Anyone gotten one recently? If so, happy? I'll call and/or e-mail tomorrow to see if he's still making them.
-
I'm curious if anyone has ever removed the exhaust collector altogether and ran a custom exhaust. I had damaged my collector, jacking my bike up with it when I first bought it. I caused all kinds of leaks at all the joints, which I've been welding as best I can without removing it all and doing it properly. This guy is the only person I've yet seen to do a custom exhaust, not involving the collector: http://www.kloppenberg.us/chopper.html I'd love to see what he used and exactly how he did it. Though its one of the coolest things I'd ever seen done to a Venture, I have no plans to go to that extreme. I'd like to figure out how to route them with my stock xvz1200. The pipes coming off that rear head would be the trickiest, I'd assume. Anyone beside this guy try and have success?
-
It ended up being my valve stem leaking. With soaping down the wheel/tire, the only bubbles I were getting was at the valve stem opening where the schrader is (I think).
-
That makes sense. Well, I got the wheel off and let it sit in the son for a couple hours. Shot some air in there while sitting on it and the dang thing re-seated. Checking for leaks with soapy water now. How important is it that the little yellow/orange painted dot on the tire line up with the valve stem of the wheel?