.JPG.97d34da93fc67655234eb6371e3710e9.JPG)

Prairiehammer
-
Posts
3,621 -
Joined
-
Last visited
Content Type
Profiles
Forums
Gallery
Events
Store
Everything posted by Prairiehammer
-
An alternative to sourcing U-joint components for the XVZ12/XVZ13 (ALL XVZ as well as most Yamaha shaft drive vehicles): Spider: 2HR-46187-00 Bearing cups: 93399-99926-00 Circlips: 93440-20088-00 This entire assembly is available from several non-Yamaha sources. Usually listed for ATVs. Do a search for 2HR-46187-00. Kimpex part number158267. Sells for $20 or less. For instance: https://www.mfgsupply.com/atv/atvsusp/atvsuspyam/atvsuspyamujoints/19-1003-ref4-atv-rear-drive-shaft-engine-side-u-joint.html http://iowamotorparts.com/yamaha_atv_u-joints.htm https://www.kimpex.com/en-us/products/atv/suspensions-and-parts/universal-joints/kimpex-yamaha-u-joint
-
 The longer bolt will break through into the head nut recess, with the likelihood of an oil leak at the intake port. Go here for an example and the fix: http://www.bikersassociationofnorthdevon.co.uk/projects/Vmax-renovation.htm Scroll down in his post to the identified problem.
-
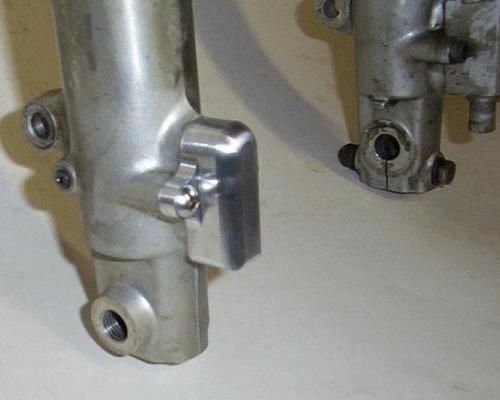
The block off plates for the anti-dive should have a passage between the ports. A block off plate that is just flat internally will blow seals. It is as if the anti dive is on all the time.
-
If you retain the stock '83 calipers, there is a 50/50 chance you may not have to change the front brake master cylinder. Some have retained it with no issues. Others have found they didn't like the feel and/or there was too much travel in the lever. Like I say, it is a crap shoot. If you decide to change the master cylinder assembly, go with the MKII master cylinder. It is 14mm bore versus the MKI ½" bore. Your master cylinder reservoir cover will fit identically on the MKII master cylinder reservoir.
-
The same brackets on the maroon 1990 are used on my black 1991. The VentureLine brackets. Just different lights on the brackets.
-
And if you REALLY want some LIGHT, I have these (100 watt each):
-
Consider how I have rigged my 1991. Markland/Drag Specialties/VentureLine driving light brackets with FIAMM car horns (one high pitch, one low pitch). The brackets are mounted in place of the stock horn mounts but include a tab for remounting the horns. I bought the FIAMM horns at an auto parts store. I removed the chrome domed back from the Yamaha horns added the chrome to the back of the FIAMM horns. The FIAMM horns sound just like an old Lincoln or Buick. They draw enough juice though to require a relay. If interested, I have two pairs of the driving light brackets. One pair has Unity halogen sealed beam lights. The other pair of brackets are new in the package, never been mounted. The pic of my maroon 1990 shows how the driving light brackets look. Then the pic of the Unity lights with brackets and stock horns (horns not included). Then the FIAMM horns as mounted on my 1991. Finally a "glamour" shot of me and my 1991.
-
1989 VR finished working on I think it's running good...
Prairiehammer replied to uhfradarwill's topic in Videos
The SAAB was the first (and only) brand new car I have ever owned. Loved it. About ten years after I bought it, the waste gate diaphragm failed at more than 135K miles (the odometer quit maybe 15K miles before). I was unemployed and could not afford to fix the waste gate, so I would just feather the pedal watching the boost gauge to avoid over boosting. Unfortunately, one day as I floored it to overtake a car, I failed to prevent over pressuring and she began to detonate. Immediately started missing. I checked compression and found little compression in one of the cylinders. Never did pull the head to fully assess the damage. Drove it for a few weeks as was, then parked it. Been in a dry shed(s) ever since.
-
1989 VR finished working on I think it's running good...
Prairiehammer replied to uhfradarwill's topic in Videos
If you wanna swing by and help me replace a holed piston in my 1978 SAAB 99 Turbo, that would be great!:big-grin-emoticon:It has been sitting since 1988. BTW: Your Venture sounds GREAT! -
1983 Venture, Royal??
Prairiehammer replied to uhfradarwill's topic in Links to Classifieds, Craigslist, Ebay, Sales, Etc.
Like I said, your VIN indicates that it is a 1983 Standard. I agree, like I said, it appears to be the original color for a 1983 Standard with "New Ruby Red" paint. Is there "Royale" badges placed on the sides of the saddlebags or are there "XVZ12" badges on the saddlebags? -
1983 Venture, Royal??
Prairiehammer replied to uhfradarwill's topic in Links to Classifieds, Craigslist, Ebay, Sales, Etc.
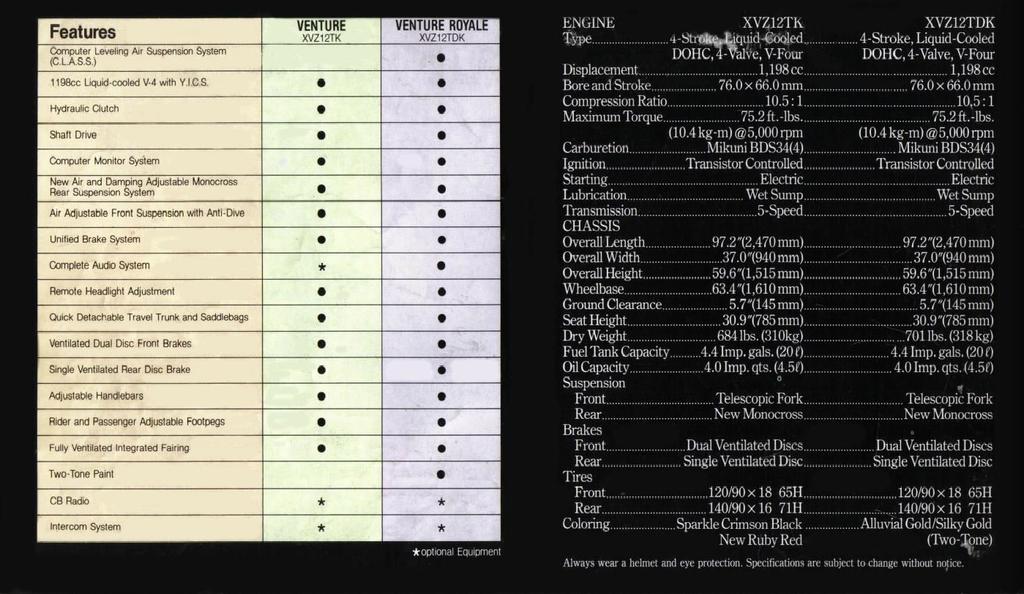
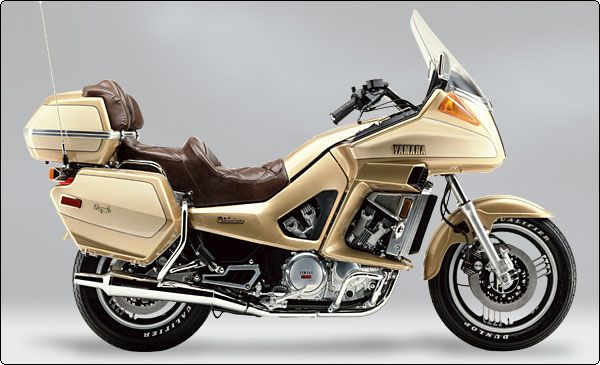
frankd is correct, the 1983 Royale (XVZ12TDK) came only in Alluvial Gold/Silky Gold (his version of "yellow". While your bike has a 1983 instrument panel, the color is not correct for a factory 1983 Royale. Also, the Royale has the CLASS from the factory, while yours shows the Schrader valve in the steering head crown, just as a Standard would have. ALL Venture Royales came with Mitsubishi audio (cassette and AM/FM radio) and CLASS as standard from the factory. The only definitive way to know what your Venture was built as is by the VIN/frame number. Royale badges can be applied to any model, plastic pieces swapped or repainted, etc. *EDIT*: Paul, I just looked at your submission of the VIN for my database and your VIN confirms that you have a 1983 STANDARD (XVZ12TK). Not a Royale. Someone has put the "Royale" badge on your top cover. The badges are just applied with double faced foam tape. Another clue to your bike being a Standard and not a Royale is the single color paint (New Ruby Red). All Royales came with two tone paint.
-
1983 Venture, Royal??
Prairiehammer replied to uhfradarwill's topic in Links to Classifieds, Craigslist, Ebay, Sales, Etc.
It is a 1984 Standard. The VIN will be JYA41R00xEA00xxxx. -
I do not. Sealed tapered roller bearings are relatively uncommon and doing a cursory search revealed no sealed bearing equivalent. There may well be one out there. Personally, I see no need for a sealed bearing at the swing arm pivot. The bearing should be packed full of grease and there is a fairly robust cover and a convoluted path for dust and moisture to migrate. Keep in mind that the swing arm has a VERY short travel and and virtually no rotational speed. Unlike a wheel bearing, for instance. Even tapered roller wheel bearings, subjected to much greater load, much higher rotational speed and wetter conditions are not commonly sealed. Pack with grease, assemble and call it good.
-
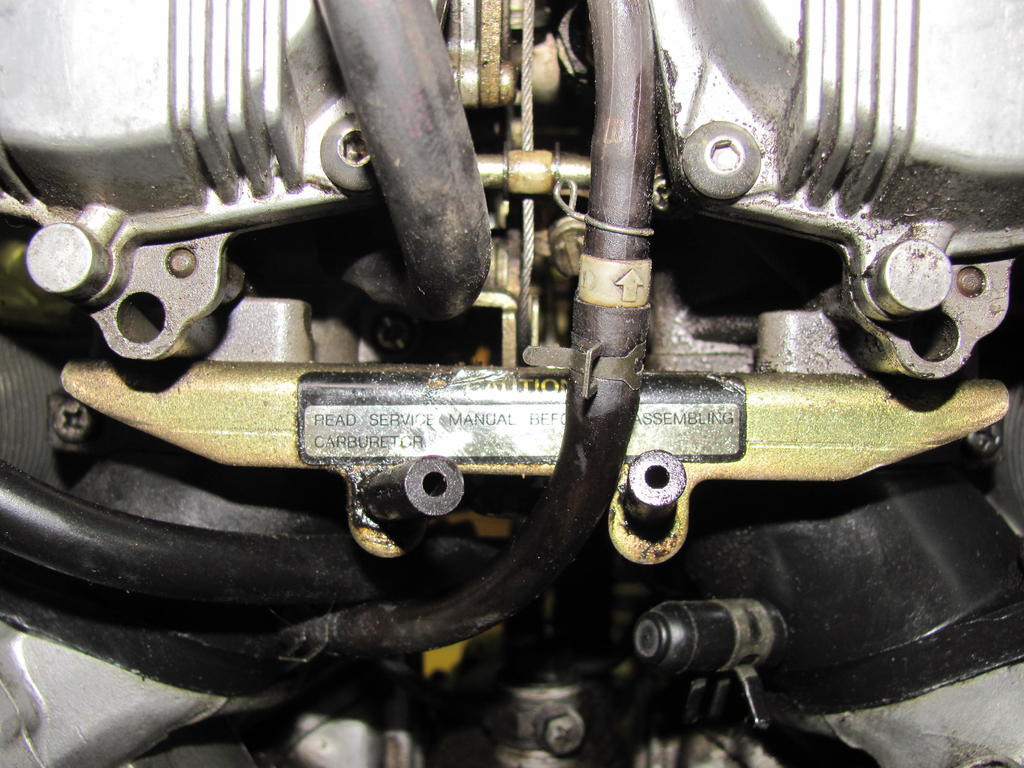
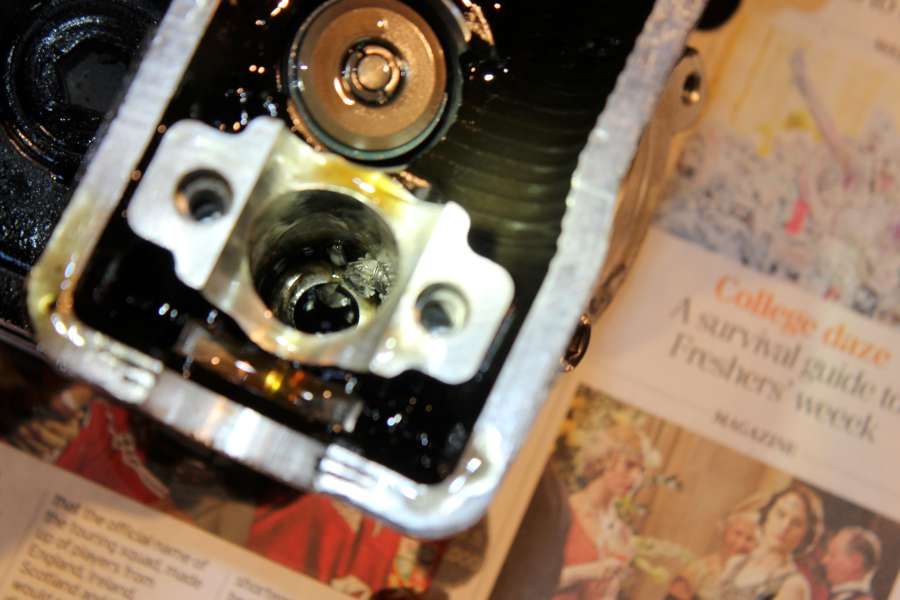
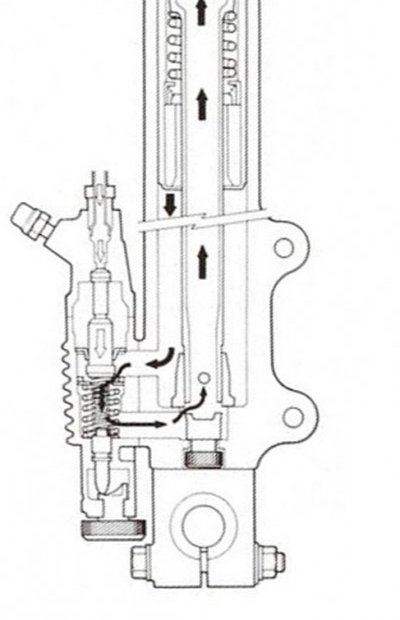
Steven may have hit on the reason for the roller, kinda. Perhaps during cruise control operation, the servo introduces slack in the throttle cable and the roller is to make sure that there is no interference with the enrichener/starter/"choke" actuating shaft? Note that on the nearly identical V-Max carbs, the same actuating shaft has the grooves for the circlips (that locate the roller), but the circlips and roller are not used or needed. Why? Because the V-Max does not have cruise control? (Ignore the red arrow in the photo, it is not relevant to this discussion.)
-
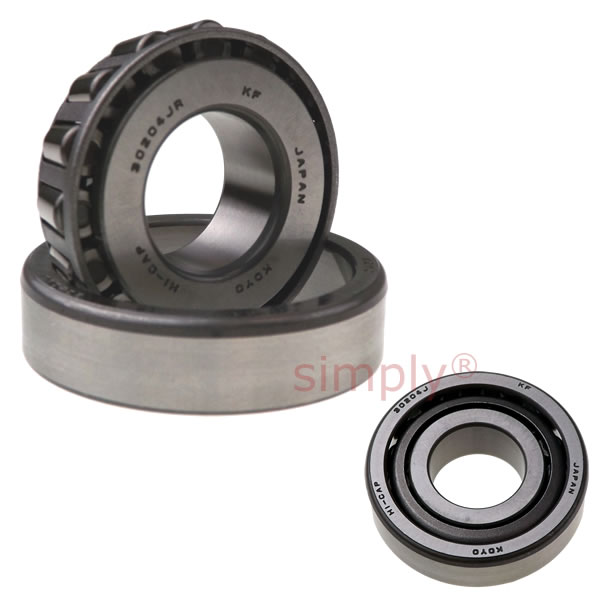
I made a typo when I wrote the number for the 93332-00051-00 generic equivalent. The correct bearing number is 30204JR, not 3024JR. I have edited and corrected my post in regards.
-
I confess that I don't know the "why", but I do know the "where" is behind the plastic roller. I think that Marcarl's explanation of that plastic roller being a spacer is valid. Perhaps, in some situations the throttle cable MAY touch the enricheners actuation shaft and so Yamaha did a "CYA" to prevent unexpected throttle sticking?
-
Which model are you working on? The 1988 XVZ13DU? At any rate, the grease Zerks were not installed on the relay arms by the factory until 1990. Yes, it will be easier to remove those shafts after the relay arm assembly is on the bench. Some have resorted to heat and a lot of CAREFUL pounding to remove the shaft(s). Actually, EIGHT of the 90381-18068-00 bushings are required if you replace all of them. (There are two bushings at each of the four pivot points on the "Big U" relay arm. You may have to check other suppliers in addition to Partzilla, to obtain enough bushings. Run the part number through an eBay search and you will find more suppliers and bushings. And yes, they do wear out, especially the relay arms without the grease zerks (1988-1989). I know of no substitutes for either of the bushings. I have never heard of the swing arm bearings going bad, but if you need to replace them, 93332-00051-00 is commonly available (at a more reasonable price) as 30204JR from Koyo and others. BTW, the previous incarnation of the swing arm bearings was Yamaha PN 93332-00050-00 (93332-00051-00 superceded it). The non Yamaha equivalent for 93332-00050-00 is HR30204J originally supplied by NSK. It too is commonly available, mostly used as an automotive wheel bearing. The difference between the two bearings is that the 93332-00051-00/30204JR is called "HiCap" (High Capacity?).
-
Clutch Slave Cylinder
Prairiehammer replied to uhfradarwill's topic in Venture and Venture Royale Tech Talk ('83 - '93)
Good tip. However, getting the slave OUT is rarely a big problem. Getting the slave back IN gives folks a fit, many times. -
There is no oil within the swing arm. The final drive has its own oil seal. The transmission output has its own oil seal. There is no need for any sealer or gasket at that point; swing arm/final drive. (I wish people would not call the final drive a "differential". It is NOT a "differential".
-
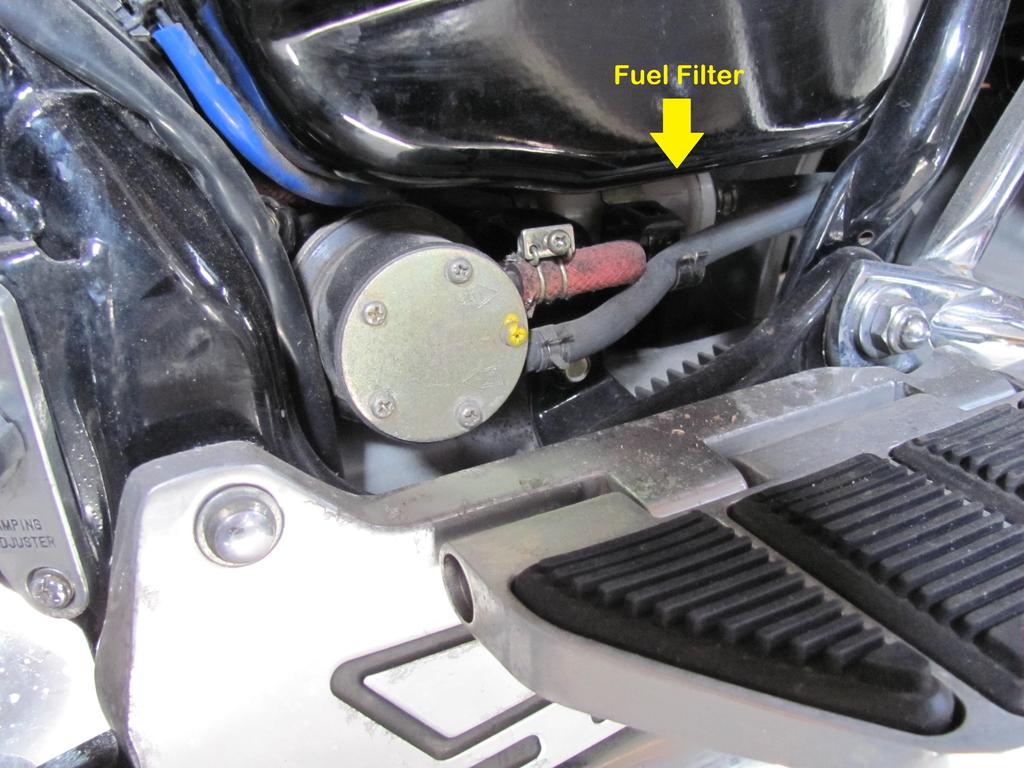
Fuel filters for 86-93 Ventures
Prairiehammer replied to cimmer's topic in Venture and Venture Royale Tech Talk ('83 - '93)
-
I sent the seller a copy of my earlier post: His response: New message from: tammytleming (4) You are correct about some of the parts being 1993. The ad states it is a 1987 in 1993 clothes. It has only 2369 miles. Original base bike is a 1987. Mentioned it should be in a museum because of the pristine condition it is in. I am going to add some additional pictures of the foot pegs. They only have 2369 miles. He did add two pics of the footpegs to the eBay listing. I still maintain that the left peg shows too much wear for 2369 miles.He has not changed the listing to reflect that it is a "1987 in 1993 clothes." He did remove the "museum" comment.
-
I saw that Venture for sale on eBay a couple days ago. Some red flags were immediately flying: 1. It is not the proper color for a 1987. There was no blue 1987 ROYALE. 2. It has 1990 forks (gaiters and the electric anti-dive on the side instead of in front of the forks as a 1987 should be). 3. The wheels are silver (like the 1990 and newer) not black like the original 1987. 4. The left foot peg rubber is worn more than a bike with 2369 miles should be worn. 5. The "chevron" pinstriping on the trunk. 6. The black and gray seat is not consistent with a 1987; it is what was found on 1990 and newer. Bottom line, despite the stated VIN (which IS for a 1987 Royale), the bike is not a "museum quality" 1987. Perhaps a 1989 or 1990 and not precisely correct even for a 1989.
-
rear wheel bearing/seal order
Prairiehammer replied to dna9656's topic in Venture and Venture Royale Tech Talk ('83 - '93)
Remove the circlip that holds the "clutch" (drive fingers). Pull the "clutch" from the wheel. The procedure is explained in a multitude of posts here and in the service manual. M2005-015, REAR WHEEL CREAKING.pdf
-
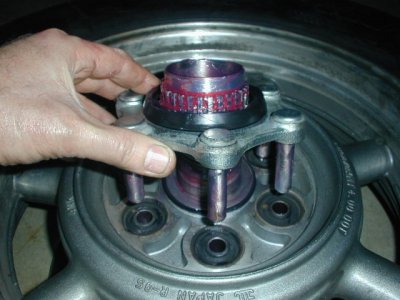
rear wheel bearing/seal order
Prairiehammer replied to dna9656's topic in Venture and Venture Royale Tech Talk ('83 - '93)
6. Installing the new bearings: we laid out the parts and slid them onto the axle to verify we understood how it needed to go back together. Started with the large sealed bearing, then the Spacer Flange (open side against the bearing, followed by the long Spacer, then the Collar (Inner Race of the needle bearing) and then the needle bearing itself (which we had not yet greased up and so we did not actually slide the collar into it). This is the point where we first really understood how it all was meant to work. When we initially slid the Spacer Flange up against the large bearing, it was contacting the bearing’s rubber seal and wanted to turn with the outer race. We knew that couldn’t be right, and it finally dawned on us that the long Spacer was meant to fit through the Spacer Flange and thus keep the flange from contacting the rubber seal. a. So the next step was to insert the long Spacer into the Spacer Flange. This is accomplished simply by laying the Spacer Flange on a flat surface (open side down) and tapping the long spacer through the center until it comes into contact with the flat surface. The end result is the long Spacer protrudes thru the flange to allow it to contact the bearing while preventing the outer edge of the Flange Spacer from touching the bearing seal or outer race. We verified that by sliding everything back onto the axle and now the only parts touching were those that lined up with the inner race of both bearings. b. Lay the wheel with the large bearing side up c. Insert the Spacer/Flange Spacer assembly into the hub (long spacer first – it will protrude out the other side of the hub). d. Insert the new large bearing into the hub and gently hammer into place. We used the tip from the XS11 instructions and had already cut a notch out of the old bearing, so we laid the old bearing on top of the new one and hammered on that until the new one was completely seated. The old bearing pops right out of the wheel housing when squeezed with a pair of plyers. e. Install the circlip f. Install the new seal g. Flip the wheel over – the Spacer/Flange Spacer assembly should slip back down and sit on the newly installed bearing h. Grease the new needle bearing i. Install new needle bearing – again we used the old needle bearing (which we also had notched) as a hammering tool. j. Apply a little grease to the new Collar (inner race) and insert into the needle bearing. It should butt against the Spacer inside the hub. k. Install the oil seal l. Reinstall the hub per the instructions in the Rear Wheel Service document i. Apply grease to the inside of the hub and to the six posts that fit into the wheel. ii. Check the o-ring on the wheel to be sure it is in place before you replace the hub and circlip. 7. The wheel is now ready for installation.


.jpg.63957437fb9f2cea179462885c68fffe.jpg)

.jpg.8886c3f2034ee0bb6a4f1425f1b46441.jpg)