.JPG.97d34da93fc67655234eb6371e3710e9.JPG)

Prairiehammer
-
Posts
3,621 -
Joined
-
Last visited
Content Type
Profiles
Forums
Gallery
Events
Store
Everything posted by Prairiehammer
-
By Jim Bryant (MoreV4), from Facebook: "I was asked to post a word on here concerning a good friend of many. Please say a prayer and/or keep him in your thoughts for Fred Saari (@Yooper). His colon cancer he beat 15 years or so ago is back. Details of when surgery will happen down in Milwaukee are up in the air as of today. Fred is a rare breed of people that tells you like it is, in total honesty, whether you like it or not. He will do anything, for anyone, anytime he can. He has taught me how to be a better person by telling me like it is whether I liked hearing it or not.....which is most of the time. Venturers and Venture Rider folks please communicate this along, thank you."
-
@Snaggletooth where the heck have you been? HOW have you been?
-
Puc, only supporting members of Venturerider.org are allowed to join the VentureRider Facebook page. And I monitor it as an administrator and remove members from the page who have allowed their VentureRider.org supporting member status to expire. And if you check out the VR Facebook page, you will undoubtedly note the relative inactivity there. OTHER Venture related Facebook pages (there are at least two that I know of) probably do siphon off potential VentureRider members, but not the "official" VentureRider Facebook page.
-

A couple of air box question
Prairiehammer replied to Chaharly's topic in Venture and Venture Royale Tech Talk ('83 - '93)
Actually, the sealant around the air box boots was a genuine authorized Yamaha fix for the 1983. On subsequent models, the factory applied that sealant. It is spelled out in this Tech Bulletin: M84-017 Air Box Oil Leakage .pdf -
Thanks for adding your '83 to the database. I did not have it.
-
Welp! I'm sorry. Someone did just what others have said they might: swapped out crankcase covers from a 1300 apparently. Who knows why. 31M 001808 is an engine that was originally installed in a 1983 Royale. Made in March 1983. Does the frame number (VIN) match? It should be JYA31M00?DA0001808.
-
I notice several "new" First Gens have graced our hallowed halls in my absence. This is just a friendly reminder: GET YOUR VIN TO ME!
-
I am very late arriving at this party, so pardon me if I missed something in the five pages of this thread. 1. Check the engine number. Both the clutch cover and the stator cover indicate that this is a 1300. I can identify the year of the engine if you give me the engine number. 2. If it IS a 1300, the second gear "missing" may not be because of the transmission damaged. It may be because of the linkage train; either the shift drum or the shift linkage on the left side. (The foot pegs are not stock MKI pegs, nor are the peg mounts. The left peg mount looks like it may have been part of an aftermarket floorboard retrofit. The linkage may have been cobbled. 3. Final drive is not stock MKI. Either MKII or maybe V-Max. EDIT: Upon closer examination, the final drive appears to be from a Second Generation Venture. I can just see the speedometer pickup port. 4. Trailer hitch is not made for a MKI Venture. Either for a MKII or perhaps a GW. 5. (minor point): The mufflers are from a MKII. Muffler mount is not proper for a MKI and the turn downs are as for a MKII. 6. (another minor point): The fairing bags are added. The 1983 Royale did not come with fairing bags; the brackets that hold the bags are also not stock Venture.
-
1983 Models (not the super model kind)
Prairiehammer replied to Ialreadyknow's topic in Watering Hole
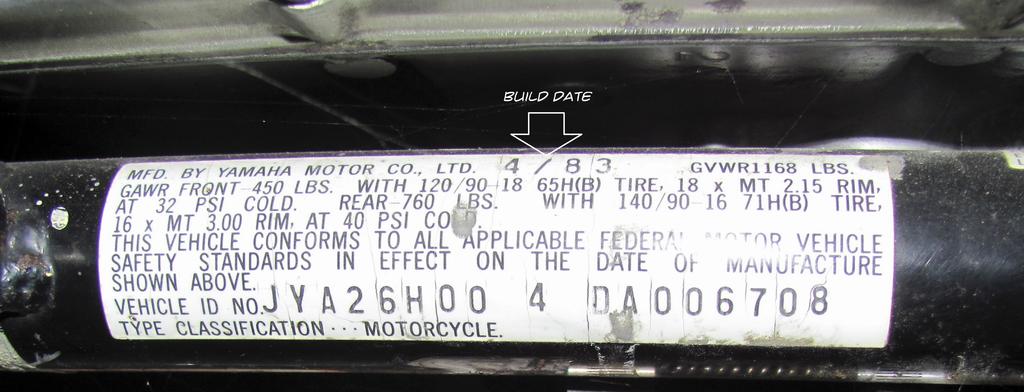
The "JYA" is not descriptive of any specific model. JYA simply means that the bike is made in Japan, by Yamaha, "A" denotes "motorcycle. To decipher your bike, I will need all the numbers and characters of the VIN. For example: JYA26H00xDA000xxx (1983 Standard Venture) or another possibility: JYA31M00xDA000xxx (1983 Venture Royale). The full VIN is located on a black text on white label adhered to the lower frame rail under the brake pedal. It is also stamped into the frame at the steering neck. Note also the manufactured date.
-
Header Pipes brick wall.
Prairiehammer replied to Vickersguy's topic in Venture and Venture Royale Tech Talk ('83 - '93)
@Dano, I found the thread where you undercut the dogs. The pictures had not migrated with the thread, but Don @Freebird has restored them now. Here: https://www.venturerider.org/forum/showthread.php?21023-2nd-gear-cut-and-measurements&highlight=undercut -
Thanks for restoring the missing photos, Don. Here's another thread that has missing photos: https://www.venturerider.org/forum/showthread.php?21023-2nd-gear-cut-and-measurements&highlight=undercut
-
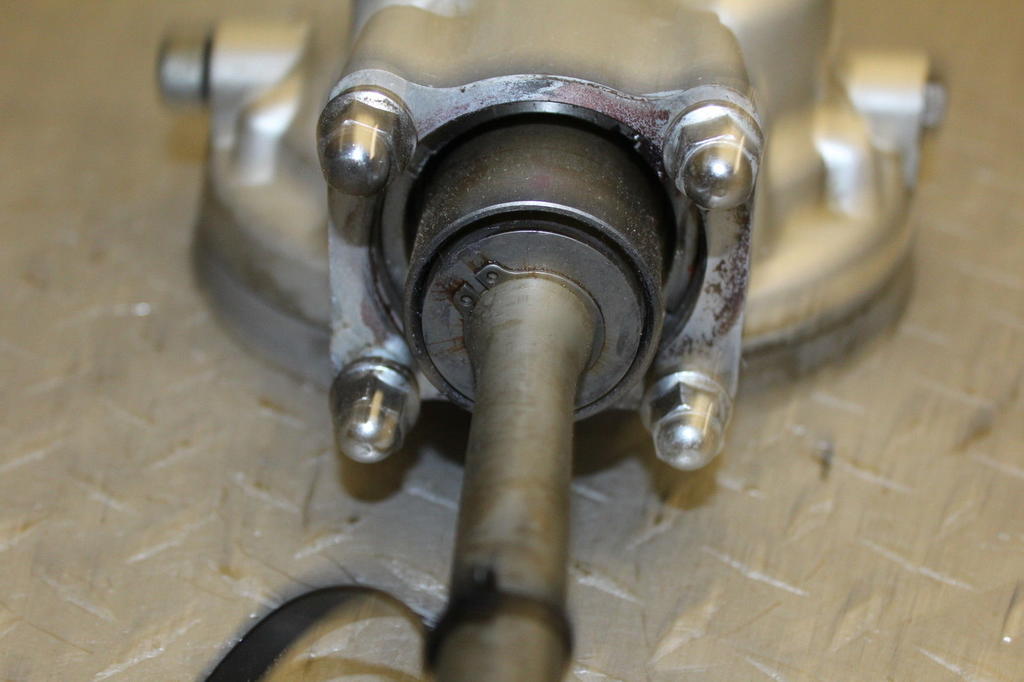
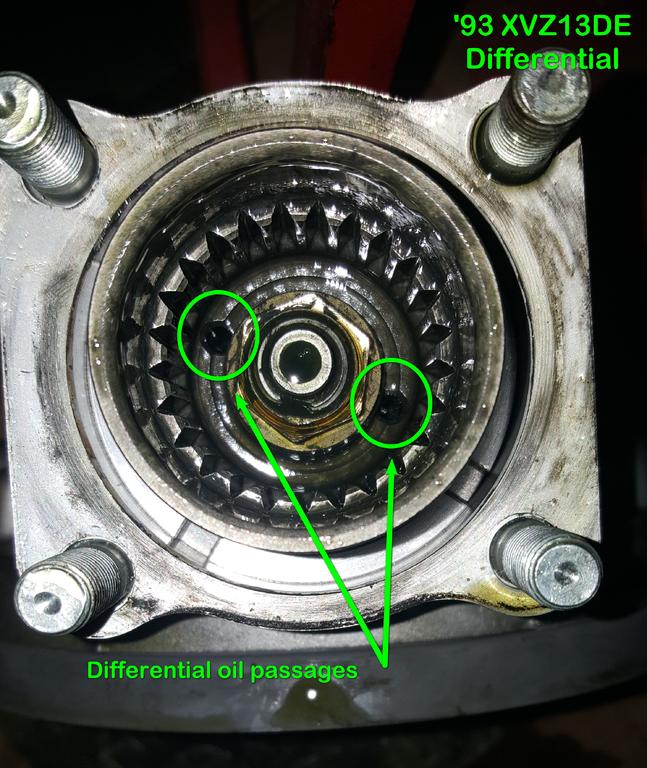
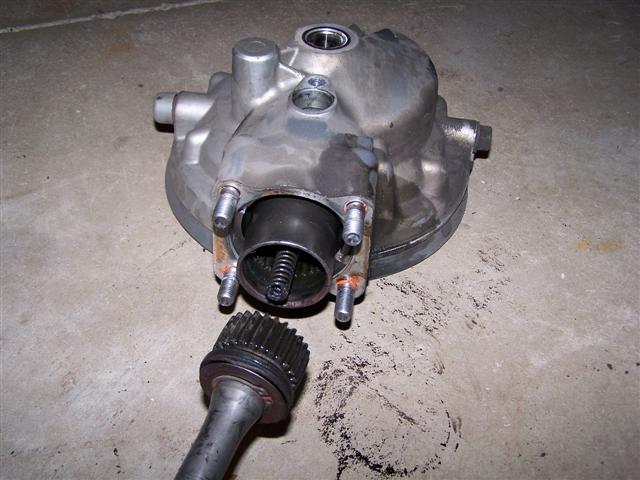
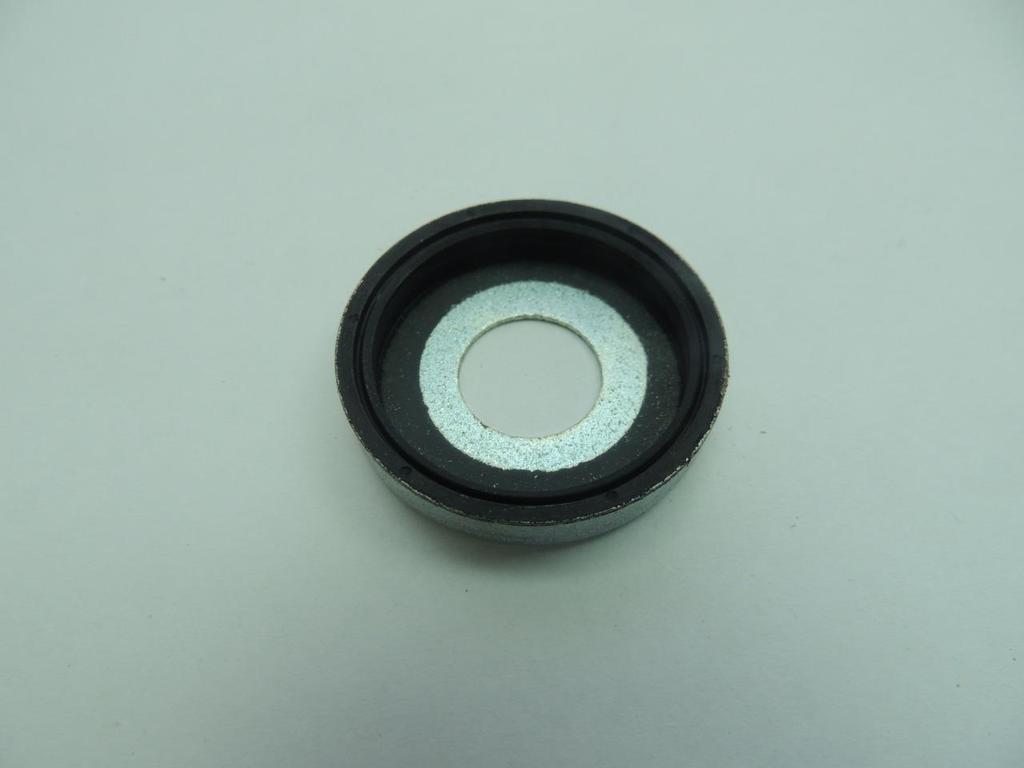
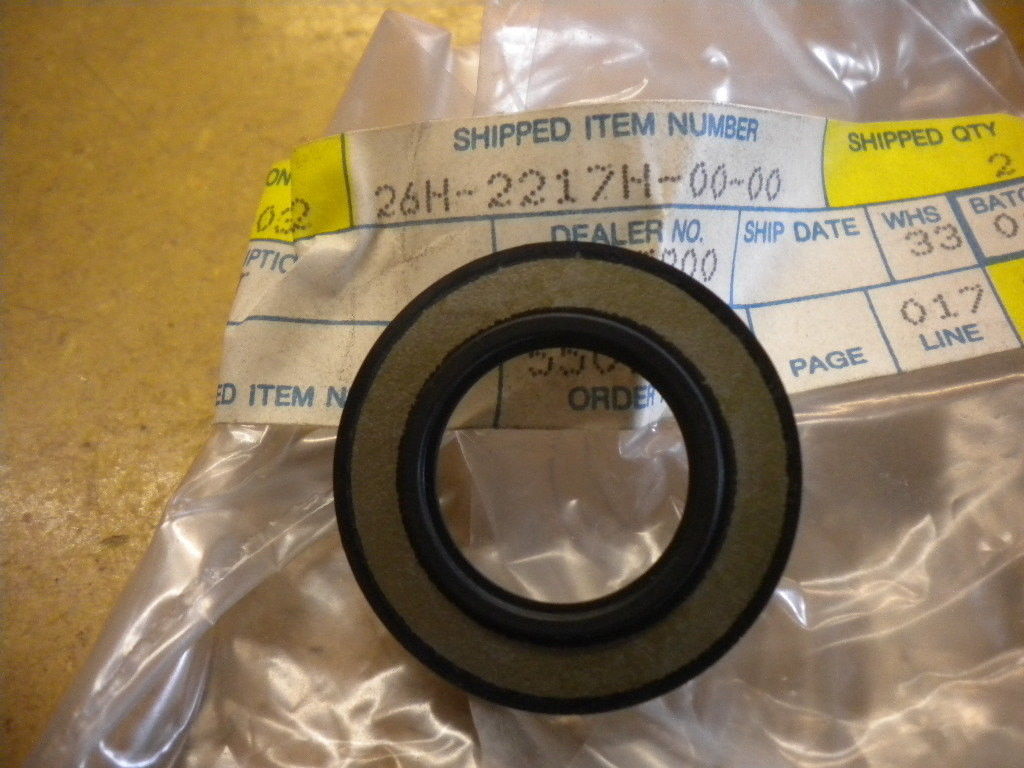
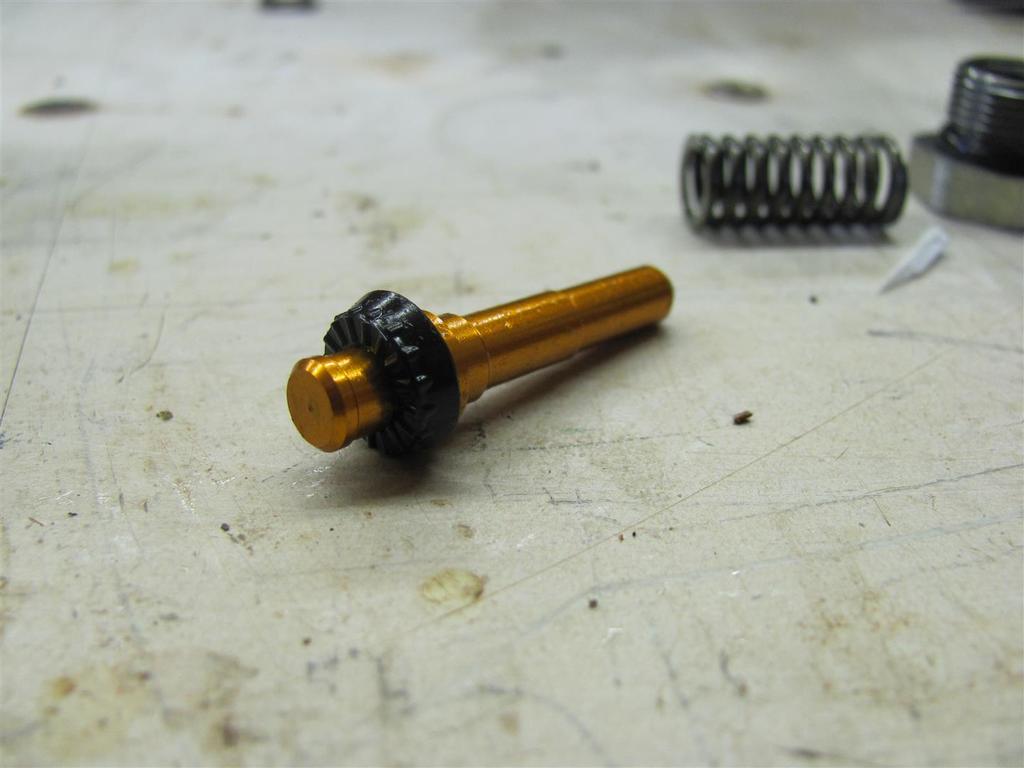
That driveshaft looks near new. As Rick says, you should consider replacing the oil seal. Although some have removed the driveshaft from the final drive and reinserted it without damage to the oil seal, others have damaged the oil seal while reinserting it, so it is a crap shoot whether you will get lucky. Whether you replace the oil seal with new or reuse it, lightly lube the periphery of the seal with gear lube before inserting into the final drive. The driveshaft simply slides into the final drive housing and is held there by the friction of the oil seal. Clean the inner part of the final drive housing where the oil seal will mate of potentially damaging debris. Before reinserting the driveshaft, inspect the inside of the coupling, ensuring that someone has not mistakenly greased the coupling and or the big end of the driveshaft and excess grease has blocked the gear lube ports with grease. Also, before inserting the driveshaft into the final drive, ensure that the compression spring is still attached to the pinion shaft.
-
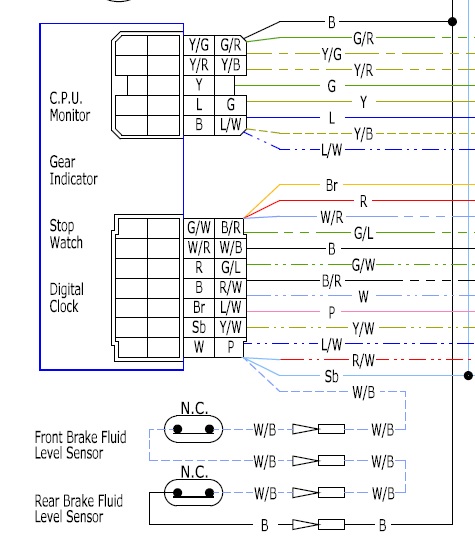
The level line "LOWER" is the minimum level, not the preferred level. Not a bad idea, but you may not find a problem with the float. The switch itself may be bad (stuck open). The switch is a tiny magnetic actuated reed switch. It is not serviceable beyond replacement. And it is no longer available new. You might try applying a strong magnet to the float stem to see if the switch closes. Because the FRONT brake master cylinder reservoir fluid level switch is wired in series with the REAR brake master cylinder reservoir fluid level switch, an open switch in either reservoir will illuminate the brake fluid level warning icon on the monitor. One way to test the switches and circuitry is to jumper the connectors for the reservoir switches on the wiring harness. Since the switches are normally closed (no warning), jumpering the leads will simulate closed switches. If the brake fluid level warning is still illuminated after installing the jumpers, there is either an open circuit in the wiring harness, faulty connections or a faulty CMS.
-
Are there still pics available for this OLD thread (2008)? Thanks. https://www.venturerider.org/forum/showthread.php?27170-VR-to-R1-Brake-Swap-Part-1!
-
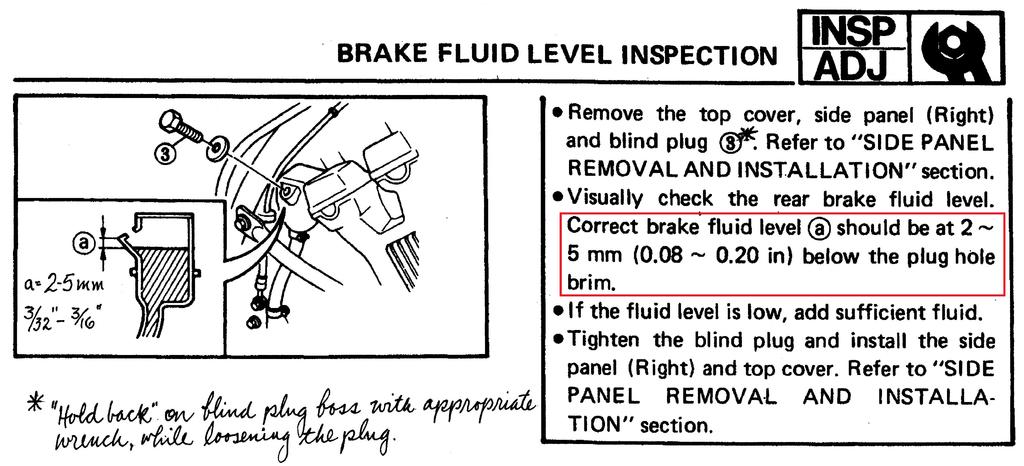
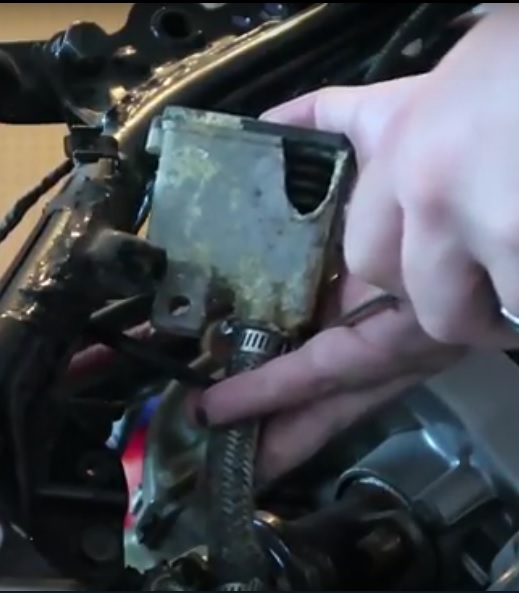
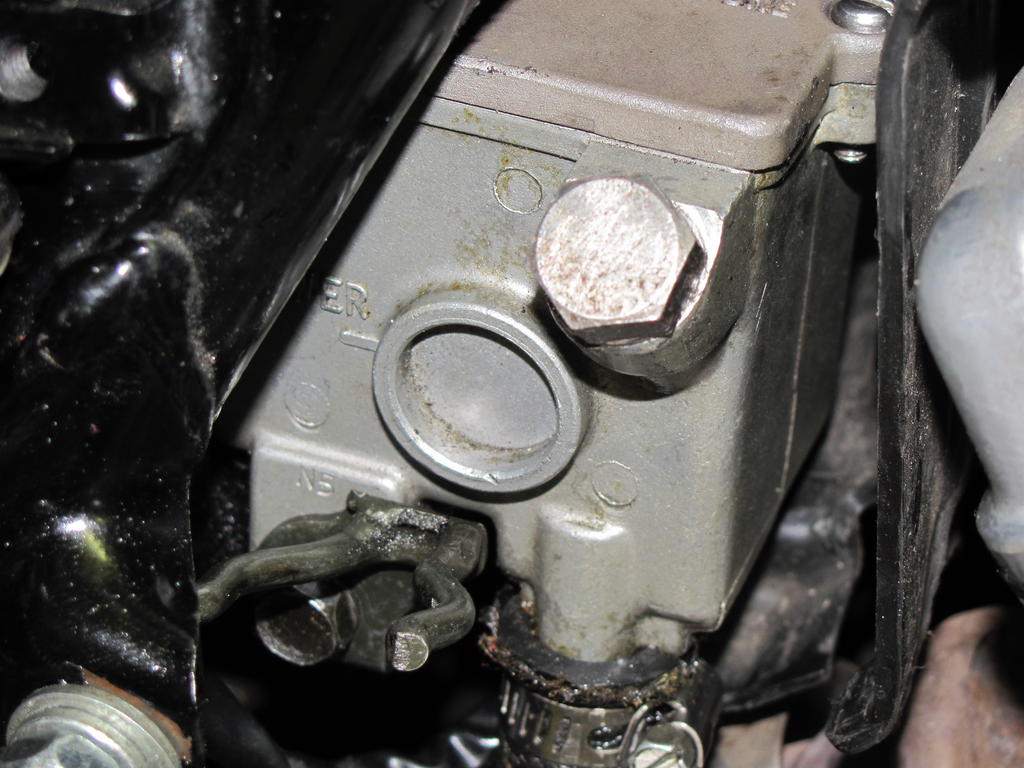
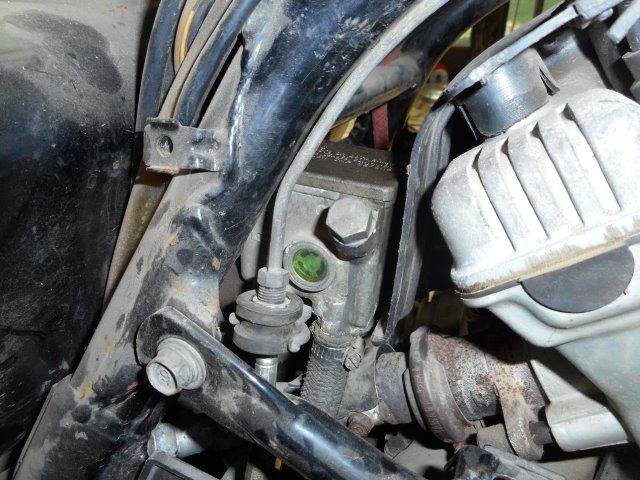
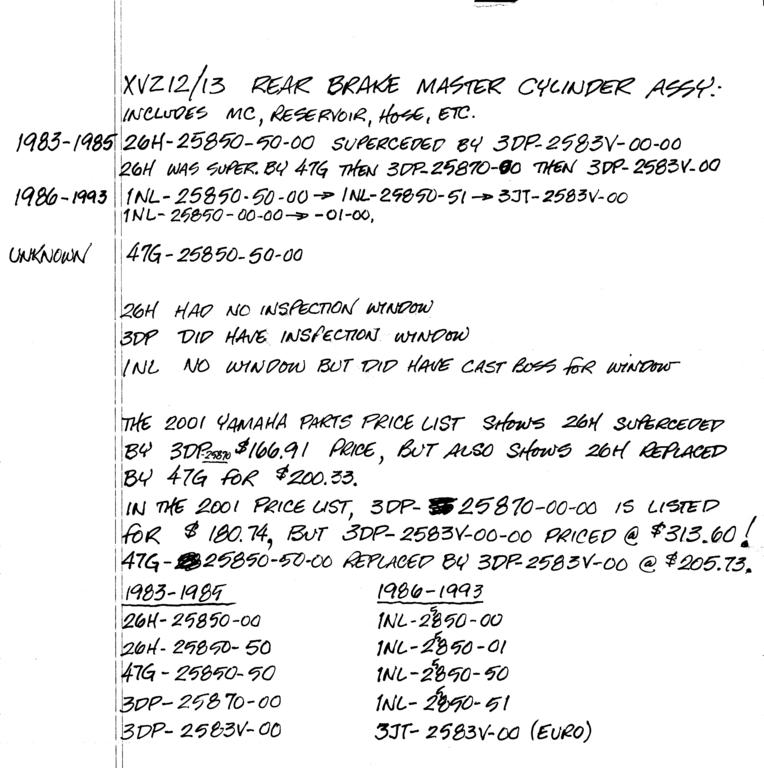
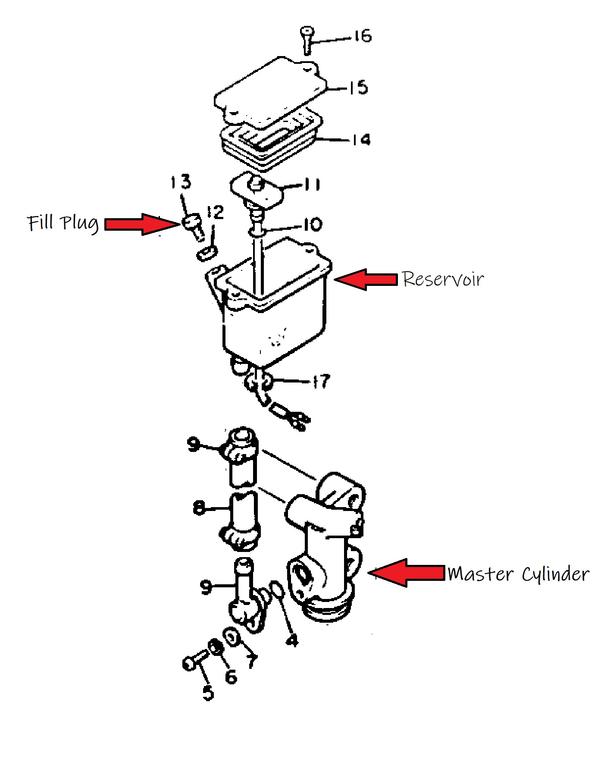
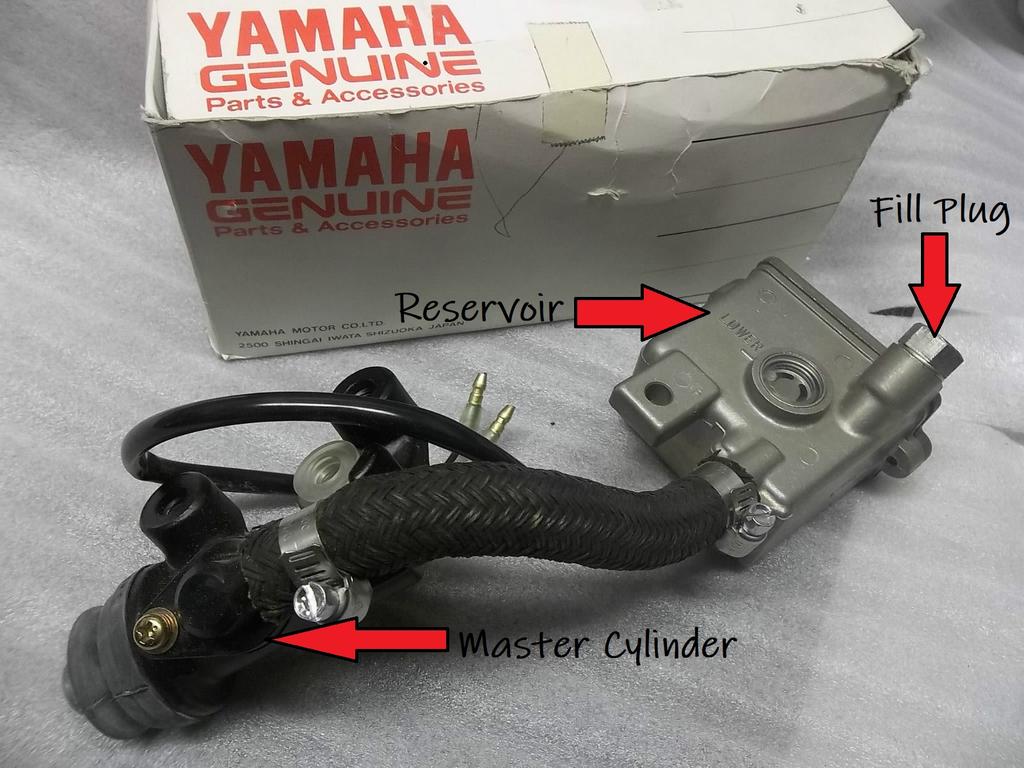
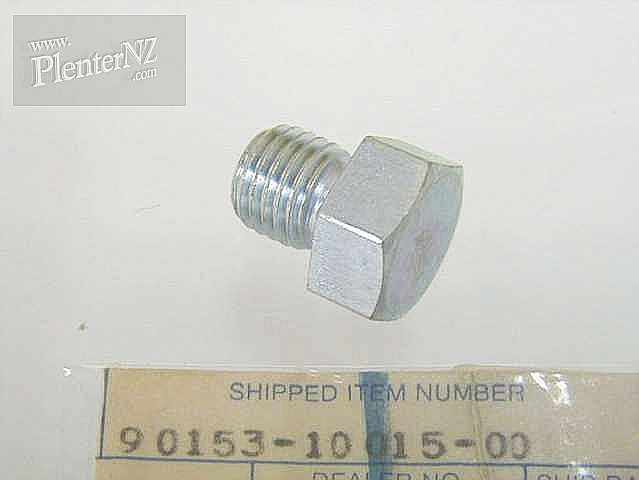
Indeed, the fill plug boss is what breaks off when too much torque is applied to the seized fill plug. It happened to me on my 1983. Using an open end wrench of the correct size or an adjustable wrench, on the flat sides of the projecting fill plug boss and applying equal counter force to the torque generated while attempting to remove the plug will prevent the boss from breaking off. An example of the broken reservoir (from my '83) here: Yes, the pictured master cylinder assembly with the sight glass on the reservoir is for a MKI. Some 1983 reservoirs had a ring cast into the reservoir but no sight glass. Even earlier 1983 versions were completely devoid of the sight glass ring casting (as in my 1983 reservoir pictured above). But, my 1990 had a reservoir with the cast in ring for the sight glass and even the "LOWER" line. I have also a picture of a European (3JT) 1990 with the sight glass. Bottom line, any of the reservoirs will work on any of the years. I have previously done extensive research on the rear brake master cylinder assembly. Here are my notes on the subject. Keep in mind the various part numbers are for the COMPLETE rear master cylinder assembly, which includes the reservoir. Different part numbers do not necessarily reflect differences in the reservoir alone. Yamaha never assigned a part number to the reservoir only. An empty reservoir may allow the bellows to descend quite aways. Look closely at the picture of my broken 1983 reservoir and you can see the bellows has extended quite low into the reservoir. But, I agree that the bellows would probably not be able to obstruct the float for the fluid level indicator. The float rides up and down on a hollow stem containing a magnetic switch. The top of the stem would likely prevent the bellows from contacting the float. Maybe. A pic of the interior of the rear brake reservoir from my 1990. The rectangular white part is the float.
-
The thermometer wire is green with a red stripe on the 1988 (and others). In addition to cleaning the bullet connector, crimp the female part of the connector slightly to tighten the connection. Clean the male part of the connection as well. Trace the wire to the instrument cluster and insure that the connection at that end is good. Check for continuity from the thermo-unit end of the wire to the instrument cluster end. Check for 12 volts at the thermometer/temperature gauge, the brown wire. Ground the green/red wire with key on. The gauge should go full scale. Check the black ground wire for tightness on the cooling system "joint" where the temperature sending unit is mounted. Clean and tighten the ground lug/screw.
-
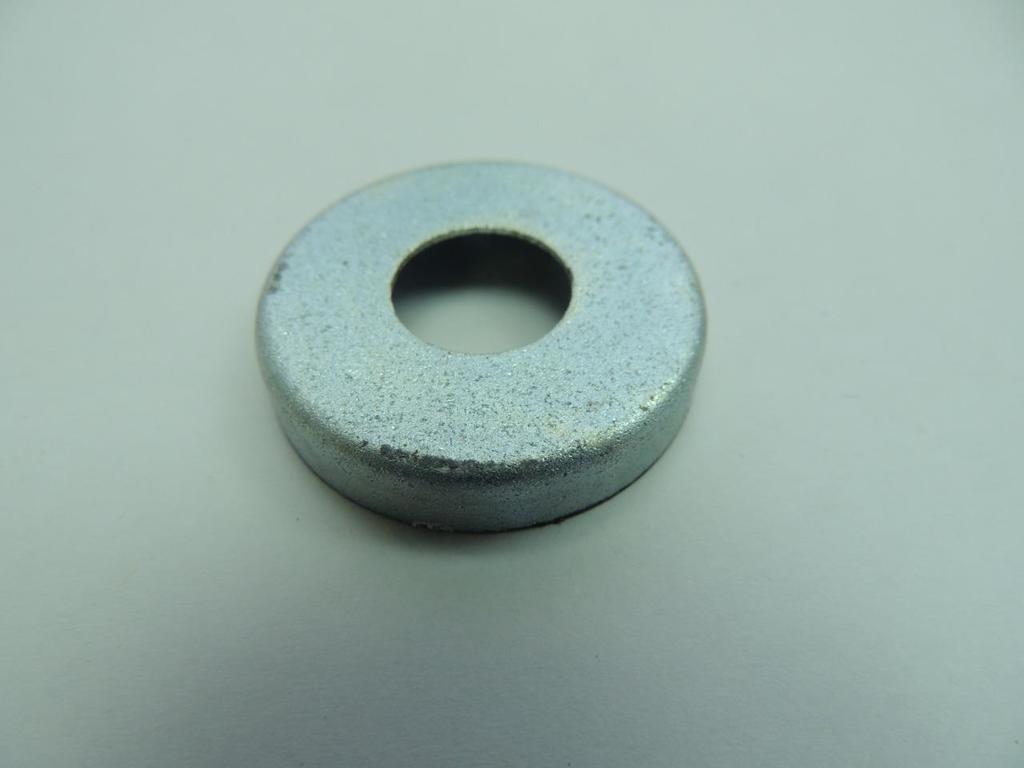
Here are the only pics I have of those parts: These parts were used on all First Gen Venture rear suspension links. Perhaps you will find some serviceable ones from your other bikes?
-
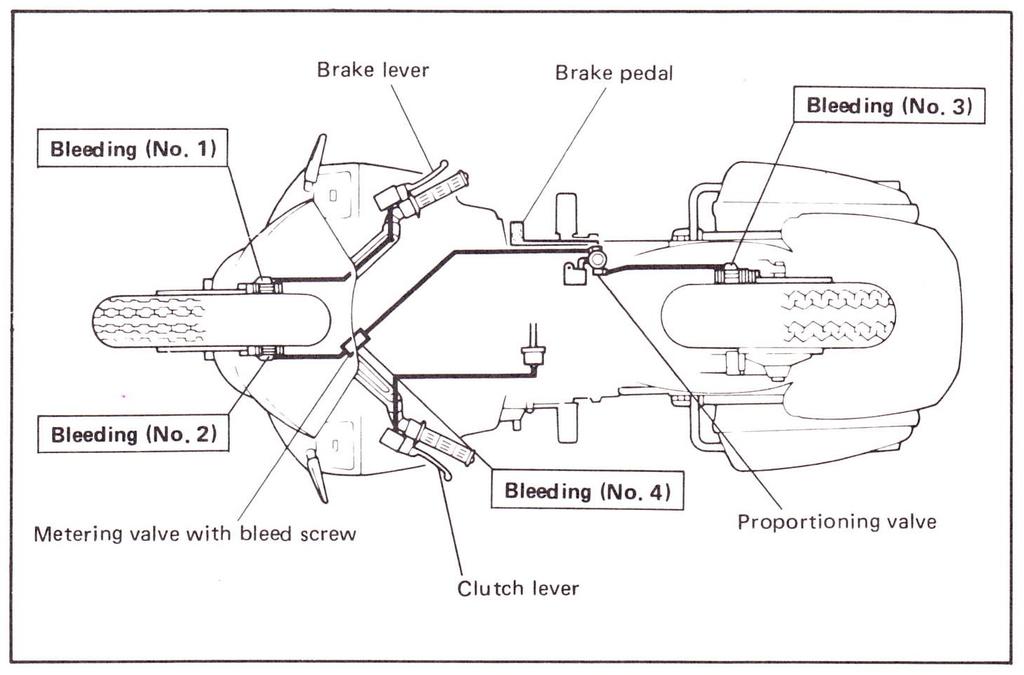
Be very careful while attempting to remove the fill plug. It is often very tight and the boss it screws into WILL break off the reservoir if too much torque is applied to the fill plug. I recommend using two wrenches when removing the fill plug. One wrench is fitted to the boss and the other to the plug. Hold back on the boss while loosening the fill plug. As for the brake system bleeding order, Yamaha says to do it in this order:
-
‘83 venture single carb conversion
Prairiehammer replied to Venturezach's topic in General Tech Talk
The 1983 Venture did not come with cruise control. On the subsequent years of the Venture, the cruise control utilized a vacuum pump, not manifold vacuum. What brand cruise control did you have? The 1983 TCI requires the vacuum source be ABOVE the carburetor butterfly. The TCI will not function correctly if the vacuum source is from the intake boot. -
Teardown and rebuild into something a little more... Me
Prairiehammer replied to Loy's topic in Videos
O.M.G. What are you doing to my bike? BTW, the banjo bolt in the rear brake reservoir was just a "plug" that I had on hand. It fit. It kept stuff out of the reservoir. Find an appropriate bolt/plug to replace it. Don't put too long of a bolt in there as a plug. And make sure to use a crush washer as a sealing "gasket". You may find that the stock front master cylinder is inadequate for use with two calipers. You will probably want to get a 1986-1993 (MKII) front master cylinder assembly to use instead of the 1983-1985 (MKI) front master cylinder. The MKI master cylinder has a ½" bore. The MKII master cylinder has a 14mm bore. Most find the ½" bore acting on the now four pistons does not deliver enough force nor does it give a good progressive brake "feel". Did you use a double banjo bolt (two orifices) at the front master cylinder? Also, you should have removed the proportioning valve from the rear master cylinder and attached the rear brake line directly to the rear master cylinder. Or at least gutted the proportioning valve, removing the inner workings.
-
I have compiled this chart showing the Yamaha parts needed to rebuild the MKII calipers. 1986-1993 XVZ Caliper Parts.xlsx
-
Brake Rotor
Prairiehammer replied to dna9656's topic in Venture and Venture Royale Tech Talk ('83 - '93)
When installed on the wheel correctly, the brake rotor rim should be offset toward the swingarm, i.e. dish out.
-
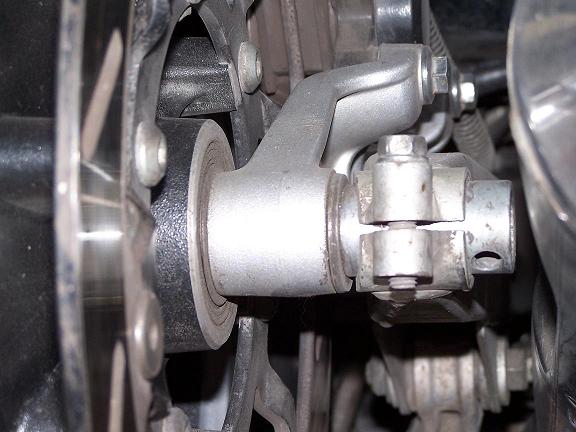
The caliper bracket pivot on the 1983-1985 is a bolt screwed through the swing arm. The caliper bracket pivot on the 1986-1993 is a welded on (to the swingarm) post. Doug, can you slide the bare caliper bracket onto the pivot post, i.e. without the caliper attached? Can you slide the bracket onto the pivot post when the big end of the bracket is not in position on the axle? If the unencumbered bracket slides onto the pivot post easily, but will not when installed on the axle, there is either an alignment problem or an assembly problem or a incorrect part problem. An example: You are not trying to install a 1983-1985 caliper bracket on the 1988 swingarm are you?
-
Only thing I can think of is that the torque for the short bolt is about half that of the longer bolt. Don't strip it out! Frankly, I'm not sure I would mess with it. The minor damage done by the incorrect long bolt will not be fixed by the substitution of the correct shorter bolt. As an aside: the parts diagram is the reason for the (probably) many examples of the long bolt in the wrong location. Notice, even though the part number describes a 16 mm long bolt, the diagram clearly shows the longer (20mm) bolt in that location.
-
Will, did you ever get those lights mounted on the brackets I sent to you?