saddlebum
-
Posts
6,866 -
Joined
-
Last visited
-
Days Won
169
Content Type
Profiles
Forums
Gallery
Events
Store
Everything posted by saddlebum
-
What do you mean by little? There is nothing little about confuser's I mean computers. As far as I'm concerned, Its the geeks way of punishing those of us that made the sports teams or knew how to build and work on our own muscle cars.
-
I am surprised they even plowed in that fashion. Up here highway plows usually team plow, with three staggered trucks 1st plow does the third lane and a piece of the left shoulder as well as part of the middle lane, depositing the snow to its right. The second truck follows slightly behind and to the right down the middle and part of the right lane picking up the windrow left by the 1st truck moving it even further to the right and finally the third truck taking whats left of the 1st lane and the right shoulder. all the snow is progressively moved off beyond the right shoulder. Nothing goes over to the left.
-
so then why did you lead us all down the garden path
-
This kid was lucky it was YOU on the plow instead of some young green snowplow cowboy. Gives me the shivers just thinking about it.
-
-
Or captain Ron Maybe ?

-
It sounds like all things considered your headed in a positive direction. Hope it continues that way. Just out of curiosity would an eye transplant be considered an option in this type of situation.
-
As far as vacuum leaks go there are not a lot of places for this to occur. Basically the carb mounting tubes and that's it. if they are properly sealed and hole free they should be fine. and be sure the caps caps are leak free ( you may want to remove the hose from the the left side tube and cap it as well just to eliminate that hose and vacuum sensor from being a part of the issue. My next move would be to totally disconnect the throttle cables from the carbs. not easy to do with carbs fully mounted but is possible. back off the idle speed set screw (its on the left side of carb ) all the way out so there is no contact with the linkage. Carefully slide the sliders open and look down into the carb. At this point you should be able to see the throttle valves and they should be totaly closed. move the throtlle linkage on the side of the carbs and ensure it all moves freely. turn in the idle speed set screw until it just contacts the throttle linkage and the throttle plates just start to open. Then give it about 2 -3 more turns. drizzle a bit of gas a few drops only or brake clean (brake clean is safer than ether/starting fluid). Place the air cleaner back on and see if it will fire and keep running while manipulating the linkage on the side of the carb with your fingers. If you can get it to stay running Adjust the idle speed screw. If after all this you can get it to idle properly without the control cable connected than You need to look at all the cables for binding including the transition box were the cable all come together for both hand throttle and cruise control.. To get at the cable junction box you will have to remove the left side outer and inner fairings to access this. While your at it check your not getting constant uncontrolled vacuum to the cruise control actuator or that its cable or moving parts are not binding. https://www.partzilla.com/catalog/yamaha/motorcycle/1984/xvz12dl/handelbar-cable
-
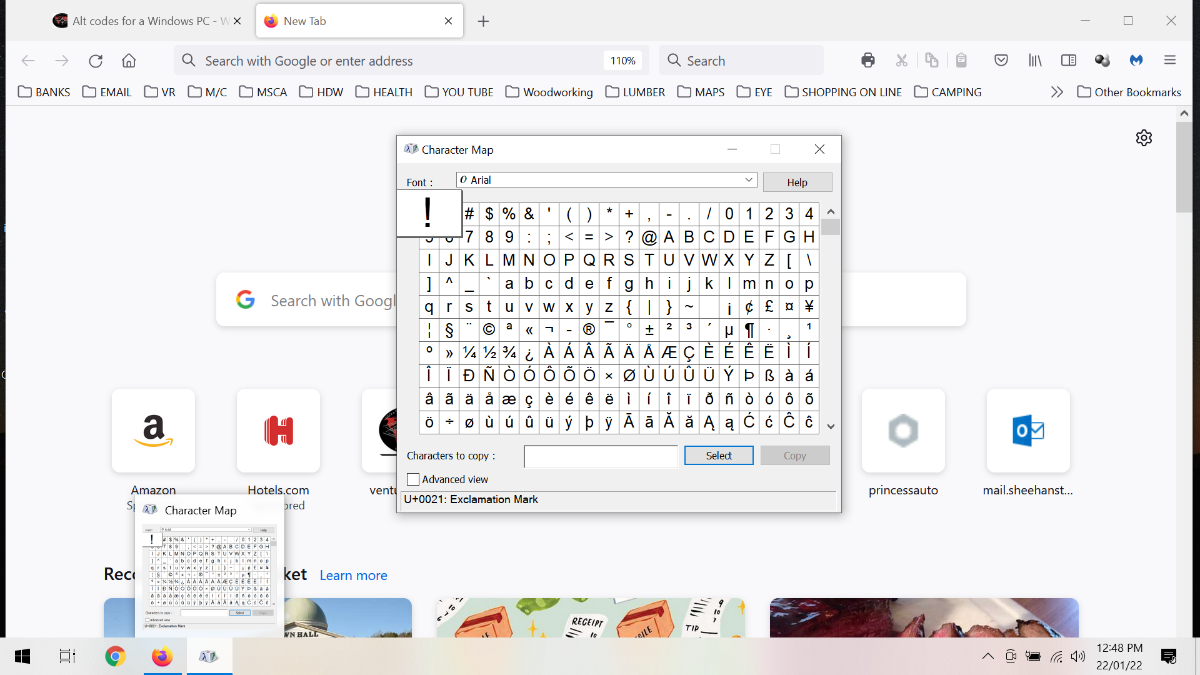
Ha found the answer to my dilemma. I found this link https://www.easytechguides.com/use-alt-codes-on-a-laptop/ Once you bring up the character map pin it to the task bar. Then you can bring it up whenever you want. You can then, select, copy and paste the character that you want to insert.
-
don't have the extra R/S # key pad.
-
Or grab a beer and come back to it another day
-
Tequila ???? and here I thought you were more the Schnapps or Korn type
-
Thank you so much. I must admit.I could not have done it alone. Having you, who has been going through this for much longer, mentoring me through this does make it a lot easier. I think Now I am getting confused again
-
Yes but sounds like more from a point of confusion than admiration
-

Anybody ever trailer a canoe W/ Motorcycle?
saddlebum replied to Pasta Burner's topic in Watering Hole
A point well worth considering. May have to borrow an idea from the trucking industry. -
87 clutch bleed
saddlebum replied to Pasta Burner's topic in Venture and Venture Royale Tech Talk ('83 - '93)
If it is still there. -
Anybody ever trailer a canoe W/ Motorcycle?
saddlebum replied to Pasta Burner's topic in Watering Hole
I have seen it done as well and had thought for years I might give it a shot as well but never got around to it. -
Actually that discussion you are referring to, was well before the picture was taken and what they were trying to figure out was " what kind of trike has two wheels in front and one in the rear instead of the other way around and were the heck was the side car " I am not sure colour actually entered conversation since they lost all interest once the good looking lady with the good looking female dog walked by which was when I took the shot.
-
In case anyone is wondering what @stickhandle2 and Baloo were looking at if memory serves my right (which can be hit and miss for me at times) it was a good looking lady and her good looking female dog passing by. I thought I would take the pic catching them in the act in case I needed some hush money.
-
Ignition switch is a very common issue with these 2nd gens. It appears the load put upon them is higher than the switch can handle. Sometimes the switch can be taken apart and cleaned up (as in the link provided by Freebird ). An alternative is to replace the switch. In either case the next step I would take, is to remove or cut any wires supporting a heavy load (or entire load if you wish) and transfer them to a relay switch (terminal 87), You can even use two relays one for the accessory side and one for the run or ignition side. Next run a wire from terminal(s) 86 of the relay back to were you removed/cut the wire(s) to the ignition switch. Run a wire from terminal 85 to ground or Bat neg- . Finally run a wire from Bat pos+ to terminal(30) recommend this wire be 12 gauge. This will take the load off the ignition switch while still leaving the Ign switch in control. I would also do the following: Load test your battery depending on its age it may be breaking down. Check charging system performance same as you would on a car (results should be no different than a car). At least 13.9 preferably 14.2 as measured at the battery engine at about 1500 rpm. The second gens are also notorious for intermittent issues with the rectifier/regulator it is mounted at the lower front of the bike. Check your wiring connections including grounds. Connections from stater and rectifier are notorious for corrosion.
-
Prayers will be said on your behalf when I turn in tonight Don. I sure hope this delay does not create problems worse than you already have Don.
-
83 Venture Rebuild/Restoration
saddlebum replied to Johnnycyclone's topic in Venture and Venture Royale Tech Talk ('83 - '93)
nice job -
You can run recaps on the drives but not on the steer axle. Another interesting point is that not all road gaters come from recaps even original tires can loose rubber if they are run on low air pressure. Also recaps like anything else depends on the quality. Bandag and Michilin for example make very reliable recaps as reluable as a new tire, but there are some recapers that are not so trust worthy.
-
87 clutch bleed
saddlebum replied to Pasta Burner's topic in Venture and Venture Royale Tech Talk ('83 - '93)
There are about four methods I like to use for bleeding depending on the situation. Here are three of them. The 1st method I wrote up for another member sometime ago. It is the method I use for bleeding the clutch most times. The 2nd method involves using a large syringe and third a mighty vac or similar device and an air tight catch container. 1st Method 1st you will not feel the same resistance with a clutch, as you do with brakes. So do not let that difference deceive you. These are the steps I recommend to bleed a clutch, If I don't have a vacuum tool on hand. 1. Crack the line loose at the master. Before you bottom out snug the line up as you continue to squeeze the handle. Release the handle and continue until you see signs of fluid. ( Sometimes if the master was completely dry such as a new one or after rebuilding, you may have to prime it. You can do this by removing the line completely. cover the hole lightly with you finger and squeeze the handle allowing air and/or brake fluid to escape from under you finger. Before releasing the handle clamp your finger tight and slowly release the handle. repeat until most fluid comes out. At this stage it does not need to be completely air free., your just priming the master ). Once you have done this reconnect the line to the master and perform the procedure at the beginning of this step. 2. Connect a clear line to the bleeder screw, after braking it loose and making sure it moves freely, and run it to the bottom of a catch container with a bit of fluid in it. This helps prevent sucking air back into the system and makes it easy to observe for air in the fluid. 3. Crack the bleeder open at the slave and slowly squeeze the handle. when it bottoms out snug up the bleeder and release the handle. Continue until fluid starts to come out of the bleeder ( it does not need to be air free at this point ). 4. As you begin to squeeze the handle crack the bleeder open and then quickly close just before the handle bottoms out while fluid is still coming out (Do not pump the handle). Continue until the exiting fluid is air free. 5. Next squeeze the handle but this time leave the bleeder closed until the handle comes to a stop. Pause and hold for a few seconds, (this allows air to come to the top near the bleeder screw) then quickly open the bleeder and then quickly close it again while a bit of fluid is still coming out just before the handle bottoms out. Again continue until the exiting fluid is air free. 6. Finally return to the master. Squeeze the handle until it bottoms out. Pause and hold for a several seconds ( again this allows for any air in the line to rise to the top of the line at the fitting), then quickly loosen bolt just enough to allow some fluid to escape but then quickly snug up the bolt before the handle bottoms out and while some fluid is still escaping. Repeat until no air spits out. 7. When done fully tighten the bleeder and line retaining bolt. PRECAUTIONS: A)-During the process keep an eye on the fluid in the master and keep it topped up. I recommend not letting it go any lower than 1/3 full because if the master goes dry your back to square one. B)- Cover everything well with rags to protect bike from brake fluid and when bleeding the master at the line use a rag to keep fluid from spraying every where allowing just enough of an opening to allow you to observe the fluid for air. With experience you don't need to look you can hear the difference between when the escaping fluid is air free or if there is air in it. C)- NOTE: during the process you will not note a mention snug the bleeder and banjo bolt. this is because during the process it is not necessary to fully reef them tight. Just be sure to properly tighten them when you are completely done. Finally there are other methods that work well such as using a vacuum tool at the bleeder or pressure bleeding, some even recommend speed bleeders, all of which make the job However, assuming you are only working with basic tools, these are the steps I recommend I have used this method on the side of the road and never ever had to re-bleed the system afterwards. 2nd Method In this method you are back bleeding. Using a a large syringe fill it with brake fluid and force the fluid in through the open bleeder screw until fluid starts filling the master. (be careful not to over flow the master). Then before removing the syringe, draw back on the syringe just slightly to eliminate any air trapped around the bleeder within the slave and close the bleeder before removing the syringe. Finally while squeezing the clutch lever carefully crack the banjo bolt holding the line to the master to allow air to escape. Tighten the bolt before the lever bottoms out. Repeat until you can no longer hear or see air escaping. 3rd method This method involves using a mighty vac. or similar vacuum device. 1st you need an air tight catch container with two hose connections. One connection should have a hose going to the bottom of the container. This is the one that connects to the bleeder screw. The second connection goes to the vacuum tool and opens just below the top of the container. build and maintain vacuum in the container as you crack open the bleeder screw. Be sure to maintain fluid in the master while doing this. When no more air is drawn out of the slave close the bleeder. Finish by bleeding the line at the master. -
What is important is that you lived to talk about it. It doesn't matter if anyone believes you or not because You were there and they were not and I imagine your underwear is still deeply stained. I know mine would be.