dingy
-
Posts
5,403 -
Joined
-
Last visited
Content Type
Profiles
Forums
Gallery
Events
Store
Everything posted by dingy
-
Pictures attached 1st thing was I went to Coil Over Plugs to eliminate the standard coils & plug wires. Do not do this with a stock TCI, without adding resistors in coil power circuit. COP's are lower ohms and will kill a standard TCI. PM me if you want more info on COP's. You are getting an Ignitech unit, which has a setting in it to handle COP's without added resistors. Fabricated a box from 1/8" aluminum that bolted where the coil rack was attached at. The gizmo mounted under box in a couple of pictures is the motor that controls the VBoost butterflies. Battery is a Deka AGM, this can not be done with a standard lead acid wet cell. Overall, driving force behind this was to get better VMax air box on bike. Gary
-
The 83-85 Ventures had a Barnett style clutch in them, then was replaced in 86 with the diaphragm style. All VMaxs have diaphragm style. You can beef up the diaphragm style easier than you can the Barnett style. More options available for a heavier spring, including doubling springs. Have a double diaphragm in Tweety, strong pull force, but it doesn't slip. Gary
-
I have used the tube type on same trim ring on Tweety. Clamp it all around after good cleaning. I also moved Venture badge down onto filler cap. This trim ring is sort of rare, I haven't seen many. Gary
-
Come on people, she is down by 7 votes at 9:00 est 725 to 732 She was up 24 about an hour and a half ago. Come on, lets vote. I put a plea out to my facebook freinds. Gary
-
Just voted for her, she has pulled into a razor thin lead. Gary
-
On a related note, I have an extra 2003 RSV tank avaliable. Gary
-
That would have been me. I will try to post something tonight. Somewhere I have pictures on site already. Was putting in a VMax airbox. Gary
-
Holy crap Batman !!! Training wheels on a 2nd gen, Who would have seen that coming? Yammer, Kic, Dingy... 1st few that come to mind. Gary
-
I just gotta say I am very proud of this group for the outpouring of help that has been shown for Mike. Thanks to everyone !!! Gary
-

Which exhaust header?
dingy replied to a1bummer's topic in Venture and Venture Royale Tech Talk ('83 - '93)
The 2nd picture is for a 2nd gen VMax, very doubtful it will work on a 1st Gen Venture. On a related note, I just bought another Mark's collector for the 2nd gen I am working on. I am rather disappointed in the quality of this one. It is not aligned correctly between the left and right halves. I emailed Mark about it and sent him pictures of it. His response was that they are made on a fixture and had to be correct. I asked for a price break since I needed to cut it apart at brackets in order to correct it and he was did not offer any. Rather than return it and take a couple of weeks to get it back, I will pay the full price & rework it myself. !st one I got for Tweety was much better than this one. There is a 3/8" difference between front sides with collector square at rear on table. There is 1/4" difference between rear inlet heights. Top tubes are at about a 10 degree angle from being parallel looking down into them. I can correct this by cutting the one short weld on top side of bracket that is holding left side. Then fitting up to bike with my exhausts in place and weld bracket back on. Price has went up on the Marks unit to $350. Gary -
Must hurt to make a $5.00 drop donation on the first day !!! Hopefully you both came out unscathed. Gary
-
And we could ride down to my garage, 40 miles, and have a 1st gen pickers dream stop. Gary
-
Progressive spring install
dingy replied to timgray's topic in Venture and Venture Royale Tech Talk ('83 - '93)
Chamfer the inside diameter on the plastic spacers a little and the 'nipple' will fit inside the spacer. Gary -
Attached is a picture of Snag. Sometimes helps to put a face to a name. Something Don didn't mention in his 1st post is that Mike has complete hearing loss. This happened about 18 months or so ago, no known cause that I am aware of. This makes his finding a job that much more difficult. Please help him if you are able to, this man is in this position due to circumstances beyond his control. Gary
-
Both !! These pictures are from before in this case. Sometimes I go out and get a spare part and photo it. I do what I can to help. My Venture folder with pictures has 45,000 files @ 29 gig. 2,057 folders. Problem comes up when I know I have a picture of something, but what folder did I put it in. I don't rename 99% of pictures to a searchable name. Call me lazy. Gary
-
If what Mike thinks is your problem, I likely have a spare throttle cable housing laying around. Gary
-
What radio cover did you use?? Any clearance issues with handlebars? Gary
-
Can you somewhat pin point location of noise? Sounds a little like the pinion shaft in final drive may have broke. Picture is looking into the final drive unit, which has the collar removed. Shaft in center has been known to break. Collar in 2nd picture. Gary
-
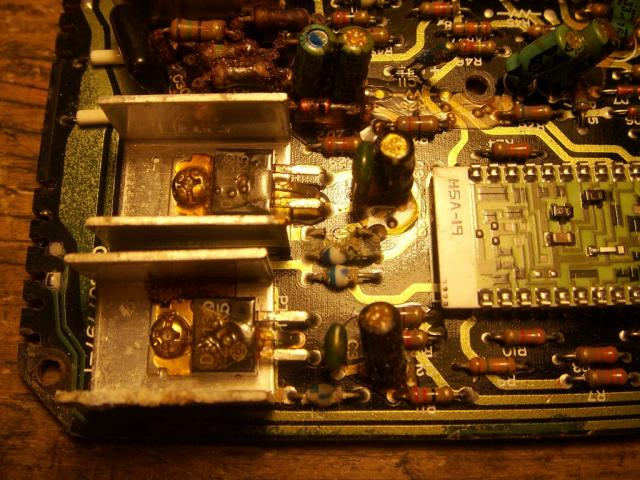
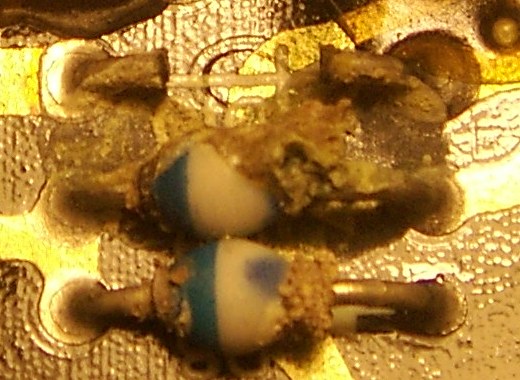
In regards to refurbing a TCI box
dingy replied to casiper's topic in Venture and Venture Royale Tech Talk ('83 - '93)
Actually that one looks good. Few closeup pictures of corroded diodes attached. You can use any 1N4000 series diode, 1N4000, 1N4001, ... 1N4007. Higher number indicates reverse voltage rating. All will work with 12V circuit. Gary
-
Ruff bow wow ruff ruff
-
And Friday dinner at Quaker Steak & Lube. http://venturerider.org/forum/calendar.php?do=getinfo&e=345&day=2013-6-7&c=1 Gary
-
18-2879 K&L carb repair kit. Has all the O-rings, fuel bowl gasket, jet Block & enricher body gasket & fuel needle valve & seat. Says it is for a VMax, but all parts in this kit work on 1st gens. I have used very similar K&L kit on Tweety, this one has the enricher gasket. I have four of this kit # in hand that are going in the RSV Hybrid. Needle valve seat is generally not needed and you need a few other parts to actually replace seat. Only saw one item on Ebay right now. http://www.ebay.com/itm/New-Vmax-CARBURETOR-REPAIR-KIT-carb-rebuild-set-vmx1200-85-07-K-and-Klein-KLY-31-/151018657385?pt=Motorcycles_Parts_Accessories&hash=item232969d669&vxp=mtr I would suggest you also replace Pilot Jet #37.5 - 4G0-14142-37-A0, Cap - 22V-14968-00-00, Cap - 22U-14968-00-00 at a minimum also. Gary
-
How to check valve spring?
dingy replied to Godlover's topic in Royal Star and Royal Star Tour Deluxe Tech Talk
You possibly have a bent valve(s) that are hitting the piston. There are two valve springs on each valve, one inside the other. With the dual springs, it would take a failure of both springs to cause a valve not to retract when being hand cranked. The bent valve scenario would cause an interference when hand cranking. With the valve covers removed, check and see if any of the valve clearances are way excessive. Most likely cause of a bent valve is a high power application at 1st to 2nd or 2nd to 3rd shift when the higher gear is not fully engaged. I would look at exhaust valves closely, as the are more likely to be bent than intakes. This is do to the intake valve opens just after Top Dead Center (TDC) and closes near Bottom Dead Center (BDC), so when valve is fully open, piston is at other end of stroke. Exhaust is opposite, exhaust valve opens just after (BDC) and closes near (TDC). So the valve is open as the piston approaches it. The valves can 'float'. This occurs when the valve is accelerated at a higher than design RPM and over extends as it opens. The inertial force of the valve overcomes the ability of the spring system to instantaneously retract the valve. Gary -
The purpose of this line is to allow air to get back into tank as it is used, not to vent tank. The vent line passes thru a one-way valve near the tank (just visible in picture in 1st post). This valve will not allow fuel thru. Purpose is to shut tank flow off thru vent line in case bike is on its side. By putting a tee in near the tank, the safety usefulness of this valve is gone. Think wreck, bike has your leg pinned under it, and tank slowly starts leaking a puddle of gas. Bet you wish you left it alone. Gary
-
Side stand bolt solution
dingy replied to dingy's topic in Venture and Venture Royale Tech Talk ('83 - '93)
Another 1st gen side stand fix bump. Gary