skydoc_17
-
Posts
2,283 -
Joined
-
Last visited
-
Days Won
41
Content Type
Profiles
Forums
Gallery
Events
Store
Everything posted by skydoc_17
-
Hey Reinhard, I don't live in Canada, but I do live in the North Eastern US and we get some pretty tough winters. My garage is also unheated, and I keep my bike on a GOOD tender during the winter months. I never remove any battery from any of my bikes, tractors etc. I do have "quick disconnects" on all of my equipment and rotate three tenders between 5 pieces of equipment. I average 6-8 years on my bike batteries using this method, and three to 5 years on the yard equipment. I do run AGM batteries in all of my equipment for several reasons. #1 is they have more cranking amps and seem to last longer. #2 is there is NO spillage like there would be with a Lead/Acid battery. My Snow Blower is a "Tim the Tool Man" special, and I have an AGM Battery mounted horizontally on that rig. You could never do that with a Lead/Acid Battery. The point I am trying to make is if you tender your batteries, you should have NO trouble with them in the spring as far as the battery goes. There may be other issues with the fuel in the Carbs. though. Just food for thought. Earl
-

spare wheel
skydoc_17 replied to Papa Fred's topic in Links to Classifieds, Craigslist, Ebay, Sales, Etc.
Hey Fred, I think this is an excellent way to approach this project! Here are a few I found: https://www.ebay.com/itm/384371005391?fits=Model%3ARoyal+Star|Make%3AYamaha&hash=item597e4c17cf:g:x0wAAOSwcQZhMmAO https://www.ebay.com/itm/311235833138?fits=Model%3ARoyal+Star|Make%3AYamaha&epid=2232621614&hash=item487719ed32:g:LTkAAOSw3uFbK7ne At less than $50. with FREE shipping sounds like a deal to me. Good luck with this project Fred! Earl -
Hey Tom, I am very glad to hear that the Diaphragms and sliders worked well for you! There is No describing the joy, joy these First Gen. Ventures bring when they are running good. As I said, these bikes run rich naturally, and that only gets worse as these bikes age. The Needle Shim Mod is the Bomb for curing this issue! I've seen these bikes get 50 MPG's when driving closer to 65mph. I hope you have many, many more miles of trouble free riding, my friend! Great job installing all of the parts you recently acquired! Earl
-
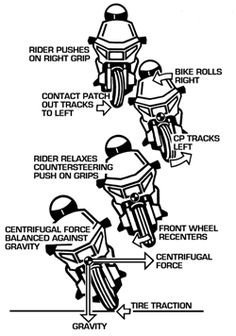
Now that the riding season is coming to an end for many of us in the North East, (except for those hard core, crazy canuks!) I hope to spend the winter months this year talking about things that many riders already know, but some may not. I fully realize that I will NEVER have the panache that Cowpuc had, (but I also will never have the beak that man had) I will do my best to impart the wisdom I have gained from over 50 years of riding in the dirt and on the street. I also must give credit to an article I read in of all places a woman's motorcycle enthusiast forum called MOTORESS. Here is a link to the actual article which goes into great depth about the physics of counter steering a motorcycle. I have also attached a pic of the actual movements to counter steer a motorcycle from another article. Here is the link: https://www.motoress.com/ride/rider/push-steering-a-motorcycle/ Now that I have given credit to MOTORESS and insulted the once Patriarch of our forum, let's move on to the "meat and potatoes" of my topic! Because I started riding dirt bikes at a fairly early age, I learned about counter steering on the dirt track. I learned very early on that if you rode your dirt bike like you were on the street, you would never be able to make the tight turns that you need to ride on the track. It just can't be done. I practiced "Push Left to go Left" and "Push Right to go Right" for hours on end until it was muscle memory to me. When I became old enough to ride on the street, (which was 15 years and 8 months old in my state) I was pleasantly surprised to find out that this same element that worked on the track also works on the pavement as well. At this time I would like to mention that this technique only works on two wheeled vehicles. It WILL NOT work on a trike, a bike with a side car or a Can Am Spider or a Slingshot. Two wheeled motorcycles, (and bicycles oddly enough) are the only vehicles that can be counter steered. To cut to the chase, so to speak, and skip all of the techno babble about why it works, counter steering basically interrupts the gyroscopic inertia that makes your bike want to "stand up" even in a turn because of the spinning front wheel, like a gyroscope. My suggestion is to take your bike to a deserted parking lot and practice the push right to go right, push left to go left technique. You can start out at a relatively low speed and try to "swerve" your bike as if you were dodging a ball that has rolled out into the street. After a day or two of this practice, and once you have FELT the reaction of your bike when you use this technique, find a sweeper right or left turn road in the 35mph to 45mph range and apply the push right to go right, push left to go left technique. (I personally find it harder to do a left turn than a right turn for some reason, but that's just me! So I started with the right turn first, Just an FYI here) The object is to set up the speed of your bike and the attack angle in advance of the turn just like you would if you were going to use the "Leaning Method" of turning, but instead use the "Push Method". By the way, many riders refer to Counter Steering as "Push Steering". In the "Old Days" we called it Counter Steering. You can call it anything you like. I would also like to mention that this technique takes some time to acquire. You will need to Teach yourself to Push the handle bars to make a turn instead of Pulling on the handle bars to make a turn. It takes some practice. One of the benefits of counter steering through a turn is it reduces the chances of the rear tire loosing it's grip on the pavement, and wiping out the bike and rider. Not to mention your turns will come much easier with a reduced amount of effort, and it reduces your reaction time in case you need to swerve right then left to avoid multiple obstacles! As with ALL things NEW, there will be an element of FEAR involved! This is natural. (And some of us thrive on the fear!) If you are the kind of rider that does not like to get out of their comfort zone while riding, then I highly suggest that you start out in the parking lot environment for an extended period of time until you feel comfortable with the Push Steering method. There is no set time for you to master this advanced riding skill. The rewards you will gain from having this valuable riding skill will serve you well, and may just save your life in the future! As always, questions and comments are welcome, if you have used the Counter Steering technique to avoid some trouble while riding in the past, please feel free to share your experience. If you would rather ask me a question about this topic in private, please feel free to PM me. And finally, Puckster, I hope I did you proud buddy, we all miss you a bunch! (And YOU know what they say about a guy with a BIG nose!) This pic is the proper Counter Steering Method. Earl

-
High pitch chirping
skydoc_17 replied to VentureNY's topic in Venture and Venture Royale Tech Talk ('83 - '93)
Hey Larry, Welcome to the Forum! What is the condition of the fluid in the Clutch Master Cylinder? Is it dark brown and looks like cola instead of clear? Might be time for a fluid change. Even worse, when you open the clutch master cylinder is there very little fluid in the master? If so, it might be time for a clutch slave replacement. Check these items out and get back to us. We are here to help. Earl -
Clutch Replacement Options
skydoc_17 replied to Patmac6075's topic in Venture and Venture Royale Tech Talk ('83 - '93)
Hey Ben, You were unusually "kind" in your comment just now, and I wanted to thank you for that. Would it be fair to say that the term "Rode it like I stole it" would describe your riding style to a degree, my friend. Be honest now, I've seen you ride your Venture more than once. I was just pointing out that for the riders that ride a little less aggressively, your clutch system MIGHT not be as smooth as the stock system if their riding style is more like "I ride it like I borrowed it, from Mike Tyson" LOL!! The most wonderful thing about these bikes is the fact that you can set them up any way you like! I have admired your riding skill for a number of years Ben, because as you know, I too like to ride HARD and FAST, and keep my bike in tip top shape, (and heavily modified) so that I can do just that! BUT in addition to my 87'VR I also have a pretty much bone stock 89'VR that I run to the store or work on all the time. Same bike, totally set up differently. Life, as well as our motorcycles, are full of options, I was just bringing a few more to the table, nothing more. Thank you again for your kindness Sir, Earl -
Clutch Replacement Options
skydoc_17 replied to Patmac6075's topic in Venture and Venture Royale Tech Talk ('83 - '93)
Hey PJ, Far be it for me to point out that you ALREADY HAVE the Clutch Pressure Plate and Six Compression Spring Clutch System that Barnett has so shamelessly COPIED except their Pressure Plate is powder coated Purple! (Which you CAN"T See once you put the clutch cover back on!! Never did understand that one!) And far be it for me to point out that your Clutch System is 37 years old! The issue I HAVE with the Carbon Fiber Barnett Friction Discs is they generate a tremendous amount of heat which has to be absorbed by the engine oil and radiator coolant. Plus, those carbon fiber clutch friction discs get a little "cranky" when they are cold. Unless you are "Racing" this motorcycle, you may want to have a look at Genuine Yamaha Clutch Friction Discs and a good set of EBC Heavy Duty Compression Springs! That should last you another 37 years or so, and leave a few extra bucks in your bank account! Just sayin". Earl -
Carb sliders…is this normal? New to carbs sorry.
skydoc_17 replied to Pasta Burner's topic in Watering Hole
Not to disrupt this thread with a shameless plug, but I can offer the Genuine Yamaha Slider Assy. (P/N 1FK-14940-09-00 ) for $125.00 USD each for the forum members if that would solve the issue of wondering if the sliders are from China or not! This is my cost on them, I normally charge $150.00 each here at the shop. There would also be a small shipping charge added to the cost. Hey Tom, Because those sliders were poorly glued back together, they are heavier than they should be and obviously misaligned due to the poor glue job which is evident by the scratch marks on the outside diameter of the slider. If you would really like to bump up the mileage, get my Needle Shim Kit I offer and install it while you are replacing the sliders. If I can help you with either of these parts, just let me know. I know this seems like a major investment in a bike that is over 30 years old, but believe me when I say that when these bikes have a properly functioning set of Carbs. they are a joy to ride. I would also like to add that we as men rarely spend money on ourselves! (At least I don't) BUT every now and then I truly believe that I am worth the money I spend that brings me pleasure. Even my wife agrees with me on this. So I ask you Tom, "Aren't you worth it buddy"? I think you are, and I am sure others here think you are as well. Look at it like an early Christmas present. Even if you decide to buy your sliders from another source, That's OK with me. Just don't cheat yourself out of the fun you will have if your bike is running properly, that's the point I am trying to make here. Earl -
Hey Ronnie, I resemble that remark, and am mildly offended that you would accuse ANY of the members of this fine forum with postulating on a subject, when in fact we have NO idea what we are talking about!! LOL!! Earl
-
Wait a minute Ben, (You OLD Goat!) You ARE OLD! Older than I am anyway! I wouldn't wish this "Oldness Thing" on my worst enemy! After I work all week, then spend all day Saturday in the shop, I end up spending all day Sunday hobbling around in the house in my "Snoopy PJ's" Getting old SUCKS! Earl
-
Hey Paul, Very Nice Bike! What a score to have it already have most of the items you would want to put on it once you got it! GOOD JOB! I too am not a fan of forward controls. That has kept me from buying a Second Gen. and most likely saved me thousands of dollars! Congrats on the "New To You" Scoot! Earl
-
I would like to point out the the 2009 Yamaha VMAX is a totally redesigned 1.7L fuel injected V4 that has very little to share with the original 1200cc "First Gen." VMAX. The new VMAX engine is much taller and wider than the original. When I spoke of items that could be shared between the Yamaha Venture and the VMAX I was exclusively speaking about the First Gen. VMAX, NOT the Second Gen. bike. In my opinion, a 200 horse power Second Gen. Royal Star Venture with forward controls would be a "death trap" for the average rider! This is the reason that the Second Gen. VMAX positions the weight of the rider directly over the foot pegs, so that the weight of the rider can be used to control the "body lean" of the motorcycle. Now are there forward control cruiser type motorcycles out there that have been overpowered, (insert Harley here), Yes there are. But as we often see, the skill set of the rider doesn't match the horse power of the bike, and this is where accidents happen. Only the rider can decide if their disposition and riding skill warrants the increase in horse power that a Second Gen. VMAX engine in a Second Gen. Royal Star Venture would produce. As the owner of a First Gen. Venture Royale that is basically a VMAX with luggage, I take the riding of that motorcycle very seriously! Even though I know my limitations with that motorcycle, it is VERY easy for this bike to get out of my control, and has in the past. I have a stock 89'VR that I ride much more regularly. I find that 94 HP matches my skill set much better than 150 HP and NOS! The current issue I face with the 87'VR is I can't, in good conscience sell this motorcycle because I have NO way to measure the skill set of the new owner. I would hate to sell this bike to a "novice" rider, and have them kill themselves with this bike. This bike truly might be a rock I wear around my neck to the day I die because I overbuilt this machine during a time in my life when I THOUGHT I could control it's power. at 66 years old, I no longer feel that way. Think carefully before you modify your bike, I wish I would have! My thoughts, for what they are worth, Earl
-
Hey Reiny, It says it on the box that our Lady in the Harbor Stands On: :Give Us Your Tired, Your Weak, Your First Gen Gold Wing Riders: So according to these sacred words Reiny, we even have to accept Tired, Old Gold Wing Riders.....AGAIN! Glad to have you back Brother! What's a barn yard without a noisy old Rooster to liven things up!! Earl
-
Excellent write up Neil, and very informative! For those that didn't know, I had a triple bypass to remove a grapefruit sized aneurism. I returned to work in March and am required to stand on concrete 8 to 12 hours a day to do my duties as a Tool and Die Maker. Without Compression Socks, I would NOT still be working I can assure you of that! Now I am not currently using the fancy "Copper Top" brand, but they are provided by my medical insurance. They come in colors, and go all the way to my knee. I am shocked that they NEVER fall down, even during the longest days at work. After reading your review Neil, I may pick up a few pairs for weekend wear because the insurance supplied ones do look a little "geriatric"! Thanks Neil, for the thoughtful post! Earl
-
Hey Guys, You gents are spot on with your description of places to check on Tom's bike! Any engine that runs on fuel needs three things. Air, fuel and spark. Because he said it feels like it is straining to go past 5 grand, and did not suggest that the ignition just flat cuts out at 5G leads me to believe that it is an air/fuel related problem rather than an ignition problem. Closely inspect the air filter. Better yet, If you are running the paper one, just replace it. If you are running the K&N filter, clean it! I personally run the K&N filters on both my VR's and every time I clean the air filter, I replace the Fuel Filter as well. Set all 4 Idle Mixture Screws at 2 1/2 turns out, and "Fine Tune" them from there. The inspection of the Carb. Diaphragms Simmer mentioned is an excellent place to start! If the sliders are not damaged, the Diaphragms from Sirius are an excellent choice. If the sliders are damaged, then complete replacement assemblies are the way to go. I offer complete Plug Wire with NGK caps upgrades for $65 that would take care of that issue for years to come, If you are interested. A good Carb. Sync is also an excellent investment in time for these bikes. Once you have taken care of these "Basic" items, if you still have this issue Tom, then the list of things to check becomes a bit more "pricey". Keep us posted on your results. Earl
-
Hey Guys, I personally flush my brake and clutch fluid YEARLY! The DOT3/Dot4 fluid our bikes use is rated to 500 degrees. (which is well in the range of normal braking temps.) Unfortunately, the clutch slave is located at the rear of the engine, close to the exhaust pipes and starved for fresh air. Because the fluid attracts moisture, and the reservoir is vented, water builds up at the clutch slave because it is the lowest point on that system. The heat boils the moisture, creating air bubbles, and this is why the clutch fades. When the clutch system cools off, the air bubbles are absorbed and the fluid functions again. This is not a hard service to do although it does help if you have a "helper" to work the clutch or brake lever while you work the bleeder. My children as young a 7 years old helped me bleed the fluid every spring. They also learned about regular maintenance on a vehicle at a very early age. This has served them well now that they are adults. Invite a few riding buddies over, provide the beverage of choice for the group, throw a few dogs on the grill and bleed everyone's brakes and clutches. It works every time for me! But even if you have to take it to a shop for this service, it does need to be done every year or two. The results of not doing it are damage to the clutch friction discs and clutch plates. It's cheaper in the long run to service the fluid than it is to replace the clutch! Earl
-
Is this how I drain my oil?
skydoc_17 replied to YoungWayne's topic in Venture and Venture Royale Tech Talk ('83 - '93)
Hey Wayne, This doesn't work as well if you are in a "Rush" to get it done, but if you have the time, Clean the Valve Covers well, put a light coat of the blue RTV in the groove of the Valve Cover. Install the Gasket, then flip the Valve Cover over on a flat surface, (Table Top, piece of glass, etc.) and place a pretty good sized book on top of the Valve Cover and let it sit overnight. Because these covers are a bear to reinstall, I like knowing that the gasket is going to stay put while I fight the covers back on. Here's another tip, The Second Gen. Valve Cover Gaskets will fit the First Gen, Valve Covers! They are wider, and have a Horizontal Rib that makes them a better Valve Cover Gasket in my opinion. When installed, there will be a bit of rubber gasket sticking out from the Valve Cover/Cylinder Head Joint. If this bothers you Wayne, just trim it off with a razor blade. I don't use the First Gen. Valve Cover Gaskets on either of my Ventures any more. The Second Gen. ones seem to last much longer, and are easier to install. This is just my opinion Wayne. Good luck with this project! Earl -
Is this how I drain my oil?
skydoc_17 replied to YoungWayne's topic in Venture and Venture Royale Tech Talk ('83 - '93)
Because I have the "Luxury" of putting all of the bikes I work on, on a lift I can easily use a hand held "Impact Driver". This is the perfect place to use one. The Oil Filter Cover is another one. I don't usually sing the praises of Harbor Freight Tools, but you can pick up a hand held Impact Driver there for under $10.00. This is an excellent investment for anyone that has a motorcycle! It comes with an adapter that holds a Phillips and Flat Blade Screwdriver tips, and if you remove the adapter, you can put a 3/8 drive socket on it as well. Do yourself a favor and pick up one of these handy devices because "Plan B" is you wring off the bolt, and have to remove the oil pan to get the bolt out! Earl
-
Hey Jason, Well, my friend, we meet again! I wrote this post some years ago for a member that posted a question very much like yours! Take from this article the items you need to address, and leave the rest. This article will give you a much better idea of the condition of the bike you are looking at, and will give you a head's up to look for. I personally would scoop this bike up at $800.00, (offer him $600.00) and settle at $700.00. CHECKLIST for 1st Generation VENTURES The 1989 VR is the last year of the "Old Style" TCI in 1990, Yamaha went to the "improved version". This should not be a problem, plenty of them out there! (1984 to 1989 all fit) Check all three brake rotors for "bluing", which means that they have been overheated from a dragging Caliper. The left front and rear Rotor are not available from Yamaha any more, and were spendy when they were. This bike is also the last year that came with the "Two Brush" starter motor. 1990 to 1993 had the "4 brush starter". Run the bike for a while, shut it off, and try to restart it. If the starter drags, you will need to address this issue once you have purchased it. I have seen these bikes get 300,000 miles with proper care, so at 65,000 miles I would have a good close look at the front fork seals, (thin, black oil ring above the lower aluminum fork tube) be sure to check BOTH tubes! Also steering head bearings will start to be an issue at this mileage point, check them closely. Check the coolant overflow bottle which is located under the "door" above the CB Radio on the upper right side of the fairing. If the bottle is empty, then you have a "weeper" coolant system. Have a close look at the "fish eye" glass in the front Brake and Clutch Master Cylinders, if the fluid is not clear like water, (cola colored) then this needs service Since you can't see into the rear Master Cylinder, I would "draw" a sample of the brake fluid from the rear reservoir and check the color. (looking for clear color here) Remove the false tank cover and remove the fuse box lid, if any fuses are missing, or are "jumpered" with wire, then this is a major issue, but can be repaired. Remove the air box cover and check the air box for engine oil in the bottom of the box, and bugs and dirt in the air filter folds. Put the bike on the center stand and roll both tires, listening for dragging calipers and dry bearings. Sit down behind the rear of the bike, and hold on to the chrome side bag guard, and place your right foot on the rear tire. (bike in 1st gear helps) Push side ways on the tire firmly, you are looking for the tire and swing arm to move sideways, meaning the swing arm bushings and or bearings are shot! If this bike has spent most of it's life in AZ., then it has seen some pretty high coolant temps. Look under the water pump, at the weep hole, (right side of bike, in front of and below the foot brake) for signs of anti-freeze staining or leakage. While you are there, look at the front of the water pump where the "Elbow" exits the water pump and turns left to the Thermostat Housing, MAKE SURE that the engine crash bar has not cut a gash in this plastic elbow! If there is a gash on the plastic elbow, then most likely, this bike has been down on the right side at some point. Check right side fairing corner for cracking. With the bike on the center stand, start the bike and let it run until the electric fan comes on. If the temp gage gets close to the red area with no fan turn on, (fan should come on at 3/4 on temp gage+/- a bit) then this bike has been ridden HOT in stop and go traffic. While on the right side of the bike, look below the water pump for the "oil level sight glass". With the bike not running, the oil level must be half way up the sight glass. If the oil level is too high and there is no oil level line, then you have an issue. If the sight glass is so "foggy" that you can't see the oil level at all, this is a sign that the oil changes have been neglected. Cracked frames. Early Ventures, '83 models specifically, have been know to develop cracked frames. This occurs just above the area where the center stand attaches. Second Gear. In models from '83 through mid '85 there is a problem with the bikes losing second gear. It does not happen on all bikes but is very common. Usually starts by slipping out of second gear on hard acceleration. Can be repaired by a savvy home mechanic but does require the removal of motor. Expensive fix if you have it done at a dealer. I've seen estimates approaching $2,000.00 Stators. Early models suffered from stator failure due to over heating. Later models incorporated an oil cooling system. Cracked trunks. Very common to find the bottom of the trunks cracked out. Class air suspension controller. E4 errors are common. Caused by bad solders on the circuit board within the controller. Easy fix if you are familiar with using a soldering iron. Front end wobble. Pretty common. Various causes but usually either a slightly cupped front tire or loose steering head bearings. Repacking and proper tightening of the head bearings is highly recommended whether you have experienced the wobble or not. Exhaust collector. Baffles become loose and cause a rattle. There is a tech article on opening up the collector and repairing. There is also an after market system out that does away with the collector. Everything mentioned here can be corrected. The point of this inspection is to see if the current owner is being honest with you about the condition of the bike. If everything checks out OK, with NO broken plastic, then this is a $3500.00 bike. If you can't see the oil level, it has at least one blued rotor, the water pump elbow has a gash in it, and the right side fairing has damage at the corner, and the coolant overflow bottle is dry, then this is an $800.00 bike, and will be a $2700.00 bike when you repair everything. Because the owner wants to sell this motorcycle, he/she will say "anything" to make the sale. Print this sheet off, check everything mentioned, deduct for the issues found, and if he is still firm on the price once you have proved that the 2K service is BS. Then WALK AWAY! In my honest opinion, paying $800.00 for an 89'VR and putting $1700.00 into it to cherry it out is a "fun winter project"! Paying $3500.00 for the same bike and putting $1700.00 into it just to get it to stop and go properly is getting RIPPED OFF! My thoughts, for what they are worth. I hope you will find this info useful, and "Happy Hunting"! Earl
-
Hey Guys (and Gals) lets crunch some numbers for a moment and see if we can come to the same conclusion I came to about the front forks of the First Gen. Yamaha Venture Royale. With the VMAX weighing in at around 579 pounds, and having 40MM fork tubes, and the Venture Royale weighing in at 785 pounds, and having, (you guessed it) 40MM fork tubes to say that the front end on the Venture Royale is on the "Light Duty" size is, in my opinion an understatement! Now Yamaha attempted to deal with this issue with the introduction of the Yamaha Royal Star Venture, but at 41MM the front forks on the Second Gen. are laughable at best! Of course, the riding style of the Second Gen. is different from the riding style of the First Gen. (In my opinion) A set of 50MM front fork tubes on a First Gen. would have suited me just fine. (1 9/16" vrs. 1 15/16") Considering that the First Gens. used the same fork lowers that were used on the XS1100 (which were 39MM lowers) Yamaha had enlarged the fork tube bore in the lowers as far as they dared to go in the 80's, early 90's. If they would have gone to a 50MM upper fork tube (as they should have, given the increased weight of the bike) that would have required the recasting of the upper and lower triple trees, the lower fork tubes, not to mention the increased 50MM upper fork tubes, which at the time, would have been the largest fork tubes that were ever used on a production motorcycle in their product line. (And still is to this day!) Plus you would have added 10 pounds to the weight of the bike, with ALL of it being on the front end. With my own personal riding style being that of "I am only vertical when I am at a stop light", I have learned to embrace the "horror" of the sloppy front end of a First Gen. in those sweeper turns where parts of your bike that should not touch the ground sometimes do. I have often though of adding a "Mid Brace" between the top of the lower fork tube travel and the bottom of the triple tree to see if that would firm up the front end. If there was some interest in this from the other forum members, I may try to introduce one as I plan to retire in early 2022 and will be able to turn all of my attention to my "Little Shop By The Creek". Feel free to comment on this upgrade that I plan to at least make for my 87'VR, and if it pans out, I will add one to my 89'VR as well. If you are so inclined, maybe I will add one to your bike as well. As a Machinist, I have lived my life making my bikes "Better". If the upgrades were solid, I offered them to the other forum members. Many have used them, some have not. If there was another front end from ANY other motorcycle on the planet that would improve the high speed handling of a First Gen. I would have figured out a way to adapt it to my 87'VR. (And believe me I have looked!) ALL of the sport bike front ends are WAY to short, and can't handle the extra weight of the First Gen. So, short of adding a totally custom Olins, multi-thousand dollar front end to a bike I paid $800.00 for, "I am stuck with what I got", so to speak. I hope I didn't steal this thread with this post. These were just my thoughts, for what they were worth. Earl
-
Water getting in gas tank through vent hose?
skydoc_17 replied to GrahamLFCkeeper's topic in Watering Hole
Hey Graham, I apologize, my friend! I just checked your profile AFTER I posted about this thread. Tractor Supply might be a bit of a ride for you, LOL!! Surely you must mow grass in the UK, and have lawn mower repair shops? We have a farm supply store chain in my area called Tractor Supply, and over the years I have solved many problems with my Ventures by shopping there, and thinking "Outside The Box" so to speak. I am sure you have a store similar to this in the UK. One more thing Graham, After you have added the filter, if the filter hangs too close to the ground, cut off some of the overflow line to return the end of the filter to it's original position. Again, I apologize for not paying closer attention to your location. But rest assured, the fix is sound advice! Earl -
Water getting in gas tank through vent hose?
skydoc_17 replied to GrahamLFCkeeper's topic in Watering Hole
Hey Graham, If this is indeed the issue, then go to a lawn mower shop, (or Tractor Supply) and pick up a small inline fuel filter that will fit the diameter of the overflow line. POINT THE FLOW ARROW OF THE FILTER TOWARDS THE GROUND, (Away for the gas tank) to allow the vapors to pass through the filter. These filters have a crude backflow preventer which will keep the water from getting sucked into the gas tank. II personally have only seen this on two First Gens. and I used this cure for both. As always Graham, good luck with this project! Earl -
Hey Todd, Boy, it sounds like you had a great trip! With that being said, let's get to it! I installed a set of carbon fiber levers from a Yamaha R1, but I did have to modify them. The hole in the lever where the bolt secures the lever to the bracket for the master cylinder is your pivot point. If we are looking down on the front brake lever, to the left of the retaining bolt is the contact area that pushes on the plunger for the master cylinder piston. The more you remove material from this area, the closer the grip end of the lever will be to the throttle grip. I actually milled that area in a milling machine to modify mine Todd because they were carbon fiber and not aluminum, but a Dremel Tool, or even a single cut file would work to remove material. Grind on it some, and "dry fit" the lever to see if you are getting the desired effect. If it has moved closer, but needs to go more, grind a bit more off the lobe of the lever, and check it again. If you go crazy removing material, you will ruin the lever and you will need to start over again with a new lever so grind a little, then check it, grind a little, then check it. (You get the idea, I'm sure) Pretty much ANY of the big cruiser/touring bikes made by Yamaha use the same lever style on the master cylinder end of the lever Todd. The only difference is the length of the lever, and the bend of the lever at the hand grip area. The R1 levers I chose were shorter than the Venture levers, but I do not have "Bear Paw" type hands so that was not an issue for me. Plus there is not another Venture on the planet with Carbon Fiber levers on it so I was more than happy to take the extra time to fit them properly. I hope this helps, and good luck with this project! Earl
-
Hey Joe, Welcome to the forum! now let's get to it! I posted this several years ago for another forum member that had a problem similar to yours Joe, I hope this works for you. Cleaning First Gen. Carbs. On The Bike I use this cleaning method to unstick a float needle that is causing the gas tank to drain when the bike is parked, or for a Carb. That is passing raw gas out of the overflow tube when the bike is running. This on bike cleaning DOES NOT address the issue of a Carb. Set needing a complete rebuild, (off the bike) and does not address the issue of AIR PASSAGES being blocked, and causing poor performance. These two issues require the Carbs. be removed from the bike. With the bike on the center stand, and the engine off, I select the first Carb. I want to clean. You will be looking for the Black Plastic Carb. Drain Tube, and the screw that opens that drain. (Phillips Head Screw) You will need a small coffee can, or a coke can with the top cut off, (NO plastic containers) to catch the gas that will come out when you open the drain screw. Allow all of the gas to drain from the Carb. and have a look in the can for “floaters”. (Solid particles) With a new can of Carb. Cleaner, insert the red straw in the end of the drain tube. I wrap the junction of the red straw, and the drain tube with a small piece of shop towel to slow the blow by. Press the button on the top of the can of Carb. Cleaner, and count to 3. Remove the red straw and let the cleaner fluid run into the coffee can. Move to the next Carb. and repeat. When you do Carb. #4, start over again, and do them again. I use up one can of Carb. Cleaner on the four Carbs. When the can of Carb. Cleaner is gone, retighten all four drain tube screws, (CAUTION DO NOT OVERTIGHTEN THE DRAIN SCREWS) Turn on the ignition switch, (do not start bike) listen for the fuel pump to fill the Carb. Bowles and stop pumping, check the drain tubes and the overflow tubes (down in front of rear tire) for fuel leakage, move the can with the Carb. Cleaner/Gas mixture away from the bike, (or better yet, roll the bike out of the garage) and start the bike. (It may take a few short bursts on the starter motor, and you may need to choke it as well) Go for a ride and “blow the cobwebs out” (my personal FAV part) if this doesn’t solve your problem, then a “Carbs. Off Rebuild” may be in order. On a side note, I run 3 ounces of Seafoam in every tank of gas I put in my 87’and 89’VR because of the negative effects of the Ethanol in the fuel these days. Because of my shop here in South Central PA. I buy OEM parts direct from Yamaha, and share my discount with the VR.ORG members. It would be my pleasure to help you with any project you have in mind for your First Gen. VR. Earl (skydoc_17)
-
Hey Tom, Without knowing your weight, I can only guess on where to start with the size of the shim pipe. If you start at 1/2 of the shim pipe, (NOT 1/2 inch of the shim pipe) and want to make it smaller, then you better weigh 150 pounds! No insult intended Tom, but after your wife caught me peeking in the living room window to see how much shim you needed to add to your fork springs, (LOL!!) If you weigh MORE than 185 lbs. then I suggest that you start with the entire shim and work down from there, unless you DO weigh 150 pounds! (I hope you take my little pun in the spirit it was intended!) Earl