skydoc_17
-
Posts
2,283 -
Joined
-
Last visited
-
Days Won
41
Content Type
Profiles
Forums
Gallery
Events
Store
Everything posted by skydoc_17
-

Doing valve adjustment - tool and shim kit needed?
skydoc_17 replied to InfinitySurf's topic in Watering Hole
Sorry for the slow reply gents, was out of town, and just got back. Here is the link in the Member Vendor's section. This kit has the shim tool, picks to remove the shims, About 80 assorted shims and feeler gauges. I also send out a set of new Valve Cover Gaskets, and instructions for a flawless gasket install. Feel free to PM me if I can help. Check out the link for more info about what is in the kit. Earl. -
Need advice
skydoc_17 replied to mnorton3256's topic in Links to Classifieds, Craigslist, Ebay, Sales, Etc.
Now Bob, I wasn't trying to insult any of my vertically challenged fellow riders, I was just pointing out that if you are on the short side, these bikes can be a hand full. Also, even you admitted that the "perfect bike" for you had reverse gear in it. I'm just trying to keep Matt from BUYING TWO BIKES, to find the perfect ONE for him. Earl. -
Need advice
skydoc_17 replied to mnorton3256's topic in Links to Classifieds, Craigslist, Ebay, Sales, Etc.
Hey Matt, This is a cream-puff, BUT it is AUGUST! And you are trying to buy this from a Stealer, I mean Dealer! Offer them $3500. and if they move on the price at all, pay no more than $3800. If they refuse, come back next month and do the $3400./$3700 dance. After a month or two, they will figure out that this is just going to get worse! Maybe in December you will pay $3500. for that beast. Lastly, Matt if you are 5'6" tall with a 29" inseam, brother, this is NOT the bike for you!! LOL! Good luck with your quest for a new Scoot! Earl. -
I apologize for being late to the party! Thanks Ronnie for the "Props" on the Shim Kit Loan. Hey Charles, I loan out my Shop Shim Kit with a set of Brand New, Genuine Yamaha Valve Cover Gaskets, the Bucket Shim Tool, and an assortment of about 80 Bucket Shims. You get all of this for $95.00 and you pay the return shipping when you finish with the shim kit. (Apporx. $20.00) Let Me know if I can help, Earl
-
Hey All, I was wondering how the first day went?!?! How was the temps? Do any riding? Any pics? "Help a brother out! Earl.
-
Well....Shucks! I left out yesterday morning at the crack of dawn. About 220 miles south west of Pittsburgh, a large black rubber wheel chock flew off of an 18 wheeler, right into my front grill of my truck! It took the rest of the day to get AAA to tow my rig back home. Thank heavens for AAA RV Towing! Made it home after 9pm. Because my truck is a bit older, the damage almost totalled her...Almost! I'm sitting here this morning, 620 miles from where I want to be! Needless to say I am truly bummed! Safe journeys to all who are riding this week! Earl.
-
Well, The Old Skydoc is gonna' be there, I'm booked at the Pterodactyl Inn! Or is that the "Feather and Fin"! Oh Yea', that's it, Feather and Fin. I say we all pull up in Ronnie's front yard and yell, "What's for Breakfast"! If I remember correctly, Ronnie's wife just retired as an Elementary School Teacher!!! Surely, she can handle a group of "Troublesome Boys, on their noisy motorbikes"!!! If not, I have a spare bed in my hotel room for Ronnie! Looking forward to seeing everyone, Earl.
-
The Skydoc and company have booked the last room at the Feather and Fin. Here's hoping that we will get to see a few old friends... and hopefully meet some NEW ones! I hope to see everyone there! Earl.
-
Hey Matt, Sorry to hear about your braking trouble! The rear Master Cylinder is dangerously close to the exhaust manifold for the rear cylinder. If you fill the Master Cylinder to the top, the heat from the engine expands the brake fluid. With the Master Cylinder full, there is no place for the expanded fluid to go except to compress the brake pads. And since the left front and the rear brake caliper BOTH work off of the rear Master Cylinder, it locked up both calipers! Pull the plug off of the Rear Master Cylinder, Insert your index finger to the SECOND NUCKLE, if there is brake fluid on the end of your finger, the Master Cylinder is OVERFILLED!! Lower the level until it just touches the tip of your index finger with the inside of your second nuckle is touching the Master Cylinder. If this Master Cylinder is UNDERFILLED, you will get a light on the dash to inform you. Splash a little fluid in there, BUT do not overfill the Master. Because of what happened, you may have overheated the brake pads. The issue with this is the friction medium is GLUED to the metal backing plate. Sometimes the heat is too great for the glue, and the friction medium detaches from the backing plates. I am a Vendor for EBC braking products, (brake pads, rotors, etc.) And as Richard kindly mentioned, (Thanks for the Props Rich!) I do offer a delink kit which connects BOTH front calipers to the right front brake lever, and connects ONLY the rear caliper to the foot pedal. If I can help you with either of the items, please feel free to contact me. If the pads didn't separate, lower the fluid in the Master, and go for a ride! Good luck with this project Matt, Earl.
-
Hey Leland, Congrats on the new Scoot! I am sure you will have "Miles of Smiles" with that beauty! Over the years, I have "Acquired" several motorcycles. I am VERY fortunate that I have the room for them, as well as a wife who is a "Good Sport" about having a few extra "Toys"! The bikes range from a pair of 550c.c. Honda Silver Wings, to a pair of Honda V65 Magnas, to a pair of MKII VR's (87' and 89') and finally an MKI VR (1984). Depending on my mood, distance, weather, and who's riding with me, determines which bike I take. As with many here Leland, it doesn't matter what you ride, it's the fact that you DO RIDE! I swear that I feel 10 years younger as soon as my butt hits the saddle! I am sure it will be the same for you as well. Safe Journeys, my friend! And don't be a stranger just because you bought a different bike. Heck Leland, the Founder of this web site, and now his wife BOTH ride Harley's, and we STILL let them "Hang Out"! LOL! Earl
-
Hey Don, You Sir, are a GOOD MAN! We don't care what kind of bike you and Eileen ride, we DO care that you ride safely, visit many wonderful places, and take lots of pics to share with the forum members! Heck! we got members that ride Electric Bicycles for Jimmy's sake! You do YOU, Don and Eileen! Update: Thanks Don, I showed Jean Eileen's new bike, and now SHE wants one too so she can ride with Eileen! Thanks Buddy! Earl.
-
Both Jean and I hope that 2024 brings back some of the fun outings we used to have. I sure do miss those days! But I also look forward to whatever our forum offers in the new year. Please stay safe, Earl and Jean Harrell.
-
Hey John, Where would this event take place? I am assuming it is in Ohio, but I thought if we nailed down the event site, we might get a bit more interest in it. I for one have been an "Avid" Cigar Smoker for pretty much my entire adult life. Unfortunately, due to recent events, (Heart Attack, Bypass, etc.) I have been left to Vape from time to time. BUT I am always up for a good Meet and Greet! Count me in! Thanks for bringing this to our attention, Earl
-
THIS is sad news in deed! R.I.P. Muffinman! I met Jeff some 15 plus years ago. This Man was a "Force Of Nature"! He was one of the few people that could make me say, "COOL, How in the Heck Did You Do THAT"!! Prayers Up for MiniMuffin and the Family. Earl and Jean Harrell.
-
Both Jean and I wanted to take this moment to wish one and all a Very Merry Christmas, and here's hoping that 2024 is a wonderful year for ALL of us! Earl and Jean Harrell
-
Hey Jr. Ebay has them. Here's the link: https://www.ebay.com/itm/335129509016?chn=ps&norover=1&mkevt=1&mkrid=711-117182-37290-0&mkcid=2&mkscid=101&itemid=335129509016&targetid=1645685073528&device=c&mktype=pla&googleloc=9006447&poi=&campaignid=20133407470&mkgroupid=147476396765&rlsatarget=pla-1645685073528&abcId=9312979&merchantid=6482024&gclid=CjwKCAiA1fqrBhA1EiwAMU5m_4tfXLGvvOOkWWgyA5L3lTmXYcY9sO0ltN4k8-eJDZHMRrU-mm8pSRoCCVkQAvD_BwE I hope this helps, Earl.
-
Hey Rich, What is your impression of this tire? How many miles so far? Thanks, Earl.
-
Hey Rich, Sorry for the slow reply, If you have dealt with this issue, I would LOVE to know which tire you selected? You also threw me off for a sec. when I looked at the tire size in the link. (With a First Gen. Rear Tire being 16 inches!!!) I got it now, it's for your Second Gen. Petlas Tire Corp. made Military Tires mostly from the mid 70's to the end of the 90's. They got into Industrial Tires in the 90's AND I actually saw these tires a LOT on equipment to move Jet Engines, Fuel Drop Tanks, Wheel Assemblies, etc. at Lockheed/Martin when I worked there. I will add that the Assembly Moving Trailers I saw were pulled around but were NEVER exposed to Interstate Highway Speeds, under power. I never saw a flat or blow out even though they were "Overloaded" regularly! I personally have never ran these tires on a motor vehicle, but like I said, I have been exposed to them. I hope this helps Rich, and let us know what choice you make. Earl

-
I'm stuck
skydoc_17 replied to Rushfandan's topic in Venture and Venture Royale Tech Talk ('83 - '93)
Hey Dan, It's NOT you, it's those pesky Metric fasteners! Harbor Freight actually has a decent Impact Driver for under $20. I like others try to replace every screw with Metric Cap Screws in Stainless Steel. This solves the rust issue and you can use Allen Head Wrenches on the Cap Screws to deliver higher torque to the fastener. Hope this helps, Earl.
-
HOLY COW DUEY! Both Jean and I are really sad to hear about your issues! We are both glad that you made it through the first go around, here's hoping you have the best possible outcome on the next! We're prayin' for ya' Duey! Earl and Jean Harrell
-
Both Jean and I wanted to take a moment and remind everyone that they don't call it "THANKSgiving" for nothing!! Thank you one and all for taking this journey with us....ALL OF US! HAPPY THANKSGIVING! Earl and Jean.
-
I'm stuck
skydoc_17 replied to Rushfandan's topic in Venture and Venture Royale Tech Talk ('83 - '93)
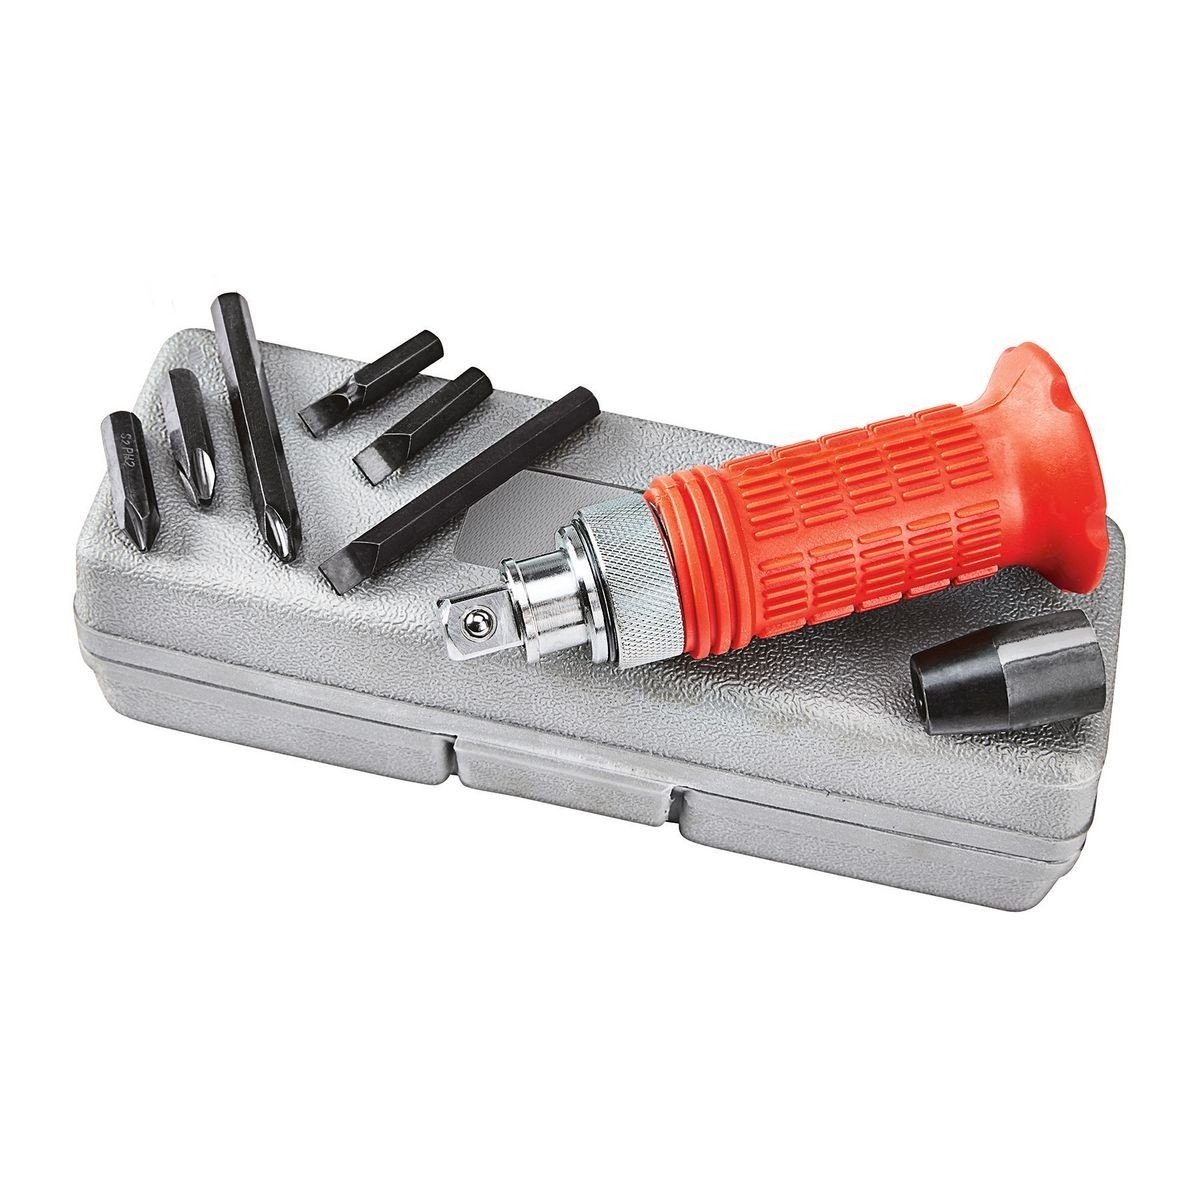
Hey Daniel, I'm just going to go down the list, and if I mention something you already knew about, I apologize in advance for that! Here goes! The angle of the slots on a METRIC Phillips Screw is different than on an American Phillips Screw. So if you're trying to get a metric screw out with that crusty old Craftsman Screwdriver, then that's not gonna' work! I'm a BIG Fan of using "Nut Buster" or "Liquid Wrench" on any fasteners I am trying to remove from my bikes. Lastly, I have attached a pic of a "Must Have" Tool when working on ANY bike, and that is a Impact Driver. The one in the pic is a bit "Fancy" but Harbor Freight sells one for less than $20. that does the job just fine. It's better to start out using the Impact Driver than to destroy the screw head and try to remove it after the fact. I hope this helps, Earl.
-
Hey Don, Both Jean and I hope you get well soon, and don't get the "LONG HORN"!....I mean "Long Haul" Virus! I hear that you Texacan's are susceptible to that! Earl and Jean.
-
Glad I didn't tow the bike to any of the events this year.
skydoc_17 replied to uncledj's topic in Watering Hole
Great Job John! Sadly, your new hitch might be the only thing American made on that truck! Both Jean and I wish you many "Miles of Smiles" with your new hitch! It's a GOOD thing that you stopped to check out that noise! Great Catch and repair John. Earl. -
Hey Steve, It's been a while, Buddy! Are you back in NC? What are you riding these days? Don't be a stranger, (Well NO stranger than normal!) Earl and Jean.