Droneh8tr
-
Posts
181 -
Joined
-
Last visited
Content Type
Profiles
Forums
Gallery
Events
Store
Everything posted by Droneh8tr
-
 This has been a persistent problem. Fortunately its MUCH less now after the rebuild. Bars leak, interesting.. Never heard of it, but I'm not against trying it. BUT, I am hesitant. Look at the picture I've included. The PO used such a sealant and literally plugged orifices all throughout the coolant system. It was an absolute mess. Now, i do think the PO used too much, hence the extensive plugging of large passages. Now to your question.. if I "find it, then what?" I've never been very inclined to not repair a known problem. But of course the problem has to be located first. Once its found, replace the defective part(s). That would be my normal course of action. But I also have to be a realist. Spend possibly crazy amount of time and money to locate and fix this properly or use a technique which has been a track record of success. Which your telling me Bars Leak does. I'm going to try and locate the problem, hopefully someone will chime in with a technique to help me do that. I'm thinking to drain the system, pressurize the system and listen for the leak. I'll decide from there to replace parts or use a sealant like you've suggested. Thanks for recommending the product.
-
I would say I'm loosing about 2oz per 400 miles ive only checked it after the ride.. It rises because of expansion, but afterwards it's less than when I started. yes, the rad is showing full all the time, the bottle is what's dropping.
-
So I've rebuilt by 83s engine. My ridiculous oil consumption is gone, but my coolant is continuing to disappear. So what I'm looking for is a plan to find and fix the leak(s). FYI, I'm still getting a little off white goo in the air box. Firstly, determine where it could be leaking from... Externally.. Simple, pressurize the system and look for a hose, weep hole or gasket to leak. Use a dye to help this process. Internally.. The list I come up with would be the head gasket, water pump seals, twinkie, coolant tubes in the heads. So, because I've got a little coolant in my AIRBOX, I would think I should look most closely at these areas. Any other areas I should consider? But, how do I determine WHICH is leaking? I was thinking I could remove the valve covers, pressurize the system, and look for any leak from the coolant tubes or the head gaskets in the channel the cam chain runs in. As for the water pump or twinkie, I was thinking to drain the system, pressurize the system and listen for a leak. This, I would think, would also work for the coolant tubes and head gasket. So you see my dilemma, I'm looking for a logical approach to solving where my coolant is going.. Or dare I say that maybe I should just leave it as it isn't too bad. I would prefer not to use any additive to the coolant that would find the leak and seal it, BUT, if this has proven successful for anyone, I would like to know. Thanks for any input to help me.
-
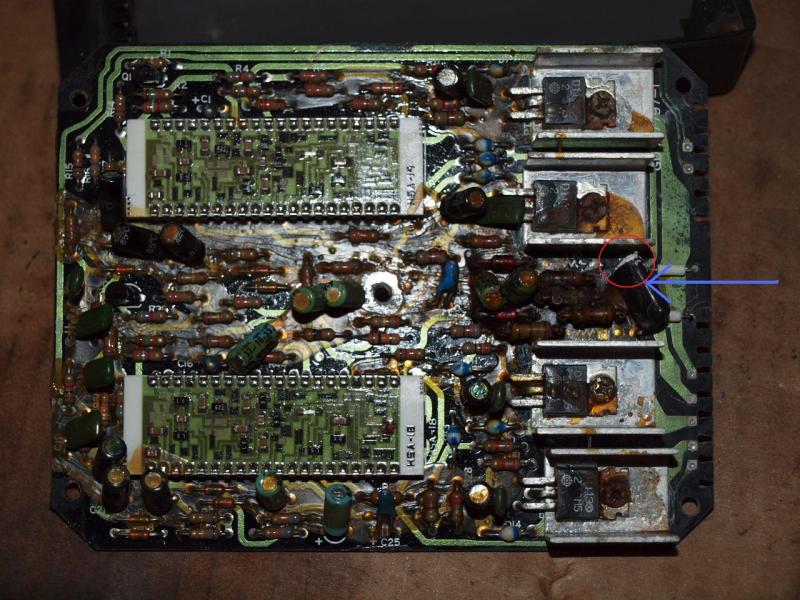
Thanks Frankd, ive got a new one on the way... Ill do the capacitor and diodes and take a closer look at that area by the capacitor.
-
83 VR, I'm really glad I decided to remove the TCI and open it up.. I don't things look too bad, but I am going to change the diodes and one other part. Whats the BLUE arrow pointing to? The red circle is white corrosion expanding the case of it. How do I get another one? Anything else I should do to the TCI?
-
83 VR, Cam timing problem
Droneh8tr replied to Droneh8tr's topic in Venture and Venture Royale Tech Talk ('83 - '93)
Oh yeah... everything was marked and is going back in its original spot.. I think what your seeing is grease. The surfaces on everything is good. -
So my engine is nearly back together. Its time to time the rear cylinders. #1 cylinder is at TDC Cams have been laid in position... Yes I know the chain isn't on them.. The exhaust cam, small hole, lines up with the mark on the boss perfectly (left cam) The intake cam WONT line up. The intake lobes for cylinder 3 are hitting the buckets. This is as far as it will go. Any idea whats going on? Does anyone know how to time the cam without the small hole lining up? I've spotted that the transmission issue was resolved awhile back. Maybe during that opening of the engine things were swapped out and now aren't exactly how their suppose to be. Just a thought. I've ridden this bike maybe 4000 miles before I opened the engine so I know, somehow, it can be timed. [ATTACH=CONFIG]98034[/ATTACH] Additional info... The front cylinders intake cam is the same as the rear. It won't line up either. OK, I think I may have figured it out.. I'll feel kinda dumb if this is the case, but oh well.. I'm humble. The cam is only suppose to line up by turning the cam and compressing the valve springs.. The exhaust does not have this issue. It will line up without compressing any valve springs. If someone will confirm if I'm right I would appreciate it.. I want to get this engine back in the frame.
-
Thanks Prairiehammer, but the problem is I can't see a number on the connecting rod. I have the numbers on the end of the crankshaft as I mentioned above. Maybe I should do the plastigage test and see if its still in limits.. Although I would think that if I can see the copper colored metal of the bearing, the safest thing would be to replace it. Does anyone know the thickness of the bearings? If I knew that, I believe I could figure my issue out.
-
No go! i inspected the connecting rod and it's cap closely and their are no marks. Any other ideas?
-
OK... well for now I'll say that maybe I didn't look close enough.. When I get home tonight I'll try to look closer.. Thanks
-
Hey all, So I got to the point of putting my engine halves back together, I look at #2 cylinders connecting rod bearings to the crankshaft and notice one of them is worn into the copper colored metal. I would like to replace it, but I can't seem to figure out how to determine what I need. On the end of the crankshaft are these numbers: 3 3 3 3 3 4 I don't see any markings on the sides of the connecting rods near the caps. On the bearing that presses into the connecting rod I see this: D3B On the bearing that presses into the cap to the connecting rod, I see this: D3B Can anyone help me figure out what i should order? What COLOR should I get?
-
Sorry for taking so long to respond to you alls help.. I had BBBS obligations. I triple verified the part number that I had for a Head Gasket and it is 26H-11181-00-00. And, I was able to see a pic of the gasket I took off, it matched the one I have. Although I know the head had been removed before and I couldn't be sure they put the correct gasket back in. So, after looking at the pics you all provided, I feel confident that what I have is correct. Thanks for answering
-
86 VR Water pump rebuild?
Droneh8tr replied to Bob and Mary's topic in Venture and Venture Royale Tech Talk ('83 - '93)
I just did mine. Upon disassembly I found the plastic impeller to be cracked in multiple places, the mechanical seal had gunk on the carbon side AND the bearing was binding. EVERYTHING got replaced. The new impeller of course is metal, the bearing is straight forward, the oil seal is a no brainier, the mating surface for the carbon seals is easy to put in by hand. The carbon seal is another animal. Be ridiculously careful with it during install. I did install mine with a socket and a slight smear of permeated gasket maker around it. Their is a tool for this job as Jasonm says, but really who has that. I just can't stress enough how fragile that carbon seal is, be careful, control the position of the tool and insert it as straight as you can from the start and it should be ok. -
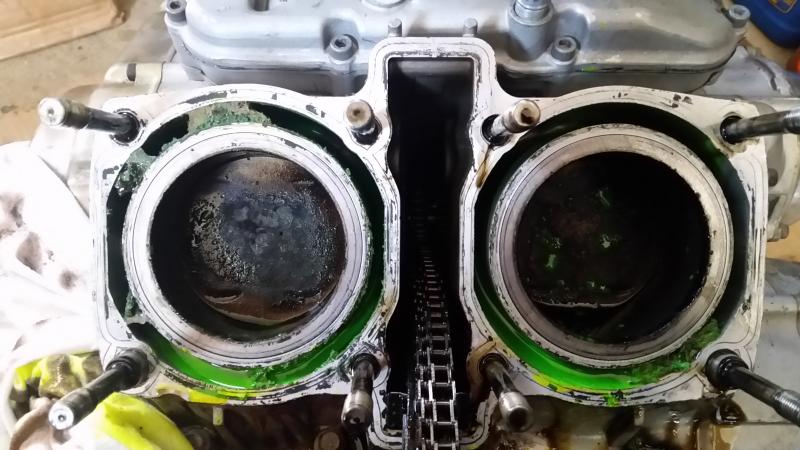
In the pic, I've marked where the passages are underneath the gasket.[ATTACH=CONFIG]96665[/ATTACH] So I've gotten the Yamaha head gaskets. When I set them on the heads, you can see that 2 of the holes (rather large) are nonexistent, and the others are too small/ misaligned. Surely this isn't right. Did I get a faulty head gasket or am I suppose to trim it to expose the passages fully. It doesn't matter which way I put it on, its the same both ways. and yes the marking "Head" is toward the head.
-
Thanks Dingy.. That's a good pic. In my picture it would be the lower mark. So alls good now..
-
I would love to share more pics so you all can share my adventures, but ill admit that im ignorant as to where I should put them. I was really hoping to post a bunch to show the condition of the bike when i got it to where it is now..
-
Your pic is VERY helpfull.. I can see the position of the crank AND balancer and use those as guides. The pic is way better than what I have. Thanks
-
I've learned alot and found some interesting things.. The tear down wasn't as complicated as I was thinking. Last night I started painting parts of the engine and I've taken tomorrow off to really start the rebuild. All parts, except pistons and rings, are in hand and my garage has been better prepped for the rebuild. I'm excited to keep moving forward, but I sure have alot more to do to the frame and other parts.. a long way to go, but worth it. I've already started filling my schedule with events for the year so I need to keep at it. Besides, the wife reminded me the other day that I "neglected" my household duties because of this motorcycle in 2014.. so I need to get this done and restart taking care of the house.
-
Thanks Richard.. I was able to find some pics that i had taken during dissasembly, but wasnt 100% sure if i had or hadnt moved the parts. But, if i didnt move anything, then your observation is correct. It would be the lower mark. I was hoping that someone would have taken pics of THEIR dissasembly and would be able to definitively answer my question. Well see. Thanks for your answer. Today i got most of my new parts and i took friday off so reassembly is imminent.. Im excited.
-
OK, so its time to put my engine back together. One of the steps is to align the Balance Shaft mark ( BLUE arrow) with the Crankshaft gear (Red arrows). So look at the picture I've provided, one red arrow is a lame looking "C" symbol, the other is a pathetic looking circle. Which RED arrow do I align with the BLUE arrow??? I can't find any other marks on the Crankshaft gear ( RED arrows). Should I rotate the crankshaft 90 degrees ccw and align it with the lower RED arrow or the other RED arrow its aligned with now OR somewhere else??? If this helps, image the crankshaft rotating, where should the crankshaft journals or counter weights be??? I simple can't see the pics provided in the manual well enough....
-
Les, I live in Richmond VA and for a comfortable historic ride into Wmsbg I would suggest Rt. 5. It follows the north side of the James river and goes from Richmond to Wmsbg. For a comfortable ride from Wmsbg to Yorktown, take Colonial Pkwy.. Youll be glad you did.
-
This is one of the funnest posts I've read in awhile.. I'm VERY interested in doing this.. Can't say yet if I can, but I'm checking my calendar and such.. ***PLEASE PERIODICALLY REMIND US ABOUT THIS EVENT. *** Me and a friend traveled to Sudbury last summer and had a great time.. Getting across the border was NOT an issue at either crossing. My insurance company is USAA and they said they didn't give out cards stating that the rider was covered in Canada. They referred me to a page in the packet which did reference that I was covered. I brought it and never needed it... But I was ready.
-
Both of you thanks for the response... I found several things not done right.....i found a middle drive gear outer bearing shim was only partly in its correct position, about 1/2" of it was folded back on itself and pinched in the case halves. And I found the 2 circlips on the transmission were comprised of only 1/2 a circle.. Maybe they lost one and then cut the other in half putting 1/2 on each end bearing.
-
83 VR So im doing some work that required me to split the case. But I see that the PO had already split the case for whatever reason. I was wondering what do I need to see to determine that the 2nd gear issue was repaired? I've got 55000 miles on the bike with no gear issues right now. Also, I understand that I could buy another years transmission and be done with transmission issues all together. What years would that be? Could I get a trans. from a 1300 that would fit or do I HAVE to undercut/ buy parts for my 1200.
-
I'm not one to shy away from looking like a fool so others may learn.... The PO seems to have used a particularly tough gasket and sealant combo. I just found a good leverage point and a long enough fulcrum and it popped of.. So alls good.... For now. I'll continue with the engine teardown tomorrow.