cowpuc
-
Posts
14,966 -
Joined
-
Last visited
-
Days Won
49
Content Type
Profiles
Forums
Gallery
Events
Store
Everything posted by cowpuc
-
 WOWZY WOW WOW WOW!!
 -
-
@saddlebum, Hey Bum,, quick question for you pertaining to this tire swapping business. I got the impression somehow we are not talking about a MK1 in this thread,,, may be wrong. All my experience has been with the MK1's, although I did help @videoarizona swap a new tire onto his 2nd Gen but that was my only other experience on the Ventures other than my 1/2 dozen tire swaps per year on my MK1's and flat fixing from punctured tires on the road. My question now is have you altered your MK2's in anyway to make tire removal easier/faster? With a little practice (LOL) I got to the point that I could have the rear wheel on my 1st Gen off in less than 10 minutes.. Another member here who was a MK2 rider was commenting to me about the ease of which a the MK1 comes apart back there and mentioned he had found a way to remove the entire rear luggage assembly with 4 bolts on the MK2 making a tire swap on the 2 almost as easy as swapping on one on a 1.. Know anything about that?
-
Need a fair idea of value - parts
cowpuc replied to KIC's topic in Venture and Venture Royale Tech Talk ('83 - '93)
Tip says hugs right back at you ya varmint and thank you for the well wishes and prayers up too!! I do too and hope all is well in your desert retreat brother.. -
Need a fair idea of value - parts
cowpuc replied to KIC's topic in Venture and Venture Royale Tech Talk ('83 - '93)
Been doing pretty fairly well Kicster, hanging in there so to speak. The wife had both eyes cut on for cataracts and had one of those fail and had to have a redo and we are about 2 weeks away from seeing her back on her feet. With summer coming, new E-Bikes to play on, Tweeks ready to roll and grand kids out in California waiting for me to come play with them it looks like we are headed for a premo summer... How bout yourself brother? Hows life? -
I highly suspect this idea of myself being the Master of anything is nonsense @djh3 but I will take a shot at this give some backyard mechanicing advice anyway.. @vulcanb822, 1st and foremost would be I advise you to find a dealership you KNOW does a fair amount of tire swaps, someone you can trust your life with. Make sure they KNOW to replace valve stems. So far, IMHO, you have gotten very worthy advice. Some steps that may help you in the removal would be: 1. Give the calipers, front and rear a good smack with a rubber mallet to back the caliper pistons off a little to allow ease in slipping the calipers off. Spray a clean rag down with some carb or brake cleaner and wipe the rotors back off after job is finished. 2. After removing wheels, front and back, remove the bushings from the grease seals on the outer most areas of the wheels and place them in a safe place at your work area before taking the wheel assemblies in for tire swaps. It is not uncommon, if left in the wheel assemblies for those bushing to pop out at the installing bike shop never to be seen again. Replace them back into their respectful places when you get the wheels with new tires on them back from the dealership. I also push as much fresh grease into wheel bearings as possible before I reinstall the bushings. 3. While you have the rear wheel off, pop the snap ring off the rear hub and pull the drive pin hub and grease the pins with Lucas Red and Tacky lube.. I have tested many brands of gear/pin lube and that Lucas is the only one I have found to date that remains intact tire swap to tire swap. Use the same product on the exposed hub gear and inner gear in the rear end. 4. I ALWAYS clean my caliper pistons while down and have had zero sticky/stuck calipers by doing so,, a huge plus if Murphy likes to tag along on long distance travels that end up taking multiple tire swaps in the process or even for just buzzing around your state. I will include a video of the process of doing so at the end of this.. 5. For reinstalling/lining up the rear wheel gears when reinstalling I like to slide the rear axle in part way from the brake side, lifting the wheel up and sliding the axle thru the wheel bearings and into the driven side of the rear end so the wheel is being supported and aligned with the axle. Now I can align the gears in the hub easily by rotating the rear wheel gently as I slide it into the gears.. Piece of cake! After the gears are engaged I simply pull the axle back out and finish mounting the caliper bracket/caliper. 6. Make sure you are replacing the axle washer correctly at the caliper mount on the rear wheel so your caliper does not end up in a bind. Really not that big/hard of a job and IMHO, something everyone who rides long distance should be comfortable with tackling as one just never ever knows if/when knowing how to do could come in very handy! YOU CAN DO IT!! Here are some vids that may help:
-
My E-4 test journey (that I wont be going back to, the E-4 is just way to stiff resulting in no way to remove from the wheel without a tire machine which, if you like the option of spooning it off to repair a flat out in the middle of nowhere is absolutely not going to happen) is almost over. I have ran a Shinko 230 on the front during the whole test period and now with the E-4 almost down to its wear bars and can honestly say = no problem mixing them. Keep in mind I am talking bias to bias. I have no clue about mixing radial to bias, have never done that and would advise against it personally.
-
Need a fair idea of value - parts
cowpuc replied to KIC's topic in Venture and Venture Royale Tech Talk ('83 - '93)
Right there with you @KIC. I have followed that exact path and have found that journey to be downright fun. I actually have pretty much sent off enough pieces/parts free of charge to areas all over the globe that I figure I have a whole bike out there roaming around somewhere, still accumulating miles of smiles.. A huge success too is that I got to help out a brother or sister in the process, paying it forward has some real enriching blessings. It is interesting though, considering actual value, my tired old has been brain went right where @Squidley's brain went. My initial thought was $125 per complete side bag. I think that is a fair price for both parties. -
No, hitches were not a stock item on them.. I know lots of varmints in the club that added them and were very happy with the outcome of adding one..
-
Trip from Vegas to Nashville through Utah/Colorado route choices?
cowpuc replied to Shaw's topic in Watering Hole
By the way,, if you do the north rim ride,, dont miss:!!!!! -
Trip from Vegas to Nashville through Utah/Colorado route choices?
cowpuc replied to Shaw's topic in Watering Hole
I would check weather of course because I have my doubts this would be doable right now but I would suggest Zion NP across to the North Rim then around to Page AZ and up/over the great divide thru Pagosa Springs CO = GORGEOUS ride and amazingly endless camping second to none.. Vid below is a 5 mile journey back into the mountains of Utah on that ride,, unspeakably amazing.. Thing is though,, that area/trip is probably under 40 feet of snow right now LOL.. Second choice in an effort to stay warm and dry would be drop down to Needles from Vegas and zig zag across those AWESOME desert lands where @videoarizona hangs out and take it the sheer endless beauty and ride/camp opportunities out there!! If you do that though, check your tires and keep an eye on them cause that desert heat will peel rubber off and your tires will end up on your as rubber dust on your saddle bags.. Another thought? Big Bend is unforgettable!! Slide down there and give @Squidley and @bikerjohn a hard time while your out that way... Dont miss Jerome AZ if you do that and 89A up to Flag while your at it... I was always warned to watch out for Rattlesnakes on the 100's of thousands of miles and multiple tent camping trips I made that way but never ever did get to see one.. My advice,,, as crazy as this may sound is to watch out for Goat head pickers when looking for a spot to drop your tent and/or off roading.. Those suckers are far more dangerous than any rattler I ever met and wayyyy more plentiful LOL -
Yeppers @AGrengs,, we/I did exactly that for years!! Got to the point though that I simply can not do the carb and such upkeep because of my hands/health.. Matter of fact, I sold out all my mopeds/scooters and also our Honda 250 Helix this spring and applied the proceeds toward E-Bikes. I/we trail rode our Helix two up as well as street rode it.. It would do 70 on the Highway no problem and was remarkably trail worthy. We also did the Honda CT-70 routine,,, with moped stickers on them they were wayyyyy fun!! I still have my sons 1971 CT70 (his 8th birthday present) and my daughters 68 CT90 (her 8th birthday present) in the basement but all the others are gone. An FYI,, we did have numerous Chinese made 50cc and 150cc scooters/mopeds thru the year going all the way back to the early 2000's when China introduced them to the U.S. market.. I was picking them for $85 brand new back then and selling them for $450.. Those were/are remarkably durable machines imho. Cool thing was the price of parts - new carbs for $8, brake parts kits for $6, complete drive train including engine for $70. If you go that route for something to beat on try to land something with the GY6 drivetrain.. Those proved to be most versatile in my experience.. I sold one years ago to a neighbor who put over 20k miles on hers.. Pretty cool considering how inexpensive they were.. Main thing with them is to keep a close eye on oil level if you run long distance at speed as their oil capacity is tiny and they,, as all 4 stroke motors do tend to aspirate small amounts of oil and even a 1/2 ounce can make a huge diff in engine longevity.. Word to the wise so to speak
-
INDEED @circa1968,, that is exactly whats going on here in our area!! Since purchasing our two e-bikes 5 more of my buddies and their wifes have purchased them!!! Its an E-Bike wave of fun!! I am thinking of starting an E-Bike biking club LOL... It is indeed a really good thing imho too! Seeing people, especially us older crowd out enjoying being on two wheels!! Got 100 miles on ours so far and thats with shut down due to Tips eye surgeries. I am now in the process of building hitches for ours so I/we can tow the grandkids around behind us. These things are remarkably versatile with plenty of power to climb even the biggest hills in our area along the lake shore. I made sure to buy the ones with regenerative input into the batteries when coasting and soooo glad I did. We left home with 1/2 charged batts not long ago, rode around the lake on our areas bicycle trail and by simply bumping the pedals to engage peddle assist and then coasting we actually came home with no discharge showing on the battery levels!! Unbelievable!! Tell you one thing, for us older people this is definitely a good way to stay outside, enjoying life on two wheels!! Worth every $$$ IMHO...
-
New stator, stator gasket, forward bevel gear gasket, oil filter, fresh 15/40 dino oil, hard wired stator, new battery, new tie wraps holding side covers on, rear tire @ 45 psi, front tire @ 42 psi, checked brakes for stick calipers, toggled kill switch to fill the bowls, choke on, hit starter,, moved choke to half choke when she fired up to keep from blackening plugs while I walked inside to tell Tip I was going for a test ride. Volt gauge bounced right up to 14.5 volts when touching throttle. Was greeted with pure V-4 torque when nailing throttle in 5th gear at 35 mph and ran solid up to 90 like a good running V-4 should. No hesitations or misses, just pure V-4 elegance from bottom to top. Headed to HD shop on this, Tweeks maiden April 24, 2021 spring test ride to see if any of my HD riding buddies were out braving the cold. Tweeks was greeted with the usual WOWZY WOW WOW - now THAT is a touring bike.. Lots of admirers as I admired the gorgeous 20 or 30 HD's sitting in the lot. Felt sooooo good to be back in the saddle, indescribably delicious to say the least.. Summer cant get here soon enough IMHO...
-
It’s all about the dealership
cowpuc replied to ChiefGunner's topic in Star Venture and Eluder Tech Talk ( '18 - Present)
Hiya Chief,, hows life? Sounds like, in your case, pretty dog gone good. There are numerous Venture owners here who have been with Yamaha for many many many years of which I am one.. I am probably not the only one who is aware of this but,, maybe I am.. Yours (and "Robs") experience with Mom Yam is not something new actually.. Back when the Venture was introduced it came with a guarenteed failing 2nd gear. The issue therein was that second gear failure (due to a soft shim on the secondary shaft) had a known habit of not failing until +25k miles so most of the failures did not even start showing up until the bikes were out of warranty. Although proven many many times over that the cause was, in absolute factual factory defect Mom Yam never ever did issue a recall. What she chose to do was run the thousands of defective parts out of inventory and then (about mid year of 85) started placing updated, hardened correctly shim and buckets in.. As a matter of fact, our group is sharp enough that there are those that can tell you EXACTLY the bike number (by VIN) when this started. As in all things though, one mans trash is another mans fortune and that is exactly where my million mile plus journey on the Ventures comes in. I took advantage of that crisis and ended up riding out 6 (still in the process of wearing out number 6) of the MK1's by simply buying them dirt cheap (my recent one was/is my most expensive one I purchased at $1000 and it has had the tranny fixed - only one so far I have had with a 2nd gear in it lol) and chasing out the remaining 250k miles with them just by skipping 2nd gear. For many many people who paid the big $$$ up front on the MK1's I always felt sorry for and,, on another note,, please be advised that what I just explained definitely had a major influence on the value of the whole Venture line from that day forward. I still think if Mom Yam would have done what was right wayyy back in the mid 80's her Venture would have been the "go to" bike instead of the much slower, much less torque, much less mpg, no where near as comfortable MK1 now iconic Honda Goldwing. -
I am sitting on the sidelines waiting to see how this turns out. I too have a 40 footer laying in my back yard in really nice shape. I also have the rotor and controls for it somewhere here... Rich has the south covered for their antenna tower needs and I have the north covered I reckon lol
-
Dont know if its been mentioned or not but be advised, the 99's were prone to rear shock failure. Upgrades are still available I am sure but probably pricey. Another option is one of our member rebuilds them but either way it does at to the labor looking forward. Maybe a quick check under it to see,, possibly someone has already put the $$ into an after market shock.. That would be cool and definitely add to its overall value if they did.. Also,, did you happen to notice if it has a center stand? If so, and if its a Rivco,, there is another pricey little add on...
-
You could try this: @Carbon_One,, and see if Larry mysteriously appears lol
-
I am 100% sure nothing has changed in the recommended Progressive manufactures process @Bob K.,, as always I just use what works for me which is seldom the same as manufactures recommend LOL..
-
Having read thru that link from the Venturers site, as long as you are not experiencing hydro lock in your forks as mentioned by Marcarl (meaning your forks will not compress at all) I would not pull it back apart just to compare fluid levels. I would spend my time out enjoying the ride
-
I always use organics cause I love their feel and appreciate the less wear on my rotors. I also carry xtra pads in Tweeks Maintenance Dept when traveling just in case I need to swap em out on the road. l also clean the caliper pistons every time I spoon on tires which gives Tweeks excellent braking performance, protects against having sticky calipers and results in never ever needing to rebuild calipers. Here is a vid on how I do a simple clean up of the calipers:
-
I have used a syringe with a hose hooked to it for years to get my fork oil levels spot on and equal, its very cheap, fast and accurate. There are aftermarket kits for doing this (like this = https://www.ebay.com/itm/312766707799?_trkparms=ispr%3D1&hash=item48d2593857:g:ToMAAOSwTM5YtdOJ&amdata=enc%3AAQAFAAACgBaobrjLl8XobRIiIML1V4Imu%2Fn%2BzU5L90Z278x5ickkRjLZq23gAR%2BKma9gM2Z1hnZQNG9tB59xPZEgypsUjDpiQxB608GjlIHtXYEzVnjo12%2B8ThH7voaCauMVScaAaGRLGoaJ9QN70RU8MryJSQZNspNzIpyQd18DE2ToHYUPv4SqA%2FehzUEZOeVu0vH8Uxe4wFVmKiCrt%2F4wfdCtRa2dkE6Q3lWyxAm%2FCcOEpu0ww03lZCO9dF6JYW1g50k%2Fhe7lWY247ahHKgrZtd9zAZDo%2BXLTJLUTNHMdwkQZgITOOBq2NdGoZ%2BkxzT755i5PuEBfNp%2BhrbWnrbhc5Q%2FS4E%2FI%2BQRakPl3XUM5Ofa4eLZuiRpIlSLd69qyVjYW81kyqXdCQcaqEYWq8SsSxf4RJxIDUGFRaqZ6BTcwLGKDE41QWJ6%2BBTAboIX00znlpoaacsaKTn3nYJzC3jL9UvxvGxnWNN74uz7i86LiBtMwpKNPJZuOPwdA%2FQ8XNQxZQ%2Fwu7y3FLCBDo0EaU5B1iUIMOM7NczpmfsoVxPtB0jbKnVI%2Bf4ay9Ioy8E0IogrKGjN9PEHbQsZ90G8gKkFE9ABP8SeobQcQZ4MMZB4sTS9Qnpdv9yklI1IofcYKIKl6EPshZiZ13wEsZOYAiN25oialgT2UoevsUimpqOvkB3b2%2BZN25obOpKGwh7Pva3ma8P04A77WvK3pcsQ%2Bft21fiFD%2BbV%2BEaxMCxGP92p8r49PUnC1n1reyisZ5%2BkmGwuHEVoqm%2Fsfhd8yGfix7RvWLDPaC0ywNhCdSuz7WWsxEzZFxPCliUehIzx%2F%2Fz4klg2jQklj9xPLbOAP5kT0glAuSkJsbAA%3D|cksum%3A312766707799fede4d4f987546b698e11a95a842e23c|ampid%3APL_CLK|clp%3A2334524 but I have found a cheap ag syringe with a hose with a mark on it at the height you are looking for works just as well. All you do is add oil, stick the hose in to the mark and suck out the overfill.. Easy peasy..
-
Was the 5.5 inches from the top on oil fill taken with the springs in or with the springs out? The springs need to be inside the tubes when filling. Personally I set mine to 4" from the top on a refill with the springs in and the tubes collapsed and that always works best in my case. Actually it is the oil weight that controls the dampening. If your dampening is slow and sluggish then try a lighter weight oil. Make sure you have your springs in with the progressive windings at the bottom of the spring when you put the spring into the tube. If the static drop (you should see about 1 1/2 inches of drop on your forks into the lower tubes when you put the weight of the bike back onto the springs when lowering off center stand and that is where it should stay until you sit on the bike) is to high than you need to lessen your preload.. If its to low so your fork tubes are setting lower than 1 1/2 inches while the weight of the bike is sitting on the fork springs you should increase your preload until you reach 1 1/2 inches. All this can be tweeked to your type of riding and what you want from your bike, it is basic suspention set up info..
-
Hey you lop eared varmints,,, its a $50 Ebay special,,, you didnt really expect the kid putting them together in his garage to triple dip in the laminate coating to insulate the coils when he could skip to steps by holding them apart with zip ties did you!! LOL
-
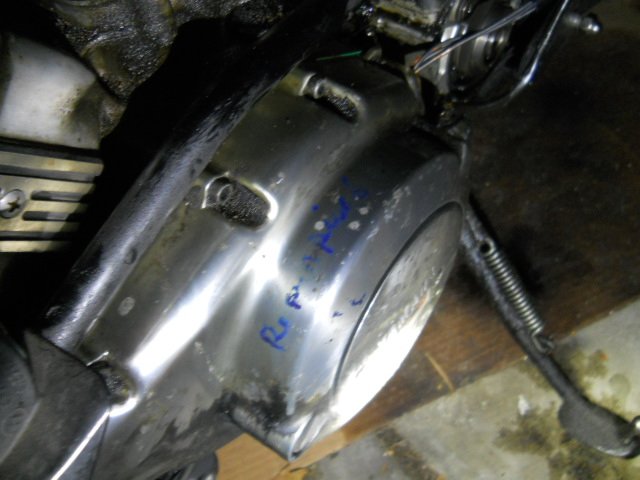
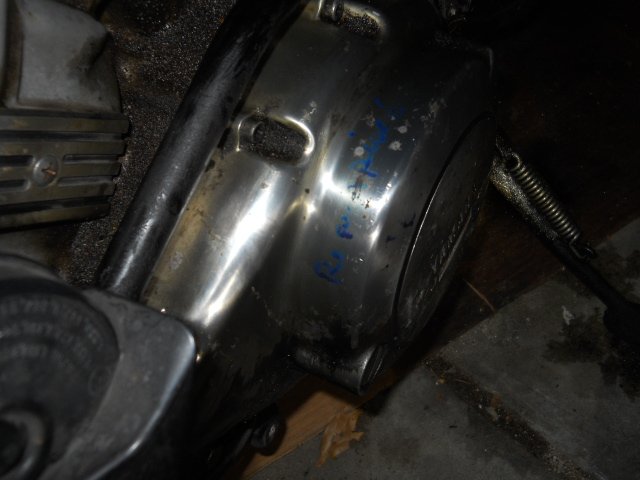
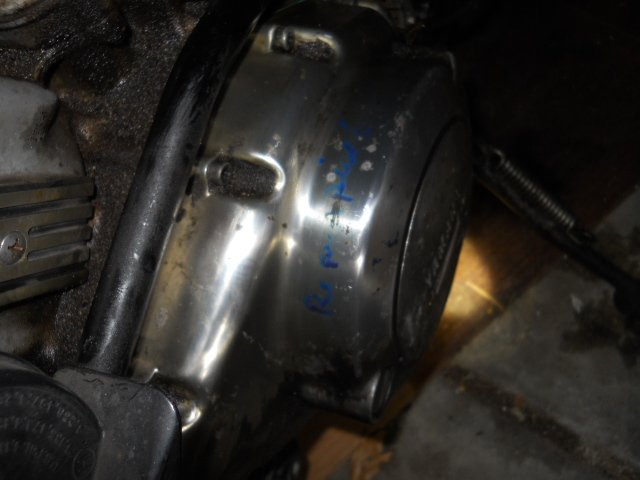
I just stepped out into the garage and snapped these just for you Squid!!! ONLY THE DOCTOR WHO DID THE JOB AND SIGNED HIS WORK KNOWS!!!! That burned out stator that I replaced with the new one is, indeed, the stator that you lovingly provided/installed for us down in Texas my precious Texas Hero @Squidley!! Sure hope this aftermarket stator serves as well as that Texas Stator did my brother, my money is on it wont happen,,, LOVE always wins!!