dingy
-
Posts
5,403 -
Joined
-
Last visited
Content Type
Profiles
Forums
Gallery
Events
Store
Everything posted by dingy
-
I had a kidney stone few years back, my urologist's name was Dr. Peck. Gary
-

Starter Gears Binding Up?? Please help!
dingy replied to KISSFAN's topic in Venture and Venture Royale Tech Talk ('83 - '93)
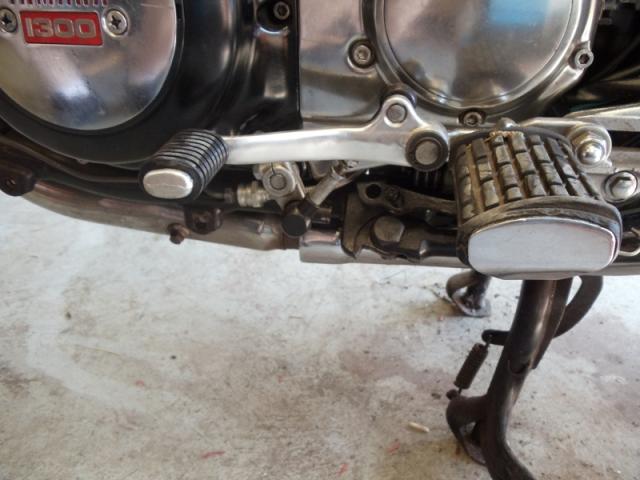
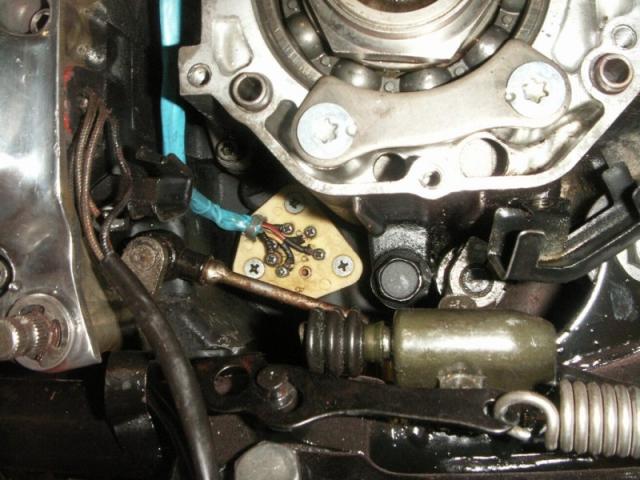
Pictures attached of shift linkage installed. The gasket thickness does make a difference. Also RTV where the cables for pickups & alternator pass through rear of case. Gary
-
Same thing snaggy posted, but a little easier to read. Gary Have dinner ready. Plan ahead, even the night before, to have a delicious meal ready on time for his return. This is a way of letting him know that you have be thinking about him and are concerned about his needs. Most men are hungry when they get home and the prospect of a good meal is part of the warm welcome needed. Prepare yourself. Take 15 minutes to rest so you'll be refreshed when he arrives. Touch up your make-up, put a ribbon in your hair and be fresh-looking. He has just been with a lot of work-weary people. Be a little gay and a little more interesting for him. His boring day may need a lift and one of your duties is to provide it. Clear away the clutter. Make one last trip through the main part of the house just before your husband arrives. Run a dust cloth over the tables. During the cooler months of the year you should prepare and light a fire for him to unwind by. Your husband will feel he has reached a haven of rest and order, and it will give you a lift too. After all, catering to his comfort will provide you with immense personal satisfaction. Minimize all noise. At the time of his arrival, eliminate all noise of the washer, dryer or vacuum. Encourage the children to be quiet. Be happy to see him. Greet him with a warm smile and show sincerity in your desire to please him. Listen to him. You may have a dozen important things to tell him, but the moment of his arrival is not the time. Let him talk first - remember, his topics of conversation are more important than yours. Don't greet him with complaints and problems. Don't complain if he's late for dinner or even if he stays out all night. Count this as minor compared to what he might have gone through at work. Make him comfortable. Have him lean back in a comfortable chair or lie him down in the bedroom. Have a cool or warm drink ready for him. Arrange his pillow and offer to take off his shoes. Speak in a low, soothing and pleasant voice. Don't ask him questions about his actions or question his judgment or integrity. Remember, he is the master of the house and as such will always exercise his will with fairness and truthfulness. You have no right to question him. A good wife always knows her place.
-
carb cost, should i go new or reuse?
dingy replied to Black wing's topic in Venture and Venture Royale Tech Talk ('83 - '93)
Like Forest Gump said, you never know whats in a box of chocolates. The set you buy may be just as bad. Outside appearance is not a good indicator of carb condition inside where it matters. Gary -
how to remove float valve assemby?
dingy replied to Black wing's topic in Venture and Venture Royale Tech Talk ('83 - '93)
The top of the carb has a brass plug that is press fit in. Probably have to drill small hole in cap, thread a sheet metal screw in and pull it. Similar to what is done on front face of carb to expose the needle valve. Very few people will do this. The seat should not go bad. What is important is that the mesh screen between the top of the seat & cap is clear. This can be checked when disassembled by reverse flushing aerosol carb cleaner through valve seat and blowing air through it. To get the valve portion of the float valve out, the rear plate has to be taken off. This to me, requires the carbs off the bike & rack split in at least two. If you need to get into carbs, at a minimum you should get 4 basic rebuild kits. These include the jet block gasket,a n enricher body gasket, new fuel float needle, and the 5 orings & back plate gasket. I found new ones on ebay from K&L for right at $80 shipped. Get K&L part number 18-2879. There are other similar part numbers, but this is best one with most gaskets in it. It may be listed as a VMax kit, but everything that is in this kit will fit any 1st gen Venture. Also 3 other things in there that should be replased. The idle jet, and the two rubber caps. 22V-14968-00-00, 22U-14968-00-00, and 4G0-14142-37-A, 4 each. The idle jet is #37.5 very tiny & it will drive you nuts if clogged. The two rubber caps each carb have been a cause of many problems that I am aware of on VMax's, and most likely Ventures. Gary -
I am using an 97 Royal Star tank, which is wider, and sets lower over the carbs than a VMax configuration. Using this because I like the cluster that is mounted in the tank top. The VMax side covers don't have a chance of fitting. Attached are a side shot of a VMax & an Royal Star, note how far up under the RS carbs are, and how far down they are on the VMax. This was one of the early thoughts for the Hybrid, but it ain't gonna happen. For what its worth, on the 1st gen VMaxs the side scoops are nonfunctional, no connection to the carbs. The 2nd gen VMaxs are functional. Gary
-
Horse power 1st Gen 2nd Gen
dingy replied to usedcyclesales's topic in Royal Star and Royal Star Tour Deluxe Tech Talk
If you are referring to the 1st gen Venture (83-93), it never had 28mm carbs. 1983-1985 (MKI), 1200cc motor it had 34mm carbs. In 1986 thru 1993 (MKII) 1300cc motor, they had 35mm carbs, same venturi size as all 1200 VMax's. The RSV is referred here as the 2nd gen Venture, 1999 to present. The RSTD's are not referred to as a Gen anything, maybe that is what is confusing. Gary -
Horse power 1st Gen 2nd Gen
dingy replied to usedcyclesales's topic in Royal Star and Royal Star Tour Deluxe Tech Talk
1st gens have the balancer shaft. Carb Venturis are the big killer. 1st gen MKII - 35mm - 962 mm square area RSV - 32mm - 804 mm square area - 83% of MKII RSTD - 28mm - 615 mm square area - 76% of RSV & 63% of MKII Gary -
That's Bullcrap, It ain't the forum punch line for nothing that a 1st gen will kick a 2nd gen's A$$ all the way to Oberlin & back. Gary
-
There is no way a VMax style air housing would fit on an RSV or RSTD due to both having a 'standard' fuel tank position. The 1st gen & VMax's have the under the seat tanks, which opens up the area under the cover for the airbox. I even have an RSTD air box I got for the Hybrid because I didn't want that massive air filter setup. Issue with it is the front to back spacing doesn't match the 1st gen carb racks either, same as the RSV is to short.. But that may be fixable by grafting the bottom of a VMax or Venture filter onto the RSTD unit. I would like to come up with a way to get a front facing intake, so as to get a ram air effect as speed increases. Sort of a cheap turbo. Tweety has a stock VMax airbox, which required mounting battery on its side where the coils & TCI were. Coil over plugs are on bike, which eliminated stock coils and ignition wires. 1st picture is stock 1st gen air box, note heigth above frame, 2nd is of VMax box, its lower, but much longer from front to back to compensate for height. Some pictures of a stock RSV system, and also an RSTD box along side a carb box from an RSV. Gary
-
Those look nice. May go that route for the filters on the Hybrid I am building. Won't have the fairings on it to hide the massive ones on the stock RSV's. Pictures of it are in one of my albums. Gary
-
The smart butt answer is that its to heavy for me to lift so therefor I couldn't drop it. Truth is, never had Tweety over, but my first Venture, an 84 was over about 4 times, twice in the yard, once in the garage when I was pulling in and front wheel slid on a dog chew toy and it flopped over. Gary
-
cruise control
dingy replied to Black wing's topic in Venture and Venture Royale Tech Talk ('83 - '93)
If you haven't found them yet, here is a link to schematics I reworked a few years ago. They are much easier to read than Yamaha's versions. http://www.venturerider.org/forum/showthread.php?t=42358 The simplified circuits versions are electrically the same as the full wiring schematic, but the connectors are not shown. This makes the point to point following of the circuits much easier. Check the cluttch switch first to make sure it is not coming back far enough to kick circuit out. Eac brake lever & clutch switch will disengage cruise. There are posts in the 1st gen Tech section on cleaning the switches on the bike also. http://www.venturerider.org/forum/forumdisplay.php?f=68 Gary -
Working on the hybrid this weekend I discovered that a 1st gen fuel pump is able to be mounted in place of the stock 2nd gen pump. Mine was bad, which I knew upfront when I got parts from Wrenchrob. The bracket from a 2nd gen will fit on a 1st gen pump just about perfectly. I had to cut old bracket off the 1st gen pump due to way it was installed, but that was very easy. The inlet & outlet hose barbs are a different orientation, but nothing serious. The plug connector fits the RSV harness. 1st gens haven't seem to have much problems with the fuel pump like the 2nd's have, so it is one more alternative. Some pictures attached. The 2 pictures of pumps on bench are both 1st gen pumps. One on right has the 2nd gen bracket mounted. Front & back view. Gary
-
So much for the PG rating on this site. Gary
-
You have two threads on this. I thought I posted to one. The 41R relay has the starting relay in it, as well as the flasher/hazards & canceling circuits. Gary
-
I have them both. PM me . Gary
-
Some pictures attached. These are on a VMax head and valve cover that is being cleaned up for powder coating. I think the 1st gens are fine. With either one, a little sealant in the cover helps hold them in place. They do need to be checked all around before tightened down to make sure they didn't slip, especially to the inside. Gary
-
They are interchangeable. 2nd gens have 'tabs' on them that make it a little easier to install. They are a little on the ugly side with the tabs that stick out. On an RSV, the tabs are covered by the chrome valve cover caps. I could send you a picture of a set setting on the Hybrid I am building if you want to see them. I have a set of 2nd gens laying on bench in garage. Gary
-
I think I have both. I'll go look. You may only need on or the other though since hazards & turns are interconnected. Gary
-
1st Gen Venture Grill on Ebay
dingy replied to GolfVenture's topic in Venture and Venture Royale Tech Talk ('83 - '93)
If your considering a set of VMax heads these radiator covers compliment the head design nicely. Gary -
This may be able to be fixed by flipping the lever that is on the end of the shaft that goes through the stator cover so it points down. I am not sure about clearances needed to do this. This might be able to be done by loosening the lever on the shift shaft that goes through block, then slide lever off shift shaft & rotate front lever that goes through stator cover downward. Then replace shift shaft lever in its original orientation. I don't think there is anything inside the motor that could be changed to fix this. Gary
-
Now that's interesting. Earl got in my poopy a couple of years ago after I expressed my preference for the Kevlars. Can teach an old dog new tricks. Gary
-
Attached are pictures of a standard 1st gen setup. Gary
-
You have the short lever on the shaft that goes through the stator cover pointing up. It needs to point down. I can put a picture up tonight when I get home if you don't understand. Gary