circa1968
-
Posts
405 -
Joined
-
Last visited
-
Days Won
19
Content Type
Profiles
Forums
Gallery
Events
Store
Everything posted by circa1968
-
Awesome, you learned some things along the way, as did the rest of us from all the great advice and tutorials given here. Venturerider.org is the internet done right!
-
What 'official' color is my bike? / Thank you
circa1968 replied to GrahamLFCkeeper's topic in Watering Hole
I ordered paint for my '07 from here: https://www.colorrite.com/ They have a look up tool by make/model/year. They might possibly ship to UK also. On their shipping page, they just say if ordering from outside US, you are responsible for customs -
Downside to buying older bike with low miles?
circa1968 replied to videoarizona's topic in Watering Hole
I'm a newbie type mechanic & have torn into my RSV multiple times learning and trying to get to the source of what turned out to be gunked up carbs on a 13-year old bike w/ only 21k miles. That said, I would look at rubber bits for signs of decay. Things like brake lines, fork seals, etc. -
Oh, how time flies...1st ride together in 20 years!
circa1968 replied to circa1968's topic in Watering Hole
@PastorCurt wait, are we still talking motorcycles here?😇 -
Oh, how time flies...1st ride together in 20 years!
circa1968 replied to circa1968's topic in Watering Hole
Oh, I can't wait to use that line! Thank you! -
Check with @eusa1 aka the diamond cut guy
-
Oh, how time flies...1st ride together in 20 years!
circa1968 replied to circa1968's topic in Watering Hole
Nice to know I'm in such good company! I started on a Honda CM450 ~1989, upgraded to a couple of larger Shadows, then the 1100 Yamaha Virago. Was planning a 5-day trip with a couple of friends in '99 and starting thinking I needed something different for such a trip. I was 31 years old then and the idea of a big touring bike was not even within the realm of my thinking. That was when I walked into a Yamaha dealer and started looking at their bigger star cruisers. I called my wife who happened to be nearby and asked her to come give me her opinion of the bikes I was looking at & see how they felt as a passenger. In her smart ass way, she looked at the Venture and said, "Well, you could buy 'Grandpa's' bike here" (Sorry guys, she said it not me, but I did laugh...). The sales guy, of course, laughed too then said in all seriousness, "its a really nice bike, we'd be happy to let you take it on a test ride". She looked at me and said "you gotta try it, maybe Grandpa knows something." I signed the necessary paperwork and was off for a quick ride, she waited at the shop. I came back, told her Grandpa DOES know something and we're buying the Grandpa bike - because I love it! Haha Two weeks later I was off on my 1st multi-day ride through Yosemite, to Lake Tahoe, Mts Lassen & Shasta and then two days down the coast. That '99 Venture made multiple trips back to Yosemite, up and down the coast and eventually a multi-week round trip to St. Louis and back. It was also my daily commute ride. I kept it looking like it did the day I bought it. It was a sad day when I sold it, but the buyer was a 52-year old guy who's youngest daughter just left for college and he had given up motorcycles when his kids came along. Isn't that something! I'm right where he was then. And still love this timelessly beautiful bike! And yes, my wife is still a smart ass and she still calls it the Grandpa bike. -
Downside to buying older bike with low miles?
circa1968 replied to videoarizona's topic in Watering Hole
Gunked up carbs. -
As long as the charger ground was not still connected to the bike, the two (charger & bike) electrical systems were isolated from each other and 12v didn't go back into the frame. This would be the same as putting two D-cell flashlight batteries together + to - end. As long as you do not connect their other ends together, you have not completed a circuit for current to flow and nothing will happen. Connect those other ends with a wire and yes, fireworks.
-
Sleepy, the trickle charger falling & hitting the bike is likely a red herring and has nothing to do with the problem. Even if the positive terminal of the trickle charger hit a conductive part of the frame, nothing would happen - as long as the charger negative terminal was not also connected to the bikes system @ the same time - then you could have issues due to reverse polarizing your bike's electrical system. My guess is the battery gave up the ghost via an internal cell short. It may still show a voltage potential but cannot actually provide any significant current flow. How old is the battery?
-
Oh, how time flies...1st ride together in 20 years!
circa1968 replied to circa1968's topic in Watering Hole
Wow, Thanks for sharing guys. Just reaffirms that I'm in good company here!! I have to admit I was a bit nervous riding with her at first, but I swear the bike handles better 2-up, like some smart engineers designed it that way... -
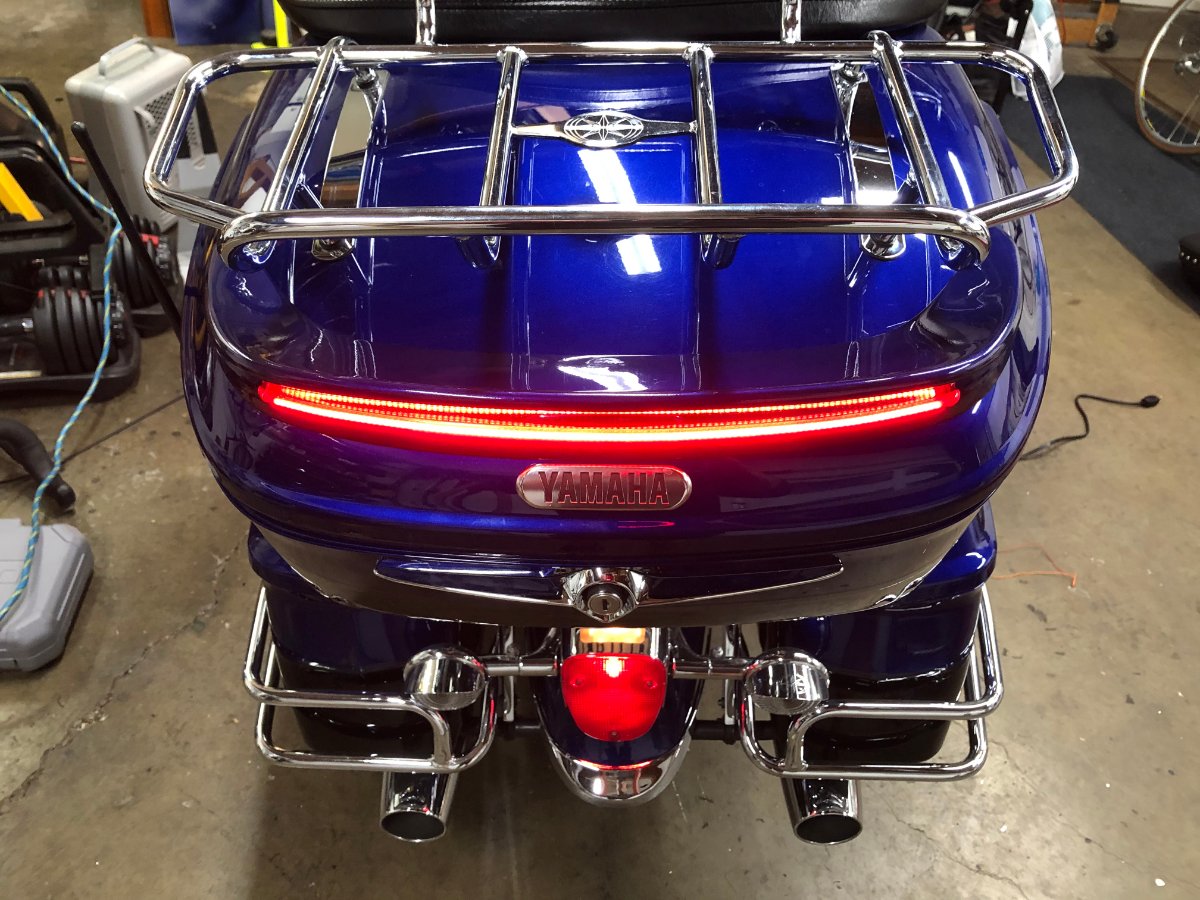
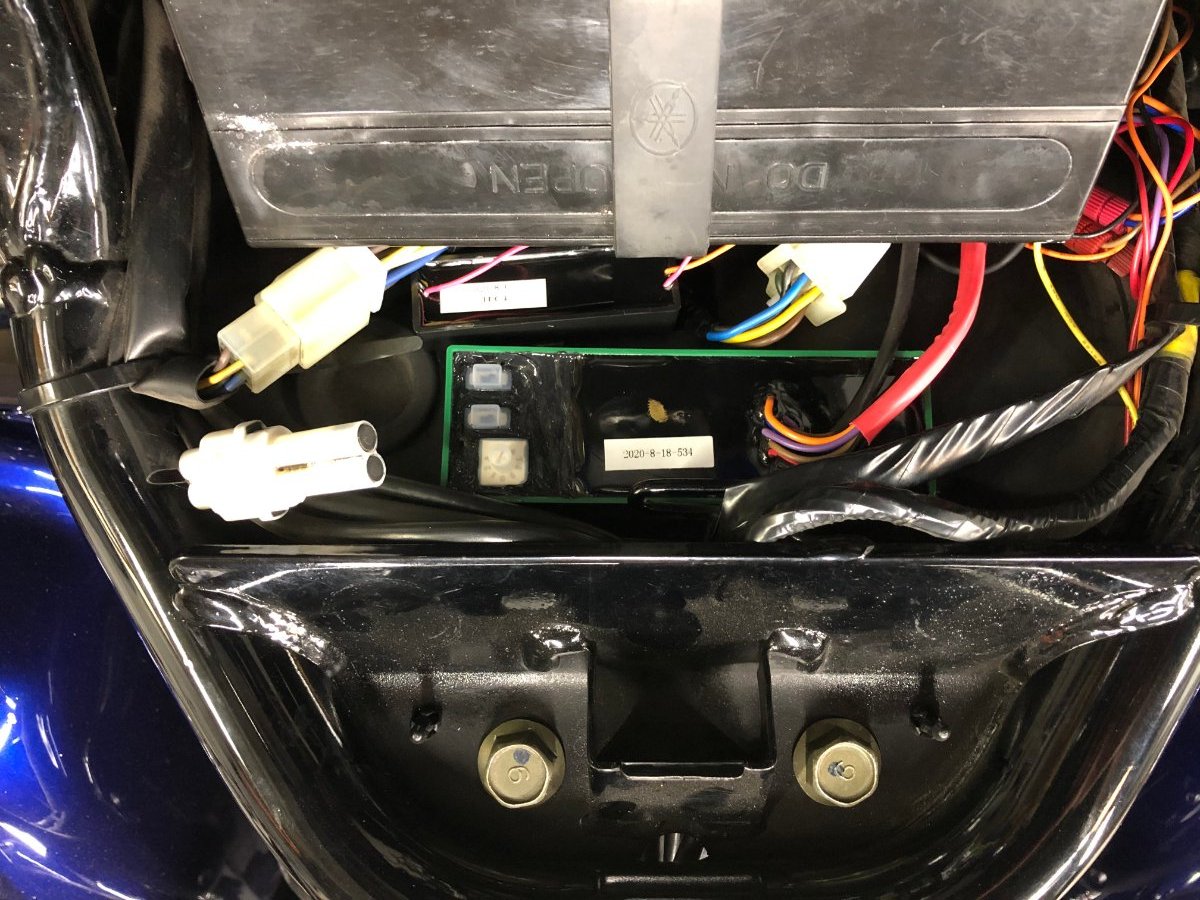
Though I would share my experience modifying a rear spoiler to have a much brighter brake light and also with turn signals incorporated into it. My wife followed me on the freeway when I purchased my bike and said visibility of the bike from behind was severely lacking, which I naturally took as carte blanche to embark on a project to fix that little problem! 🙂 So, picked up a used wing from 'the diamond cut guy', ripped out the old LED and ordered Custom Dynamics TruFlex light bar, along with their Dual Converter and Smart triple play controller. The latter two allow for the dimmer running tail light function and programmable operation of the brake light and turn signals. With the triple play controller, the entire strip, including turn signals operate as the tail/brake light. I have mine programmed to strobe the brake light for a few seconds, then go solid. The brake light is significantly brighter than the stock LED strip. I can't define that in terms of lumens, or anything, but can say that when I first tested it I looked at it too long from a few feet away and had that burned into your eyes thing going on, like when you look directly at the sun. The CD truflex strip is 14.6 inches long and the stock strip is ~11" long. Fortunately the height was identical and was a perfect fit into the existing slot in that direction, but the slot needed to be lengthened ~1.5" on each end and it need a backer plate installed from the backside in order to affix the new LED strip to it. So, step 1 was take a deep breath and grab a dremel with a router bit. My trusty old corded single (high) speed dremel was not the right tool for this job, so with my carte blanche blessing to make the bike more visible I acquired a nice cordless multi-speed dremel to safely accomplish the task. From prior (bad) experiences, I knew it would be difficult to carve the slot out by hand and keep it straight, so I used some 1/8" wide masking tape to extend the slot lines and then proceeded to cut away, staying well short of the tape. From there, I used a series of files to fine tune the slot. It was not 100% perfect, but the imperfections are ultimately not visible in the final product. I then cut a scrap piece of ABS plastic sheet, courtesay of Tap Plastics, to approximately 16" long and 1" wide, used a heat gun to soften it up and shape it to the contour of the backside (inside) of the spoiler behind the slot. With a little cutting and fine tuning it fit perfectly and I permanently fixed it into position using ABS pipe glue. Painted the spoiler to match my '07 blue with the color rite matching paint, drilled the necessary holes for the LED light strip and installed. The dual converter and triple play controller fit nicely behind the battery box and the wiring was simple with the help of the wiring harness adapter from @M61A1MECH. In hindsight, I should have taken more pictures along the way....but here is the finished product. Took it out for first ride today and watched cars behind me as I braked. Almost without fail, they all seemed to give me more room when I braked. The brake strobe effect really is attention grabbing. IMG_1208.MOV

-
After being blessed with a beautiful baby boy 19 years ago, I decided to sell my '99 Venture due to not being able to get the 'what if' thought out of my head every time I rode it. Ironically, it was my wife who said "don't sell it, you love that bike". I can still hear her saying those words to this day. I think she also loved it, we took many trips together up/down the coast, Yosemite, Mt. Lassen and Shasta, beautiful country and amazing rides. At times I wished I'd kept it and took my son riding, but baseball was his passion in life from when he was 2 years old, so we ended up spending most weekends at the ball field anyways and the bike ultimately would not have fit into our lives and sat unused for too much of the time. Well, last August we dropped our son off at college in St. Louis (where he's playing ball!!) and in September I purchased my new baby, an '07 Venture. As a funny little side story, I was recently searching for some family photos from 2010 and came across a photo of the blue/black '07 that I had apparently downloaded to my computer late one night in 2010! I have no recollection of doing that but apparently my love of the '07 color scheme goes back a good 10 years. It's taken 6 long months to work through carb issues, then getting a trust & wills set up (at my wife's, the responsible adult here, insistence) and then finally some nice weather for this day to finally happen. Our first ride together in 20 years. It really is amazing how time flies, the whirlwinds of parenting, getting older and then suddenly right back to where we started and hard to believe that these 20 years passed in the blink of an eye. I'm blessed to still be here, healthy, to have a wife who gives me no grief about having a motorcycle and to have experienced the greatest joy of all in life of having a child. In the end, I can't say I would change a thing but now, its time to ride!
-
61 degrees here, but now its raining on my party.... My poor son is in 1st year of college near St. Louis, he's in single digits. I kept telling him Feb was the worst, I hated Feb growing up there.
-
There you have it! Proof of global warming, 3 degrees warmer after just 57 years.
-
Positive Crankcase Ventilation
circa1968 replied to Monsta's topic in Royal Star Venture Tech Talk ('99 - '13)
Thanks Patch. Definitely no air box drilling going on here. Appreciate the knowledge you share! My concerns about putting some mesh webbing in the down pipe would be 1) it getting clogged and not knowing its clogged, 2) pain to get to for maintenance and 3) since its inline to a 4 cylinder vacuum cleaner that it could get sucked in, especially if it gets clogged up. -
Yep, I sorta did both, but in the end, just got it where it would hold @ the 45 degree mark and it still had a small amount of "bounce", which seemed too objective of a measure to me. Definitely a worthwhile maintenance step! Also, good point on the right side, that was my observation as well and worthwhile pointing out for anyone who is going to do this for the 1st time. Love the knowledge that flows here!
-
Positive Crankcase Ventilation
circa1968 replied to Monsta's topic in Royal Star Venture Tech Talk ('99 - '13)
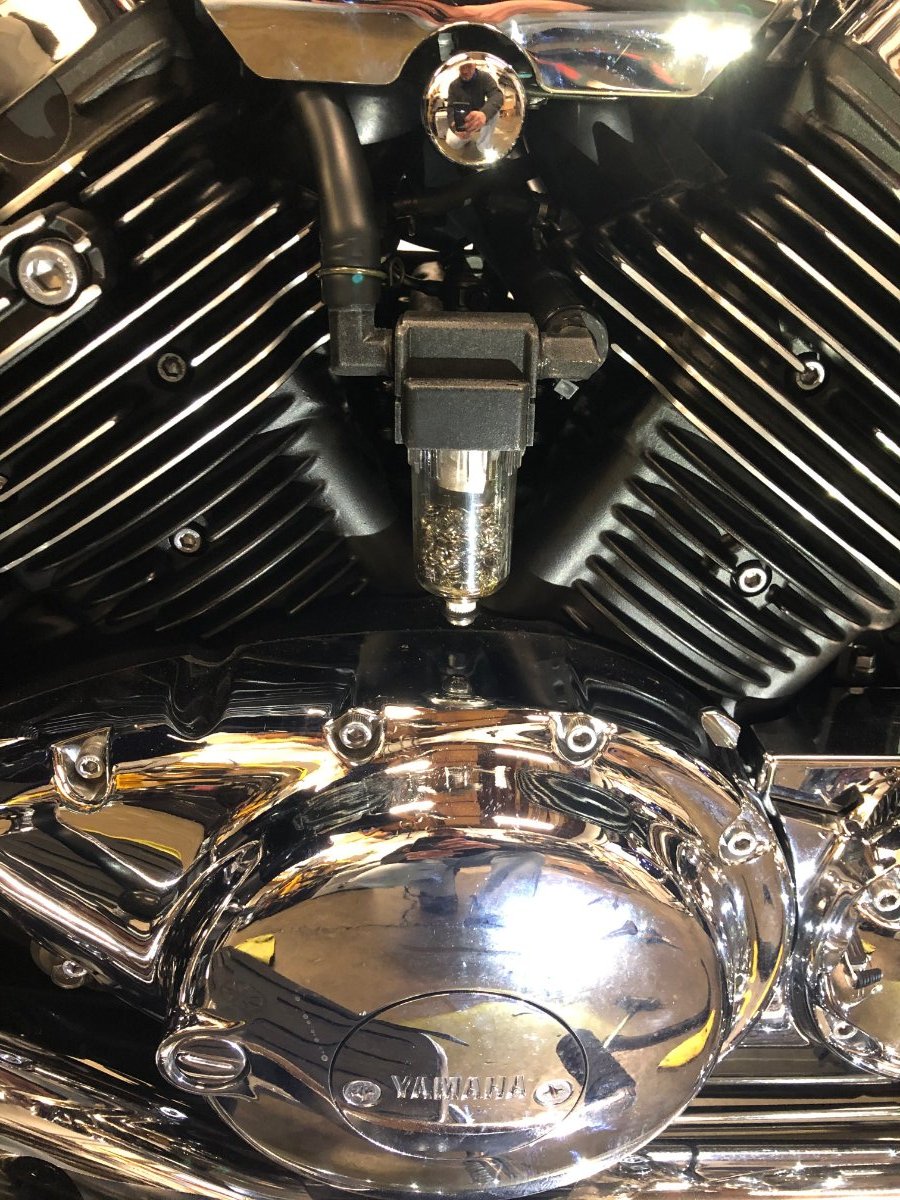
Amazon: https://www.amazon.com/gp/product/B07Z1R2MSN/ref=ppx_yo_dt_b_asin_title_o02_s00?ie=UTF8&psc=1 Made a couple of modifications to it. The elbows shown did not come with it and as I found out after a trip to Home Depot, they are not NPT but rather BSPP (British Std) so you if you want to use those, have to order them separately. I found mine on ebay: https://www.ebay.com/itm/Fitting-Hose-ID-1-2-13mm-Barb-x-1-4-Male-BSP-BSPP-Brass-90-Elbow/162893204537?ssPageName=STRK%3AMEBIDX%3AIT&_trksid=p2057872.m2749.l2649 Also, replaced the the schrader valve core with a screw and an o-ring as I did not want there to be any accidental dumps of fluid. I ]coated the gold-colored filter with 2-part epoxy to basically make it a pipe & then used a dremel to make a hole on the same side as the exit port, then epoxied a piece of aluminum from a can of Red Bull to the input side to act as a baffle or plenum so that input flow would have to go down through the mesh material before drawn into the output. The mesh material is just stainless pot scrubber from Home Depot. -
Also in CA (SF Bay) and experienced the same last few days. But sunny today!!!! A little clean up work in order, but not unusual, we typically get 1-2 of these type of storms each year. If I remember correctly from growing up in the midwest, an inch of rain equates to a foot of snow, so it could always be worse I suppose. Good luck with all the cleanup/repair work.
-
If you have a minute
circa1968 replied to RDawson's topic in Inspirational, Motivational, Prayer Requests, Etc.
May she rest in peace and may your family find comfort in knowing she loved you until the end and she is now in a better place with your father. -
Positive Crankcase Ventilation
circa1968 replied to Monsta's topic in Royal Star Venture Tech Talk ('99 - '13)
Ok, I removed the vent filter and routed the output of the little catch can back to the intake box. So, this is now essentially the stock config PLUS the catch can. Also, I did not modify anything else, including the stock hose which connected the crankcase to the airbox so in case this ends up being another of my useless hair-brained ideas, I can go back to 100% stock config. Thanks again for the honest feedback and great advice!
-
So, now that other issues have been sorted out on my girl, decided it was time to address the loose front end, which flopped around like a fresh-caught fish! I followed the process in the technical section, but thought I'd add a few observations that I did not see addressed anywhere else: 1) The crown nut is 27mm. I purchased a Husk brand open/box wrench from HD for the job. Its quite beefy and there's not a lot of space between the crown nut and the handlebar risers. I ended up taking the wrench to the bench grinder to shave ~1/6" off the widest part of each side to be able to have enough room to work the crown nut loose. It took 2-3 back & forth between the grinder and bike to just grind off enough to fit and no more. 2) Since I wasn't sure how much torque would be required to loosen the crown nut, and I'm still nervous about lifting my bike in the air, I broke the nut loose with the bike on the ground and on the side stand for stability. If I have to do it again, will probably follow the same procedure for safety sake. 3) Removing the ignition switch cover gives a little more wiggle room with the wrench. 4) Note where on the wrench it could possibly strike the gas tank while either loosening or tightening and grab it at that exact location with your hand. Sacrifice the hand, not the paint! (No, not learned from a mistake in this particular case, but past mistakes in life) 5) Ok, this is were I open myself up to well-deserved ridicule. It is now clearly obvious, but perhaps my nervousness at the beginning clouded my thinking (yeah, that's it!), but when tightening the locking nuts....it is tightened down, towards the ground. NOT towards the top fork brace, that is loosening it! Right tighty, lefty loosey.... Oh well, I deserve to be skewered by the seasoned mechanics here for that silly mistake. 6) I found that when I got the bearing adjusted to my liking & retightened the crown nut that tightening the crown nut caused things to loosen back up again (not sure why, but it was definitely the case). So, I did 3-4 iterations of tighten the bearing lock nuts, tighten the crown nut and test until satisfied. 7) Probably should have put this as #2, but good lighting helps tremendously. A lovely (and patient) flashlight holding assistant is highly recommended! 8 It does not take much adjustment as pointed out below. As I tapped the locking nuts, I could see the bearing shroud rotate (see flashlight note #7). I was only going ~1mm, or less, of rotation of the shroud at a time & retesting after each. Just pick a spot on the shroud and watch it rotate. The rest of the procedure below (copied from the technical section) was spot on and extremely useful! In the end, it was a fairly simple procedure and any novices, like me, out there should not be afraid to tackle this, just go slow and make very small adjustments. Can't say enough how much I appreciate this site and the folks who paved the path for the rest of us with these resources! Adjusting Steering Head Bearings Today we are going to look at a very simple method of adjusting your steering head bearings. Loose steering head bearings are a fairly common problem on both the first and second generation Venture and probably the Royal Star also. At some point, you will most likely want to do a true service on these bearings. That is a much more complicated and time consuming job which requires completely removing the handlebars, top tree, and on at least the second generation Venture, the front faring..inner and outer. I've done that job and it takes several hours. It should be done at some point though because you will probably, at some point, want to repack the bearings and that requires the more complicated method. If your front end seems loose though and you simply want to tighten it up a bit, it's a very simple job that can be done in about 30 minutes. You will need a lift to do this job as the front must be completely off the ground. As you can see from the following picture, it does not need to be high in the air...just make sure the front tire is not touching the ground. Once you have the bike lifted, gently push the handlebar one way or the other and see how loose the front is. In my case, the front would fall to one side or the other without me even touching it unless I had it perfectly centered. That is too loose. The front should stay where you have it and if you gently push it one way or the other...it should gently come to a stop but not be binding or hard to push. If you gently push the bars so that it bounces off the stops, it should rebound gently and stop...maybe even ever so slightly oscillate back just a tiny bit but if it oscillates back and forth 2 or 3 times, it is definitely too loose. http://www.venturerider.org/steering/lifted.jpg The next thing you will need to do is slightly loosen the top nut just below your handlebars. An open end wrench works great for this but if you don't have the right size, you can protect the finish with a rag and use a pair of Channel Locks. http://www.venturerider.org/steering/topnut.jpg If you look just underneath the top fork brace, you will see two locking nuts. These nuts are slotted and locked together with a locking washer with a tab. You do not need to pry out the tab as we are going to simply tap and tighten both nuts together. http://www.venturerider.org/steering/lockingnuts.jpg Believe it or not, we are almost done. Simply take a long screwdriver and place the blade in the slots in the nuts. Tap lightly with a hammer to tighten the nuts. Be careful here. You will be amazed at how little you have to tighten these nuts to make a big difference. http://www.venturerider.org/steering/screwdriver.jpg After tapping, gently swing the front end. If you gently swing the front end to where it gently hits the stops, it should rebound slightly and come to a gently stop. It should not bind or be stiff but should not oscillate back and forth. If it bounces off the stop, and then rebound and hits the stop again...it is too loose. If it rebounds and gently stops....you are about right. Once you get it right....simply retighten the top nut and you are done. Very simple job that takes about 30 minutes.
-
Am I the only one who's inner 'beavis & butthead' came out upon reading that? 🤣
-
Positive Crankcase Ventilation
circa1968 replied to Monsta's topic in Royal Star Venture Tech Talk ('99 - '13)
Yes, I poke fun at them, only because of some of the extreme positions but I love nature and also believe where we can, we should do better. My biggest issue is where they use the "environment" as an excuse to command control over too much of our lives and in the US, we have such strong special interest (deep pocket) control over our gov't, which then has control over us, that so much of this stuff turns into protecting profits and/or large gov't employee unions and the balance of power, first and foremost. The truth dies a sudden death when either of those are at risk, IMHO. Industrial processes and output has vastly and necessarily improved over the years for protecting both people's health directly and the health of the environment. But, I always question if ethanol, solar panels, electric cars, etc are truly a net benefit or just pushing chairs around on the titanic, or is it just a way to provide profits to well-connected individuals and companies - in the name of environmentalism. Are you 100% certain those trees died of 'acid rain' and not some other natural phenom (like beetles, some underlying volcanic activity, etc). For example, the ocean emits more carbon dioxide, through natural processes, than all human activity combined. I sincerely appreciate all of you being here, sharing knowledge and pushing me to learn more. Such a great site and group! -
Positive Crankcase Ventilation
circa1968 replied to Monsta's topic in Royal Star Venture Tech Talk ('99 - '13)
Thanks @Patch! This grasshopper just got a little smarter. Been reading a lot about open vs closed loop crankcase ventilation and will get rid of the vent and go back to a closed-loop - with the catch can. Sorry, I wasn't suggesting the engine is 99% efficient. The only thing I know in the entire universe which is 99% efficient is me, in my proficiency to do stupid stuff! I just used 99% as a strawman argument about how much of the exhaust gas is exhausted vs blowby/recycled through the crankcase ventilation as to why the tree hugger argument does not impress me. Once again, once we dig up the dead dinos, its out and not going back in, regardless of what this or that agency requires. (And once again, for the fun sake of argument.....If the world was once a lush, tropical paradise with man-eating dinosaurs and we're slowly taking ourselves back to that, minus the dinos.....why is this a bad thing?😀) I will go back to my original plan of just using the catch can in the as-designed closed loop system. As always, I'm here to learn and always appreciate and humbled by the knowledge that is shared!!!!