circa1968
-
Posts
405 -
Joined
-
Last visited
-
Days Won
19
Content Type
Profiles
Forums
Gallery
Events
Store
Everything posted by circa1968
-
Profit before people. And as long as some of that profit finds its way into the pockets of corruptible politicians via campaign donations and sweetheart deals for their family, we can expect this type of thing to continue. The human race is doomed by greed. And I say that as a die-hard, free-market capitalist.
-
Still running hot, any advice?
circa1968 replied to circa1968's topic in Royal Star Venture Tech Talk ('99 - '13)
Thanks @Patch!! I decided the best next step was to do a carb swap for a rebuilt set from eusa1. My curious mind is still restless however and I'm hoping to find a set of used carbs on ebay for a reasonable sum for me to tear apart and learn more, but that's for later. For now though, I've waited 18 long years to get back onto a Venture and ride and that's my #1 priority. I gave it a shot, learned a whole lot more about carbs, motors, etc than I knew two months ago and satisfied with my newbie effort, even if I didn't get the desired end result. I'm also praying there's nothing else wrong that requires an even deeper dive. Starting to worry if I made a bad buy on this bike due to it sitting and maybe not having had proper maintenance. Will keep my thoughts positive though. Can't say it enough how I appreciate this site and the fine people willing to help me! -
Still running hot, any advice?
circa1968 replied to circa1968's topic in Royal Star Venture Tech Talk ('99 - '13)
Thanks @Patch but it looks like the congrats may be premature.... Apparently I need to fine tune my bench sync skills a bit more, haha! Cylinders 1 & 2 were pretty much spot on, 3 & 4, ehh and then the two banks were pretty far off from each other. But, that's now sorted out w/ the vacuum gauges. Bike is running great, idle is stable and the throttle response is snappy. That's the good news! The bad news, even in 50 degree weather, still lots of heat coming off when riding and still reading high temps on the exhaust pipes. So, w/ a tach and vacuum gauges (and my mostly useless ears), I set out to fine tune the idle mixture screws. Now this is where I get lost. Only on cylinder #2 (actually maybe #3 too, I need to double-check), does the engine bog down when I turn the idle screw all the way in until it stops. I don't understand this. Am I not cutting off fuel flow to to the cylinder when I turn it all the way in? I will recheck #3, but for sure, there is no change when turning in #1 & #4 (rear) mixture screws. At around 1.5-2 turns out, I can see where the RPMS start to increase a bit and then level off, so that part of the process seems ok and I've seem to have gotten each of them at least near the sweet spot. But what does the above symptom mean, where it does not bog down the engine on three of the four cylinders? -
3 John 1:2
-
Still running hot, any advice?
circa1968 replied to circa1968's topic in Royal Star Venture Tech Talk ('99 - '13)
Well, at long last, the replacement float bowl gaskets and needle valves came in, I've managed to get everything back together. In the process, I shimmed out the needle by moving the washer to other side of c-clip and made a slight adjustment to the float bowls, using the method found on the site here. Much to my amazement, it doesn't appear that I've totally screwed anything up (but perhaps that verdict is still out). The bike fired up and I took it out for a quick 5-minute ride. Its definitely got more zip to it but I suspect its now running on the rich side of the spectrum as I'm getting some backfire I did not have before. I still need to check sync on the carbs, even though I did the bench sync, will still check again w/ vacuum gauges. Also need to dial in the idle mixture but I'm about as tone deaf as they come (In 9th grade, Sister Denise spent the entire year trying to teach me how to tune a guitar by ear - it never happened and my Rock & Roll dreams came to an abrupt end), so I'm looking for a proper tach to help with that or may just take it to a shop that has an exhaust gas analyzer. @cowpuc@BlueSky@Patch and so many others here who have encouraged and taught me, I am in awe and in sincere gratitude for all of you. I've actually enjoyed working on all of this along with the learning process. I have much to learn and many mistakes to make to assist me in that process but nice to know that there are so many here willing to help me through. Thank you all! Dean -
Yeah, that's my take on it also. From what I've read, at a relatively low % of water absorption, it will phase separate from the gasoline & settle at the bottom of the tank and that's when s* hits the fan. IIRC, Isobutanol has one more carbon molecule than ethanol and that is the game changer. There are a couple of companies already switching over to isobutanol production in the midwest, but mostly for exporting. I don't know anything about Brazil, but I'm guessing if you asked the gear heads, they will complain about ethanol there too. Physics don't change from one country to another. If you watch the 6:00 news, you'd never hear about ethanol problems in the US either.
-
https://sfbay.craigslist.org/sby/mpo/d/san-jose-yamaha-chrome-radiator-cover/7236124192.html https://sfbay.craigslist.org/sby/mpo/d/san-jose-kuryakyn-grips-metric-cruiser/7236124753.html
-
Here's my list since buying the bike in Sept: Cassette delete and turn it into a storage cubby. CB delete. Moved the radio antenna from right side to left side & replaced the whip antenna w/ a shorty (https://www.amazon.com/gp/product/B000K50HAI/ref=ppx_yo_dt_b_asin_title_o02_s00?ie=UTF8&psc=1) Hardwired a bluetooth receiver in behind the fairing, tapping into the 12v port wiring and then the cassette aux jack (https://www.ebay.com/itm/Car-Stereo-Truck-Home-Add-on-3-5mm-Input-Audio-Bluetooth-Receiver-Adaptor-12V/331841419661?ssPageName=STRK%3AMEBIDX%3AIT&_trksid=p2057872.m2749.l2649) Mounted a phone holder/charger on handlebar, also tapped into 12v port (https://www.ebay.com/itm/Universal-Motorcycle-Cell-Phone-Handlebar-Mount-Holder-USB-Charger-with-Switch/192956706728?ssPageName=STRK%3AMEBIDX%3AIT&var=493147868608&_trksid=p2057872.m2749.l2649) Got super, duper lucky and found a NOS Yamaha touring saddle (Corbin) on Ebay from a Canadian Yama dealer. Total cost was $350 including shipping!!!! Replaced the aftermarket toe shifter, the PO put on, with a stock heel/toe shifter. Replaced aftermarket grips w/ stock, including weights. Removed the chrome radiator grill PO put on. Moved the trunk back. Removed the tank mount for headset cable and for now the cable is tucked up inside the fairing. Will remove it next time I have the fairing off.
-
"There are 10 kinds of people that understand binary, those that do, and those that don't." Love that! Eng humor @ its best!
-
The Alpinestars jacket will be my cold weather jacket too. But, cold being a relative term..... I live in Northern California (SF Bay Area), low 30's is about the coldest it gets here and that's typically overnight, warming to high 40's/low 50's during the day (at its coldest). And at that, I'm a fair weather fan so much below 50 and I just don't have much interest in riding. "Winter" is also our rainy season so cold/wet puts a damper on my desire to ride. When I was younger, I commuted through it all on my moto but don't plan to do that any longer.
-
I recently picked up one of these made by Alpinestars: https://www.chapmoto.com/alpinestars-amok-air-drystar-vented-textile-jacket-parent-0203207716101?msclkid=d80d919e63f8119b50dfce2461e3fc03&utm_source=bing&utm_medium=cpc&utm_campaign=**LP - Shop - TM - Protective Gear - %24300-1,000&utm_term=4580634168710250&utm_content=020-3207716-922-3XL | Alpinestars Amok Air Drystar Vented Textile Motorcycle Jacket - Grey 3XL 3207716-922-3XL | %24319.95#92=518&250=1084?utm_term=&identifiers=pla-4580634168710250&Campaign=**LP - Shop - TM - Protective Gear - %24300-1,000&CampaignId=380457658&AdGroup=020-3207716-922-3XL | Alpinestars Amok Air Drystar Vented Textile Motorcycle Jacket - Grey 3XL 3207716-922-3XL | %24319.95&AdGroupId=1232552739056471&AdId=77034656219681&Network=s It has three layers, outer mesh, waterproof liner and then thermal liner. I've gotten a few short rides in with it ranging from 90's temp w/out the inner liners to 50's with the liners in. I like it. It has elbow/shoulder protectors built in (maybe removable, not sure) and a soft back protector. Not sure if this helps but size-wise, I'm always right at that medium feels tight & large feels big spot. My jacket is a medium and fits comfortably w/out the liners. W/ the liners, it naturally feels a bit tighter but workable. I think my only negative is I would like the cuffs to cinch up a bit tighter so I can have my gloves go over them when it gets colder. I supposed I could go the other way and cinch the cuff over the glove, but I haven't tried that yet. Style-wise, a solid black would look better, imho. This is a model from a few years ago and I'm sure you could find similar new ones in solid colors.
-
Now that I'm deep into my carburetor cleaning and overhauling (waiting for new needle valves at the moment), my curious mind has taken over and I've been doing a bit of research about ethanol, why we are required to use it, what it does and why its bad. I'm sure most of you are already years ahead of me on this, but my research led me to ask "Why in the heck isn't someone creating an alternative to this ethanol?" Well, as it turns out, they are: bio-isobutanol! Bio-isobutanol has higher energy content than ethanol, is not corrosive, is not hygroscopic (so does not phase separate) and can be made from same feedstock and equipment as ethanol (different fermentation yeast and separation processes though). There really shouldn't be any political battles from the corn belt to protect their profits, which would be a huge hurdle to overcome. And the best news is that the EPA approved its use as a fuel additive in 2018. We can, in part, thank the marine industry for pushing for this through gov't channels. https://www.nmma.org/press/article/22033 I'm not too far into it yet, but wondering if other industry groups are also backing isobutanol to replace ethanol and what the chances are we'll actually see this in our fuel instead of ethanol in the near future. Here's an interesting article from a few years ago comparing the two additives in boat engines: https://www.boatingmag.com/replacement-ethanol/
-
Still running hot, any advice?
circa1968 replied to circa1968's topic in Royal Star Venture Tech Talk ('99 - '13)
Found it! You were close: "Evaporative Emission Control (California Models)...captures fumes that are created in the fuel tank and stores them in a charcoal canister. While the motorcycle is parked or when it is operated at low engine speeds, the fuel vapors remain in the charcoal canister. When the motorcycle is ridden at high speed, the vapors pass through a hose to the carburetor and are burned..." I call it a PITA! -
Still running hot, any advice?
circa1968 replied to circa1968's topic in Royal Star Venture Tech Talk ('99 - '13)
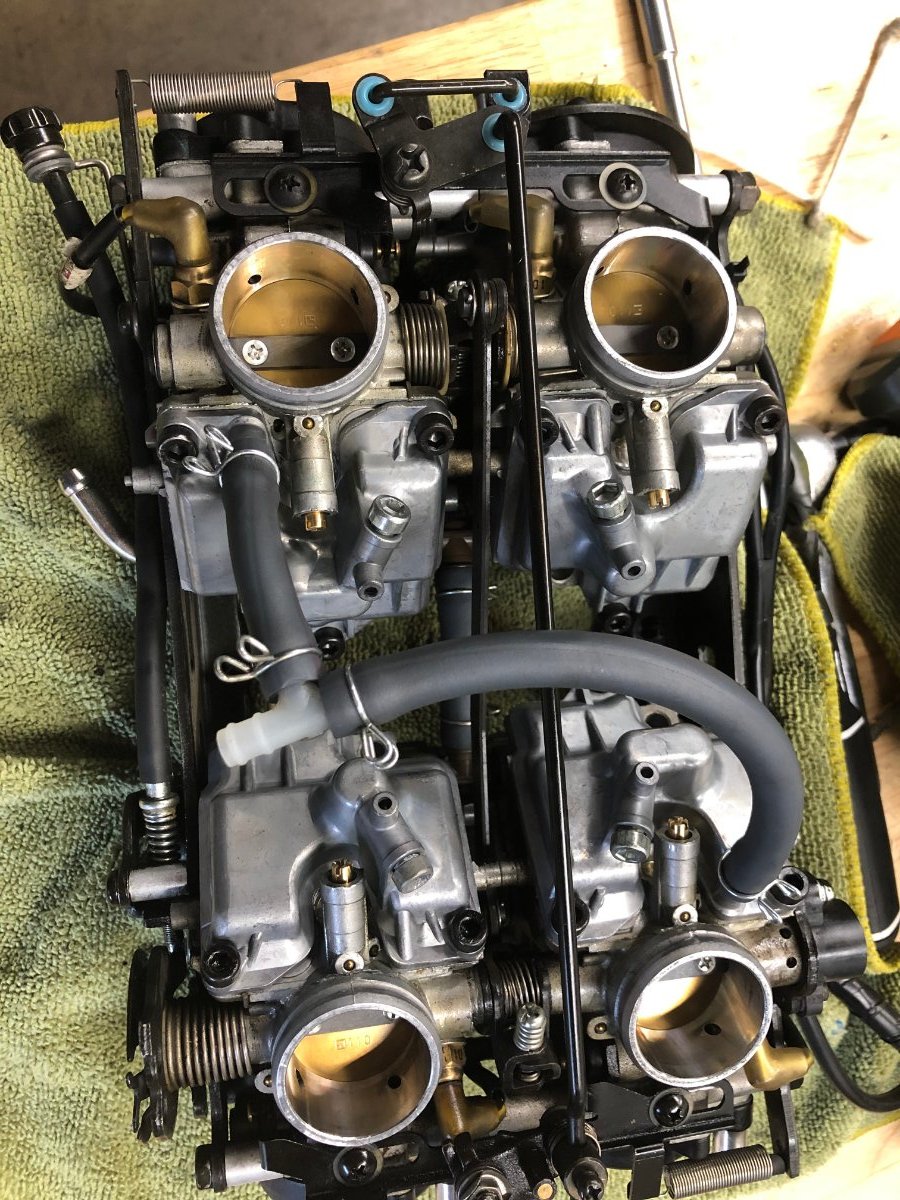
Well, since you've pushed me to become divorced from my comfort zone and we now live in separate states (thank you!), I will be doing all those things you mention. The float bowl o-rings are pretty gunked up and new ones will not arrive until Friday, so I now have time to fiddle and see how much more trouble I can get myself into. Question: I've been studying the service manual, and I have a clymer manual as well now, and have been able to identify and understand pretty much everything so far. But, in the attached picture there is a rubber hose connected to two diagonal float bowls via a T & the T goes off to the some abyss under the battery. I cannot find anything which identifies this. What the heck is it and what does it do?
-
Still running hot, any advice?
circa1968 replied to circa1968's topic in Royal Star Venture Tech Talk ('99 - '13)
That was timely! I just got everything loosened & ready to pull, but no go. Figured I missed a step in the process and came to the computer to review. Yeah, that throttle cable.... -
Still running hot, any advice?
circa1968 replied to circa1968's topic in Royal Star Venture Tech Talk ('99 - '13)
Apparently I have at least two plugged jets. Turning out the pilot screws on #1 & #3 had no effect. When turned nearly all the way in, it would bog down the engine, but backing out from that point all the way to 4 turns made no difference on either of them. I never even got to #2 & 4. Bottom line, I'm now armed and dangerous with more information than I probably should be allowed to have. I'm going to pull the carbs & open them up to clean the pilot jets!!!! Wish me luck! -
Still running hot, any advice?
circa1968 replied to circa1968's topic in Royal Star Venture Tech Talk ('99 - '13)
@Patch Got it. They were not far off to begin with so it was fairly quick and easy to dial them in. That makes sense, the rears seated @ 1.5 turns. -
Still running hot, any advice?
circa1968 replied to circa1968's topic in Royal Star Venture Tech Talk ('99 - '13)
@ Patch Yep, got it figured out! I wasn't able to acheive more than a 2-3mm opening of the throttle plate though w/ the idle screw turned all the way in. I do a lot of work on bicycles (much simpler machines!) and happened to have some steel braided brake cable that's ~1.5mm. I used that for the feeler gauge and got them all set accordingly. To fine tune it even more, I turned the idle screw down a bit and then used a 1mm shifter cable for a gauge. That's a very cool process! Thank you! Ready for next step!! -
Still running hot, any advice?
circa1968 replied to circa1968's topic in Royal Star Venture Tech Talk ('99 - '13)
Thanks. That's what I thought you were referring to, but I saw no effect on the throttle plate, but now as I think about it, guessing I start w/ the fat knob & go from there? I'll go fiddle around and see what else I can learn. BTW, while poking around and doing more reading, etc found the brass caps for the pilot screws & removed them. With the throttle plates fully open, I could see the needle tip sticking through into the carb body. Each one protruded a different amount. wth? The two front ones were close to each other and the two back ones were close to each other, but I could visually see that all were different! I threaded each one in until it gently seated then back out 2.5 turns, as I read somewhere else here. Now they are all uniform. I may have skipped a step ahead, but hey, you made me dangerous here!! haha Back to adjusting the throttle plates until my better half tells me to fire up the bbq for dinner! -
Still running hot, any advice?
circa1968 replied to circa1968's topic in Royal Star Venture Tech Talk ('99 - '13)
@Patch can you explain this to me further: “Set the # screw so that the throttle plate is just touching the shank of the bit,” I thought you meant the sync screws but that is not it. Which screw adjusts the throttle plate? -
Still running hot, any advice?
circa1968 replied to circa1968's topic in Royal Star Venture Tech Talk ('99 - '13)
@Patch Heading to the garage now to work on the bench sync, have a couple hours free for the rest of afternoon. Thanks for the read on the plugs. I will focus on the bench sync 1st thing today and pull the plugs later. @cowpuc I was just looking for a set for my own educational purposes to take apart, put back together again and try to learn more about what it does and how it does it. I may get to the point of pulling and doing the swap, but not quite there yet. I do recall seeing that post in some of my travels. -
Still running hot, any advice?
circa1968 replied to circa1968's topic in Royal Star Venture Tech Talk ('99 - '13)
Thank you Puc! I'm looking forward to digging into the carbs more and learning how they work. I looked on ebay for a used set, just to play around with and explore how they work. Oh my, that's an expensive toy, $300+ for a set of used carbs! -
Still running hot, any advice?
circa1968 replied to circa1968's topic in Royal Star Venture Tech Talk ('99 - '13)
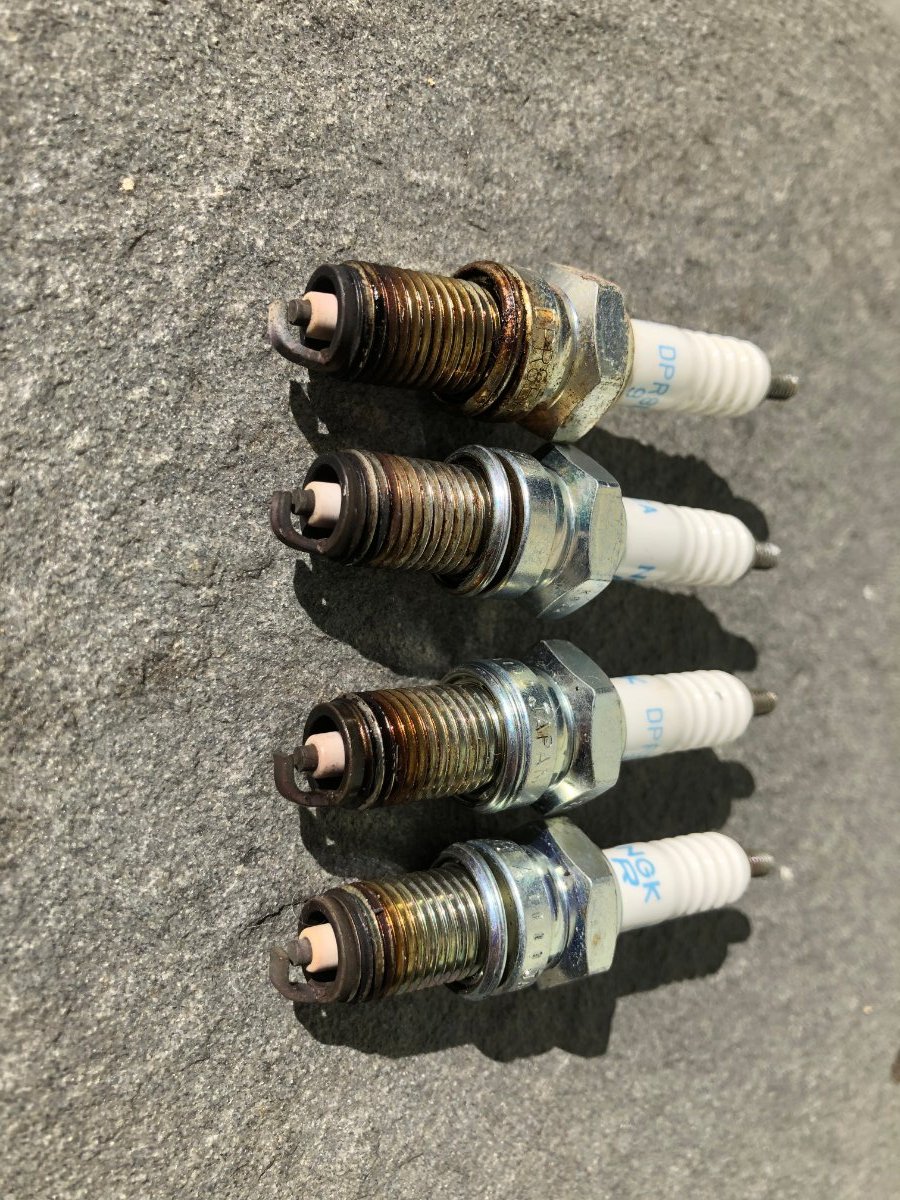
Thank you for that Patch. I mostly followed you on that explanation. Not to toot my own horn, but back in my day I was very good and well known for my troubleshooting skills of computer/electronic systems (I worked in both Mfg & Development). I like challenges and, when faced with a new one, I always try to first obtain some basic knowledge of how the thing is supposed to work before I can figure out why the thing does not currently work. Hence my frustration here and grasping at straws (definitely not my normal approach). I think I was hoping to get lucky with a quick and simple action. Thanks for getting me on track and the education. I think I'm on day 2 of school here but loving the learning. I'm slowly getting over my fear of screwing something up too. And we're heading into cooler/wetter weather so I guess even if I do, I have more time to unscrew it. haha Attached is a pic of the plugs I removed, but failed to track from which cylinder.
-
Still running hot, any advice?
circa1968 replied to circa1968's topic in Royal Star Venture Tech Talk ('99 - '13)
Hi Puc, Up until this last ride, and maybe one other time, the two back pipes did not read the same. I am able to take the exact same reading (directly on the pip, same angle, etc) on both of them. #1 is always ~400+ and #3 was reading the same (~200) as I got on the #1 & #2 flanges. I guess I made a bad assumption there on those readings (pipe vs. flange). Part of my learning/education process. I guess I see now the difference in thermal mass, but not sure why I was seeing such a difference, directly on the #1 & #3 pipes before. And for what its worth, #1 gets to that temperature within minutes. From what I'm learning from all you zen masters, that sounds like it is running lean and now maybe the same for #3. I'm going to follow Patch's bench sync advice and see what comes next. @bpate4home Yeah, I hear you and having an EE background that was my first instinct also. I hooked up 12 v to the fan connector and confirmed it came on and then also got her warm & let it sit until the fan kicked on to confirm all the other sensor & control circuitry works. If it makes small sparks, I understand it. Its all this big, controlled explosion stuff that's outside of my wheelhouse! -
Still running hot, any advice?
circa1968 replied to circa1968's topic in Royal Star Venture Tech Talk ('99 - '13)
Thank you Patch. I understood your procedure perfectly and will follow it. Unfortunately, I did not track the plugs when I removed them, but have a few miles on the new plugs, so will pull them & get pics to see if that is of any use. I will also take pics of the old plugs, for what that's worth. I'm pretty mechanically inclined and have an engineering degree and a quick study of most things that come along. I like challenges, just have zero experience working on engines or carbs and don't want to screw anything up. But that said, I've learned a lot already and each new step leaves me wanting to learn/do more. Fascinating stuff. I did get out for a ride yesterday. the cooling issue seems to be much better. I noticed it getting warm a couple times when in traffic, but out on the twisty road had no issues. Of course it was also in the 60's vs. 90's when I first got the bike and noticed the heat. At the end of my ride, the radiator was reading ~200F, a little warm, but seems mostly normal. #1 & #3 (two back) were reading 400+ on the exhaust pipe (#3 was not this high previously). #2 & 4 were reading ~200ish but I can only check those on the mounting flange, not the pipe itself. For what its worth, when I check the mounting flange on #1 & #3, instead of the exhaust pipe, they are also 200ish. Again, I sincerely appreciate the help and information!