circa1968
-
Posts
405 -
Joined
-
Last visited
-
Days Won
19
1 Follower

Recent Profile Visitors


-
I really want to see the technology for battery-powered stuff (tools, lawnmowers, tractors, cars, motorcycles, etc) advance to the point of truly being competitive with their gas-powered equivalent. BUT, my viewpoint has nothing to do with global warming or any of that fear-mongering crap. Two viable, competing technologies will make both better in the end. That's free market capitalism at its finest. The problem we are having now is a bunch of gov't busy-bodies trying to mandate stuff that is not yet truly viable technology to be cost/performance/utility competitive with its gas-powered equivalent. They are working to an agenda, rather than letting free market forces do what they do best. It's going to take several humongous technology break-throughs to make battery powered stuff viably competitive with gas-powered, when you take all aspects into consideration. Tesla makes the fastest production car on the market, but has range limits and takes longer to charge than a gas car takes to fill up. If you just want to go real, real fast for a relatively short distance, don't mind waiting for at least an hour recharge and have a large enough bank account, nothing beats a Tesla. So until EV mfg'ers can overcome the tradeoffs, gas-powered technology will need to not only survive, but continuously improve to stay ahead of the new competition, or it WILL be replaced - eventually - by better technology. Personally, I think the Mustang Mach E is a cool vehicle. If it had more range and could charge to full capacity in the time it took to fill a gas tank, I would buy one in a heartbeat for cross-country road trips, but it doesn't currently do what I need it to do for that (5-600 miles/day @ 85-90MPH) My dream is to have a full electric touring bike that will go a minimum of 200 miles on a full charge, has swappable battery modules that I can pull into any 'gas' station and swap out for fully charged ones in 5 minutes and then go another 200 miles. Rinse & repeat. If it can do that repeatedly, reliably and safely, I am all in. Until then, I still love my Venture (and honda gas mower). P.S. the one thing that really scares me the most about all the EV stuff is the amount of electrons stored and used for operating/fast charging and the intensity of those electrons being unleashed if/when something goes wrong - they move in unison, at the speed of light.
-
What's the mileage and where are the pictures of your new machine?? For what its worth, I joined this group 3 years ago, knowing almost nothing about working on motorcycles, after purchasing my 2007. With helpful guidance & encouragement from this group here, I worked through an issue on my bike (basically, gunked up carb from sitting too long). Well, lo & behold, after that experience of wrenching on the Venture, I discovered that I actually enjoyed working on motorcycles and this old dog set out to learning a few new tricks. Thanks to the immense wealth of knowledge about all things on the internet, I'm now on my 7th & 8th motorcycle projects in the last few years, learning more with each project. All have been Japanese bikes, with low mileage (except one) that had been sitting for years (30 years in one case). A couple were parked long ago for other reason's that I had to sort out, along with the resurrection process. With all that said, here's my advice and the first thing I do when I get a new project home: Give the bike a good bath and do a quick polish up on the side you first see when walking into your garage. It may sound silly, but seeing what it will look like, or close to it, as the first step keeps me motivated to keep going on the rest of it.
-
Additional information on Keyless Ignition
circa1968 replied to circa1968's topic in Royal Star Venture Tech Talk ('99 - '13)
https://www.denniskirk.com/baron-custom-accessories/profiler-gas-cap-kit-ba-7450u.p185573.prd/185573.sku A bit pricey, but what isn't these days. -
Additional information on Keyless Ignition
circa1968 replied to circa1968's topic in Royal Star Venture Tech Talk ('99 - '13)
Thanks. I still need to install the keyless gas cap to finish this project off though. Install is a combination of plugging into the ignition switch connectors and the on/off switch on the right handlebar (this connector is inside the fairing). Their standard install uses the on/off switch to essentially turn the keyless module on and eliminates the keyed ignition switch, so no reason your bypass relay wouldn't work. I just checked and don't see a p-n-p kit for the Venture on their website. I shared all my documentation with them via google drive and can see they have accessed them. They seemed genuinely interested in adding more models to the p-n-p offerings, so maybe still in the works. BTW, I rode through Phoenix area last fall, I-60 if I recall correctly, hit it Friday afternoon, probably the worst possible time. One of the few times I've been genuinely butt-puckered scared on a motorcycle (ok, maybe more than a few). There's what 6 lanes? Most doing 90+, criss-crossing across all lanes to/from exit/entrances that seemed to be about every 1/4 mile. It was only really bad for about maybe 10 miles, but wow - won't be doing that again. -
Additional information on Keyless Ignition
circa1968 replied to circa1968's topic in Royal Star Venture Tech Talk ('99 - '13)
Quick update on my communications with Digital Guard Dawg regarding having them make a plug-n-play solution for our Ventures. They were very interested, saying they want to add more models to their lineup of p-n-p solutions and asked for more info. I shared all my documentation, connector part #'s, wiring diagrams and pics with them via a google drive earlier today and can see that they have been accessing it. https://www.digitalguarddawg.com/ -
Additional information on Keyless Ignition
circa1968 replied to circa1968's topic in Royal Star Venture Tech Talk ('99 - '13)
Agree, I will add a bypass relay eventually, won't be a difficult upgrade. I put the daylight running lights on a separate relay while I was in there, so that at least cuts down on the power draw through the switch from those. I didn't see it in any spec, but Digital Guard Dawg told me the module is designed to supply up to 30A, when I asked. I didn't touch, cut or modify any factory wires, did all that in between the new connectors I added. I also thought about adding a hidden 3rd switch in parallel, as you suggested, in case the keyless module AND key switch both failed. But in the end decided that's what I pay AAA for. 😉 -
LOL. My motivation was exactly the opposite. I have a bad habit of leaving my key installed in the bike after stopping. When I stop for lunch or for the day, I turn the key off, then proceed to dismount the bike, take off gloves, helmet, jacket, secure all of those and then walk away.... Can't tell you how many times I've woken up at midnight, in a hotel, thinking 'crap, left the key in the bike again!' Next step is the keyless gas cap to solve another of my first world problems.
-
Additional information on Keyless Ignition
circa1968 replied to circa1968's topic in Royal Star Venture Tech Talk ('99 - '13)
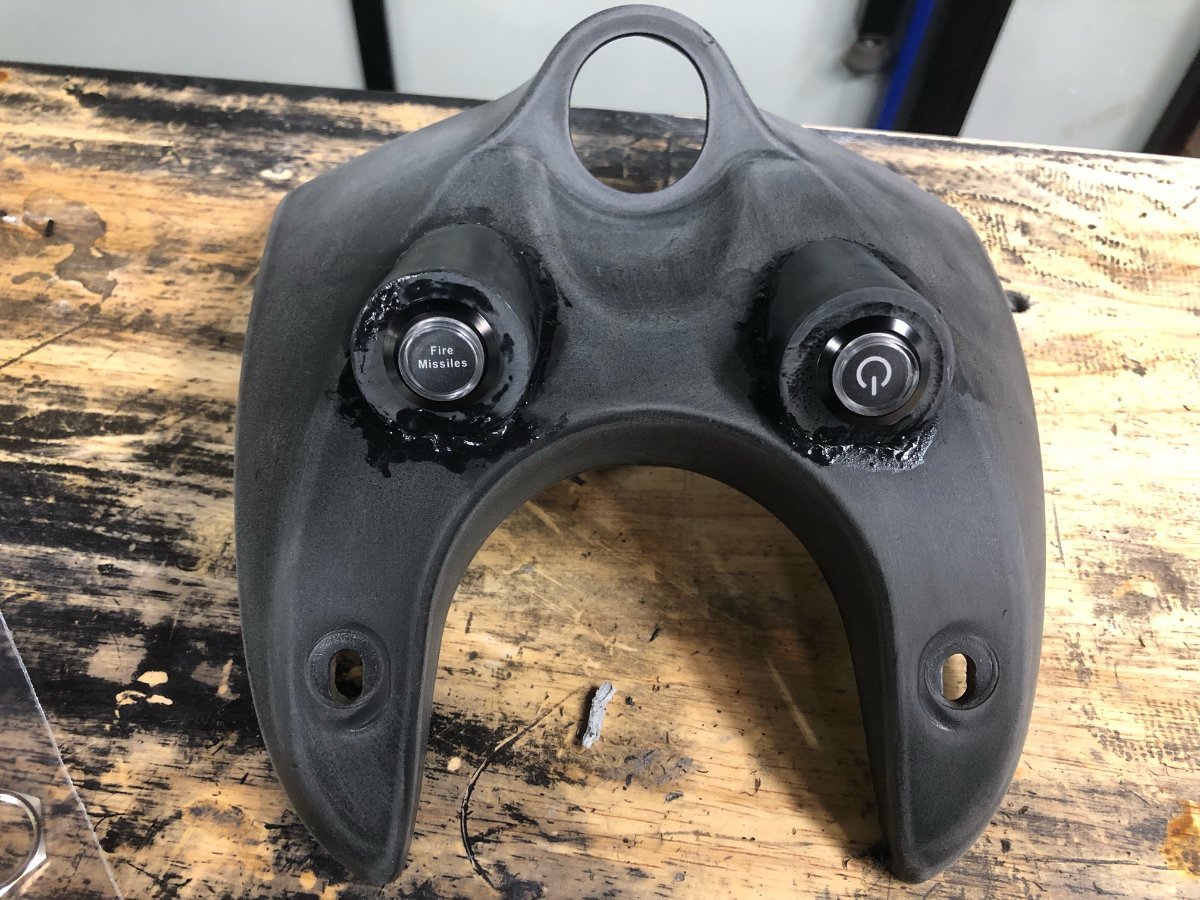
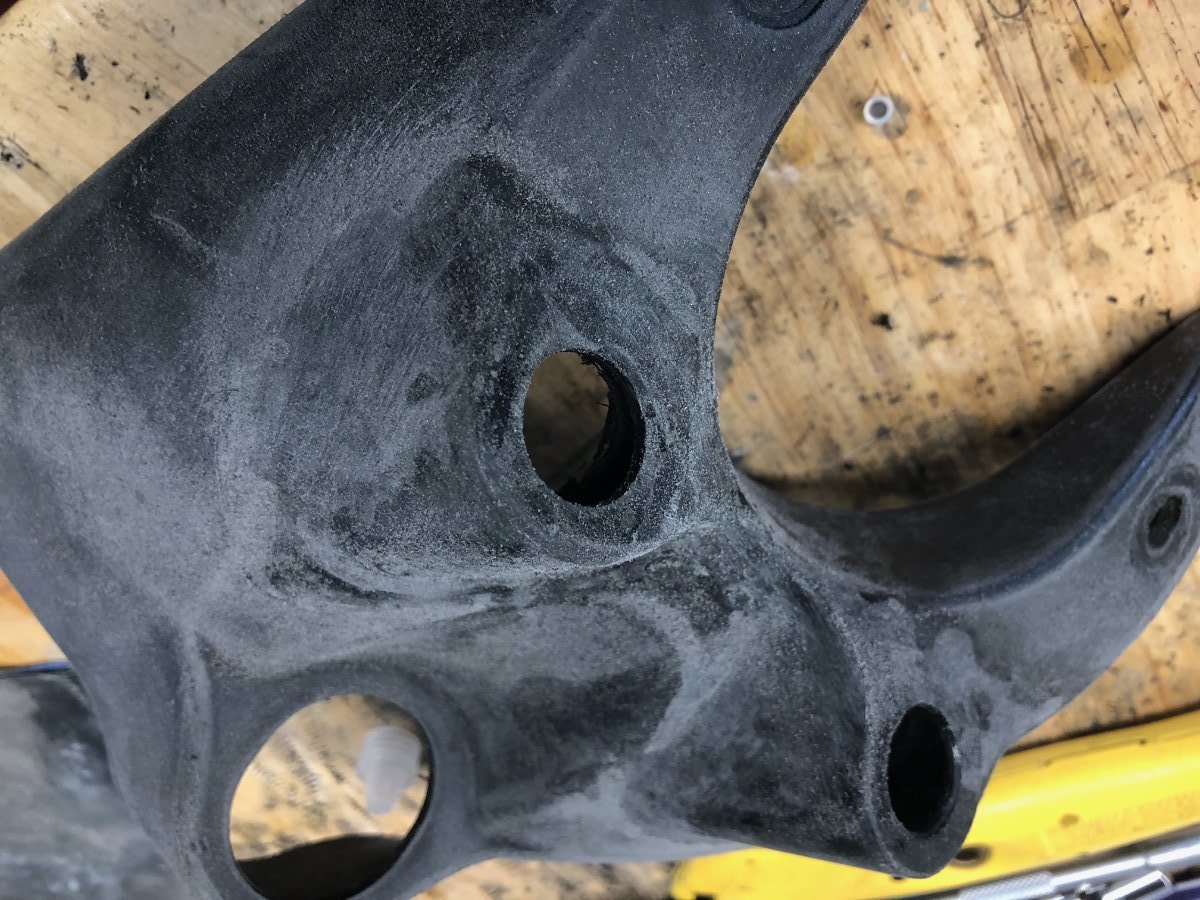
I will continue looking for push buttons that look more "professional" (for lack of a better way to describe it). The ones I used are ok looking, but that's it. There are OEM style push buttons out there that look much nicer, but are larger diameter, which was going to make the "bumps" that much larger as well. They are also a bit more expensive and since I wasn't even sure if this was going to turn out, I took the cheap/chicken way out. Might turn into another future upgrade project, but I'm happy enough with it now, as-is. -
Additional information on Keyless Ignition
circa1968 replied to circa1968's topic in Royal Star Venture Tech Talk ('99 - '13)
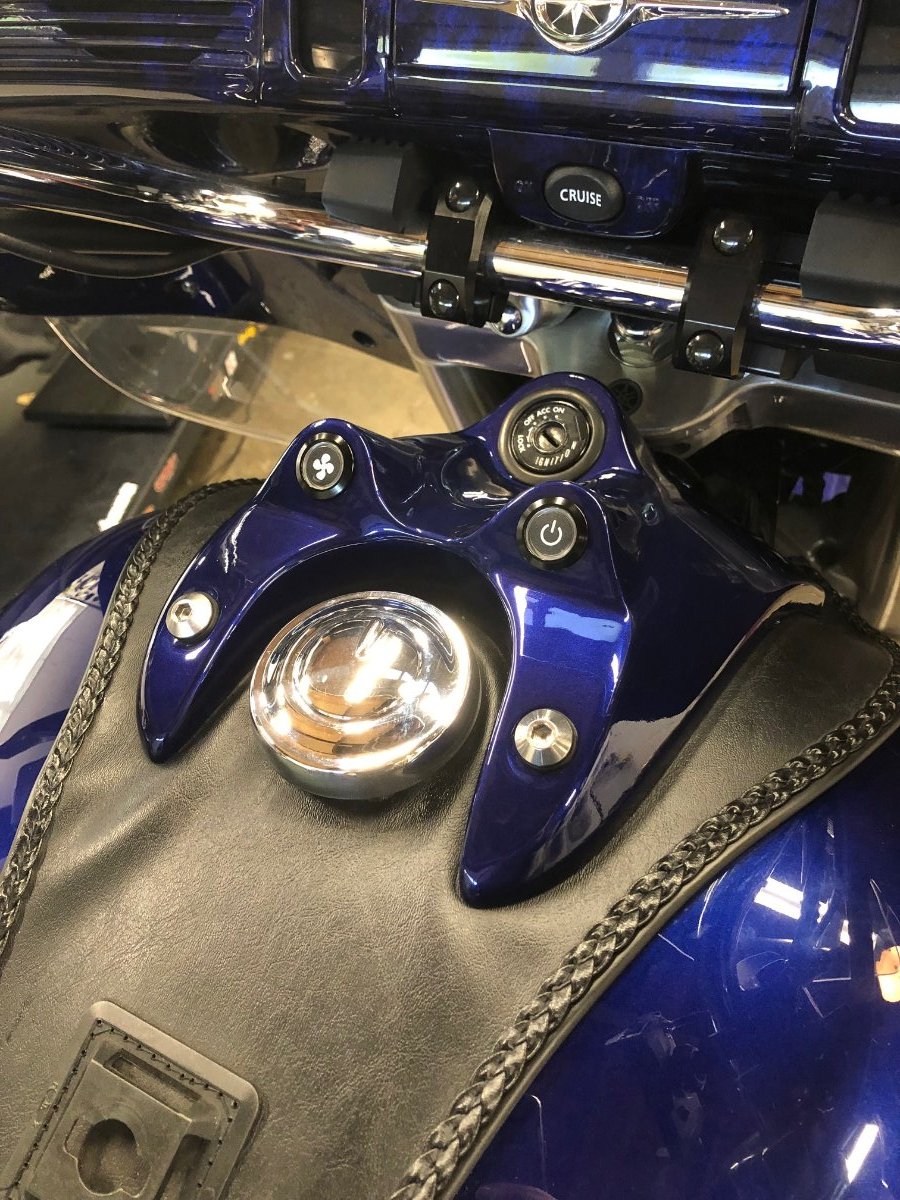
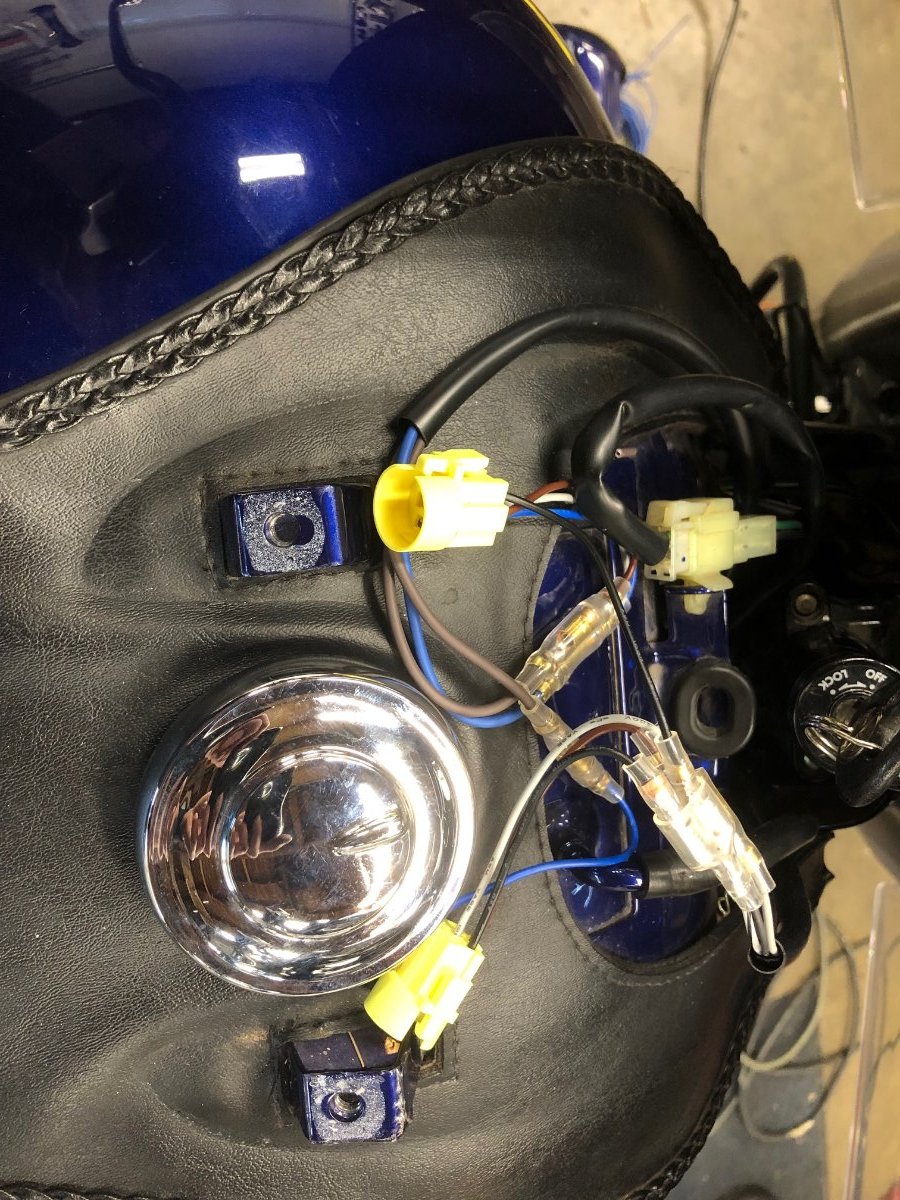
Final picture of the installed, painted cover.
-
Additional information on Keyless Ignition
circa1968 replied to circa1968's topic in Royal Star Venture Tech Talk ('99 - '13)
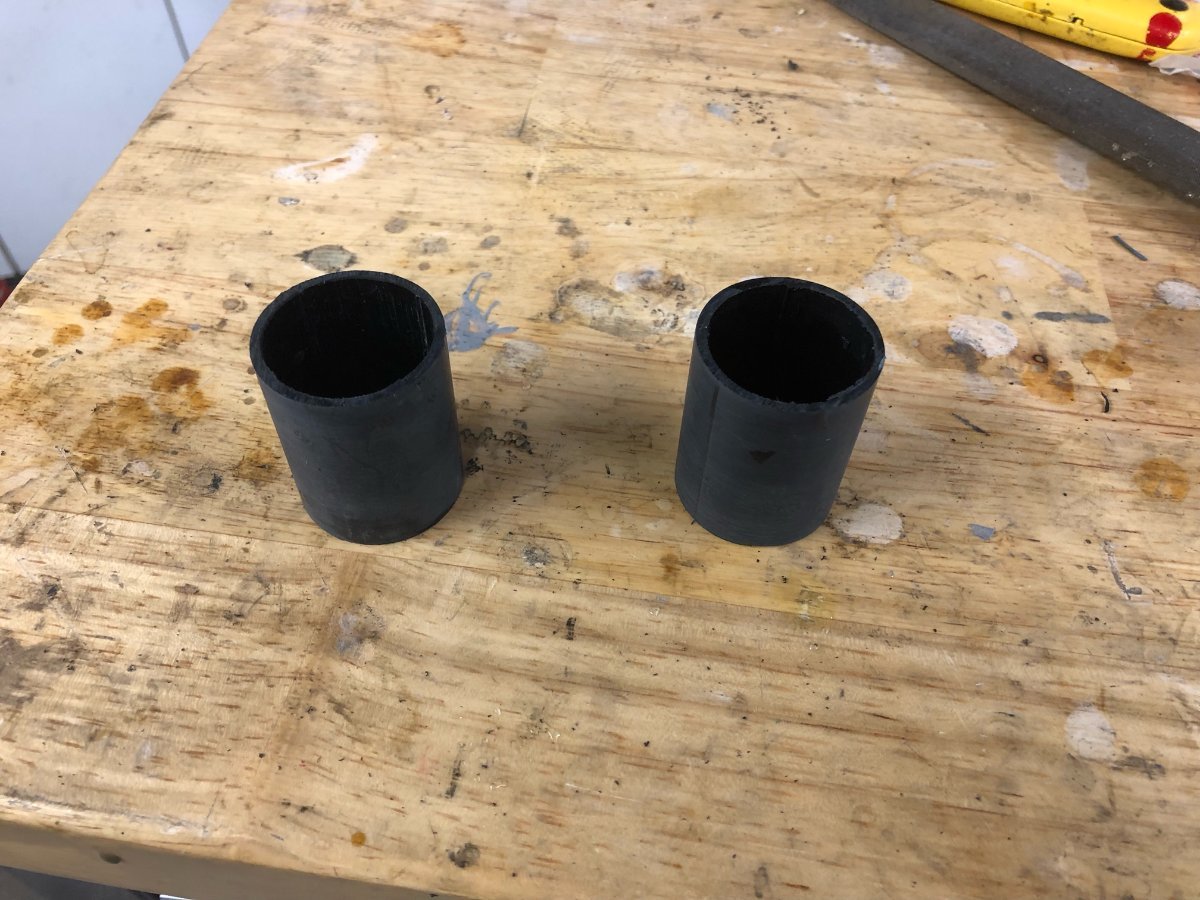
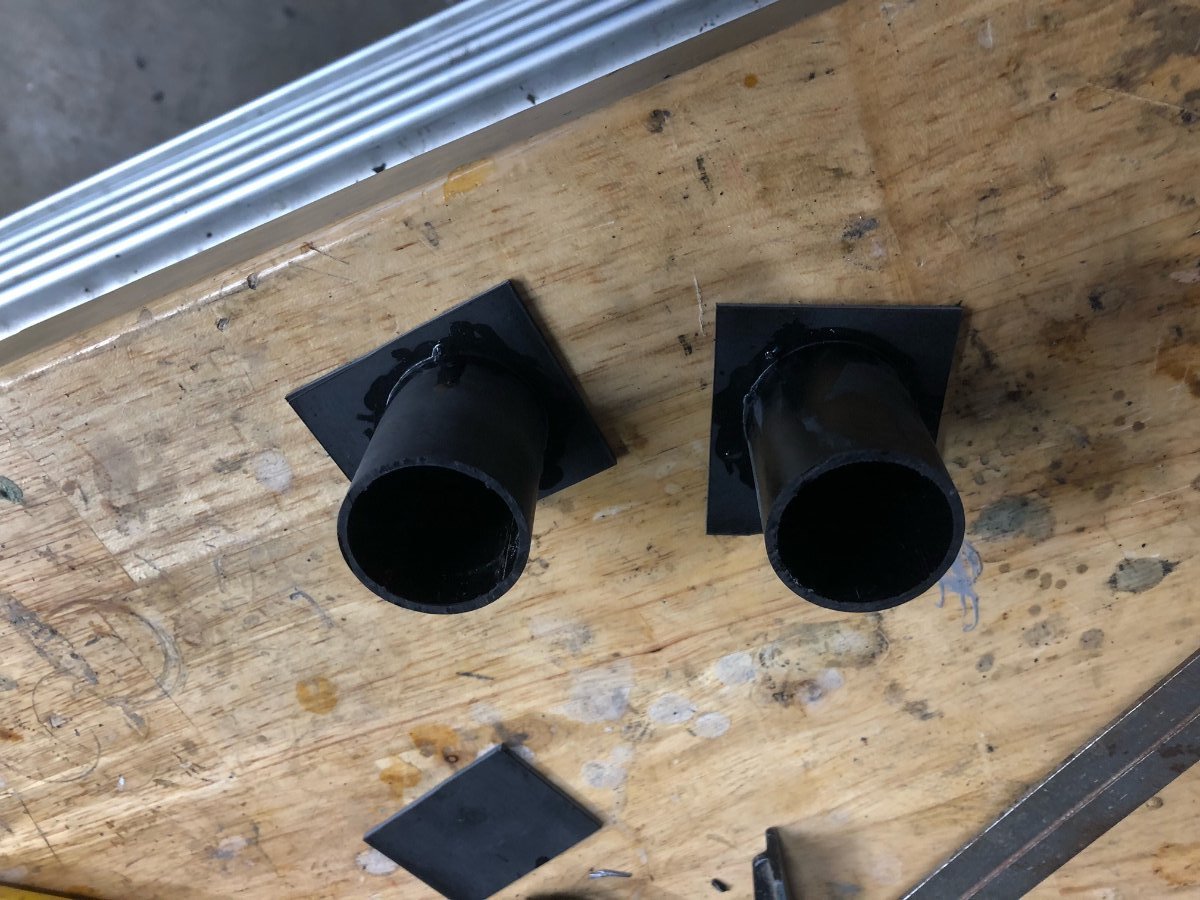
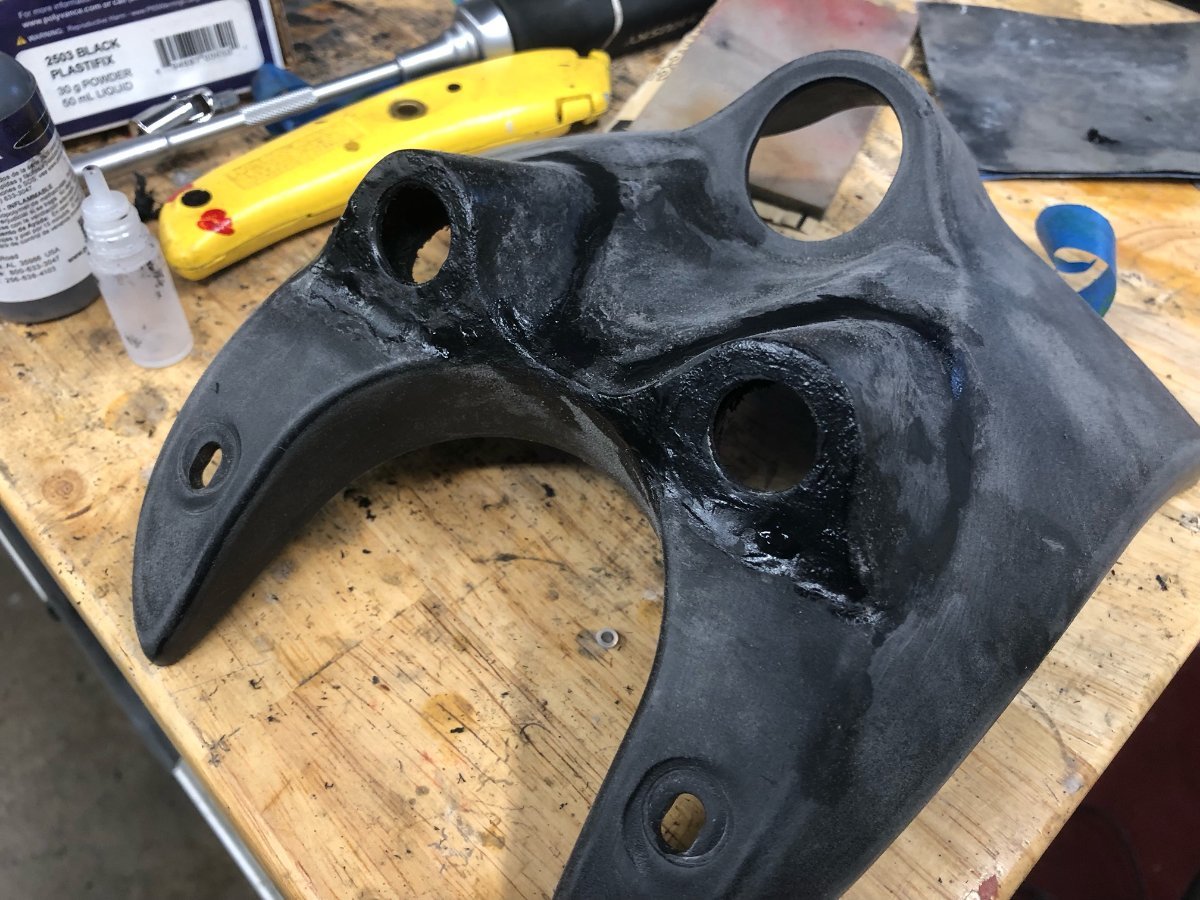
And last, but not least a few in-process pictures of my arts & crafts project to make a custom ignition cover. Mike Eycamp was kind enough to supply me with a spare cover he had in his inventory for the project. TBH, I was not sure how this was going to turn out and I was prepared to scrap this part of the project & just do the recommended install, if it didn't look 'factory' when I was finished. I surprised myself and exceeded my own expectations and hopes for how it turned out and looked in the end. The stock cover is ABS and so I knew I could work with that using the Plastifix product from Polyvance. Plastifix is, as near as I can tell a very fine ABS powder and strong solvent which 'melts' ABS and fuses everything together. I've used it on several projects now and could not be more impressed with how well it works. Being a bit frugal and creative, I started making the two "bumps" from the body of an old busted pop-up sprinkler head I had laying around (never throw anything away! haha), it is made from ABS as well, so I knew I could fuse it on. I cut two pieces to equal length, then fused them to pieces of flat ABS stock, then drilled the mounting holes for the push buttons. With a little eye-balling, found the mounting angle and cut the backsides at that angle, then used the solvent to fuse/mount them on to the cover. This was all literally eyeballing everything from multiple angles for symmetry, etc and I was giving myself about a 10% chance that this would come out looking 'right' in the end. There was zero precision manufacturing going on here, which was hard for my OCD, engineering brain to accept. (A 3D scan, some cad software and 3D printer project kept popping up in my head, but I persevered through that). Once fused into place, I then proceeded to use the Plastifix filler to infill around the tubes, followed by dremel tool grinding, more eyeballing, more filling, more grinding, more eyeballing, and so on. At this point I was starting to realize this might actually work and turn out to look good. I forget what its called at the moment, but Polyvance has another product which is basically bondo for plastics, which I used to do the final 'body work' on the cover. It was a multistep process of fill, sand, primer, sand, fill, primer, sand, etc. Just like any other body work. Once I was happy with the part in primer, went to my local auto paint shop with the paint code & got a spray can of PPG envirobase. (Note: 2007 blue is technically a 3-stage paint process, but they mixed it as a single stage color, which turns out ever so slightly darker). For clear I used Spraymax 2k, a two-component urethane clear in a spray can. I cannot say enough good things about this product. I've used it multiple times on other projects and finally getting the hang of laying it down wet enough so that if flows out smooth, but doesn't run. Once cured, its hard as nails and not effected by any gasoline drips which might occur. Well, that's the long summary of my fun little project.
-
Additional information on Keyless Ignition
circa1968 replied to circa1968's topic in Royal Star Venture Tech Talk ('99 - '13)
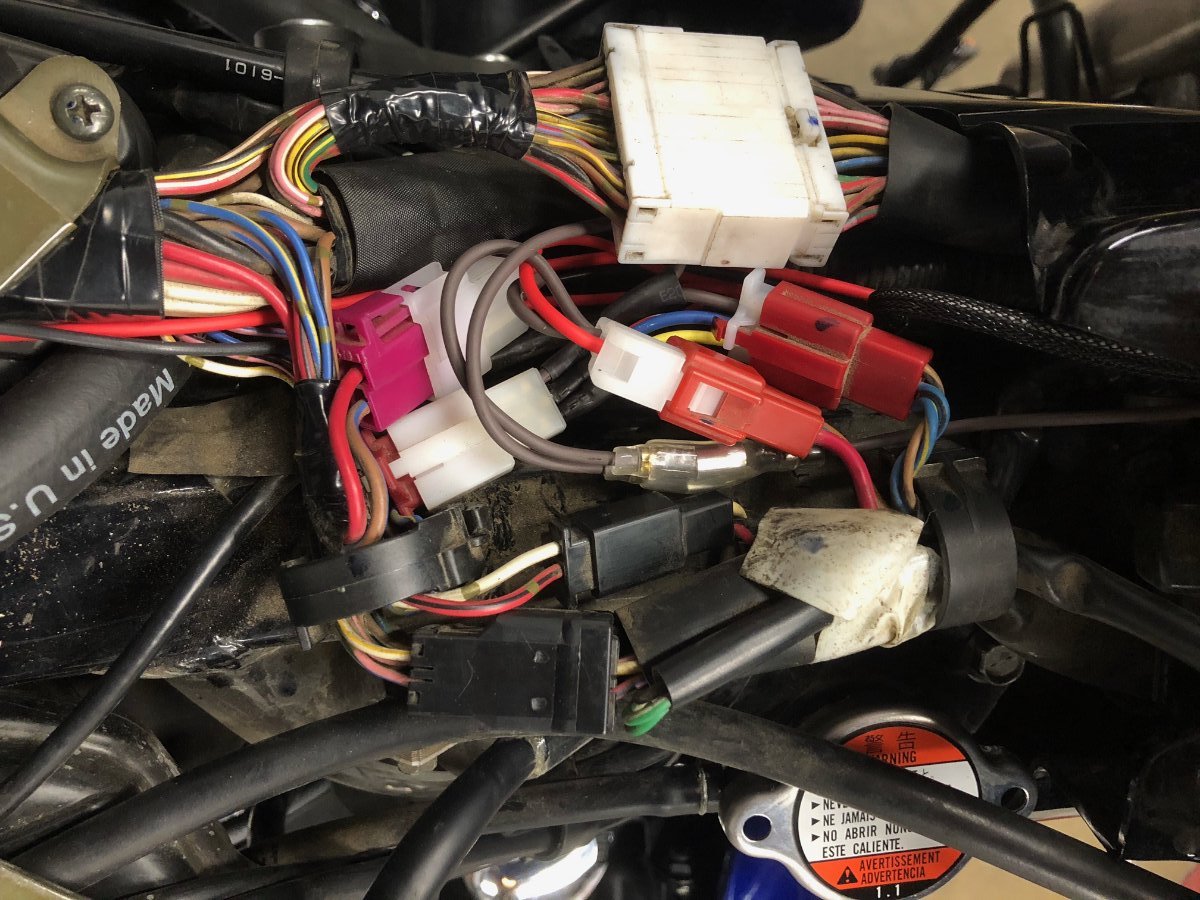
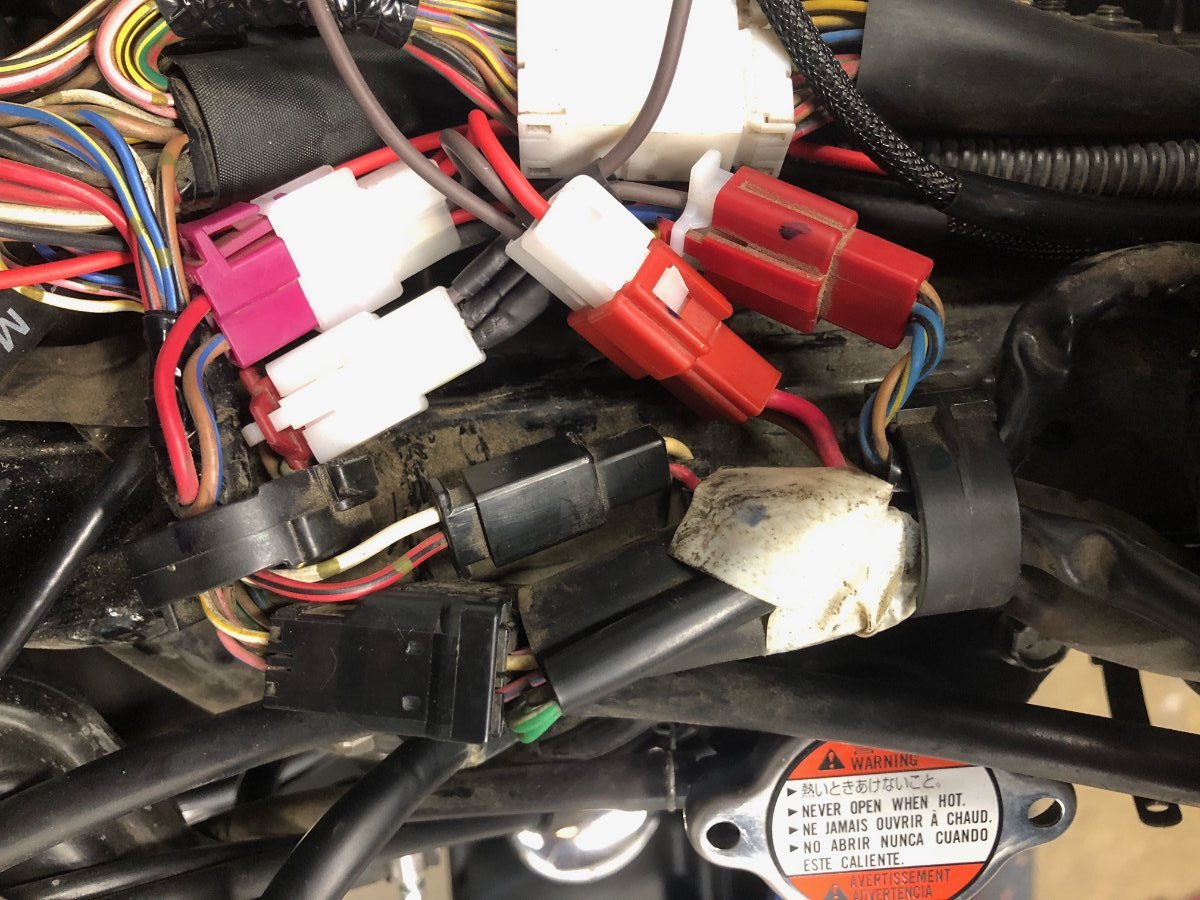
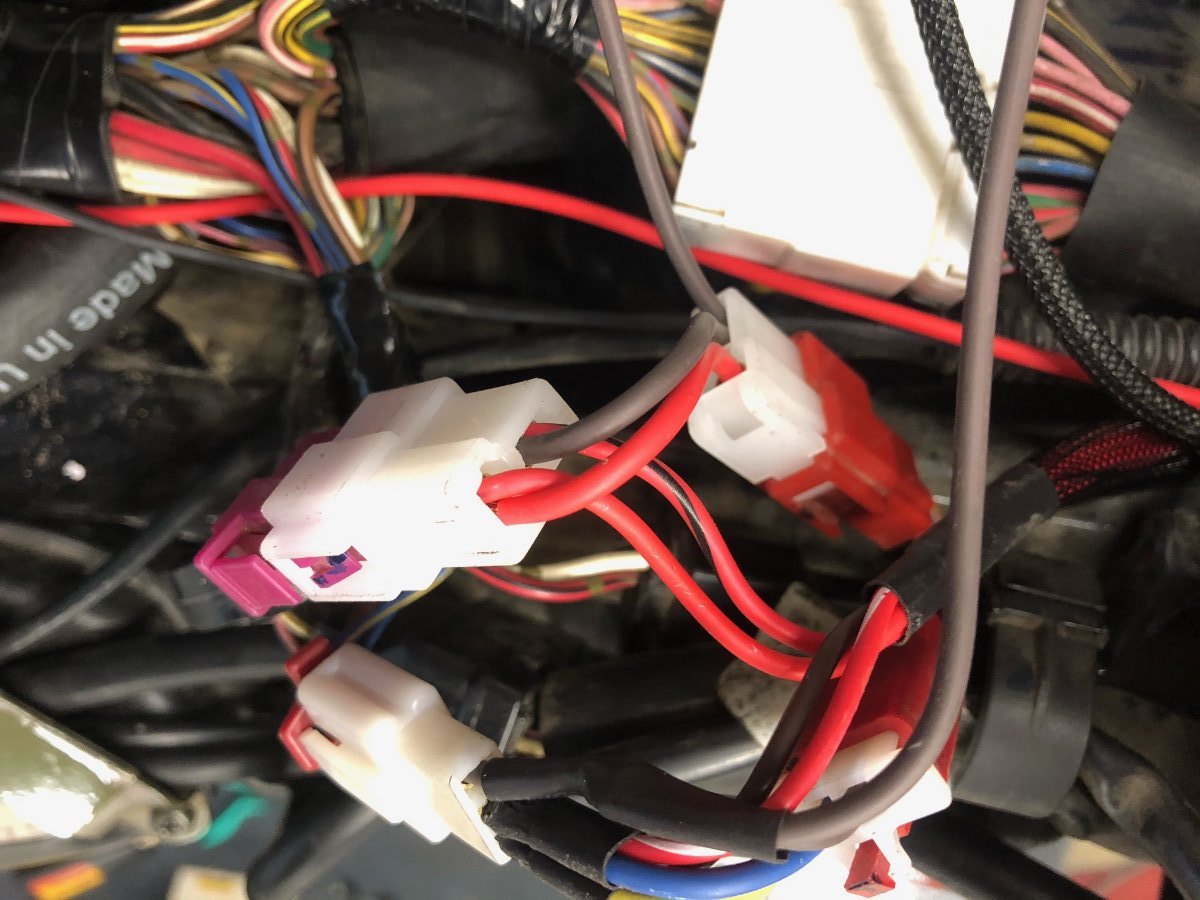
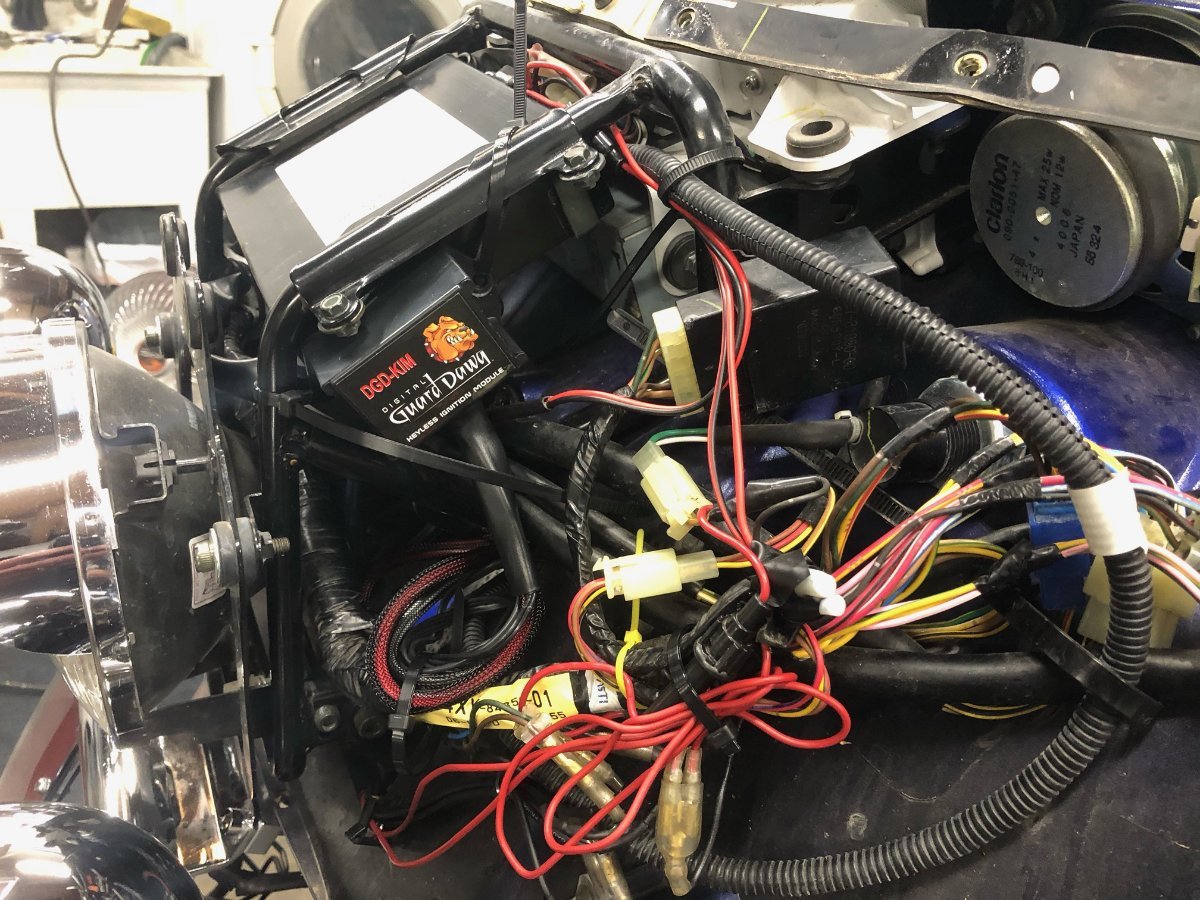
A few pictures of the finished wiring under the tank and what's now under the ignition cover and where I installed the module inside the fairing.
-
Additional information on Keyless Ignition
circa1968 replied to circa1968's topic in Royal Star Venture Tech Talk ('99 - '13)
I'm going to send the above wiring diagram to Digital Guard Dawg to see if they will consider making a plg-n-play kit for our Venture so that others who don't want to DIY it could just order straight from them. Please respond here, if interested and I'll send them a link to this discussion so they can see there's enough interest for them to invest the time to develop the kit. This next attachment is how I wired up my install, including the remote fan switch. The bike operates 100% as normal/stock with the key. I could have done the DGD recommended and still use the key, but the start/stop switch would not function, in key mode. I don't normally use that to turn the bike off because still gotta turn the key off anyways, but I still wanted to keep it operating fully stock w/ the key none-the-less. Once I decided to use a separate start/stop push button, the idea came to incorporate it into the ignition cover & add the fan switch, which I've always wanted to do anyways. For power to the remote fan switch, I ran straight off the fan fuse. Sorry I didn't take pictures of it, but I opened the fuse box, removed the fuse and with a small flat screwdriver was able to release the fuse block terminal. I then soldered a second wire to the terminal, made sure the little locking spring clip was good and re-inserted, then ran that wire up to one side of the push button. The other side of the push button goes to the connector inside the lower fairing for the fan. I also connected this wire to the LED. So now the LED is on when the fan is on, either by the thermo switch or the manual one. Copy of Yamaha Venture wireless V2.pdf -
I will make several posts here with some more details on installation. First attachment is the wiring diagram for a plug-n-play install utilizing the Start/Stop switch, per the Digital Guard Dawg recommended install. Connectors were ordered from here: http://www.cycleterminal.com/motorcycle-connectors.html A small-business website run by a very helpful guy named Joe. Joe was very communicative and fast to ship. I also ordered the connector crimp tool & running lights relay from him. Total cost, with shipping was $65, but 1/2 of that was the crimp tool. If you can strip wire, work a crimp tool and soldering iron, this is a fairly straight-forward DIY project. The one issue I had w/ crimping was putting two wires into one connector pin was tough. It didn't help that I probably did not have the crimping torque at high enough setting, so the wires were able to be pulled out. I just proceeded to crimp, then solder the connections. They aint goin' nowhere now! Yamaha Venture wireless ignition.pdf
-
Changing antifreeze
circa1968 replied to mike042's topic in Royal Star Venture Tech Talk ('99 - '13)
It will take exactly 1 upset wife unit of time, if you are lucky. If not lucky, it will take twice as long as that. -
Thanks, I won't deny it took some head scratching at a few points to figure it out. I'll start a separate thread on the tech section with wiring diagram, pics and some additional commentary on the project.