Bob K.
-
Posts
167 -
Joined
-
Last visited
Content Type
Profiles
Forums
Gallery
Events
Store
Everything posted by Bob K.
-

Fork seal rebuild
Bob K. replied to CrazyHorse's topic in Venture and Venture Royale Tech Talk ('83 - '93)
I used the originals. -
I found this as well: https://www.venturerider.org/forum/showthread.php?23774-Clean-a-gas-tank Looks like a solvent is the right answer, then?
-
What's this crud in my gas tank? The bike has sat mostly unused for the past 10 years without gas stabilization. It's big flakes and it's gritty but doesn't have the consistency of rust. Nor does it seem to react to a magnet. The tank looks awful shiny underneath this crud. Is this just old gas varnish and precipitates? This stuff obviously needs to come out. I'm thinking of removing the entire petcock assembly and washing out the tank through the petcock hole with water or a solvent like carb cleaner. Anyone else have advice for how to clean out a gas tank on the bike?

-
Fork seal rebuild
Bob K. replied to CrazyHorse's topic in Venture and Venture Royale Tech Talk ('83 - '93)
For archive's sake, I discovered that the seat plate is a snug fit inside the outer fork tube. I coated it with a little bit of fork oil and then used a 1" dowel to push it down to the bottom of the outer fork tube. It went in easy and square. -
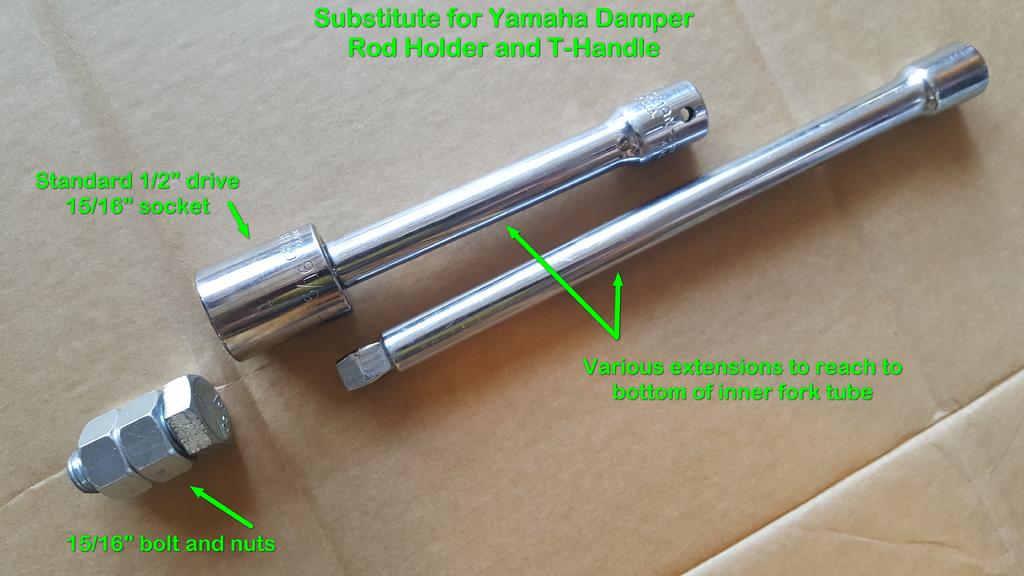
Here are the existing tools and hardware I had that I was able to put together for holding the fork damper rod. The 15/16" nut fit into the top of the damper rod quite nicely. The longer bolt and two nuts (versus one) were enough to fill up the socket and still be long enough to fit into the damper rod head. Hand-tightening the nuts is fine for installing and tightening the damper rod bolt. To keep the nuts from coming loose while removing the damper rod bolt, I hammered them onto the bolt with an air hammer. The Craftsman 15/16" socket walls were thin enough to fit inside of the inner fork tube. I put enough extensions together to reach to the damper rod. Once I was done tightening the damper rod bolt, I retrieved the bolt/nut tool with a magnet or just dumped it out.
-
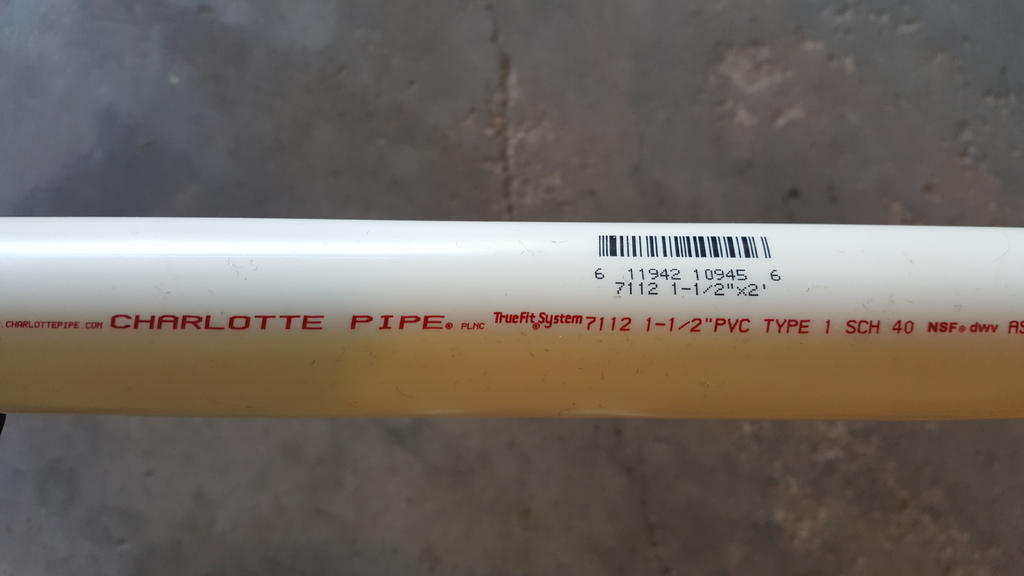
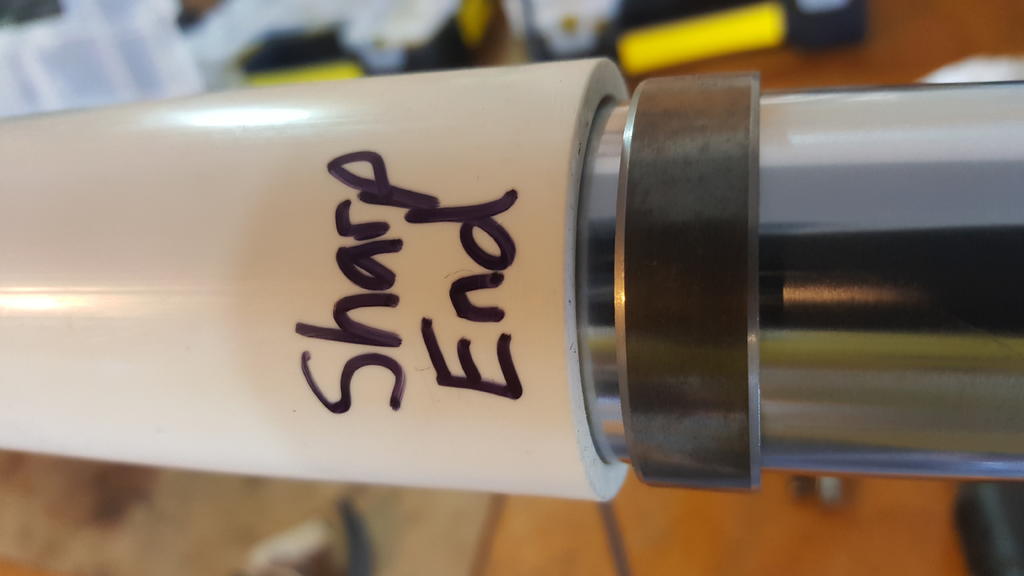
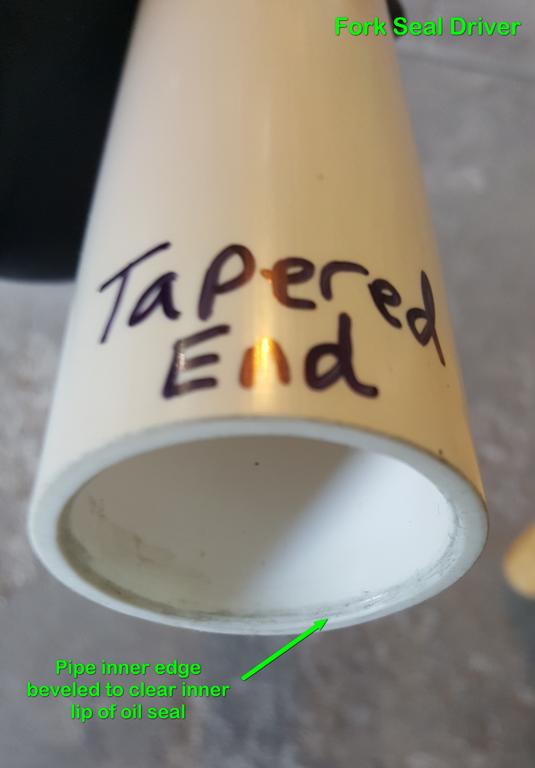
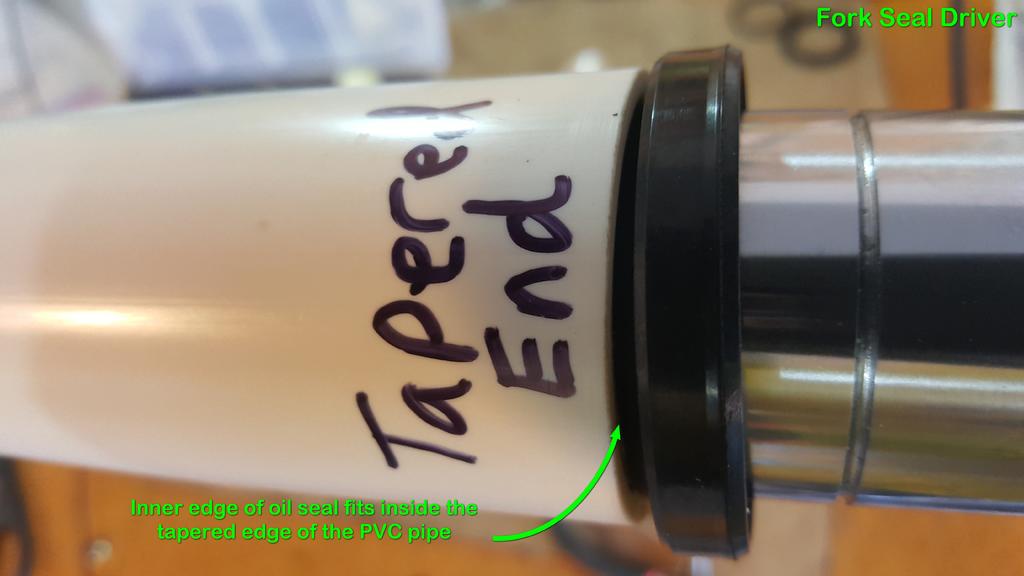
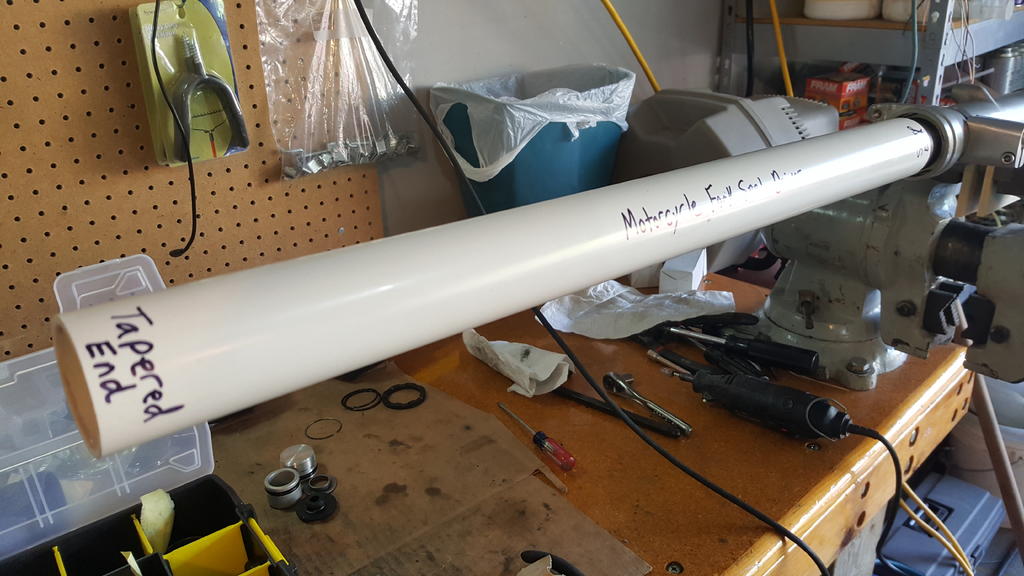
Others have created different varieties of PVC pipe fork seal drivers. This was my expedient solution for a Sunday afternoon. It worked great and cost me a whopping $3 at Lowe's. The inner fork tube has an outer diameter of 1.58". Purchase a 2-foot section of 1 1/2" PVC pipe. My piece had an inner diameter of 1.8"...just enough space to fit snugly over the inner fork. The 2-foot pipe is long enough to fit completely over the inner fork tube, especially if I push the inner fork tube all the way down into the outer fork tube before I begin seating things. The ends on my piece were a little ragged so I squared them up on a miter saw, which also gave them a nice, clean finished edge. Then I knocked off the sharp edges, inside and out, with some sandpaper. On one end, I left the edges crisp for driving in the metal slide (aka "slide bush"). The 2-feet of PVC had plenty of mass to drive the metal slide in with a few whacks. On the other end, I beveled the inside lip of the pipe with a Dremel and a stone. I didn't want it to be sharp and I wanted it to clear the thin inner lip that sticks up on the oil seal. The safest way to drive in the oil seal is to place the pipe against the seal, and then whack the end of the pipe with a mallet. That way I can be sure the pipe is safely over the delicate inner edge of the oil seal. That'll also allow me to better detect the change in sound when the oil seal bottoms out. To prevent damage to the seal, I put a piece of thin tape over the CLASS joint circlip indentation before I began driving the seal.
-
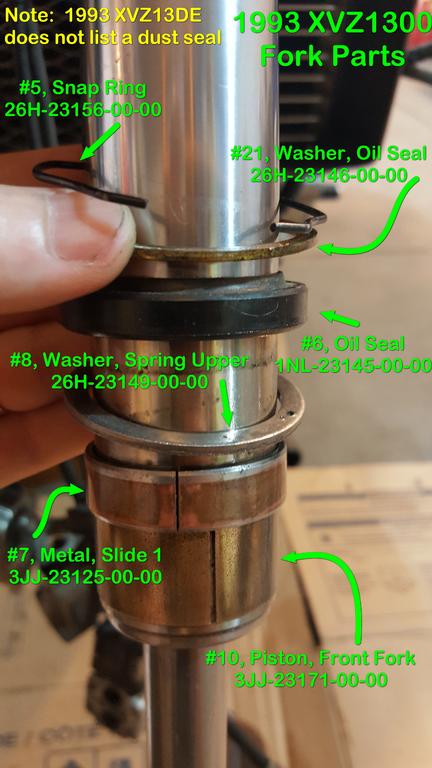
Both seal washers on my '93 are flat. If yours are conical, I'd presume them to be damaged (perhaps from the forks bottoming out?) and therefore unable to properly support the oil seal. The oil seal washer's finished side goes against the top of the oil seal. The upper spring washer's unfinished side goes against the bottom of the oil seal.
-
I removed the driveshaft from the differential on my '93 and was happy to see that it was nicely bathed in differential oil. When I tipped the differential upward, differential oil freely flowed through the two oil passages. I took it apart primarily to confirm it was A) getting oiled properly; and B) not gummed up with grease from PO maintenance. I had no grease gunking up the works, so I'll install a new oil seal, put it back together, and not worry about checking it in the future. Appreciate the help!
-
home made set up for wet setting floats on the bench
Bob K. replied to saddlebum's topic in Watering Hole
Bwaaaaahaaaaaahaaaaaaaaaa! -
Are you proceeding from the belief that the red dot indicates the heavy spot?
-
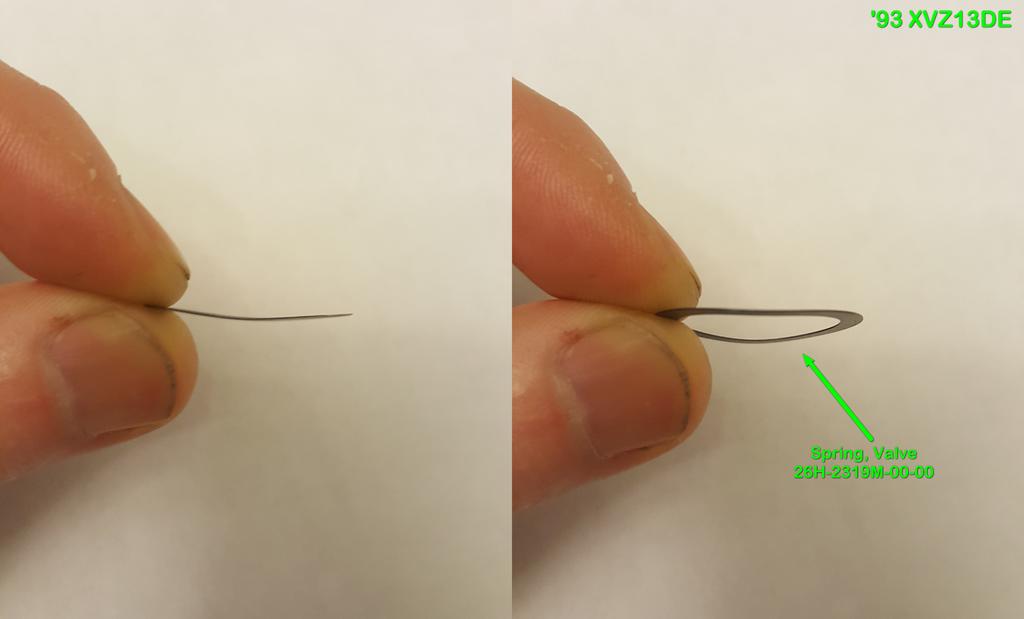
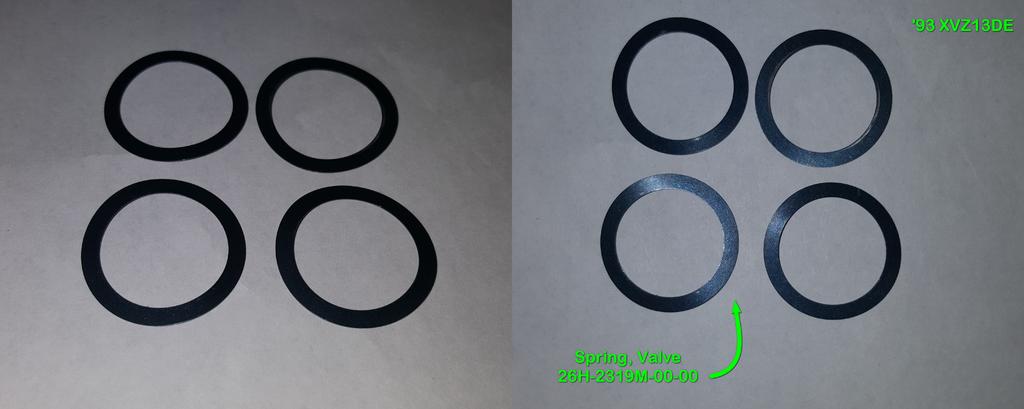
I'm rebuilding the front forks on my '93 Venture. I ordered replacement Spring Valves, P/N 26H-2319M-00-00 (referred to as "special washers" or "wavey washers" in the service manual). They go on the bottom of the damper rod. Unfortunately, Yamaha has them on backorder for another 5 weeks. I can't wait that long. Here are my existing washers. I'm going to reuse them if they're still serviceable. They're smooth, still wavey along one axis, and plenty springy. If you've ever seen these things brand new, do mine still look like they're serviceable and bent (or wavey) the requisite amount?
-
I'm trying to do my due diligence by reading through old threads in order to get the differential and driveshaft maintenance completed on my '93 Venture. Yet opinions across the years are all over the map on whether or not the differential end of the driveshaft is lubricated by the differential oil on '86 and newer bikes. This thread seems to say "yes", and is backed up by Yamaha Bulletin M92-006 and Venture rear-end specialist John Furbur. Yet some '86 and newer bike owners say their splines on the differential end are as dry as can be: https://www.venturerider.org/forum/showthread.php?87852-Rear-tire-Final-Drive-and-Drive-Shaft So which is it? Is the differential end of the driveshaft on '86 and newer bikes supposed to be lubricated by the differential oil? And if the splines are dry, does that mean something is malfunctioning, such as the oil lubrication passages being blocked inside the differential?
-
Rear tire , Final Drive and Drive Shaft
Bob K. replied to dave_wells's topic in Royal Star Venture Tech Talk ('99 - '13)
It sounds like the consensus is that '86 and newer driveshaft splines in the differential are supposed to be lubricated by the differential oil. If one's differential-end driveshaft splines are dry, should one then look further to see why the splines are not getting lubricated by differential oil? Such as checking the differential oil level or making sure that the oiling holes are clear? What else should be checked if the splines appear under-lubricated or dry? -
I checked both wheels on my Harbor Freight motorcycle tire balancer and the heavy point for both is about 5 inches to one side of the valve stem. The heavy spots don't coincide with any marks. I got an email from Shinko customer service today. They indicated the red dot on the SR777 tire should be aligned with the valve stem, though they did not overtly indicate that the red dot was the tire's heavy spot or light spot. Proceeding from the belief that the red dot is the tire's light spot, I aligned the red dot with the heavy spot on the wheel. I still required 1oz of weights almost directly opposite the wheel's heavy spot in order to balance the tire.
-
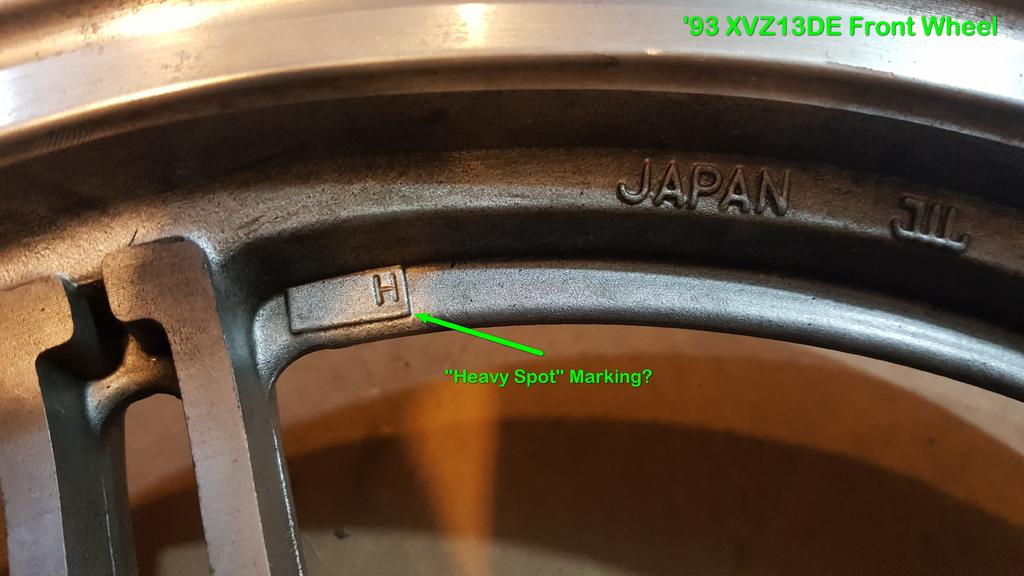
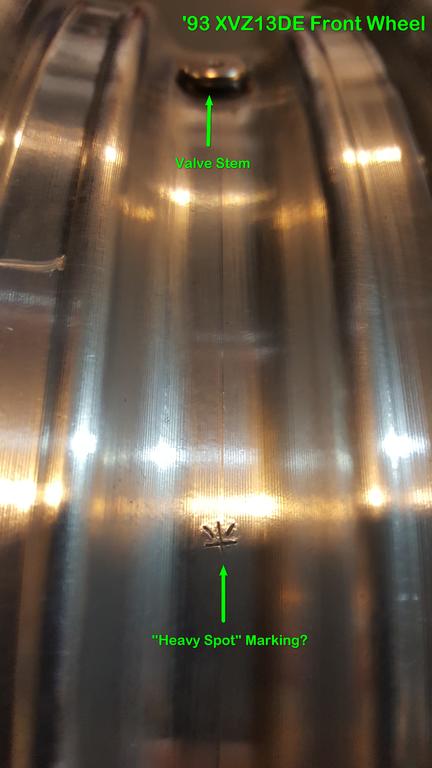
It's tire replacement and balancing time. Last time, I just aligned the red dot on the tire with the valve stem on the wheel. This time, I want to make sure I really know where the heavy spot is on the wheel. I plan to throw the wheel alone on the balancer and see where the true heavy spot is. However, just for my edification, does anyone know if Yamaha marked our wheels with "heavy spot" markings? Here are a couple potential "heavy spot" markings on the front wheel. This "H" is on the side of the wheel. It seems unlikely this would be the "heavy" spot, because why would the wheel manufacturer add extra raised metal to this spot just to mark it as the "H" heavy spot? This spot, which looks like a stamped Japanese symbol of some sort, is inside the wheel. I didn't see any other marks on the outside or the inside that could be construed as "heavy spot" marks.
-
Fork seal washer order
Bob K. replied to jimmyenglish's topic in Venture and Venture Royale Tech Talk ('83 - '93)
Both washers are flat. The prevailing opinion is that if either one of these washers is bowed out, it is damaged...likely caused by the forks bottoming out. The oil seal washer (mine is a gold color) goes on top, and the rounded side of the washer--the side with the smoothed edges--goes against the top of the oil seal. The upper spring washer (mine is a silver color) goes underneath the oil seal, and the flat side of the washer (un-smoothed side?) goes against the bottom of the oil seal.
-
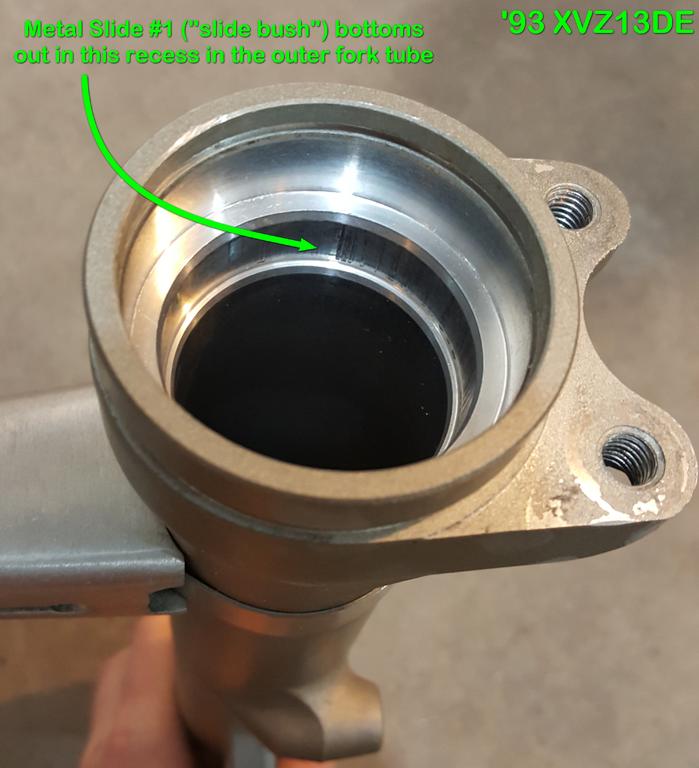
Thanks, Du-Rron. I see that now. There's a perfect recess for it in the top of the outer fork tube and a shoulder upon which it rests.
-
I'm ready to put my '93 forks back together and have a couple questions. How deeply do I install the upper slide bush (referred to in the maintenance video as the "upper bushing", official name "metal slide #1", P/N 3JJ-23125-00-00)? The Yamaha maintenance video at 3:38 says to "lightly tap it into place". Do I actually need to use Loctite on the hex bolt to secure the damper rod at the bottom of the outer fork tube? If so, what Loctite version is required...red, blue, some other?
-
Fuel flow question
Bob K. replied to SpencerPJ's topic in Venture and Venture Royale Tech Talk ('83 - '93)
Paul--How did you (safely?) install a glass fuel filter in a metal bracket? I've got one that I've considered installing. -
Fuel filters for 86-93 Ventures
Bob K. replied to cimmer's topic in Venture and Venture Royale Tech Talk ('83 - '93)
I bought one of those glass fuel filters with replaceable elements years ago but haven't gotten up the courage to put in on my '93. I wonder if the screen mesh would filter out as well as paper media, and putting a glass filter on a motorcycle makes me concerned about breakage. -
Thanks, windrider1983, this worked perfectly! Here's one thing I did differently that might augment your techniques for some folks. Because my bolt diameter was just under the inner diameter of the bearing, I installed the bearing first so that it would center the bolt. Like you, I put one layer of tape on the bolt to protect the water pump housing and bearing from the bolt threads. This centering allowed me to use an appropriately size socket and drive the seal straight down in without the socket rocking back and forth. It went down in flat on the first try.
-
I ended up not adding any fuel pressure when I wet tested the carbs. As I discovered in my other thread (https://www.venturerider.org/forum/showthread.php?138154-Carb-Float-Adjustment-Problems-Standard-Dry-Adjustment-Results-in-Low-Fuel-Level), I think adding vibration to the carb in order to get an accurate float level measurement is more valuable than adding fuel pressure.
-
I took a new approach based on the fact that the carbs are supposed to be wet checked while they're on a running motorcycle. A running motorcycle produces a lot of vibration. Without changing any of the dry float settings away from the recommended 28.5mm, I hooked up the test set, opened the fuel drain screw, and then tapped on the carb with a screwdriver handle for about 1 minute. Sure enough, the fuel level in the clear hose rose up substantially and then settled to a consistent level despite continued tapping. By dry setting the carbs at 28.5mm, the wet fuel level ended up being: 1--15.75mm, 2--16.25mm, 3--15.75mm, 4--16.0mm. With these settings, all of the float tangs are in reasonable positions, completely close the float valve spring, and the floats don't contact the jet block. As the picture above indicates, the 28.5mm setting produces a float height on my carbs where the casting circle is just visible beneath the float. Also, my floats were originally set quite a bit richer (only about half the casting circle visible). So...tap on those carbs and produce some vibration if you wet bench test them! I also recommend bench testing each carb independently before screwing them all back together. I made a lot of extra work for myself by first reassembling all four together and then needing to disconnect all of them to adjust the floats. Bonehead move.
-
@Venturous Randy--I think it's completely coincidental. The round circle--a mold mark--just happens to be in the same neighborhood of the dry float level measurement that happens to yield a pretty close wet measurement fuel level for a lot of folks.
-
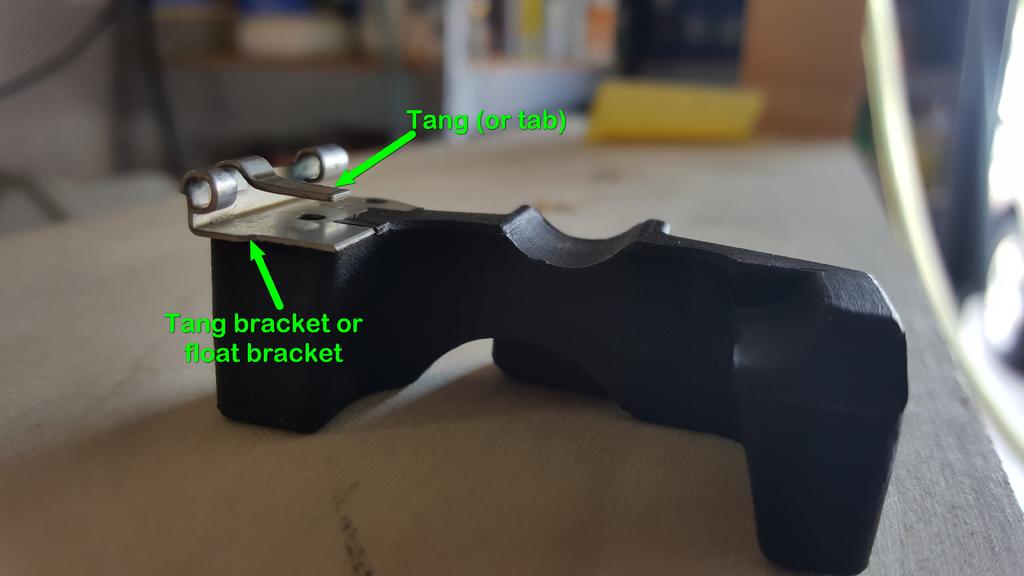
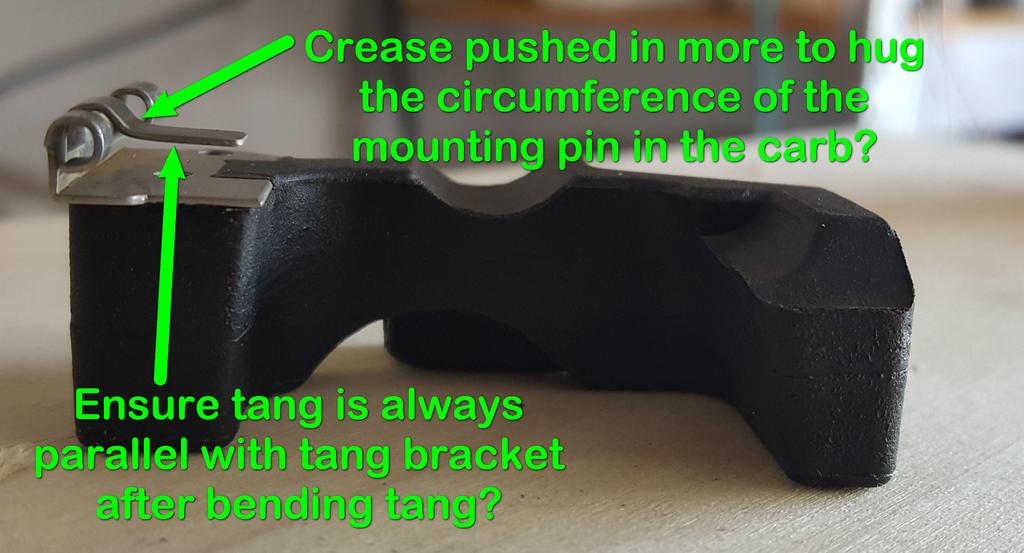
@Steven G., I think this is what you're suggesting: To be sure we have the same names for the same parts, here's what I'm using. Are you recommending that the rounded portion of the tang wrap more around the circumference of the mounting pin inside the carb, such as by pushing in at the crease between the rounded portion of the tang and the flat portion of the tang? Also, are you recommending that the tang always be parallel with the tang bracket after the tang is adjusted?