Bob K.
-
Posts
167 -
Joined
-
Last visited
Content Type
Profiles
Forums
Gallery
Events
Store
Everything posted by Bob K.
-
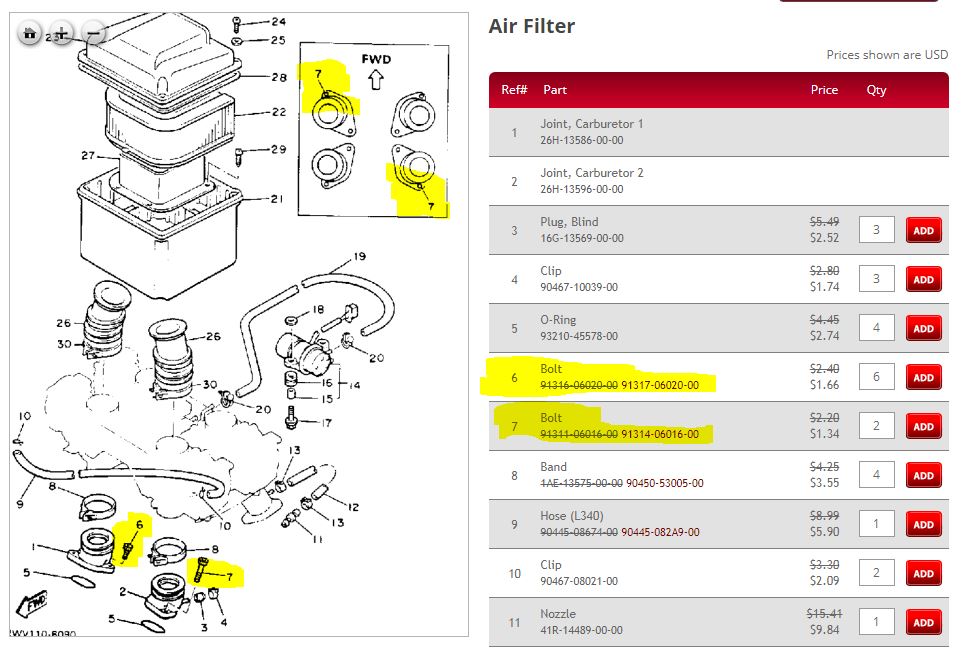
 I noticed that, too! #7 is supposed to be the short bolt, but in the fiche, it's drawn as longer than the #6 bolt. Dang artists!
 -
Interesting. The long bolt has been there since I purchased the bike--presumably installed incorrectly by the previous owner or his motorcycle shop--however, I've never noticed any problems or oil leaking into the #2 cylinder. No oil burning, no fouled plug, no buildup in the intake portion above the intake valve, no loss of oil. Oil does leak out of the hole when the bolt is removed, but as I understand from other posts, this is normal, and that's why the bolt needs sealant on it during reinstallation. Is that correct? I'll swap the bolts and see what happens. Is there anything in particular I should keep an eye out for?
-
When I removed the intake manifolds on my '93, the two short bolts were on cylinder #1 in the outside spot and cylinder #3 in the outside spot. They've been like that since I bought the bike in 2001. I reinstalled them that way. However, I just discovered that the short bolts are supposed to be on cylinder #2 in the outside spot and cylinder #3 in the outside spot. That means I've been running a long bolt in that cylinder #2 spot for 17 years. I've never noticed a problem. https://www.venturerider.org/forum/showthread.php?79927-intake-carb-boot-bolts What are the consequences of having a long bolt in a short bolt position?

-
My '93 tension bar (rear brake bracket) is a sloppy fit on the swingarm projection. Maybe installed the wrong way? I vaguely recall having a goofy, tight fit when I tried to install it the wrong way.
-
Fork seals, again!
Bob K. replied to CaseyJ955's topic in Venture and Venture Royale Tech Talk ('83 - '93)
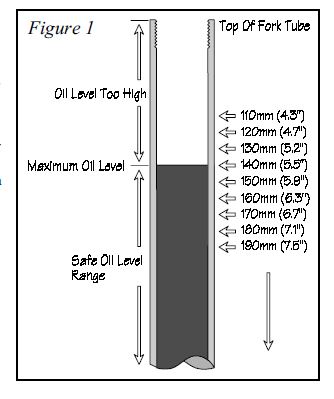
The Progressive instructions indicate not to put in more oil than that which gives a 5.5" air gap at the top. That's with the springs out and the forks completely compressed. The instructions indicate any oil level less than that is "safe". I'm just theorizing here. Putting in more oil than Progressive says is "safe" might result in not having enough air gap once the springs are installed and take up a bunch of volume, so one might get some hydrolock (and resultant overpressure on the seals) if one hits a hard bump. On the other end of the spectrum, I think we only need enough oil in the forks to make sure all the valving has enough oil to use. The only downside I can see is that a large air gap leaves more room for the air to compress, thus resulting in lower air pressure and softer suspension on hard bumps. I dunno. Maybe somebody who understands how all those dang fork parts work can explain it better.
-
Fork seals, again!
Bob K. replied to CaseyJ955's topic in Venture and Venture Royale Tech Talk ('83 - '93)
I decided on a 6" fork oil level this time around. I also made sure I pumped the forks up and down to distribute oil and then checked the level again. I was shocked by how far the oil level went down upon initial fill once the oil was distributed. I have limited experience with forks, so I can only go off of what Progressive's instructions said. Anything less than a 5.5" air gap (aka "fork oil level") at the top of the fork is too much oil. Do I have that right? Progressive Spring Instructions.pdf -
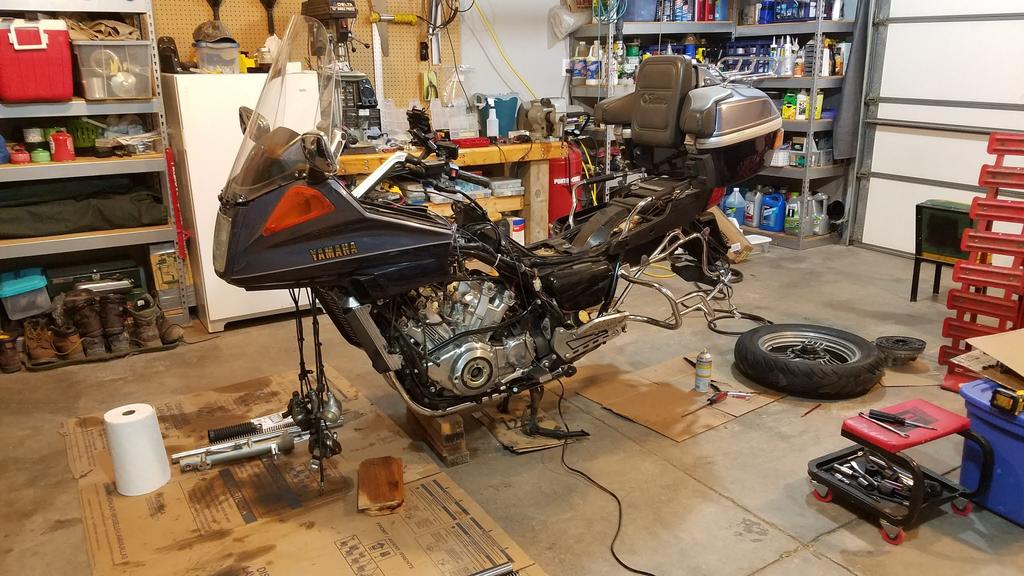
She runs terrific! Unfortunately, my desire to save a few dollars during the refurb led to some necessary disassembly and replacements. I have a leaky intake manifold o-ring on #2 , a couple leaking carb drain screw o-rings, and a leaky water jacket rubber drain plug on #4 . An additional investment of about $40 up front would have saved me about 6 hours of labor. Oh well, live and learn.
-
When I tested the fuel pump with the fuel line disconnected from the pump and redirected into a bowl, 8 to 10 clicks would be somewhere between 1/4 and 3/4 cups of fuel.
-
Yes, the fuel pump cycle count I mention finishes before the relay/circuit shuts off.
-
I'm trying to determine if I have a fuel leak at the carbs. I expect there to be some evaporation of fuel in the carb float bowls since there are vent tubes and the passages are open to the outside world via the air intake. My fuel pump seems to consistently click 8 to 10 times. When your bike sits overnight on a typical summer day and you turn the key on, how many times does your fuel pump click to top off the float bowls before you hit the starter button?
-
Remove and replace tires at home
Bob K. replied to dna9656's topic in Venture and Venture Royale Tech Talk ('83 - '93)
What manual tire changer do you have? My Harbor Freight tire changer has a built in bead breaker. I put a couple 2x4s underneath the wheel to raise it up a bit and to protect the rotor. It works great. $80 gets you the tire changer and the motorcycle wheel adapter: https://www.harborfreight.com/catalogsearch/result/index/?dir=asc&order=EAScore%2Cf%2CEAFeatured+Weight%2Cf%2CSale+Rank%2Cf&q=changer Or, you can buy a separate bead breaker for $50: https://www.harborfreight.com/bead-breaker-92961.html
-
Really odd blown fork seal issue
Bob K. replied to Patmac6075's topic in Venture and Venture Royale Tech Talk ('83 - '93)
What about a marginally high fork oil level? Might the springs and shocks be compressing more than usual with the anti-dive units off, which could cause unwanted hydraulic pressure. Just a WAG. -
Great idea! That was one of the first things I thought of. I installed the Furbur Fix and did triple tree maintenance about 5,000 miles ago, and am pretty confident I got it in right. No issue with the previous Avon Venom-X tires I had on. I checked the head again this time but I plan to look closer. Is it safe to ride a bike at 70mph with the fork brace removed (assuming that's what you're suggesting)?
-
Mine has only 40,000 miles on it and it's just as loud and just as prominent.
-
I've got about 250 miles on my Shinko 777s on my '93. The front tire is swimmy above 63mph. If I give the handlebars a sharp input or if I get a sharp input from the wind or a bump, the front end will oscillate slightly (maybe 1/2" at the handlebars) 2 to 4 times (over the course of about 1.5 seconds) before it settles down again. It never progresses into a high speed wobble--even if I take my hands off the bars--but it's a little disconcerting. Even though I have a Superbrace, it reminds me of the front end mass wobble I get at parking lot speeds if I give a sharp input...all of that fork & tire mass oscillates a little bit. Of course, I've changed about 5 different variables recently--new tires, removed & rebuilt forks, calipers, etc.--so I couldn't declare with authority at this point that it's being caused by the tire. I'm pretty darn sure I got everything aligned properly when I put the forks back on. At any rate, I don't like it and I'm not sure what I'm going to do about it.
-
No kidding?? You never had that RPM-dependent chirp that you can hear at :40 in the @cowpuc video above? That's awesome. I thought it was a "standard feature" of 1st Gen bikes. I sure wish mine didn't do it. It's the loudest noise on the bike.
-
I installed the "Double-D Clutch Fix" on my '93 as well. I love it! However, it's unrelated to the chirp.
-
Fuel filters for 86-93 Ventures
Bob K. replied to cimmer's topic in Venture and Venture Royale Tech Talk ('83 - '93)
Mine has worked very well, too, for about 200 miles so far. One Amazon reviewer said the plastic on his melted () so I'll keep an eye out for that. So long as that was a one-off issue, these appear to be great filters for the Venture. It also looks like this same filter is sold under multiple brand names on Amazon, so there might be betters deals available there for multiple filters. -
Go to :40 in this video. It's the highest pitched RPM-dependent chirp you hear. On my bike, if I'm at speed and pull in the clutch, the chirp goes away. Similar to the chirping sound of the Jetson's flying cars: https://www.youtube.com/watch?v=tTq6Tofmo7E. Somewhere in the 750Hz to 870Hz range: http://www.szynalski.com/tone-generator/
-
I've read through about 10 years of Venture clutch chirp threads and I'm probably hoping beyond hope; however, have there been any new solutions for the 1st Gen clutch chirp (aka Jetson Syndrome)?
-
The new website is www.brakecrafters.com. I bought the front and rear kits for $81 shipped. That includes a 15% discount for first time purchasers. It's a terrific kit. No bumbling with the parts fiche to figure out what to order from Yamaha, includes installation grease, and less expensive, too. The owner, Mark, was also very responsive and helpful when I wanted to make sure that I got the correct seals installed in the correct caliper (since the Venture front caliper pistons are different sizes.) The driver's right caliper uses 32mm pistons and the driver's left caliper uses 34mm pistons. Mark indicated that he packs the seals so that the right caliper seals (smaller pistons) are in the top of the packaging and the left caliper seals (larger pistons) are in the bottom of the packaging.
-
20 lb-ft seems about right for the amount of force it took to separate them. Any other solid references for the correct torques to rejoin the halves? I put the halves back together at 25 lb-ft with a little bit of blue Loctite. By the way, the kits from BrakeCrafters are awesome! I'm convinced splitting the calipers in half is the way to go, and having the included little o-rings made that possible. It was much easier for me to clean out the bores, get the new seals in, and ensure the pistons were put back in straight. With a light coat of the included red grease on the seals and the pistons, they slipped in easy as pie. I got the front kit and the rear kit (to do all 3 calipers) for $81 shipped. That included a 15% newcomer discount. A warning, though: BrakeCrafters does not label the bags of seals in the front caliper kit. Mark says he puts the right caliper seals (for the smaller pistons) in the top of the container and the left caliper seals (for the larger pistons) in the bottom of the container. Make sure you're using the correct size for the correct caliper. Mark also indicates the size differences are pretty obvious when one tries to install them in the incorrect caliper.
-
Agree! They're in a temporary holding pattern. I put them all wonky like that so that I wouldn't forget to adjust them before I began riding.
-
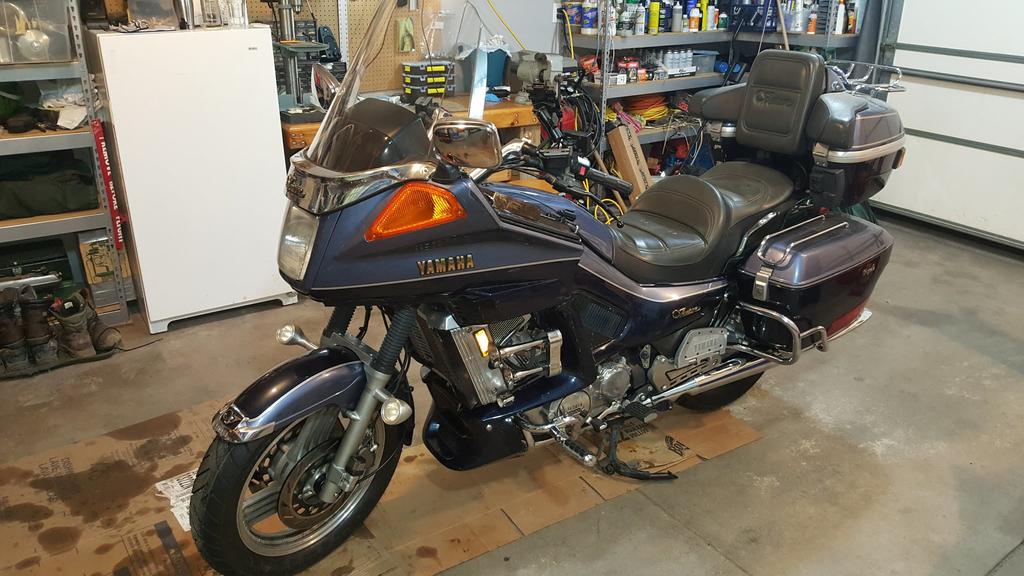
From this... to this... A month and a half of work--a couple hundred hours' worth--and lots of help from this group! Tires, bearings, valves, carbs, water pump, final drive, forks, caliper rebuild, and fuel delivery system, lots of lubing, lots of refurbishing, lots of cleaning. Thanks for all the help! After an 11-year hiatus, she rides again tomorrow.
-
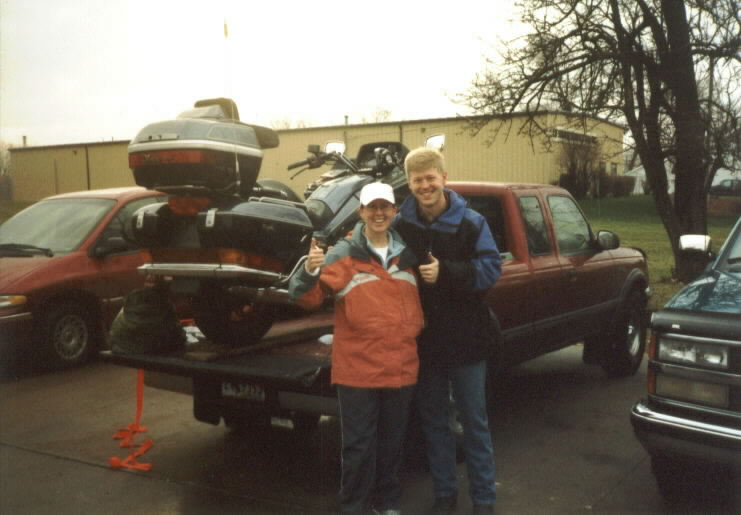
Has anyone carried a Gen 1 in the bed of a pick-up?
Bob K. replied to GaryZ's topic in Watering Hole
My trusty 1997 Ford Ranger has been carrying my 1993 Royale around for about 15 years. (Wow, who is that young guy???) I use multiple straps for a measure of failsafe-ness. One from each fork just above the lower pinch point to the front tie-down hardpoint in the bed corner. Then another strap through the triple-tree in case one of those primary straps breaks. I also learned not to compress the front forks too much but rather to let them compress and decompress as they wish. I think over-compressing them left me with a leaky seal one time. I ratcheted them down maybe a third of their normal travel length. Each of the two independent straps on each fork, then, was enough to hold it in place. When I went around corners, one strap would tighten and the other strap would loosen as the forks compressed. Then the forks would decompress and both straps would share the weight. The whole setup sorta lets the bike float comfortably in the bed. I've never had an issue with the load itself. As others have said, the hardest part is finding a place to load and unload it. I've used ditches, train loading ramps, motorcycle shop ramps, and commercial riding lawnmower shop ramps (the big concrete ones, not the independent metal ones used for ATVs, etc.).