M61A1MECH
-
Posts
2,337 -
Joined
-
Last visited
-
Days Won
18
Content Type
Profiles
Forums
Gallery
Events
Store
Everything posted by M61A1MECH
-

99 Royal star venture kickstand plug
M61A1MECH replied to rw14798's topic in Royal Star Venture Tech Talk ('99 - '13)
Not sure how much this will help, but here is a screen grab from the tech library SIDE STAND SWITCH.pdf -
Radio/CB/Comms Controller not coming on with key.
M61A1MECH replied to tex_waco_usmc's topic in GPS, Audio, Electronics
These two links to the tech forum may be of help. -
Sorry but the Stebel harness was not one of my products. It should be a very simple harness. Connect the OEM plug to a relay to energize the coil and run a fused line from the battery to one side the Normally Open (NO) contact of the relay and connect the input for the Stebel to the other side of the NO contact. Push the horn button and the relay closes making the horn blow. The tricky bit is making sure the relay is rated for the current needed for the Stebel horn, size the wire and fuse accordingly for the current needed by the horn. I could build one, but not having a Venture around to determine what connector is needed or estimate the length or wire needed, I would need some help in the form of pictures of the horn connector, and estimate of length of wire needed to get from the battery to the new horn.
-
Cure for the RSTD Whine?
M61A1MECH replied to Steve-O's topic in Royal Star and Royal Star Tour Deluxe Tech Talk
Greg, Most of the folks on this thread show as having an expired membership, so they cannot reply and most likely are not even seeing them. Your posts are showing just fine, I am always interested in fixes to hear about potential fixes to known problems, although I am no longer riding, but I keep reviewing posts in case I can help somehow from my experiences. -
Cure for the RSTD Whine?
M61A1MECH replied to Steve-O's topic in Royal Star and Royal Star Tour Deluxe Tech Talk
Yes your message has ben posted, please post the details of your fix. -
Fish Rueben, grilled or blackened.
-
From DR Google I found this, How do I tell what size Mikuni carb I have? Measure the inside diameter of the carb on the engine side. Maybe this helps. Found this here on page 82, of the full manual, not the supplements. https://www.venturerider.org/manuals/1996-2001 Royal Star LIT-11616-VZ-01.pdf

-
Trailer Wireing Harness Available
M61A1MECH replied to bucfan11's topic in Star Venture and Eluder Tech Talk ( '18 - Present)
You may be restricted from private messaging because you are a trial member, I will try to PM you with my email address. PM Sent -
The bike does have a temp sensor, that turns the fan on and turns the light on. There is a fairly easy test that can be done with each one, see the tech section for a copy of the repair manual that tells how to test it. I have attached a PDF of the pages from the manual that should help. Troubleshooting temp sensor.pdf
-
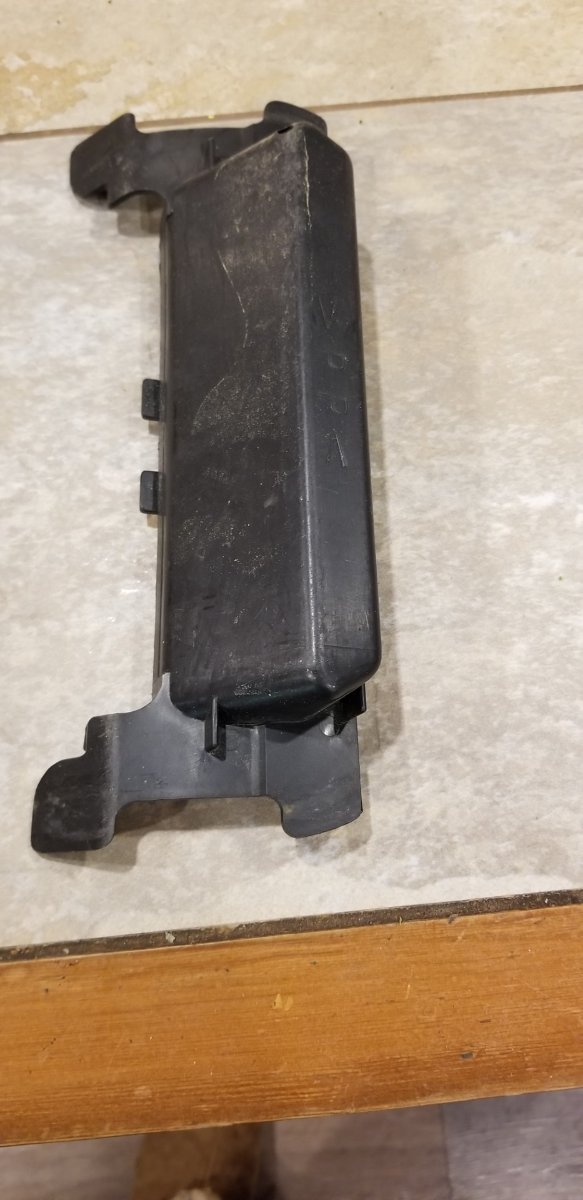
That may fit behind the battery, to hold the cable that was supplied with the bike to use as a helmet lock. I forget where the cable was locked to when securing the helmet(s), I am not sure I ever used mine.
-
No
-
so here is the picture, I have no idea, except maybe it is a cover for the lock mechanism in the saddle bags on a tour deluxe. I do not recall ever seeing anything like that on my 98 Tour Classic with soft bags. Do not recall if there were covers over the saddle bag locks on my Venture.
-
May be because you are listed as a trial member, but normally you can just up load from your computer. PM sent.
-
No the rear shock is not air over hydraulic on the original Royal Stars, the air over hydraulic shocks started with the 1999 Venture and was only used on the Ventures from 1999 to 2013 and the Tour DeLuxe 2005 to 2010. For the front shocks the max pressure is 7 psi and you needed to use a zero loss pump, normally they look like an over sized syringe. I am not sure who makes or sells them now a days. You used to be able to find them at Harley dealers.
-
Probably take more than a toggle switch, some of the wires carry a lot of current and the heat produced would likely destroy a toggle switch, in cases like that best to use a toggle switch to actuate a relay that is rated for the current. On my 98 Royal Star Tour Classic the ignition switch was located on the left front just behind the radiator so it got plenty hot. My ignition switch went bad while the bike was under warranty so the local shop replaced it for free. I am not sure if new switch modules are still available or not for that year bike, if they are I would replace it, if not look up Dion Hinskey here on the forum, he makes ignition bypasses for the 1999 to 2013 Ventures, he may be able to help with one for your year and model. Here is link to his profile, https://www.venturerider.org/forum/profile/6542-djh3/
- 1 reply
-
- 1
-

-
Check the fuel pump and the fuel filter. The fuel pump should come on when the ignition is first turned on, there should be several noticeable clicks as the pump pressurizes the system. When the bike dies on the road, open the gas cap and listen for any sound like air rushing into the tank, that would indicated the vent tube is clogged. Sometimes when bikes sit for a long time, critters can make nests in the vent tube and plug it up causing there to be a vacuum in the tank that will prevent the fuel from flowing out. Also check the electrical module on the back of the ignition switch, they have been known to over heat and go bad.
- 1 reply
-
- 1
-
-
The fairing is made of ABS plastic, you may want to try some ABS glue.
-
Agreed but the speed bleeders work on what ever system you install them, you can even use them on hydraulic clutches, they work very well and all with out the help of another person.
-
When I had my Goldwing, the brake bleeding process was very involved due it having linked brakes, I installed Speed Bleeders, those coupled with a catch pouch, I could do the whole process in a matter of minutes and never had an issue with air or spongey brakes. http://www.speedbleeder.com/bikechart.htm
-
Most likely is a stuck needle valve or debris in between the needle and the seat that is not allowing the float to close the valve fully. Some times a dose of Seafoam and a good spirited run will clear that up if it is minor. If a dose of Seafoam or carb cleaner does not fix it, you probably in for a carb overhaul. I am pretty sure the are posts in the tech library to help with this issue.
-
Forward the email to PayPal using this address, spoof@paypal.com .
-
T6 is what I used in my 2013 Goldwing, that was a manual shift not the CVT like the new 2018 and up Goldwings. In my 2013 it helped eliminate ghost shifting and made shifting smoother.
-
LED rear lighting upgrade questions...
M61A1MECH replied to tooldood's topic in Royal Star Venture Tech Talk ('99 - '13)
Thanks for the kind words, but I must make one correction, I do not make the ignition bypass system, another member here named Dion #djh3 makes those. -
LED rear lighting upgrade questions...
M61A1MECH replied to tooldood's topic in Royal Star Venture Tech Talk ('99 - '13)
Behind the license plate you will find where the taillight and turn signals come together, you can tap into the needed circuits in there. The connections are bullet style single connectors. I do sell some special multi tap bullet adapters but if you are replacing the taillight all together you may not need those unless you want to retain the OEM turns. As far as the light bar under the trunk I sell those with a plug and play harness that taps in under the seat, with enough information about your light bar I am sure I can make a plug and play set up for that also. You check out this thread if you like. If you do not have this already here is the color codes for the rear lighting Tail = Blue Right turn = Green Left Turn = Brown Brake = Yellow Ground = Black Happy to help if I can. -
Jay, Freebird is correct, there are i think 4 wire loops where you feed black tywraps through and around what ever is close and cinch them up. I always had extra tywraps in the trunk, just in case. Good Luck Steve K