saddlebum
-
Posts
6,866 -
Joined
-
Last visited
-
Days Won
169
Content Type
Profiles
Forums
Gallery
Events
Store
Everything posted by saddlebum
-
 I am not that well versed on the 2021 bikes but dealing with electronics on transport trucks and assuming the speedo on these bikes are based on pulses per mile derived from a wheel speed sensor I have to wonder if this could be a calibration issue. On trucks we take into account the tire revs per mile and the the drive line ratio. Using a specific mathematical formula we derive a figure referred to as pulses per mile. this figure is then programmed into the ECM. to get the correct reading at the speedometer.
 -
What is this noise from the carbs?
saddlebum replied to megablok's topic in Royal Star and Royal Star Tour Deluxe Tech Talk
I am agreeing with Marcarl on the electrical side if this is occurring even with the engine not running. Things that come to mind are Fuel pump running on due to faulty pressure sensor or wiring short, fan running on due to faulty temp sensor or wiring fault. relay cutting in and out due to wiring fault, this often sounds like a buzzer. Starter solenoid acting up again wiring fault also check your handle switch for conductive debris such as green corrosion affecting your starter button. -
I also enjoy riding in winter as long as the roads are clear and dry. Extra precaution is definitely required since they do sand the roads up here and I am sure the colder temps are not optimum temps for motorcycle tire performance but slip on a snowmobile suit and it it is enjoyable. I have been told more than once I am nuts because its too cold for comfort. Yet many of these same folks spend all day out on their snowmobiles. Do snow mobiles make the outside temp warmer ? Maybe I am not sure I don't ride snowmobiles, one toy is all I can afford, Plus when I go into the woods I prefer to walk and enjoy the silence versus a noisy machine encroaching on the peacefulness of the woods. Guess I am crazy by today's standards.
-
Navigation System Updates
saddlebum replied to American's topic in Star Venture and Eluder Tech Talk ( '18 - Present)
Ya gotta wonder how they can justify knowing there are so many cheaper options out there starting with phone apps that range from totally free to annual subscriptions that do not require cell service to function for approx $16.00 annually with monthly to weekly free updates. Or GPS units like Garmin or TomTom for about $600 or less depending on the unit that usually come with free lifetime maps and updates. But I guess its up to the customer wether or not they want that option. -
It was a nice day for it so I am sure you were in your glory.
-
So now that the dust has settled more or less with the pros and cons of going to windows 10. Windows 11 is hitting the fan. Anybody have any insight to this latest upgrade?
-
What happens to your bike when your not home by midnight
saddlebum replied to saddlebum's topic in Watering Hole
I have been lead to believe they are tubeless, but do contain some sort of filling type substance and balancing seeds as well -

-
What is this noise from the carbs?
saddlebum replied to megablok's topic in Royal Star and Royal Star Tour Deluxe Tech Talk
Hard to tell on the video but it almost sounds like the starter is running on or hanging up. Instead of using the key to crank the engine try shorting across the two big studs on the solenoid to crank the starter and see if you still get that noise. If not you may have a sticking solenoid. This can happen when the contacts inside the solenoid get pitted and as a result they sort of temporarily weld themselves together after a few seconds that weld point gets red hot and the points break apart again. If it still make a noise when shorting across the solenoid the other possibility is a faulty starter sprag clutch or starter gears the sound would be coming from the area of the stator -
Carb installation
saddlebum replied to Pasta Burner's topic in Venture and Venture Royale Tech Talk ('83 - '93)
This is true and to be honest over the years I have seen the hose sometimes on #1 and sometimes on #2 and even experimented swapping it around myself and really did not notice any difference. Having it on #2, (if that is were it actually belongs) probably has more to do with location in relation to the sensors location . -
I wear either a 3/4 or modular full face. Like Cimmer I wear glasses hence the modular. However my next full face will likely be solid since many models are built so you can replace your glasses after putting the helmet on.
-
Carb installation
saddlebum replied to Pasta Burner's topic in Venture and Venture Royale Tech Talk ('83 - '93)
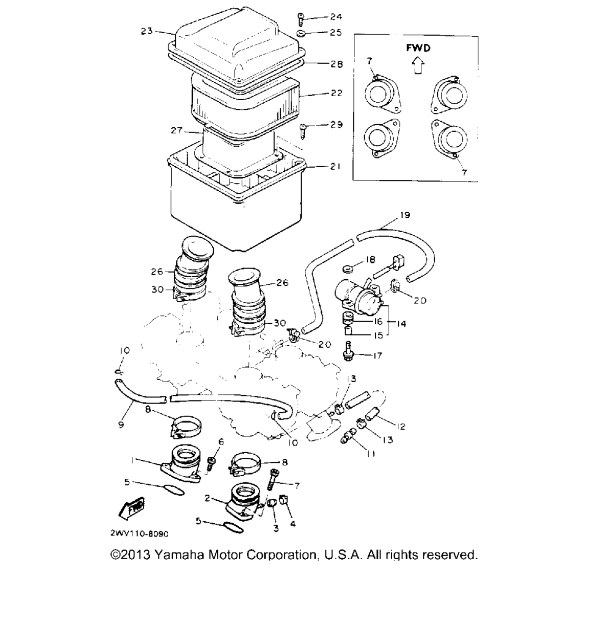
Interesting and yet if you look at the parts diagram the plug is on #2 and the hose comes off #1 as per attached pic and more complete parts break down PDF.AIR Cleaner 1989 Yamaha XVZ13D VENTURE ROYALE.pdf
-
Carb installation
saddlebum replied to Pasta Burner's topic in Venture and Venture Royale Tech Talk ('83 - '93)
That is actually #1. Sitting on the bike, the left rear is #1, The left Front is #2, The right Rear is #3 and the right front is #4 and the hose goes to the left rear which is #1 not #2 -
Great news @Pasta Burner. Glad that you got to were your at, even if at times you took the long road to get there.
-
With the tires inflated higher, that high spot will eventually level down as long as most of your riding is straight line riding versus twisties. I would still take the tires to max air pressure. I have ridden mine at max air and had no ill effects.
-
07 Venture ‘Drive Pully’?
saddlebum replied to craigatcsi's topic in Royal Star Venture Tech Talk ('99 - '13)
-
07 Venture ‘Drive Pully’?
saddlebum replied to craigatcsi's topic in Royal Star Venture Tech Talk ('99 - '13)
What appears to look like an attempt to drill them out could also just be the bottom of the socket hole. I am more inclined to think that for one reason or another the heads snapped off, either from being over torqued or trying to use an impact driver and snapping the heads off (I have seen this type of head snap off like this on more than one occasion ). The way the bottom strap is marked around the hole would indicate something has been floating around in there. Maybe the bottom bolt snapped off for some reason and the tech snapped the heads off the top two in an attempt to remove the bearing so he could look behind it for debris. Definitely torque to yield one time use bolts. Torque to yield bolts have an engineered stretch factor built into them and this is why they are only meant to be used once My technique for removing broken bolts if drilling and easy out, will not work, is to place a copper washer around the hole and then a steel washer over the copper washer (this protects the base metal from the arc). I than weld the metal washer to the bolt filing the hole in the washer. Next a place a second larger washer over the first and weld the second washer to the first washer and weld again filling the hole. Sometimes I may add a third even larger washer. I will then weld a nut or bolt head to the final washer. let it cool right down an hour or so and then gently work the nut back and forth with a wrench slowly an d carefully remove the bolt. Do not try to force it in one move even if it moves a bit unless it is completely loosened. I will use this method even on recessed brake like the bottom bolt but that requires the use of a stick welder not a mig and a very steady hand. Sometimes a copper or brass sleeve slide into the hole will protect the sides from welding arc. If you wish to drill and but the bolt is too hard for a normal bit you can use a carbide drill (not a masonry bit) to drill it. I have even drilled out broken taps with these carbide drils. Keep in mind this bits are not cheap and are brittle a slight tweak will drilling can snap them in a heart beat. There are also diamond tipped drills for hard metals But I personally have not used them. -
85 venture with oil leak on the left side shifter
saddlebum replied to Dirtworkerml's topic in Watering Hole
Definitely not a dumb question! Pulling that screw drains approx a 1/8 - 1/4 cup of additional engine oil. Some pull it, most can't be bothered, ( it is the one screw in the cover with a a copper washer under the head ), . However if you do make sure you always include the copper washer under the head preferably with a new one if possible. -
07 Venture ‘Drive Pully’?
saddlebum replied to craigatcsi's topic in Royal Star Venture Tech Talk ('99 - '13)
They definitely DO NOT need to remove those bolts to work on the clutch slave or even the clutch itself, which is on the opposite side. However for easier access to remove and install the clutch slave some do remove the middle gear cover and this likely is when they spotted the broken bearing retainer bolts. As far as, is it possible that they broke the bolts? That would only occur if they removed them for some reason and reinstalled them but there is no reason other than replacing the middle gear bearing for them to even touch those bolts. -
SNOWWWW Whats this talk about snow ? @Flyinfooljust what are you trying to pull
-
07 Venture ‘Drive Pully’?
saddlebum replied to craigatcsi's topic in Royal Star Venture Tech Talk ('99 - '13)
I doubt the Hannigan kit is responsible, those bolts on there are only keeper bolts to hold the two bearing retainer plates in place. The bearing is a ball bearing so unlike a taper bearing there is or should be little no side thrust unless there is an issue between the the angled middle gears such as a broken tooth or too much lash between the two gears because of worn bearings or improper shimming of the gears but since one bolt appears to still be in place unless it is loose, I am inclined to second guess that thought. So my 1st thought is this has been worked on before and the retaining bolts have been over torqued. The top two appear to have had the tops taken off while the lower bolt has a clean break. 2nd thought is the bolts loosened off for one reason or another allowing in and out sideways movement of the bearing under minor shock loads resulting in pounding of the bolts until they finally failed. 3rd thought is the drive line suffered some sort of shock load between the angled middle drive gears forcing the bearing outwards snapping the heads off two bolts and making a clean break of the third but which does not explain why the fourth bolt appears to be still intact unless it is loose. 4th thought binding or seizing u joints on the drive shaft can cause strain on the middle gears and bearings. Finally some foreign object or broken piece floating around in the gear box, so regardless of the cause, I would not just extract and replace the bolts. Remove the engine and gear box, open it up and do a thorough inspection checking all the bearings in case they have had debris go through them. I would also check the final drive for any defects including improper gear lash between crown and pinion. Too much gear lash could cause There may be other causes but these are the ones that hit the top of my list. -
Baron 4-2-4 baffles
saddlebum replied to fredster66's topic in Royal Star and Royal Star Tour Deluxe Tech Talk
I would say run for a while and then check your plugs for a lean running condition. Another indicator of insufficient back pressure is backfiring at deceleration. So as long as your plugs do not show a lean running condition and you do not have a lot of backfiring you should be fine. If you do find your running too lean and are backfiring a lot on deceleration there is the risk of burning valves. -
I would say run for a while and then check your plugs for a lean running condition. Another indicator of insufficient back pressure is backfiring at deceleration. So as long as your plugs do not show a lean running condition and you do not have a lot of backfiring you should be fine. If you do find your running too lean and are backfiring a lot on deceleration there is the risk of burning valves.
-