.JPG.97d34da93fc67655234eb6371e3710e9.JPG)

Prairiehammer
-
Posts
3,621 -
Joined
-
Last visited
Content Type
Profiles
Forums
Gallery
Events
Store
Everything posted by Prairiehammer
-

What is your winter project for this year?
Prairiehammer replied to Venturous Randy's topic in Watering Hole
For several years I have been compiling First Generation Venture VIN (Vehicle Identification Number). I've entered the accumulated VIN into an Excel database. It is rather an OCD thing I suppose, however, the database has proven useful to me and other Venture owners by providing some insight into such Yamaha vagaries as annual production numbers, export market differences and accurate model designations for the purpose of obtaining the correct parts for a specific motorcycle. Perhaps you would be so kind as to forward me your Venture's full VIN, the manufacturing date and the Venture's current mileage, so that I may enter it into the database? The VIN is located at two locations on the First Generation Ventures. The VIN is stamped into the frame at the steering neck, but that location makes it difficult to read the VIN on the Venture. However, there is also an applied white label on the lower frame rail beneath the rear brake pedal, that contains the VIN. The VIN is easily read there. The VIN consists of 17 characters and digits and starts with 'JYA'. On the same label, the manufacturing date is shown. The manufacturing date is formatted as month/year, i.e.: '04/83', '08/87', etc. I will send you a copy of this database if you wish. If you want a copy, include an email address where I can send the Excel file. Thank you for your consideration. -
Shameless bump. Thanks.
-
One more important note to add to Clive's. You will need a 32 mm socket to rotate the crankshaft. Do not be tempted to use the rotor bolt. http://www.venturers.org/Tech_Library/attachments/412/412-g-modified.jpg Also: check on eBay for '25mm' shims. The 25mm shim is the correct diameter for the Venture and many other makes and models. http://www.ebay.com/sch/i.html?_odkw=xvz+shim&_from=R40&_osacat=0&_from=R40&_trksid=p2045573.m570.l1313.TR2.TRC0.A0.H0.X25mm+shim.TRS0&_nkw=25mm+shim&_sacat=0
-
Seat heater swicth
Prairiehammer replied to dna9656's topic in Venture and Venture Royale Tech Talk ('83 - '93)
Mea culpa is Latin: an acknowledgment of one's fault or error. -
Relocate TCI?
Prairiehammer replied to Donvito's topic in Venture and Venture Royale Tech Talk ('83 - '93)
I have done it to two different Ventures. The only 'bad': depending on how you mount it to the airbox, to check the air filter, the TCI may interfere with removing the top of the airbox. I used a 3"x3" square of Velcro to attach mine to the air box lid. Easy to pull the TCI off if desired, however, the harness to the TCI is long and flexible enough to allow the TCI to remain attached when one flips the airbox lid out of the way. I also sawed off the original TCI mounting 'ears' after removing the TCI from it's stock location, only because it made the TCI more compact. As for removing the TCI: 1. Remove the airbox 2. Remove the plastic and rubber deflector on top of the forward head 3. Use penetrating oil on the TCI mounting screws 4. (the most important) Use a #3 JIS crosshead screw driver to remove the TCI mounting screws. I used a one inch long, #3 'Phillips' insert bit, inserted and taped into a ¼" socket driven by a short handled ratchet. -
I saved this from an unknown source (so your mileage may vary): For the painted areas of the engine and swing arm assembly, Dupli-Color #DE1650 "Cast Coat Aluminum" paint is a perfect match for touch ups and can be bought at your local NAPA store.
-
Seat heater swicth
Prairiehammer replied to dna9656's topic in Venture and Venture Royale Tech Talk ('83 - '93)
Of course, that would make no sense. I should have added a 'smiley' at the end of my "I suppose either would work if you held them depressed all the time." comment. Since I do not possess the remote switches that you have, I did not realize that one of the switches was ON/OFF. I presumed both switches were momentary. Mea culpa. -
Seat heater swicth
Prairiehammer replied to dna9656's topic in Venture and Venture Royale Tech Talk ('83 - '93)
I believe those switches are momentary switches, not ON/OFF. I suppose either would work if you held them depressed all the time. The 'other end' should be in the audio panel where the radio/cassette unit plugged into the console. -
Um. The panic stop was the first time you noticed the metal on metal?! To wear through the pad backing plate AND into the caliper piston takes a fair bit of 'waiting'. Wowser!
-
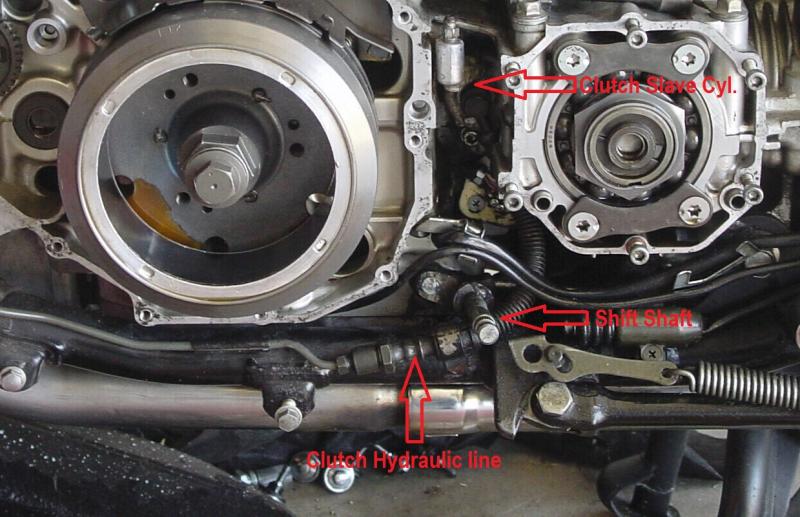
If the fluid you observe is actually brake/clutch fluid, then you may, (but unlikely) have compromised steel hydraulic line or the hydraulic hose from the steel line to the slave cylinder is leaking or the slave cylinder is leaking. However, the fluid is probably just residual DOT3 from previous attempts at bleeding the clutch hydraulic system.

-
The Internet is that old?
-
A suggestion for those who want to power your device from the bike's electrical: consider offering the SAE 2 pole connector common to the various battery chargers/tenders. A lot of people have that pigtail wired into their bike already.
-
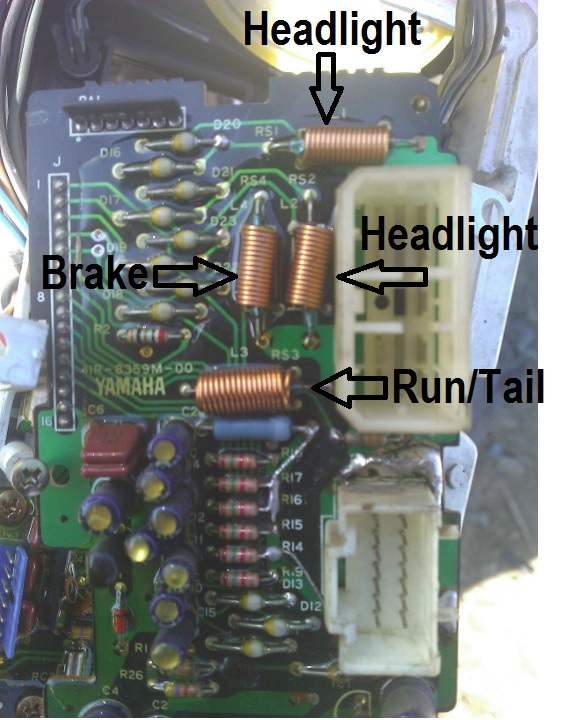
Sensing coils for head lamp
Prairiehammer replied to KISA's topic in Venture and Venture Royale Tech Talk ('83 - '93)
Here is 1984-1993 reed switches. I'm sorry, but of the 'headlight' reed switches, I don't know which one is 'HI' or 'LO'.
-
Do I have a combustion problem?
Prairiehammer replied to VanRiver's topic in Venture and Venture Royale Tech Talk ('83 - '93)
If you hold throttle open at a higher than normal idle rpm, say 3000 rpm or so, do the rear cylinders then become hot? If so, then the pilot circuit of the carb is likely plugged. Be cautious when pulling the spark plug wires from the running engine. The spark should be grounded to avoid damage to the TCI. IS there spark at the rear cylinders? -
When the remote passenger control is plugged in, the other DIN jack is for the passenger headset that is mounted in the helmet. It appears you have one too many cables and plugs.
-
Adding a radio to a 1st gen venture?
Prairiehammer replied to bonedizzle's topic in GPS, Audio, Electronics
Yes, but I would use the 'ACC' (accessories) circuit, so that power goes off and on with the ignition key switch. Any 12 volt radio of your choice will work. A marine radio would be better. A four inch speaker (again marine is best) will bolt right into the stock speaker location. Mounting the radio into the left fairing pocket will probably consume most of your time and McGivering. Back in the day, Cycle Sound made a radio mount specifically for the First Gen Ventures. I had one. Check around on eBay, maybe there will be someone there parting out a Standard Venture with a radio. -
Randy, Squeeze maintains that 1999-2003 YZF R1 calipers and 1997-2001 YZF R6 calipers are assured to work. In my research, I have discovered that some FJR1300 calipers (2003-2005) should work as well as calipers from 2001-2005 FZ1. Rick Butler says that the front calipers from a 2004 Road Star are also good. Squeeze also says that the 14mm master cylinder is, while not NEEDED, a very good upgrade if one wishes to take advantage of the R1/R6 calipers.
-
Progress
Prairiehammer replied to dna9656's topic in Venture and Venture Royale Tech Talk ('83 - '93)
Andy and Doug, Check out this currently running thread about the VentureLine air dam (chrome chin spoiler) where Brian posted a link to buy a brand new NOS VentureLine chrome air dam. http://www.venturerider.org/forum/showthread.php?90485-Help-identifying-and-finding-a-part -
Progress
Prairiehammer replied to dna9656's topic in Venture and Venture Royale Tech Talk ('83 - '93)
What Doug is saying about his '85 is that his is the fourth SINCE the factory second gear fix. -
Vacuum Advance/Boost sensor
Prairiehammer replied to KIC's topic in Venture and Venture Royale Tech Talk ('83 - '93)
The black and white thing is a pulse dampening orifice. To check the Boost Sensor: When I was diagnosing the Boost Sensor on my 1990, I used a MityVac. I could record the proper voltage output (2± volts at rest and about 4.9 volts when a vacuum was pulled on it.) but unless the engine speed was above about 1500 rpms, there was no increase in engine speed when a vacuum was applied. If the idle was set to 1500 or more when testing the Boost Sensor, then rpms did increase when vacuum applied.
-
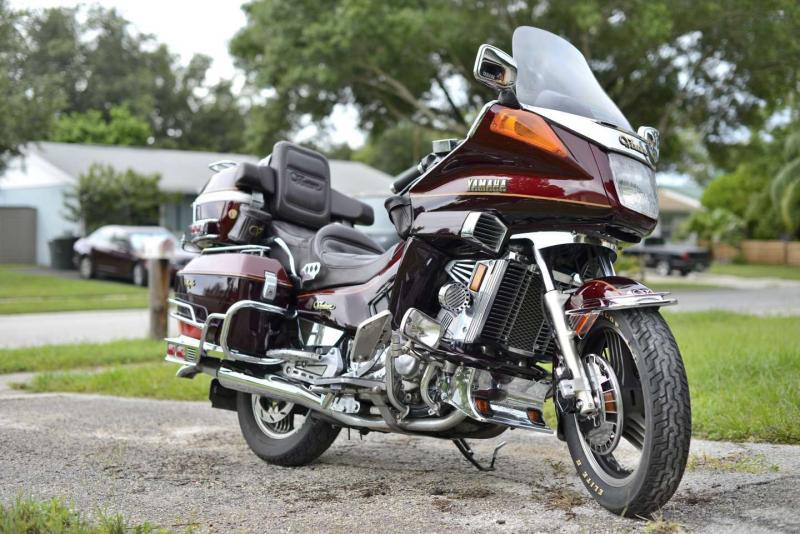
The air dam was sold by Yamaha with the intent to install onto 1983-1985 Ventures, but some folk have adapted it to the MKII. I believe it requires a change of engine guards to the MKI or removal of the mounting tab on the MKII guards where the lower cowling would mount. Here is a pic of a 1989 with the chrome air dam installed. [ATTACH=CONFIG]95306[/ATTACH]
-
The last time I was on the Apache Trail (2006) it was still one lane (timed one way traffic). How on earth did you negotiate the approach to the Fish Creek Bridge with that trailer?
-
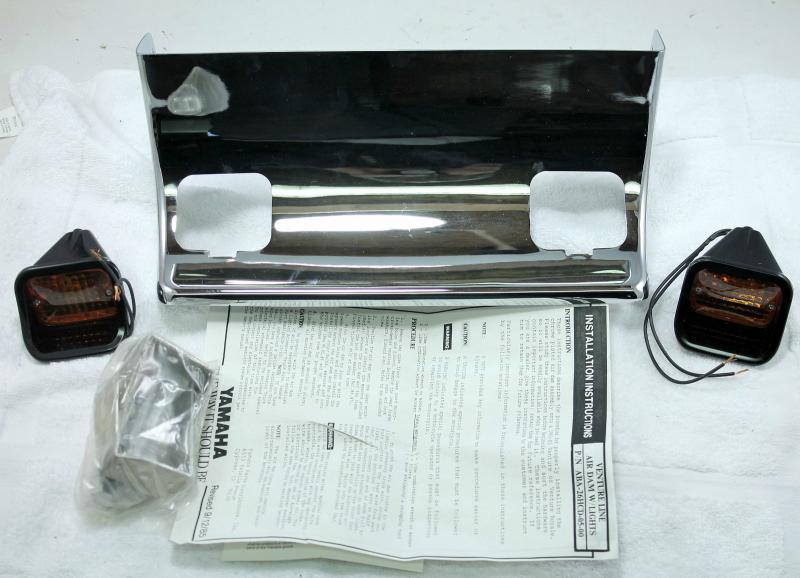
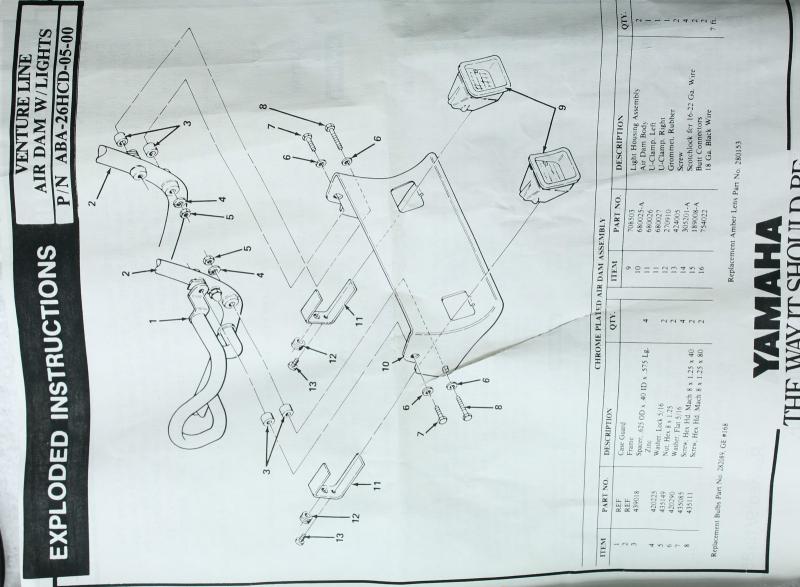
Coff, The original lights were from Drag Specialties, PN 708503. Here is a pic of a NOS unit sold on eBay, complete with the instructions and parts diagram. Good Luck.
-
Jack, how were you able to mount the R6/R1 calipers to the '83? Did you swap the forks for a MKII forks?
-
My mistake. For some reason I was thinking Video was in Phoenix.
.jpg.f679c40a3e2133cb2e7ec9e7e43e0523.jpg)