Phoenix
-
Posts
30 -
Joined
-
Last visited
-
I've ridden down to 17F, which is cold for Maryland, where we rarely hit single digits. I keep an eye on the weather to give me an indication of the probability of black ice in the morning. Once they put salt on the roads, I stay off the bike until we get a good rain to wash it away. Getting that salt dust in the nooks and crannies of the bike will haunt you for years to come. Luckily, it seems like we get rain within a week of when the put down salt. In Maryland, they tend to over-do the salting of the roads as soon as they THINK something might freeze. Last year I was tempted to shovel up the excess and sell it back to the state. Phoenix
-
I have been using Amsoil MC oil (10w-40 and 20w-50) for about 20,000 miles and it has served me well. As the others have mentioned, DON'T use conventional car oils as most have friction modifiers that will lead to slippage of wet clutches, which the RSV has. (If you have a bike that does not have a wet clutch or the clutch is not lubricated by the engine oil, then that is a different story.) I think everyone has a favorite oil, and if it works for them, then that is the oil they should use. Again, just stay away from the ones with friction modifiers, sometimes referred to as energy conserving. You will see this in the circle on the container that lists the rating of the oil. Phoenix
-
I generally use about 1/2 to 1 ounce per gallon on each fill-up during the warmer months. In the winter I make sure I keep it at a 1 ounce per gallon concentration, since weather conditions make riding less predictable. During the winter, I match an ounce of Seafoam to each gallon of gas, no matter how much or little gas I put in the bike. (i.e. if I put in one gallon of gas, I put in an ounce of Seafoam when I get home.) Seafoam acts as a fuel stabilizer, also. In the winter, I always top off the tank after each ride, no matter how few miles I put on it. Keeping that air space small reduces the likelihood of rusting. Phoenix
-
Mine opens all the way with the rod attached. Personally, I like the hold open rod - saves the lid closing while you are putting stuff in or taking it out of the trunk. It is not a complicated component that shouldn't take too many times to remember how to operate. Kind of like walking into a pull to open door - doesn't take many times to remember to pull instead of push. Phoenix
-

Changing Coolant Without Mess
Phoenix replied to Phoenix's topic in Royal Star Venture Tech Talk ('99 - '13)
I know exactly what you mean. Whenever I do one of these jobs for the first time, I read up on the posts and tech articles that other members have written. Then I look over the bike and get it all figured in my head before I start. Every time I have done a new job on the bike, I always say "that wasn't hard" when I finish. It is the fear of the unknown. Once you get it behind you, it is a breeze the next time. It is all about your comfort zone, which is expanded each time you do something new/different. I have not done the SR-2 clutch conversion yet. but I have all the parts. Was waiting until I note some slippage before I attempt that job. Ride safe, Phoenix -
Changing Coolant Without Mess
Phoenix replied to Phoenix's topic in Royal Star Venture Tech Talk ('99 - '13)
My coolant level has been at the "Full" line on my reservoir since the day I bought the bike, so I don't think you can periodically add coolant to the system and accomplish any equivalent benefit to draining and refilling. I used the Honda 50/50 premix. This was my first time and including taking the pictures, it probably took me an hour. It really is not that involved. The simple non-detailed steps are: 1. Remove rider's seat 2. Remove tank 3. Remove front lowers 4. Remove cylinder side covers 5. Remove radiator cap 6. Remove radiator drain plug (water will flow FAST) 7. Replace radiator drain plug (so you don't forget later) 8. Drain each cylinder and replace drain plugs individually 9. Replace side covers (so you don't accidentally do step 14 with covers off) 10. Remove and dump reservoir (or siphon out) 11. Reinstall reservoir (remember to hook-up hoses) 12. Refill radiator 13. Refill reservoir to "Full" line 14. Run bike for about 2 minutes (enough fuel in carbs to do this) 15. CAREFULLY remove radiator cap and top off radiator 16. Reinstall tank, seat, and lowers 17. Take for a short ride (to build pressure in system) and check for leaks 18. After engine cools, recheck coolant level (I like to check it at radiator after this first run, however, it does mean pulling the tank. Some just check it at the reservoir.) It really is pretty easy and considering you only do it once every two years, an hour is not really that much time. When I do stuff like this, I usually set a day aside and do several maintenance tasks while I have the bike up on the jack and parts off. Hope this is helpful in making your decision on changing your coolant. Phoenix -
Some Tips on Changing the 2nd Gen Coolant
Phoenix replied to V7Goose's topic in Engine and Drivetrain
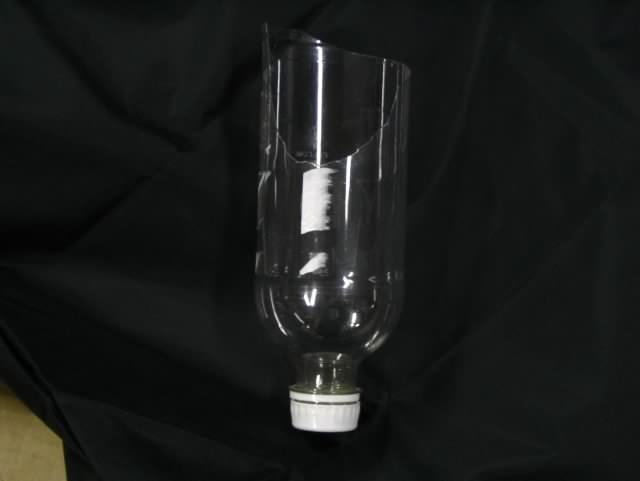
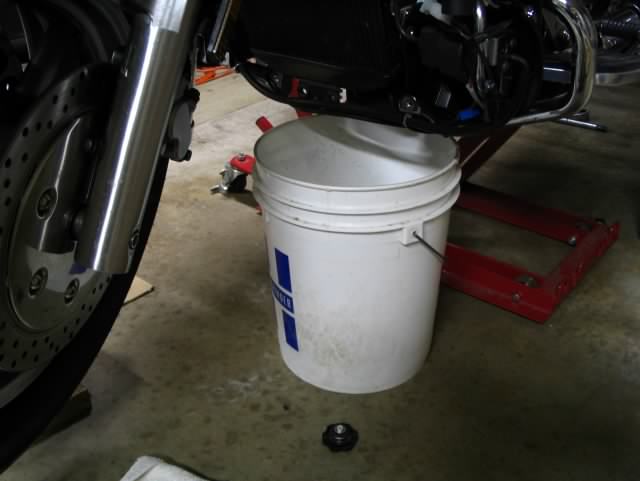
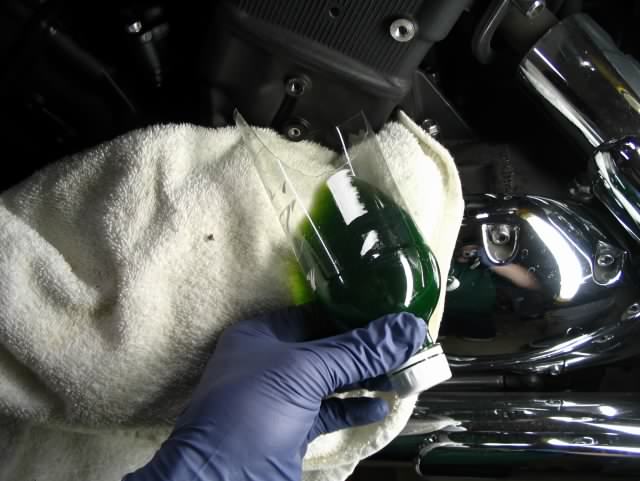
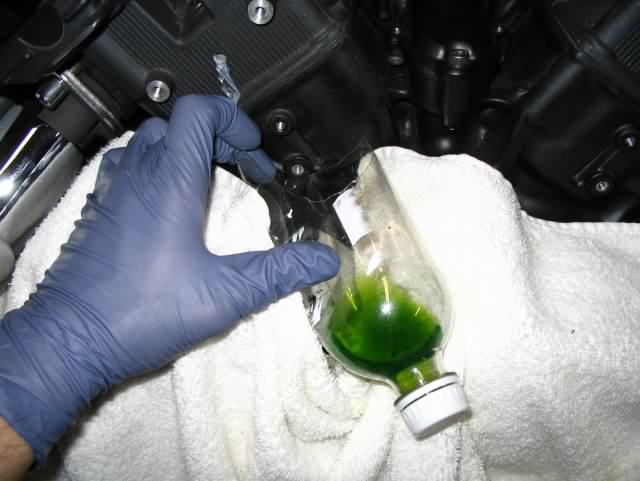
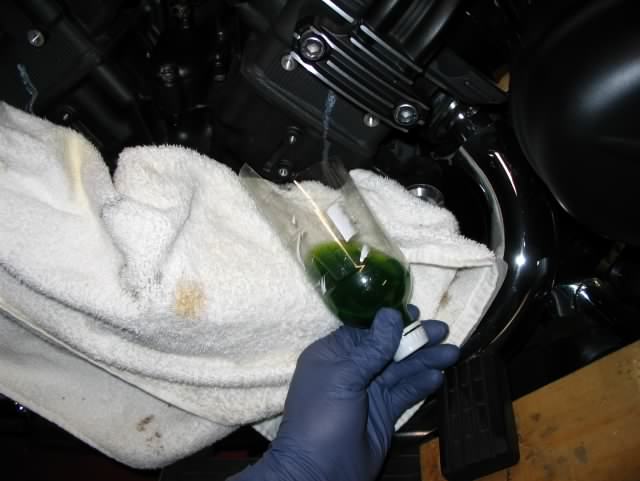
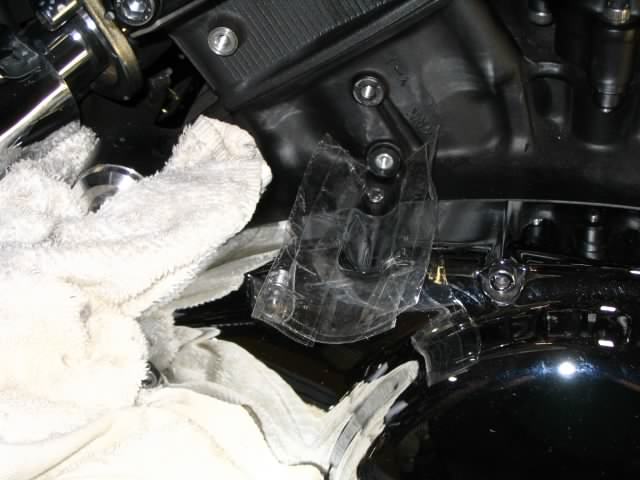
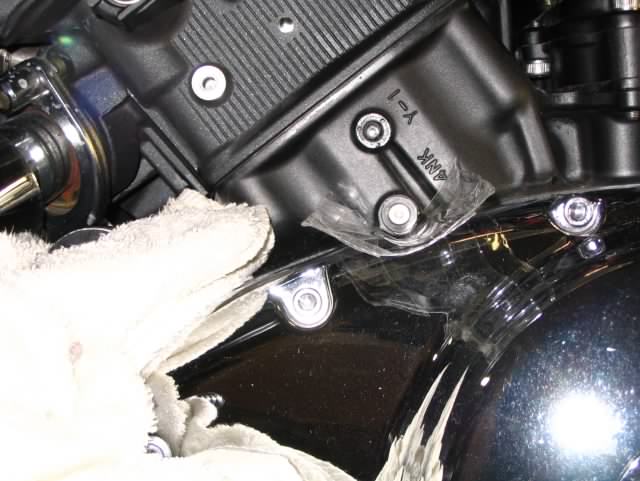
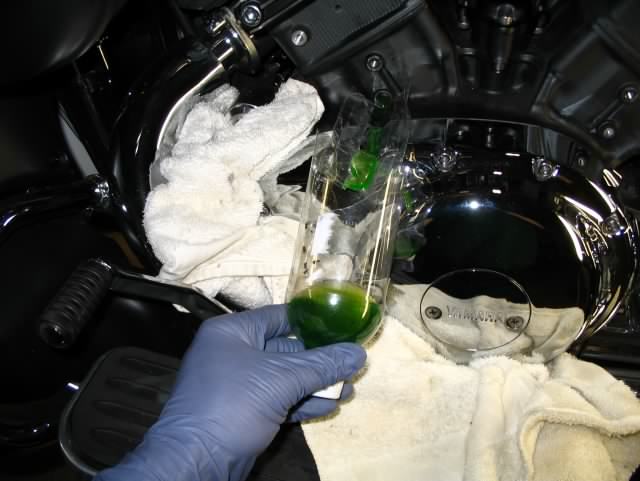
(The information in this post would serve well to be included in the tech library with the other coolant change information.) I changed my coolant the other day for the first time. After reading all of the very helpful posts and the Tech Library, the only thing I noticed was that there were no tips on how to do it without creating a mess, especially when draining the cylinders. Sooo, I spent more time visualizing and figuring than I did actually draining the coolant, but I did come up with a method that resulted in no mess on the engine or floor. This will make my, and hopefully your, next coolant change a little easier and less messy. As well, I found that at 2 inch long screw of the proper thread size was easier to use for pulling the cylinder side drain plugs than using the cumbersome spark plug. I didn't repeat the steps on how to get to the radiator cap and how to remove of the side covers, as this information is already well documented in the tech library. PHOTO 1 - Side Cover Drain Bottle Get a 16 oz soda bottle, the type that is smooth sided because it flexes better. Cut an angle across the bottom end and cut out room for your fingers to pull the plug on the top side. You can do a few test fits with the bottle to get the angle right. You will need the cap screwed onto the bottle when you use it. PHOTO 2 - Draining Radiator Put the bike on a jack and raise it high enough to clear a 5 gallon bucket. Remove the radiator cap, then the radiator drain plug and the radiator will speed dump with no mess. - - - - - - - Next, you will want to grab a large bath towel (preferably not the one your wife just bought at Kohl's). While I only dripped about 1 ounce of coolant onto the towel while draining cylinder 3, I used under the drain bottle on each cylinder to catch any dribbles (and this was the first time I tried this method and didn't know how well it would work). Photos 3-5 illustrate how I placed the towel and the drain bottle for cylinders 1, 3, and 4. (I saved cylinder 2 for last, as it involves making a chute out of packing tape to flow the coolant to the bottle.) The drain plugs are in place in all of the pics, as I took the pics after I drained each cylinder. The coolant in the drain bottle is from the respective cylinder pictured. PHOTO 3 - Draining Cylinder 1 PHOTO 4 - Draining Cylinder 3 PHOTO 5 - Draining Cylinder 4 - - - - - - - - The last step is draining cylinder 2. The location of the drain plug for cylinder 2 does not allow for the angling of the drain bottle. I saved this for last because it took a little construction of a chute made of packing tape. Tear three strips of packing tape long enough to go from the side of the cylinder to about 2 or 3 inches past the side of the chrome engine cover. One strip will be the middle strip with the sticky side down. The other two strips get folded in half lengthwise over the left and right third of the middle strip. Then abut one end of this tape contraption to the side of the cylinder and press the center portion down so it sticks to the top of the engine and along the groove of the chrome engine cover. You now have a little rain gutter to carry the coolant to your drain bottle. PHOTO 6 - Cylinder 2 tape chute PHOTO 7 - Cylinder 2 tape chute viewed from side angle PHOTO 8 - Cylinder 2 draining - - - - - - - - - - My coolant drain amounts were as follows: Radiator - 80 oz (2.5 qts) Cylinder 1 - 5 oz Cylinder 2 - 2 oz Cylinder 3 - 2 oz (this accounts for the 1 oz that spilled into towel) Cylinder 4 - 3 oz Reservoir - 10 oz (was at the "Full" line) Total - 102 oz (3.19 qts) I didn't drain the water pump. Every post I've read and folks I have spoken with said they only got 4 oz, at most, out of the water pump and the headache of getting to the plug outweighed the amount of fluid I would get out. Hope this has been of some help to others out there. Phoenix (If anyone would like higher resolution pics, let me know and I can email the high resolution originals to you.)
-
Well, after much consideration, I went with the Milestone for several reasons: 1. It has an impressive tread pattern that looks like it would do well on the wet roads. 2. It has a 990 lb load rating 3. New tread depth of 10.5/32 4. Lastly, it seemed like there was only limited review information on it and I figured someone ought to try it out to provide some feedback on this tire. I'll post a review after I get a few thousand miles on it. Phoenix
-
Some Tips on Changing the 2nd Gen Coolant
Phoenix replied to V7Goose's topic in Royal Star Venture Tech Talk ('99 - '13)
From reading the posts in this thread, it sounds like there is VERY LITTLE coolant in the water pump. I think one rider estimated 1/4 cup. If that is the case, that 1/4 cup should not have any great affect in the grand scheme of things to make it worth the trouble of draining. It seems, from reading these posts, that if you drain the radiator, reserve/overflow tank, and the four side plugs, you have reasonably drained the system and the little bit left behind would be diluted sufficiently by the new coolant. Thoughts? Also, any tips/tricks to draining the side plugs to keep from getting coolant all over the side of the engine and pipes, etc.? Thanks, Phoenix -
Before I got my Gerbings heated leather gloves and jacket liner, I used ATV mitts. These are very similar to the old Hippo Hands. They are nylon fabric lined and are easy to slide your gloved hand in and out of. Never had a problem with them and they did make a big difference, by keeping the wind off your hands and creating some dead air space, which is your key to insulation. Do a Google search for "ATV mitts" and you should find several places to purchase them for about $12-$15. Phoenix
-
Stebel Nautilus Horn Install
Phoenix replied to SilvrT's topic in Royal Star Venture Tech Talk ('99 - '13)
I just recently installed my Stebel compact air horn at the location of the stock right side horn. I used the right angle crimp connectors for the wires on the bottom of the compressor. You can find these at Advance Auto parts or Home Depot. Some places call them "flag" connectors. For the rider who said they can't hardly hear the Stebel, you might want to check to make sure it is functioning properly. Mine definitely is loud and gets attention. Phoenix -
Go to http://www.amsoil.com and purchase it directly. They ship it to you. Phoenix
-
New Brake Pad and Disc break in
Phoenix replied to Seaking's topic in Royal Star Venture Tech Talk ('99 - '13)
The first thing you should do is throw out the HH brake pads. HH pads are sintered pads - i.e. metallic. If you are putting the money into a new disc, don't throw it down the drain by putting on pads that are going to eat it up. It is better to use the softer pads (i.e. organic or kevlar) that don't eat up the disc. When you create friction between two objects, one of them has to give up mass. It is better to lose the mass from the pad than the disc. Moral of the story is that it is better to change 100 pads than 1 disc. Many years ago, I was told by a friend mechanic that you should never purchase a lifetime or "long life" brake pad or shoe, because the reason they last so long is that they eat up the rotors. Phoenix -
Gerbings Heated Gear and my 09 RSV
Phoenix replied to csogbk's topic in Royal Star Venture Tech Talk ('99 - '13)
I have the Gerbings leather gloves and jacket liner. Riding when temps are in the teens, I only have to turn them on half on the thermostat control and I'm comfy to ride for hours. I recommend getting the dual control thermostat so you can adjust your gloves and jacket separately. The jacket liner has connections for the thermostat and for the gloves, so everything is neatly interconnected. Of course it all depends on what your comfort level is. I don't use the heated gear unless it gets into the low 30's or below. Above that, leathers keep me plenty warm. Phoenix