Search the Community
Showing results for tags 'screws'.
-
As most of you may already know I had a little accident with my bike on Oct 12, 2007 after surgery on my ankle. The ortho doc gave me a photo of my ankle with the plate and screws. I hope this won't be too distasteful to see. i have added a couple pics of the bikes damage
-
Hey All: Thought I would post so everyone could check their hard bags for a potential problem....While putting on the bag rails I dropped my allen wrench down between the metal plate in the bottom of the bag and the cloth material going down the side....Big hands, so decided to take the bag lid off....There are four screws that hold this plate on...three across the outside edge and one right in the middle of the bag....When I went to loosen the first one along the outside edge I though it was stripped.....On closer inspection I noticed it was broken...These three screws go into molded holes (stud like-raised about 1/2") as opposed to the one in the center of the bracket....On looking further, I discovered that ALL three molded studs were broken...This plate has never been off before....First attempt....I decided that during the install, (factory) they may have been over torqued...Took to the dealer with the three broken studs (with screws)...He just called and Yamaha is replacing the bag under warranty... Thought you might want to remove the foam thing from the bottom sometime and check these...Basically, the only thing holding on the bag lid was the one screw in the middle of this mount and the material support along the bag and lid sides....This happened on the left bag (from drivers position)....Right bag was OK... George in VA 2006 BC Venture
-

83 Mixture Screw Source???
zagger posted a topic in Venture and Venture Royale Tech Talk ('83 - '93)
I finally found the reason why a couple of cylinders were idling super rich - the tips of two idle mixture screws were missing, busted off by some previous owner! In looking at the carb exploded diagram it doesn't seem that these screws have a part number and I am guessing that they aren't available from the dealer (I'll check tomorrow morning). Anyone know a source for these little stinkers? Anyone have a couple of old carbs they might like to sell? Feeling a little gloomy right now. zag -
how do i adjust,the spliter,what meter do i use,have turned the adj screws ,dose not seam to change anything:confused24:
-
 a word of caution ,to anyone taking the fairing apart on an old bike. mine had two broken tabs, on the right side, so i decided to repair them today. in the screw removal process, i managed to break two more tabs. it seems that the screws have never been removed before. when i turned the screws, the tab turned with it and broke/shattered. i suggest ,if you are gonna split your fairing, spray all the screws with a good penetrating oil and let them sit overnight. now i have a bunch of tabs to build! just jt
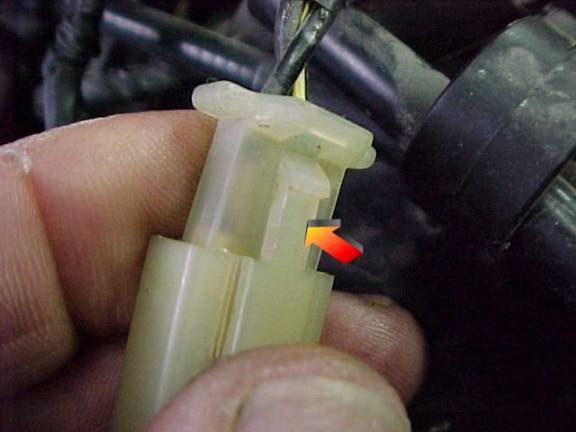
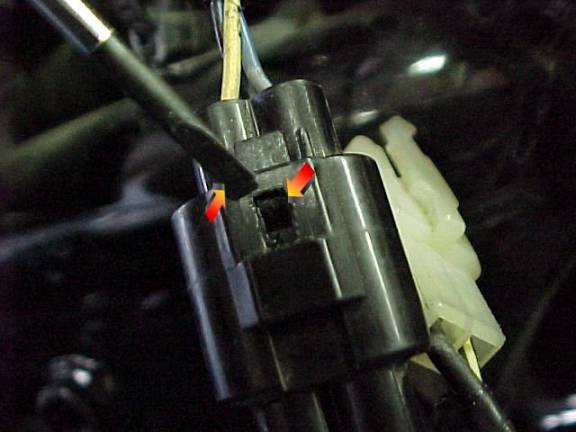
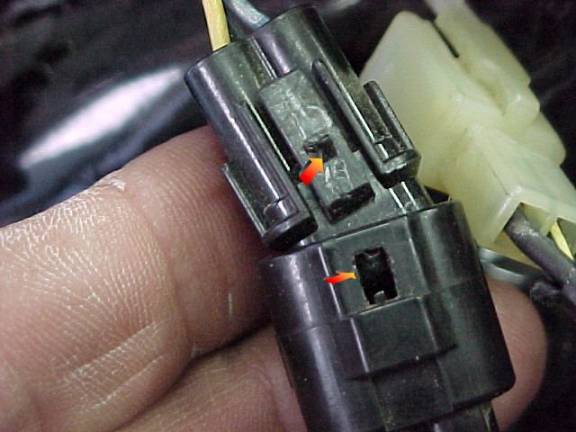
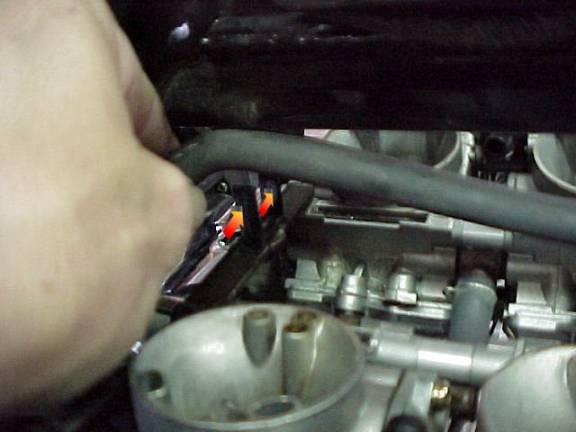
 -
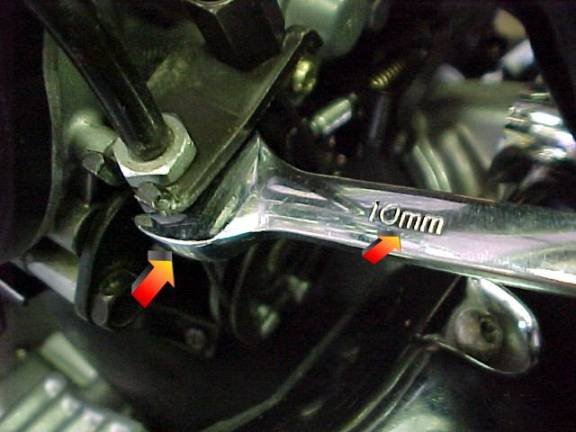
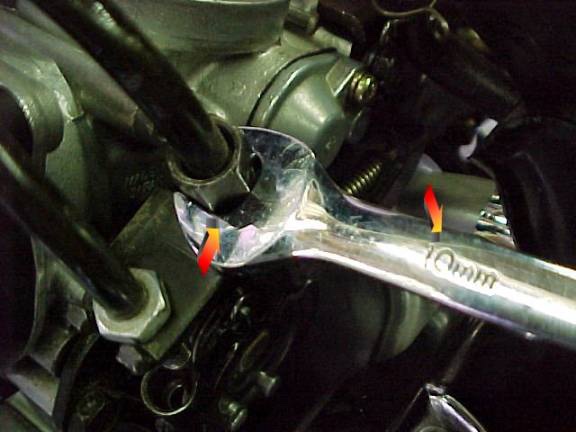
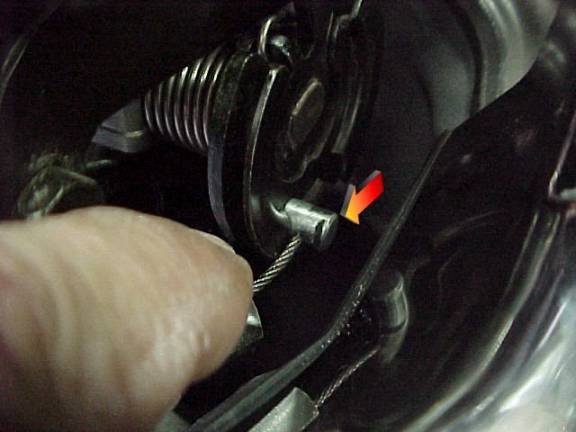
What are the basic settings for my carbs. I have heard that there are starter settings on the sync screws and idle screws.
-
I am having a problem with the area just above coasting and pulling. If I am running on flat ground with just enough throttle to maintain speed, at say 30 to 45mph, I am getting a constant skip, but not like a single dead cylinder. When I give it just a little more throttle, it smooths out and pulls fine. I have been thru the carbs recently and cleaned the pilot valves and everytrhing else. I have also synced them again today and they also look good with the rpm's up to 3,000 to 4,000. I have tweaked on the mixture screws, starting at 2 1/2 turns out and really can not tell much difference when turning them in or out. I have also worked on the diaphrams and have no holes. I also ran a full can of Sea Foam thru it today. Is there any suggections? Denden, are you listening? RandyA
-
If you are lucky, You learn something new every day. Have you ever wondered why phillips screws (like on carb bowls) on metric bikes always get boogered up or rounded out? Well today I finally found out why..... It appears the Japanese industry standard for phillips screws is different than the US and European standard. Yeah and they use a different phillips screw driver. It appears from the following link that Snap-On carries these items. http://www.katun.com/products/toolsjis.html So does anyone out there have access to a Snap-On truck to validate this? And do they have the hex screw tips for our magnetic drivers. This might keep us from drilling phillip heads off and replacing them with cap screws? Rick
-
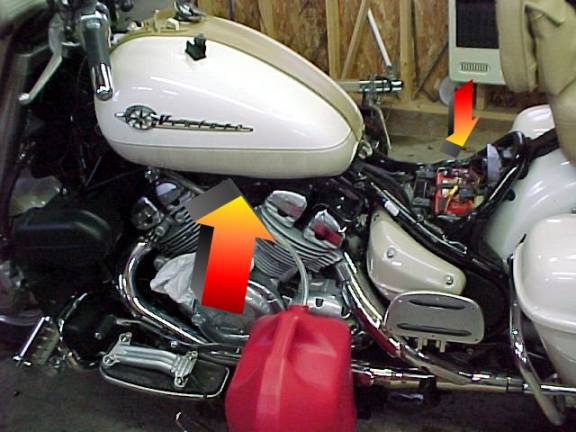
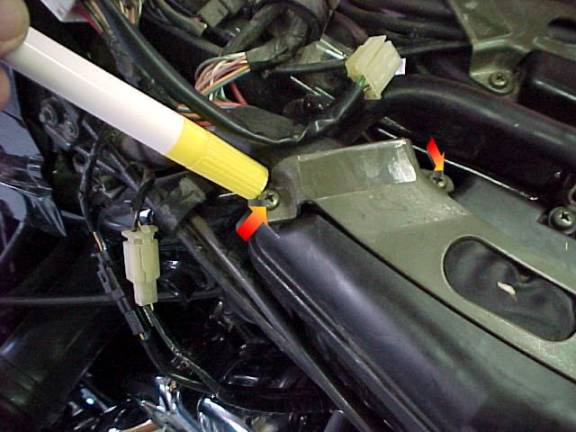
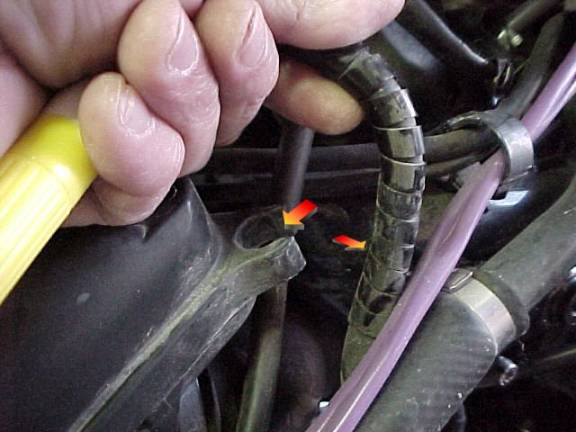
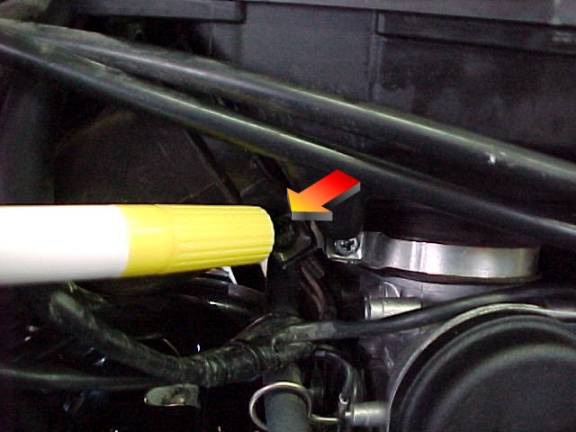
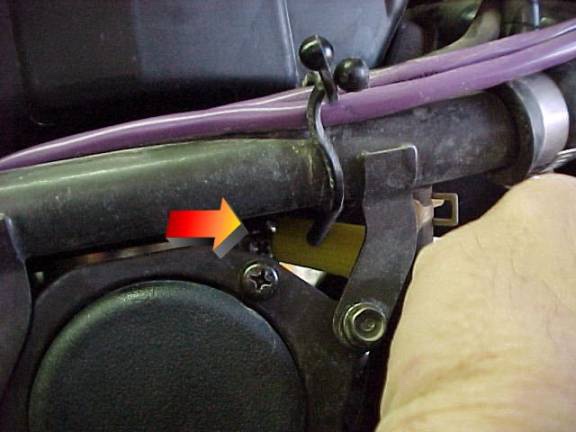
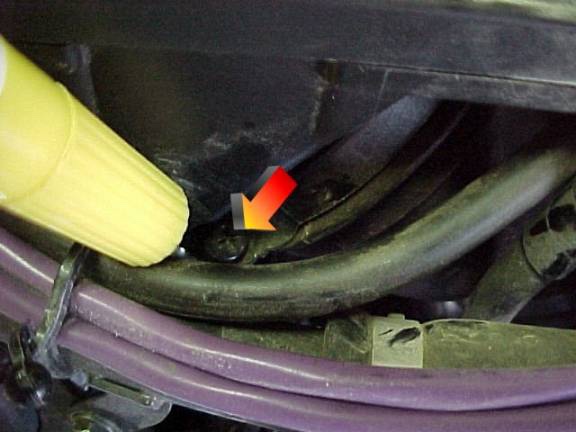
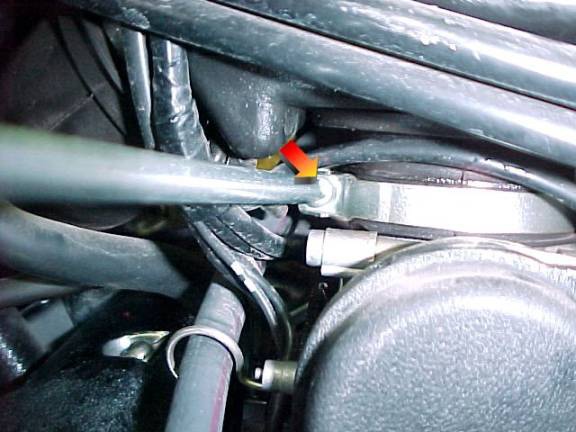
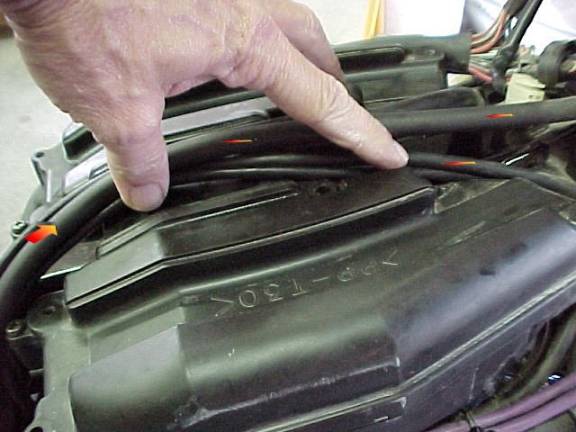
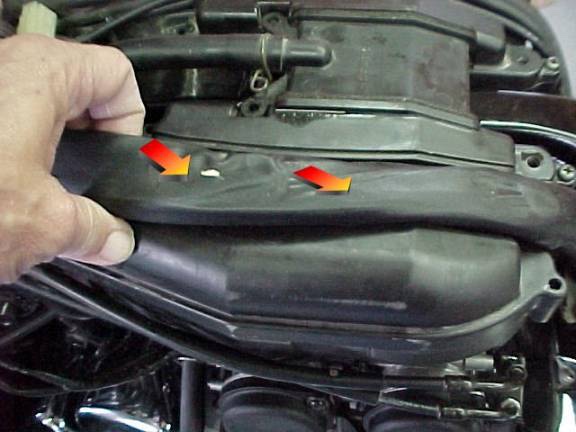
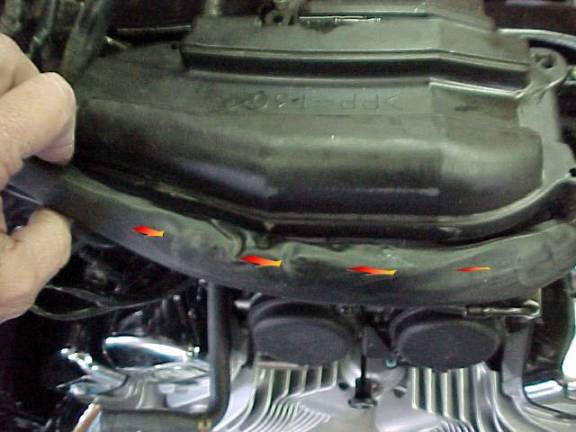
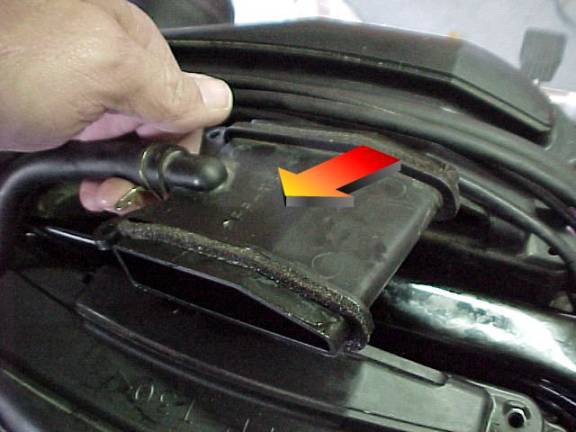
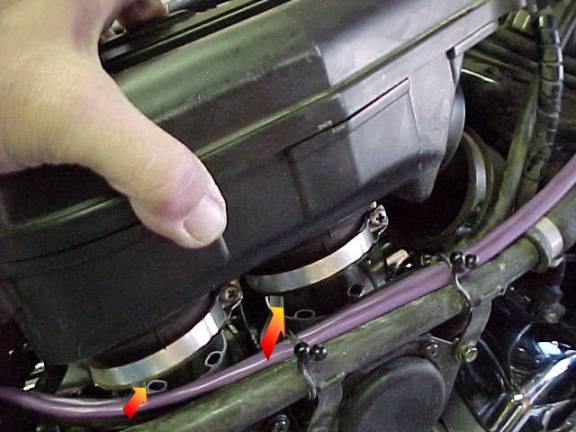
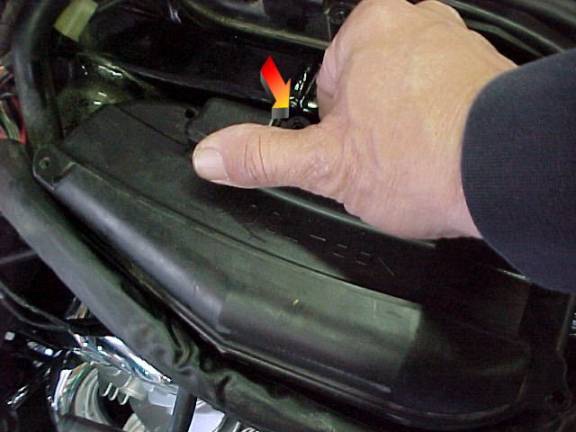
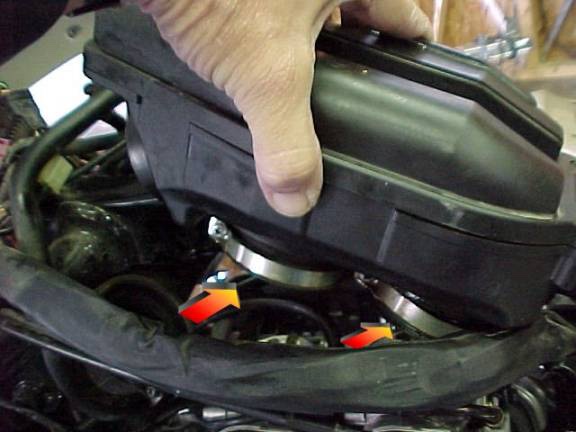
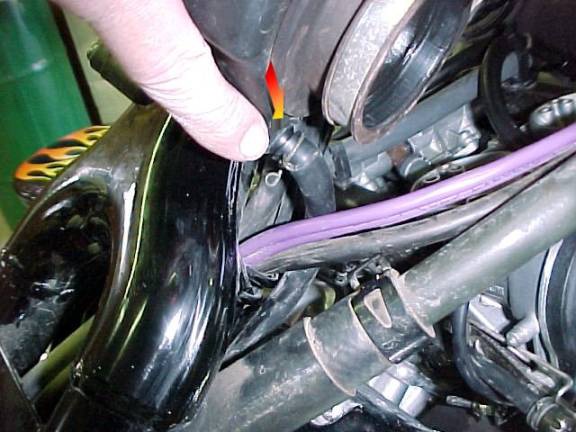
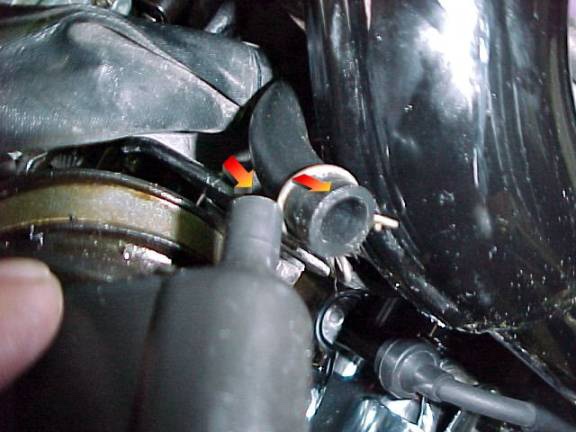
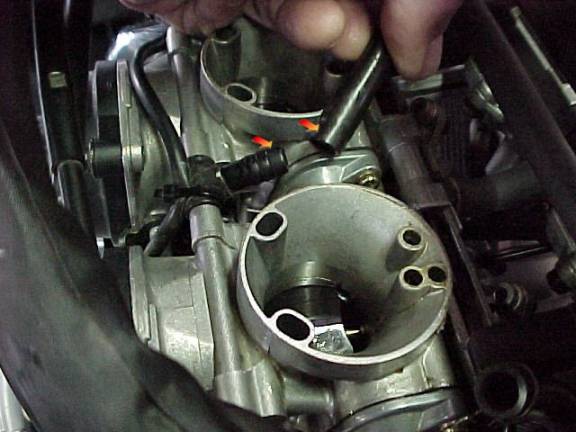
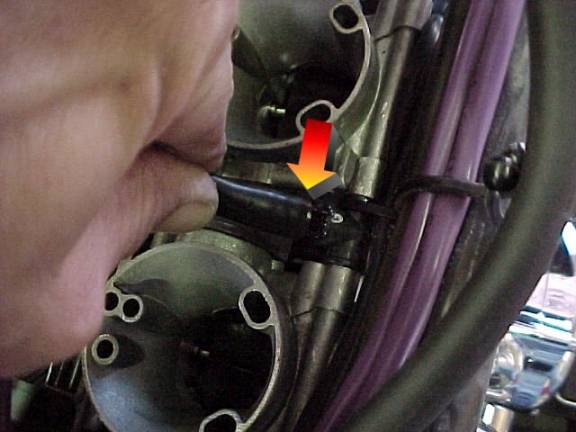
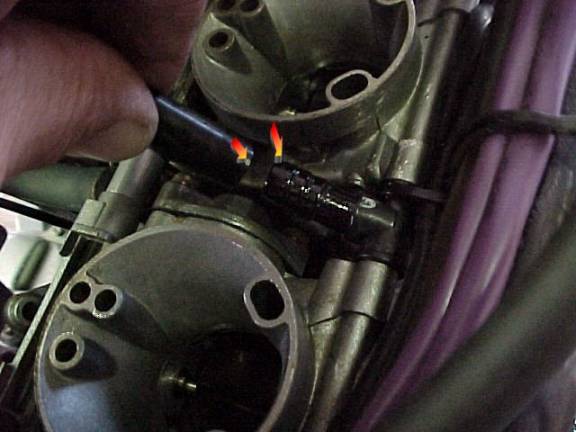
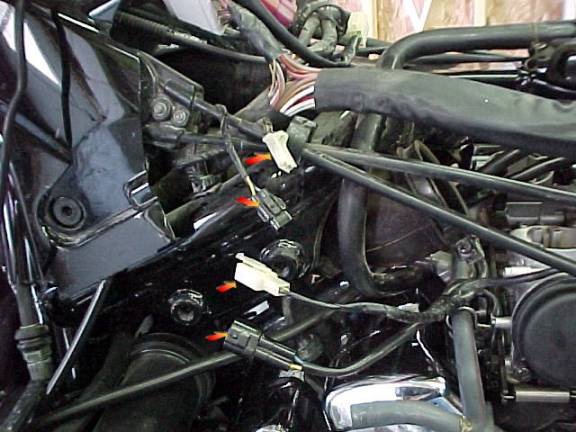
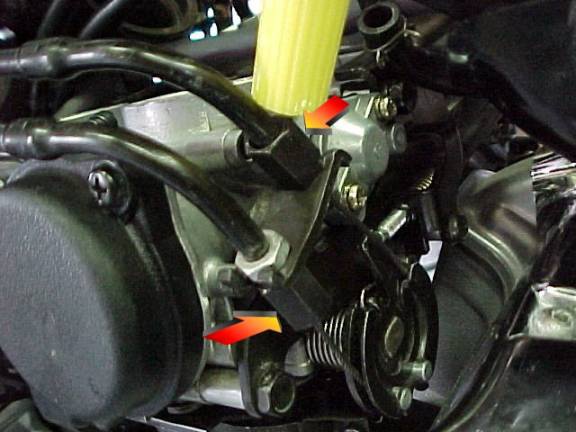
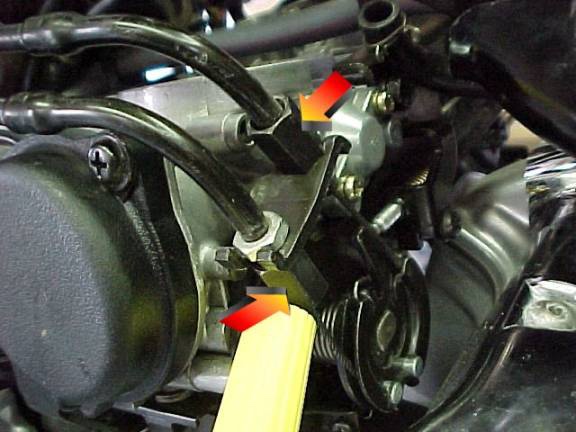
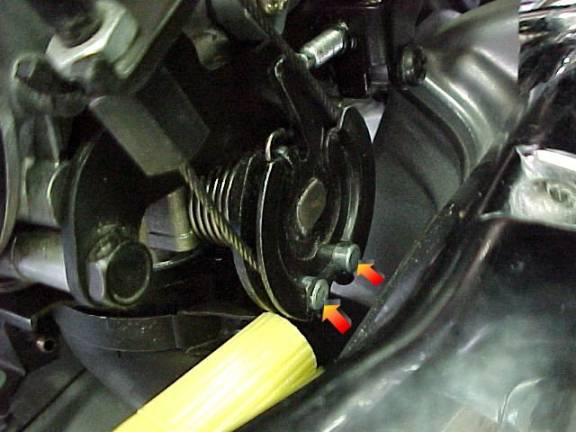
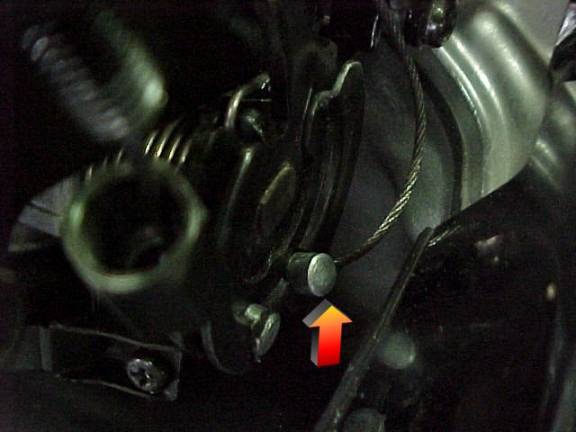
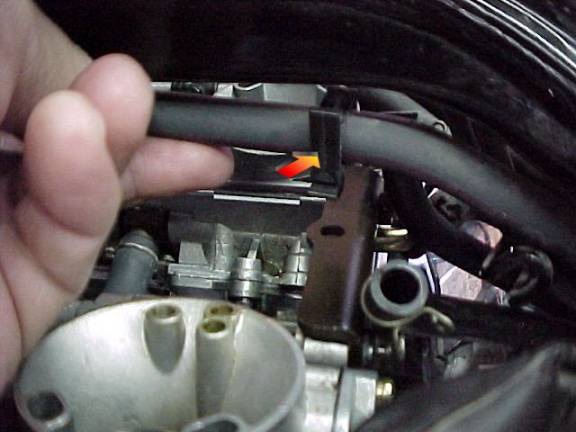
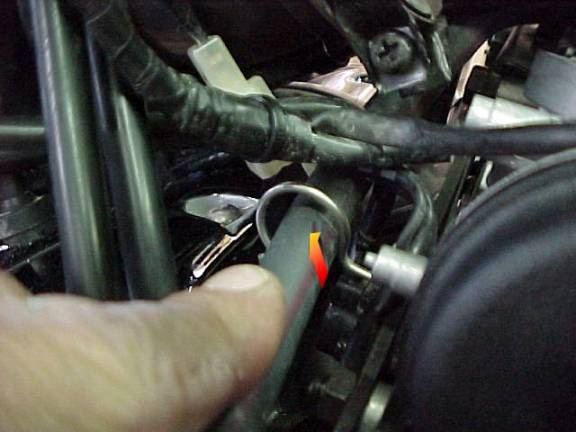
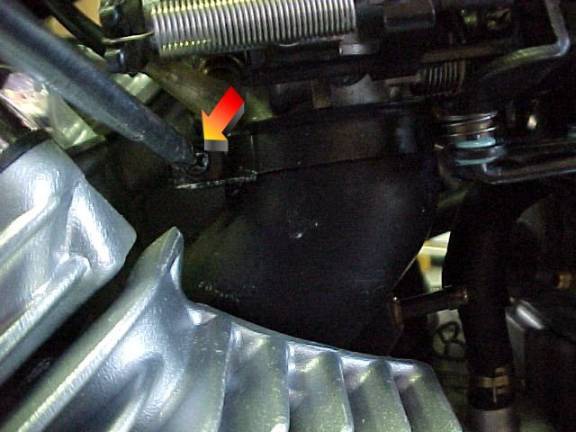
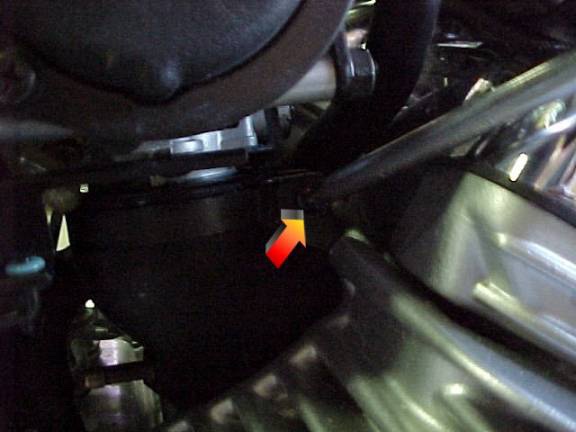
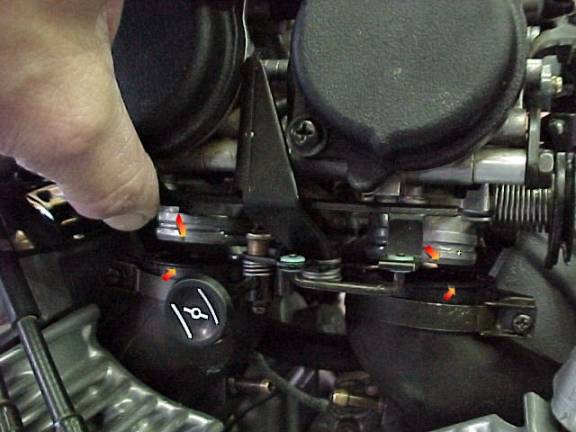
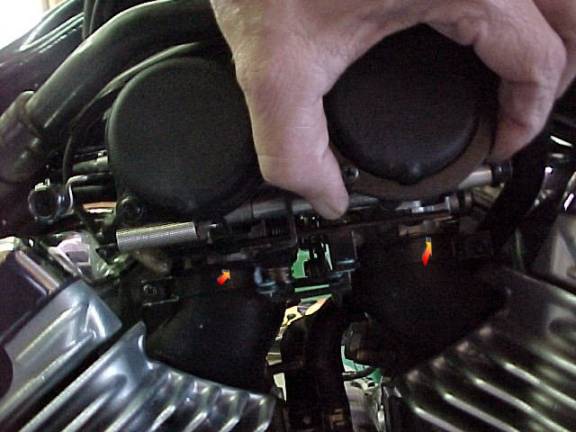
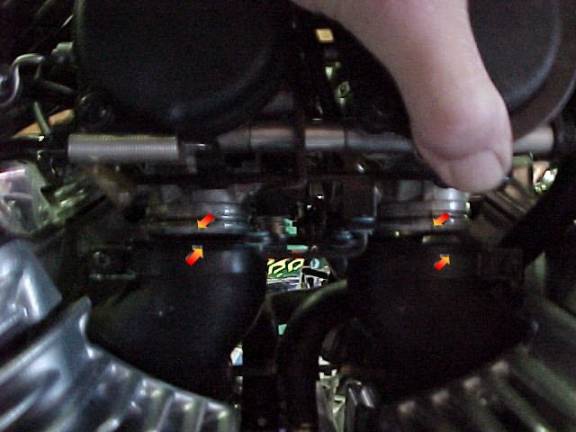
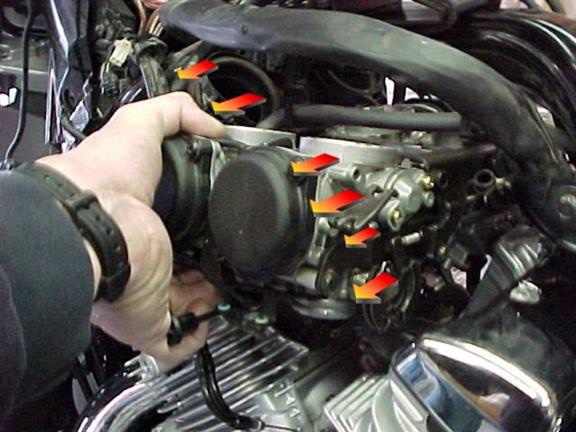
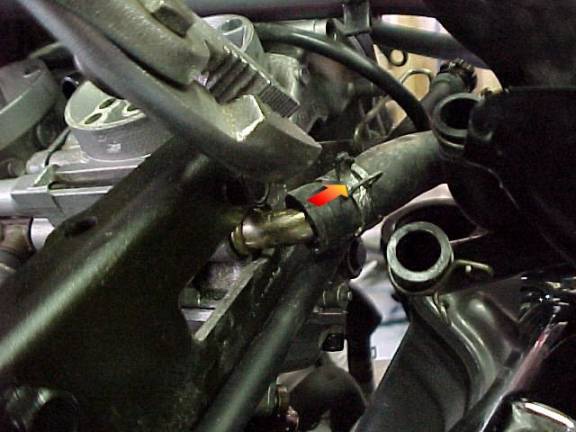
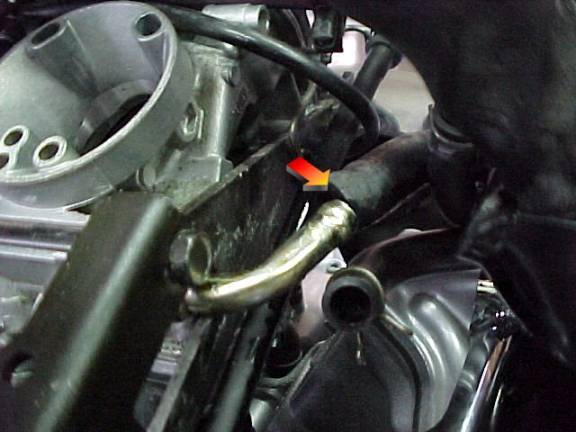
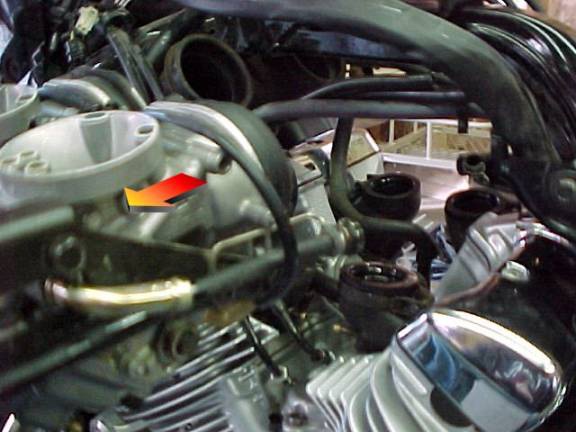
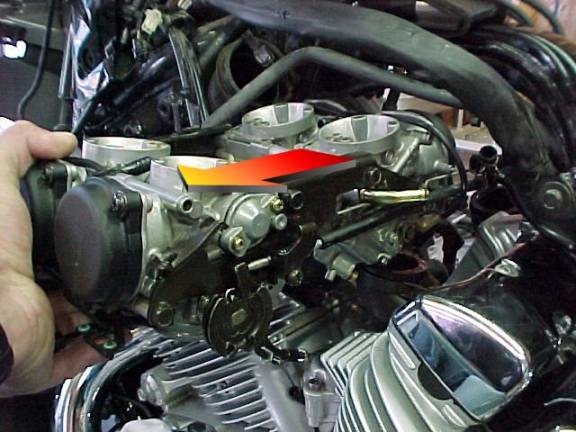
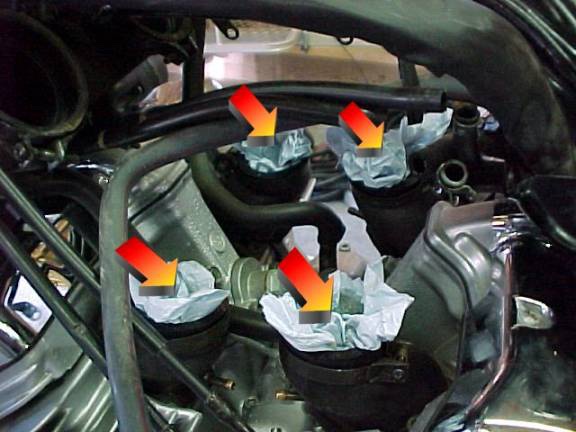
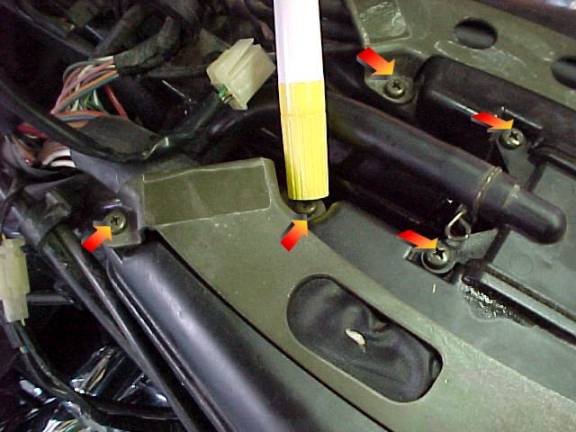
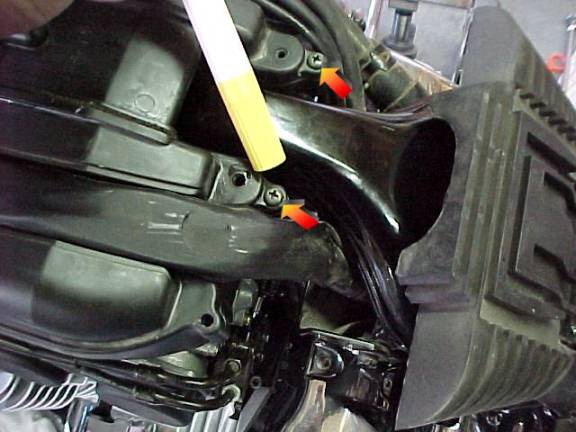
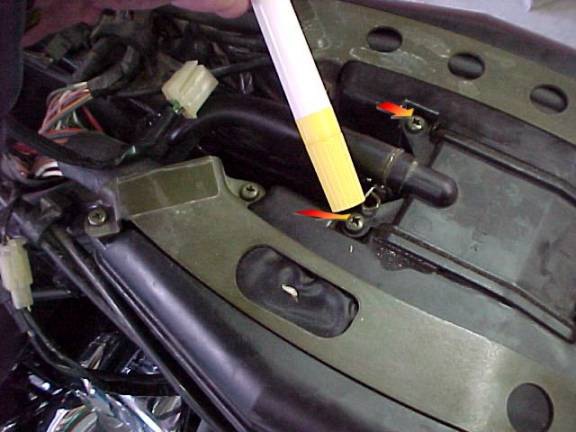
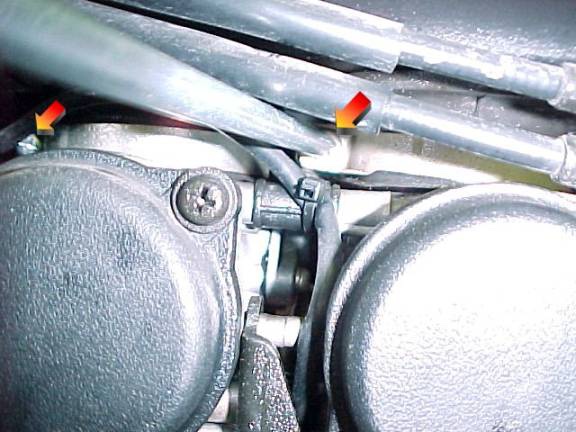
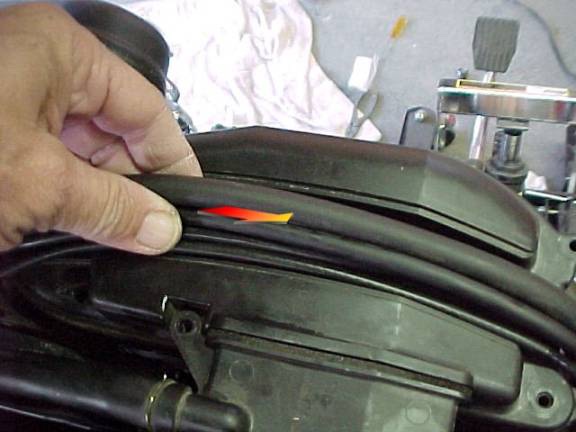
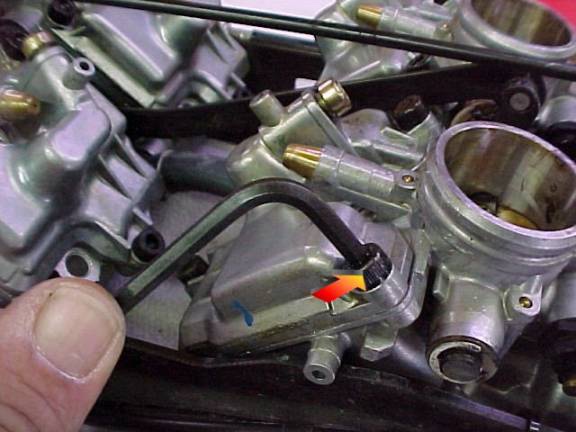
How to remove the carburetors from the '99 to present Royal Star Venture Thanks to Cougar for this excellent article. This was my first time removing the carb cluster from my 2000 RSV. This project took me about 30 to 40 minutes to do including the seat and tank removal. I think it is a pretty easy job to tackle. I tried to take as many pictures as I could. In the write up I used only 2 instead of 5. You will get the idea. 1. Remove the seat and fuel tank. 2. Now you will see the cable and cord clamps. Remove all the screws shown below. 3. No need to remove these screws. 4. Remove this hose from the right surge tank. 5. Now loosen the clamps on the front of the surge tanks (2) as shown below. 6. Now loosen all four clamps on the bottom of the surge tanks that are attached to the top of the carbs in four places, one on each carb. 7. These wires and hose will go towards the middle. 8. Pull the left and right wires and hoses to one side of the surge tanks. Do not worry, they will stretch far enough. 9. Now remove the tank surge union. 10. Now start wiggling and pulling up on each surge tank. 11. Remove one vent hose on each surge tank and then they will be free and out of the way. 12. Remove both left and right overflow hoses from each carb. 13. Next, split apart the two wire connectors on the left side front of the carbs. I think that they are heater and sensor wires. I always have hated the black connectors. 14. Now the fun part. Loosen both nuts on the throttle cable housing. (NOTE: REMEMBER AND MARK THE TOP AND BOTTOM) in the pictures I just remembered that the top nut and lower nut are different. 15. Remove the fuel line from the three holders. 16. Remove these two bolts off the right front carb. NOTE: DO NOT REMOVE THESE TWO SCREWS! (these are to hold the cover on for the carb diaphragm) 17. Loosen all 4 lower clamp screws on the bottom of each carb. 18. Now lift slightly on each side, left and right. 19. Start to pull from the left side about half way and then remove the fuel line that is on the rear middle of the carb cluster. 20. Now the carbs are free from everything. Pull them the rest of the way out from the left side. 21. Find a bucket and turn the carbs over to drain them. 22. Find your favorite work bench and place your carbs on it. 23. Do not forget to fill your intake manifolds with something that will not fall apart to keep the junk out of them. Just a side note for the float bowls. You will need a 4mm hex to remove the 3 screws. The cone shaped brass caps above the hex wrench come off for adjusting the mixing screws. Also, I want say PLEASE make any other comments or suggestions so that Don can add them to this write-up. I hope I explained this for you well.

-
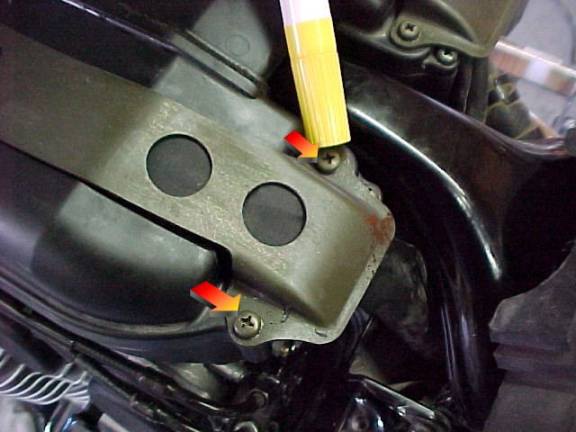
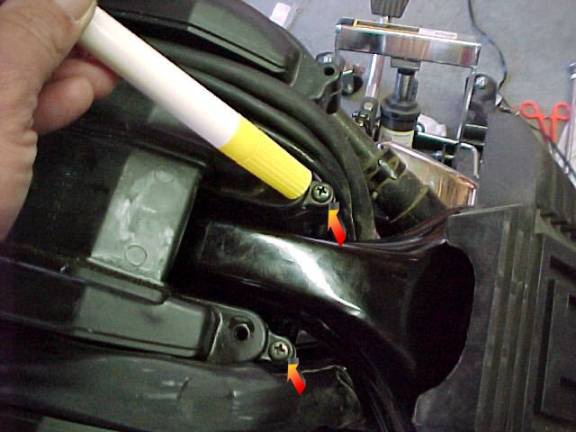
Splitting the Faring If you ride the second generation Venture long enough, you are eventually going to need to get into the faring. This may be to install passing lamps, repair a loose wiring connection, various reasons. Here are some step by step instructions to make the job easier for you. If you do not have passing lamps already installed, you can obviously skip the first step. If you have passing lamps, you will have to remove them in order to remove the front of the faring. The chrome cover in the center of the passing lamps simply snaps off. http://www.venturerider.org/faring/faring1.jpg Once the chrome comver is removed, there are two bolts that secure your passing lamps. The factory supplies allen bolts for this but mine have been changed out to regular hex heads. If you have allen bolts, a "ball end" allen wrench works best as it allows you to go in at an angle without hitting the bottom of the faring. In the following picture, I have removed the bolts and let the bar rest on my front fender. No need to unwire anything. Note the towel...don't want to scratch that pretty paint do we? NOTE: There are two spacers behind the bracket that you will most likely drop when removing these bolts. Be aware of them. You can usually hold your hand under the bracket as you remove the bolts but I usually end up dropping them anyway. http://www.venturerider.org/faring/faring2.jpg The next step is to remove the top two screws, one on each side, located on the inside of the faring. These two screws hold the top of the faring together and also secure the chrome strip at the bottom of your windshield. http://www.venturerider.org/faring/faring3.jpg Once these two screws are removed, you can carefully lift the chrome strip off. BE CAREFUL HERE. There are tabs molded into the chrome strip that are fairly easily broken. Lift first from each end and gently work it back and forth to separate the tabs from the faring. http://www.venturerider.org/faring/faring4.jpg Once the chrome strip is removed, simply remove the 6 screws that hold the windshield on. http://www.venturerider.org/faring/faring5.jpg After removing those 6 screws, the windshield will just lift out. http://www.venturerider.org/faring/faring6.jpg Now you are ready to remove the remaining 6 screws on the inside of the faring. There are 3 on each side. http://www.venturerider.org/faring/faring7.jpg After removing these 6 screws, the only thing hold the front of the faring on is the screw in the bottom of the headlight ring. I always save this one for last because it enables me to be in front of the bike where I had hold the faring and safely set it aside instead of watching it bounce off the floor. http://www.venturerider.org/faring/faring8.jpg Once you have this last screw removed, gently pull the faring off the headlight and set it aside. That's all there is to it. This is what you'll have now. http://www.venturerider.org/faring/faring9.jpg Now...regardless of why you took your faring apart, take the opportunity to check the connections for your audio system and etc. The big connectors are known to cause problems sometimes. In addition to the ones here, there is another one usually tucked under the tape/radio assembly. Simply pull them apart and use some good di-electric grease to ensure that they stay dry and do not corrode. http://www.venturerider.org/faring/faring10.jpg That's all this is to it folks. Putting it back together is just a matter of reversing these instructions and..of course...turning the screws the OTHER direction. A couple of notes though. As you are putting the screws back in the faring...don't snug them down tight until you have them all started..you might need to wiggle it around a bit to get them all started. VERY IMPORTANT. Do NOT overtighten any of the screws. Especially the ones along the top edge that secure the windshield. Yamaha didn't make that top edge thick enough in my opinion and many people have cracked the plastic around these screws. Just snug them down pretty good but not TOO tight.