.jpg.74ad527ee3b944bb2fbbda340f151e7c.jpg)
yamagrl
-
Posts
977 -
Joined
-
Last visited
Content Type
Profiles
Forums
Gallery
Events
Store
Everything posted by yamagrl
-
.thumb.jpg.c4a003e98a39017035bc287be592ba02.jpg)
Puc you said you'd like to build another chopper! How about this build?
yamagrl replied to The Tooch's topic in Watering Hole
Is this The new 3rd Gen? -
Probably that advance curve difference
-
According to the parts breakdown the gears are all the same. Here is the 2nd gear pinion on Partzilla http://www.partzilla.com/parts/detail/yamaha/YP-26H-17121-00-00.html It shows all of the bikes it's used on.
-
I'm certain you will hear back from him soon. I had a lot of email contact with him about 2 years ago and he was usually quite prompt with his responses but a few times, like most of us, it took a few days to hear back from him. Let me know if you don't hear back from him about the videos in a couple of days.
-
Well now, with this new version of vbulletin is there a way to set default font stuff? After all that's been eight years ago since all of the other requests.
-
I believe the gear ratio differences are between 1st and 2nd Gens, not between Mk1 & 2. There are improvements in the later transmissions but I don't think it is gear ratio. The thrust washer that is at fault is about $20.00 now. I spent $290.00 +/- for all of the seals, cir clips, o-rings yada, yada, yada plus $75.00 for a used transmission and SEVERAL hundred on tools and equipment. I think I have about a grand in redoing 2nd and upgrading my M/C shop/garage. I think that marking is a punch mark on the top of the middle gear housing.
-
I've read about converting the carbs into what essentially amounts to throttle body injection. It's a great idea! One thing about Big Red... no matter how much I spend it is still far less than it would be I bought something new.
-
Oy gevalt!
-
I am a huge fan and advocate of those videos. I tore down Big Red and did the infamous second gear repair/change out and rebuilt the carbs according to those videos. If you watched the engine one, then I recommend it. The Engine video is about 4 1/2 to 5 hours. Very, very good instruction. Heather
-
yep
-
Ex-husband wrecked it on his way home from the bar... (just kidding)
-
side kick stand
yamagrl replied to kapebretoner's topic in Venture and Venture Royale Tech Talk ('83 - '93)
Mine broke on the way to Freebird's in 2013. I followed Dingy home and he drilled it out and installed another side stand for me in his garage. -
Rear Master Cylinder Wont fill
yamagrl replied to HStocker's topic in Venture and Venture Royale Tech Talk ('83 - '93)
Have you tried to reverse bleed or force it up from the caliper? -
I think Damon covers it in his videos. Here is info how to get them http://www.venturerider.org/forum/showthread.php?84030-DVD-of-1st-gen-motor-amp-carb-rebuild-process-purchase-info
-
84 is Mk1, 87 is Mk2 which began in 86 and introduced refinements and upgrades. Most things are interchangeable. Most things are directly interchangeable; that is to say just install it and most of these things are pretty obvious. Some of the other things also require other related items be replaced as well in order to facilitate the installation. For instance Mk2 front brake calipers are different and mount differently. Therefore, in order to use Mk2 front brake calipers on Mk1 you would need to also use the Mk2 forks (or at least the lower fork tubes) and also the anti-dive units and the rotors. The clutch is a similar example, as well as the luggage and some of the fairings/body panels. The TCI has different part numbers but I think they may be interchangeable from 84 to about 89. I'm not 100% sure. I think the main change took place around 90. So, you see, the answered to your question is "Yes, kinda, sorta, mostly."
-
Starter just quit
yamagrl replied to Dragonslayer's topic in Royal Star Venture Tech Talk ('99 - '13)
If you have done all of the above tests and everything checks out OK. And you are certain about that then about the only thing left is the Starting System Cutoff relay. It certainly looks like a short in there could cause both the oil and temp lights to come on. Bongobobny has me convinced that the SSCR (Starting System Cutoff Relay) is kind of tedious and involved to get to. So I'd make darn sure that all of the above stuff is in fact...OK -
Starter just quit
yamagrl replied to Dragonslayer's topic in Royal Star Venture Tech Talk ('99 - '13)
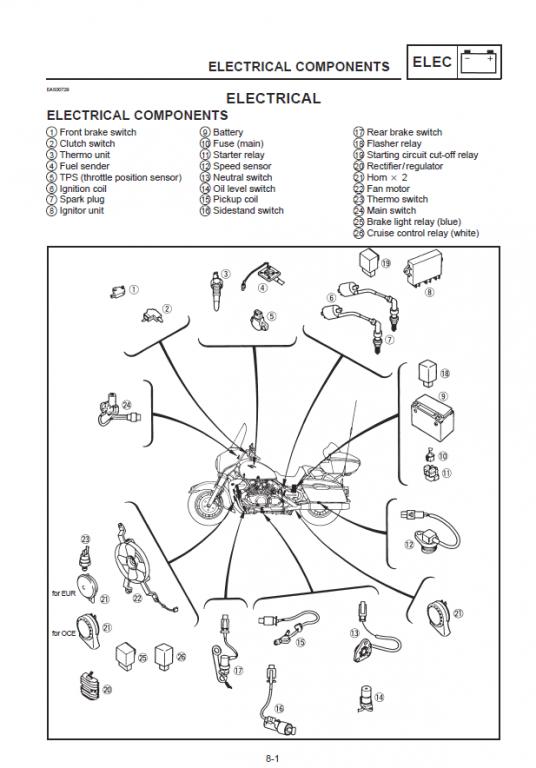
I'm not sure where the Starting System Cutoff Relay is located but I'm attaching a screen shot of pg 8-1 of the manual. It's number 19 and appears to be right behind the engine, pretty close to the Igniter Have you gone through the tests that I posted yesterday? If so what were the results? You should determine all of this first. I'm not sure about the lights dimming etc. Most of those kind of feed through or are somehow connected to the Starting System Cutoff Relay. Some of it could be normal and some of it could be a secondary symptom of the root problem in the component the root problem lies. If the faulty component is grounding out then that might also explain some of the other symptoms/dimming. I'll be traveling a lot over the next few days so my responses may be delayed.
-
Starter just quit
yamagrl replied to Dragonslayer's topic in Royal Star Venture Tech Talk ('99 - '13)
Glad to be of help. I confirmed your Friend request. -
Starter just quit
yamagrl replied to Dragonslayer's topic in Royal Star Venture Tech Talk ('99 - '13)
... know what happens when you hook the battery up backwards? The horn sucks, the radio listens and the lights cast shadows... -
Starter just quit
yamagrl replied to Dragonslayer's topic in Royal Star Venture Tech Talk ('99 - '13)
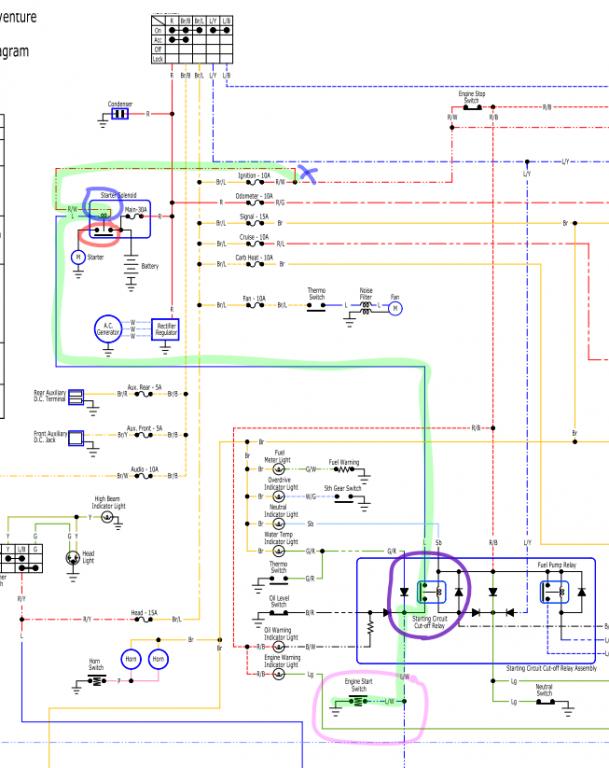
I've been looking at the 99-09 Simplified. You should also have the Wiring Diagram available. I like to familiarize myself and theoretically troubleshoot the issue on the Simplified and then refer to the Wiring Diagram as needed to determine the placement of wires and connectors, etc. so that I can apply what I've figured out to the bike. Based on what you just said, I think you can troubleshoot straight from the "Starter Solenoid". Look at the pic below. With ignition switch on and the "Engine Start Switch" pressed (pink circle) ... current should flow from the blue X (by the ignition fuse) through the coil of the"Starter Solenoid " (blue circle) through the"Starting Circuit Cutoff Relay"(*) (purple circle) and through the "Engine Start Switch" to ground. Thus activating the internal contacts (red circle) in the "Starter Solenoid" and in turn engaging the Starter Motor. (*)That is: assuming that all of the safety switches are in the appropriate position and working correctly and the "Starting Circuit Cutoff Relay" coil is energized and the internal switch in that relay is closed. In the picture it is shown in a normally open state until all of the safety switches, etc. are in their proper setting. ...It appears that with the ignition switch on you should have current (12v) on the Red/wht wire on the "Starter Solenoid". So that would mean that grounding the Blue wire would activate the relay and send major current to the starter motor. That grounding is what is supposed to happen normally through the "Engine Start Switch" via the "Starting Circuit Cutoff Relay" provided that all of the related switches are in their appropriate positions and working correctly. With ignition switch on and if you have 12v to the R/W and you ground the L (blue) wire with a jumper to the Neg side of the battery and the "Starter Solenoid" activates and the starter engages then the "Starter Solenoid" is probably OK and the problem is farther down the line. (see below) If the starter does not engage then the "Starter Solenoid" is likely the culprit. This, you can verify by disconnecting both of the R/W and blue wires from their terminals on the "Starter Solenoid" and then connect a jumper from the terminal that the R/W was attached to the positive side of the Battery. Then attach another jumper on the terminal that had the blue wire momentarily to the Negative side of the Battery. If the starter does not engage, it's bad. Install a new one and you're probably good to go! If the starter did engage then the "Starter Solenoid" is good. It's something else. Proceed as follows: Disconnect the blue wire from the "Starter Solenoid" and with the "Engine Start Switch" pressed, check for continuity to ground. Again, this is what appears to happen when the safety switches are in their proper position and working correctly. If you do not have continuity to ground then you have a problem in the "Starter Circuit Cutoff Relay" or one of the safety switches or the "Engine Start Switch" or it's related ground connection". That BLUE wire just needs to find ground... through the "Starting Circuit Cutoff Relay" and the "Engine Start Switch". Good luck. Heather
-
I added a printable work sheet to the original posting (above). This has also been added to the 1st Gen Tech Library so it can be easily located. Click the PDF link above and print it out.
-
Bad clutch master cylinder and slave cylinder?
yamagrl replied to Lug Nut's topic in Royal Star Venture Tech Talk ('99 - '13)
http://uploads.tapatalk-cdn.com/20160425/e592203430340916a69594f35a9869de.jpg -
I'll send it to ya if ya send me some back stage tickets
-
Bad clutch master cylinder and slave cylinder?
yamagrl replied to Lug Nut's topic in Royal Star Venture Tech Talk ('99 - '13)
I prefer to bleed the clutch in a northerly direction. Get a large syringe from a feed store. You can usually get at least 60 cc. You can get very large (100-200cc) on Ebay if you have the time to wait. You can also buy the same exact thing, except its very large syringe , made for force brake bleeding at Auto Zone. I don't recall the cost, maybe $20. Attach a clear hose to it. Remove the banjo bolt on the clutch master cyl. Place the end of the hose/banjo fitting into an empty plastic soft drink bottle. and kind of secure it so that it will kinda stay in place. Fill the syringe with Brake fluid. Attach it to the Slave bleed screw, open the screw and force fluid all of the way into the coke bottle. Tighten the screw. It may require a couple of syringe-fulls. Be mindful to not reintroduce air when refilling the syringe. If you get the syringe type from Auto Zone it will probably only require one fill. You may have to remove the speed bleeders and reinstall the original bleed screw. Be sure to carefully teflon tape it so the bleed screw threads will be fairly sealed while you are forcing fluid in. Now there should be no air in the line all the way up to the coke bottle. Carefully, so as to not drip fluid on anything, reattach the the banjo fitting and gently finish forcing fluid into the master cyl reservoir... Be careful... it will SQUIRT OUT of that tiny hole. This will only take 15-30 minutes Viola! Let me know if you have questions. -
pm semt