.JPG.97d34da93fc67655234eb6371e3710e9.JPG)

Prairiehammer
-
Posts
3,621 -
Joined
-
Last visited
Content Type
Profiles
Forums
Gallery
Events
Store
Everything posted by Prairiehammer
-
 The short hose with a "diaphragm" looking thing is the intake for the compressor and the pancake is a filter.
 -
The short hose with a fitting goes to the hose and fitting attached to the rear shock. The long hose goes forward to the forks. Those fittings are banjo fittings with O-ring seals, hollow bolt, etc. I believe your best bet to finding those special hoses is on eBay, or contact a member here who has removed their CLASS, perhaps they saved the hoses.
-
In a clutch
Prairiehammer replied to Ed S, SE Nebr's topic in Venture and Venture Royale Tech Talk ('83 - '93)
I think you are on the right track and have sound logic. Get a new slave for $70 and worry no more. BTW, I believe a new rubber flap/bleeder screw cap is included in a genuine Yamaha slave assembly. As for the crankcase oil seal, if it ain't leaking engine oil, then it should be OK. -
Does this help?
-
Side panel vents...
Prairiehammer replied to mechanic1's topic in Venture and Venture Royale Tech Talk ('83 - '93)
There are three different louvered vents on the Venture: The small ones on the dash between the speakers and the instrument cluster. The ones in the fairing lowers that allow air control to the rider's shins. The (most problematic) vents in the side covers of the 1985-1993. These are never found intact, especially the right side louvers. I had a broken vane in the side cover louvered vent on my '90. I fabricated a single vane from brass sheet with a copper 14 gauge wire soldered to the back side of the vane and painted black. It looked OK, but because I didn't fabricate the little pivot arm for that single vane, it would not pivot open with the rest of the vanes. If one examines the individual vanes, one sees that it is a bit more complex than just a center pivoting flap of material. I imagined that the individual vanes could be easily made with a 3D printer. -
Make sure that the plunger within the front brake switch is free. Check for continuity of the front brake switch wires. Check that the front brake switch is in fact properly positioned with in the housing (should be pushed into housing, not partially backed out.)
-
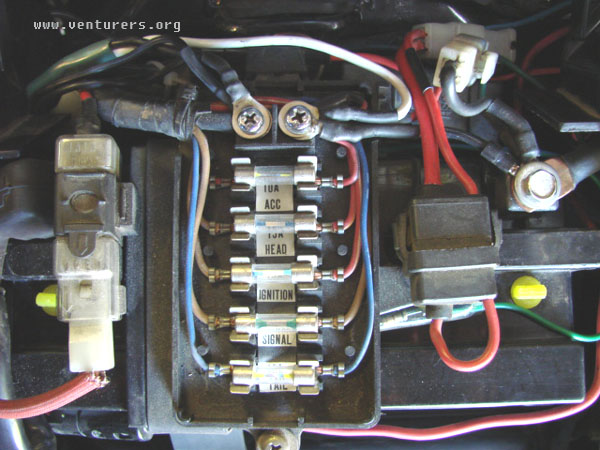
Main fuse is pictured on the far left of this photo.

-
Suspicious tire damage
Prairiehammer replied to stanG's topic in Venture and Venture Royale Tech Talk ('83 - '93)
The Elite II has raised white letters. In order to obtain those white letters, a layer of white rubber is included when the tire is molded. The black rubber showing on the outside is sometimes quite thin and any minor scrape can sometimes remove this thin black layer revealing the inner white layer. My suggestion is that at some point there was some damage done to the black layer (stone chip, careless tire changer, road debris) but you never noted it until you did your tire cleaning and the suddenly clean stark white blemishes were evident. Unless the gouges are deep (through to black rubber under the white), I believe these defects are cosmetic. BTW, Brian, the Elite II is still being made. -
By "collars" are you speaking of the grommets (donut shaped rubber), number 4, 17? If so, they are still available from Yamaha. Some folks have found such grommets at a local auto parts store or home center. If by collars you mean the rubber shouldered sleeve at the rear of the sidecover, number 8, 21, they too are available from Yamaha.
-
Perhaps, while installing the exhaust, the battery ground at the engine (above the water pump, near the motor mount) was loosened?
-
Kev, it's about an hour and a half, prolly less, via Rte 17 and 18.
-
VMax or FJR1300 Final Drive
Prairiehammer replied to jdross440's topic in Venture and Venture Royale Tech Talk ('83 - '93)
This link should work: http://www.venturerider.org/forum/showthread.php?t=37388 But to answer your question: For sure 2005 FJR final drive works, that's what Skydoc put in his '87. As for the VMax final drive, it is my understanding that circa '90 and later First Gen VMax final drive will bolt on. -
low fuel indicator today
Prairiehammer replied to Max's topic in Venture and Venture Royale Tech Talk ('83 - '93)
If you pull the sending unit (inside the tank), you can see the construction of the sender albeit it is enclosed within a steel enclosure. It is basically a wiper attached to a float. The wiper makes contact at various points along a wire winding. With time, the core of the winding becomes distorted, resulting in erratic fuel gauge readings. Some folks have simply straightened the winding core. Others have gently cleaned the accumulated crud from the wire winding. Three caveats: the tank must be emptied to less than half full before pulling the sending unit out or fuel will come out of the large hole that results. Secondly, if it isn't the sending unit, check the wiring between the sending unit and the fuel gauge, especially the connectors at the sending unit. Thirdly, bad solder joints on the CMS (computer monitor) have also been known to cause similar erratic fuel gauge behavior. http://i.ebayimg.com/00/s/MTIwMFgxNjAw/z/vKsAAOxy0bRTDP-y/$_57.JPG -
This bike is ten miles from me. I've looked it over before. He's been trying to sell it for more than a year. But it is NOT an '84, it is a 1983. Have him text you the VIN.
-
Foot brake switch
Prairiehammer replied to mralex714's topic in Venture and Venture Royale Tech Talk ('83 - '93)
The plastic adjusting nut is captured in the mounting bracket by tangs. Using needle nose pliers, squeeze the tangs to release the switch from the bracket. http://i.ebayimg.com/00/s/NDgwWDY0MA==/z/yFUAAOxy4kpRAdbm/$%28KGrHqV,%21oEFCyPWfZ7MBR%21dbmckww%7E%7E60_12.JPGhttp://pinwall2.pinwallcycle.com/ebay/bike5751/844.jpg -
Apparently the "Peggy" with just two mutual friends was the fake, 'cuz the page linked above is gone.
-
So. How do we know which Peggy is the real Peggy? Is this the real Yama Mama or the fake?: https://www.facebook.com/peggyann.pahneryerger?hc_location=friend_browser&fref=pymk This Peggy only has two mutual friends. Seems like it may not be the real Peggy. OTOH this Peggy seems more likely the real Peggy with 24 mutual friends: https://www.facebook.com/peggy.yerger?fref=ts
-
new diaframs
Prairiehammer replied to hell yea's topic in Venture and Venture Royale Tech Talk ('83 - '93)
According to my go to source: http://www.boats.net/parts/detail/yamaha/Y-26H-14933-00-00.html 1983 Spring: 26H-14933-00-00 1984 Spring: 41R-14933-00-00 But the same source says the 41R is used in the 1983. http://www.boats.net/parts/detail/yamaha/Y-41R-14933-00-00.html -
One suggestion, Randy. Modify your search string to include: "-fits" (without the quotes). Seems eBay automatically labels junk as "fitting" a Yamaha Venture. The word "fits" is in many of these product headings. Also: search only in "North America". That eliminates much of the junk from China, Hong Kong, etc.
-
Driveshaft or Tranny
Prairiehammer replied to GilbertHall's topic in Venture and Venture Royale Tech Talk ('83 - '93)
The '83-'85 final drive housings have a 'starburst' pattern to the exterior reinforcing ribs. The '86-'93 are much smoother and less busy in appearance. -
Maybe not in your household, but if I call Debbie a *****, there WILL be some cuss words in response. So, yeah, it's a cuss word by association.
-
Listening to Neil Young as I type.
-
OIC. Duh! Sorry. I didn't see that you had a Second Gen in addition to the First Gen.
-
Rusty, I don't understand. Why did you replace the OEM centerstand on your First Gen with a RIVCO?
-
Closest I can come to a 1952 Yamaha Venture is the first Yamaha. It was introduced in 1952. I don't think Deb would appreciate the pillion. And no cassette player...yet! http://upload.wikimedia.org/wikipedia/commons/2/2c/Yamaha_YA-1_00.jpg