


cimmer
-
Posts
977 -
Joined
-
Last visited
-
Days Won
7
Content Type
Profiles
Forums
Gallery
Events
Store
Everything posted by cimmer
-
ignition questions
cimmer replied to mantree91's topic in Venture and Venture Royale Tech Talk ('83 - '93)
To answer your question, yes the engine does use the wasted spark method. Rick F. -
I am sure that the Funny Car was detuned a bit as not to hurt any parts as they consistently run under 4 sec in 1000 ft. at 300+ MPH. Not bad from a standing start and yes they dont turn worth a crap. Rick F.
-
I think he looks like a WIBE to me.. WIlliam Big Ears.. Rick F.
-
Lost my drive train!
cimmer replied to 86er's topic in Venture and Venture Royale Tech Talk ('83 - '93)
I think I would get it on the center stand and see if you can move the rear wheel with your hands when it is in neutral first and see if you hear any noises. Then I would try it with the transmission in second and see if you can spin the rear wheel that way. Try the simple stuff first before tearing into anything. Good luck.. Rick F. -
The floats are still available from Yamaha with the part number being 1FK-14985-00-00 and a retail price of $50.90 but can be had for $31.68 plus shipping. I would check the float levels before pulling them off if the drain lines are sticking out of the brackets on each side of the bike. Service manual has a good explanation on how to do this and it can be done without pulling the carbs. Setting the float level isnt too hard to get it close as the carb fuel bowl has some markings inside of it that help to get it close. We can give you some assistance and photos on what to look for if it comes to that. Good luck and dont give up on it.. Rick F.
-
Come one come all : Step right up and test your 1st Gen Venture knowledge!!
cimmer replied to cowpuc's topic in Watering Hole
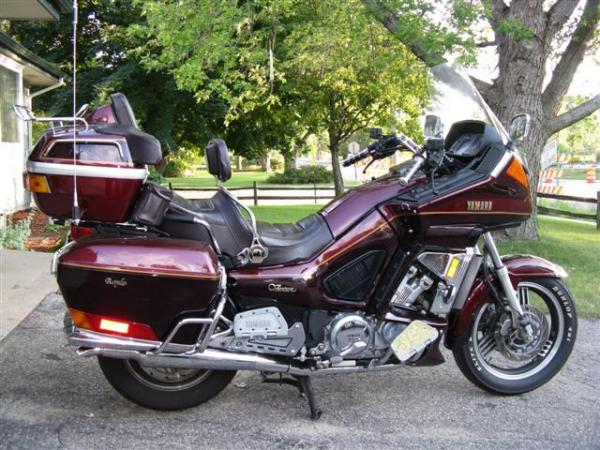
I have those travel trunk bars on the side of my 89 VR. They are a Ventureline item that I was able to pick up NOS when I first got my VR. I actually picked them up at a dealer and was the only Ventureline item they had left in stock. Here is a picture of them on my bike. I am thinking he has them mounted backwards from what I do. Rick F.
-
Hi Jack, welcome to the group. I also have an 89 VR, so I will try to answer some of your questions . The fuel pump does cycle on when you turn on the key to the run position and only runs for a short bit to top of the carbs. There are 4 overflow lines from the carbs, one for each, and they do exit the bike down by the swingarm. I would suggest taking off the saddle bags so you can get a clearer look and see if it is all or just one and maybe trace it back to the offending carb. Chances are you might have a stuck float that is holding open the needle seat valve and flooding the carb. But also check and make sure the gas supply line from the fuel filter to the carbs doesnt also have a leak. I know you said it is holding pressure but better to be safe then sorry. I would also remove the rear tire too, as you might as well service the rear end and swing arm if you havent do so yet. One of the mods that a lot of us do is to add grease zerks to the pivot joints to keep things greased. I believe there is a how to on this in the library for 1st Gens. I would also recommend getting the service manual for the bike, there is a PDF file in the tech section that can be downloaded to you PC. You should not have to pull the tank or the seat to see this but removing the side panels to the fairing and the false tank cover does help. Also the air filter box can easily be removed also to get some light on the subject also. The overflow lines connect to the part of the carbs that face the center of the carb setup so taking off the air filter box would make it easier to see them, but also when trying to run the bike without the air filter assemble, the bike will not rev up properly without the air box. Let us know if you have any other questions and no I dont have the correct powerball numbers either.. Rick F.
-
Be aware that any "kit" you buy will not be complete for your carbs and you will need to buy some items from Yamaha if they are available still. The biggest thing to replace will be your slide diaphragms and these are available from a couple of sources. Sirius Consolidated, Inc in Canada use to give the group members a discount on a set of 4, but not sure if they still are and what price they would be. https://www.siriusconinc.com/search_result.php?make=2&model=Venture%20Royale&part=All&partno=&x=56&y=16&search=search&start=0 contact them and see what they have to say. When ordering from the Carburetor Shop website, I would suggest you pay for the faster shipping, as when I ordered from them this spring and use the standard shipping, it took about a month for the parts to arrive as they come from across the pond. It looks like a nice kit with all the o-rings and gaskets included but you still will need to order parts from another source to replace everything in the carbs. Good luck Rick F.
-
I was out there in June and was able to get a ride in on the Dragon.. We road it on a Tuesday about 430pm and not little to no traffic on it and have a real nice ride both direction on it. It was my buddy on his 89 VR and me on mine. I dont think I ever made it out of second gear the whole time. I also enjoy the ride to the Dragon from Maggie Valley area. Very nice riding out in that area... Rick F.
-
Demo ride impression 2018 Star Venture
cimmer replied to cimmer's topic in Star Venture and Eluder Tech Talk ( '18 - Present)
A little more to add here, we did play around with the parking assist and how to use it. One thing to note is when engaged, you dont need to use the brakes as the electric motor locks in and the bike wont move till you push the control buttons. When you release the button the bike stops and stays stopped. I didnt move the bike a lot, just forward and back with the assist as it was in line for the ride but it was simple to use and engage. Also the adjustable windshield was nice also. I ended up using it at the up most position as the bugs were getting thick out in the country, but it raises and tilts as it changes positions. This is also able to be done while moving on the bike. I should also note that when testing the 2 helmets in the travel trunk, they were full face helmets we used for the test. Also, the Loveland Co area is where the demo bikes were headed to next so the members out there will have a chance to ride them also. And I know they were taking a full dressed one, as the Yamaha guys called it, to Sturgis as it had already left Star Days for there. I also see that they will be offering demo rides on the Star Venture out there for the week of Sturgis, Saturday, August 05, 2017 - Saturday, August 12, 2017. Rick F. -
2018 Star Venture Owners Manual
cimmer replied to Du-Rron's topic in Star Venture and Eluder Tech Talk ( '18 - Present)
I did see on the gas cap cover the premium fuel requirement also when I was checking out the bike. Also on the FOB dying, there is a key built into the FOB that can be removed and used to activate the bike from the right saddlebag. Demo guys showed me that one but you are right about the FOB being able to start the bike but the FOB only has a 31 inch range on it, so I dont see it being an issue, as long as you dont leave it in a side pod on the bike all the time. Rick F. -
I had the pleasure of taking a demo ride on the new 2018 Star Venture Transcontinental today. I will start by saying I wasn't sure if I would like the forward controls, V twin air cooled engine but after riding it I would buy one if they price was cheaper. We went on about a 20 mile ride mostly on country roads in the Red Wing area what included turns, elevation changes and long straight sections. I also sat on the bike with it running as I looked over the center screen to see what all you could do with it. First off, I never felt the heat from the bike as it idled in 85 degree sunshine. I presently ride an 89 VR and sitting in traffic on that can be a hot experience and the Star Venture didn't even approach that. The bike was also very smooth at idle and while riding. I was able to idle around the parking lot at about 10MPH as we positioned ourselves for the ride and it didn't surge or struggle at all. Acceleration is very crisp in sport mode with a little less in touring mode. You are able to switch between the two with ride by first releasing the throttle and the pushing the mode button and the twisting the throttle for the new mode. The indicator is on the speedometer and easily seen. The bike handled the curves with ease and had no problem accelerating out of them. I found that when running about 55 MPH I was usually in 4 gear unless I pushed my self to shift up to 5th or 6th which I did for testing purposes. Again, no issues with lugging the bike down while in 6th to 55 and accelerating up to 65 or so. I did hit the rev limiter a couple of times early into the ride when accelerating from a stop sign but quickly got the feel for the engine and the speeds and had no issue with the rev limiter after that. I did find myself not using 6th much as I felt I didn't need to. The escorts did have us running on some of the roads at 65 MPH and the engine never seemed to care what gear I was in. I did find that after a few miles the forward controls were very comfortable to use and I seem to adapt to them ok. I loved the foot boards as they are big and roomy and you can change the position of you feet and hence your leg/knee and still have them firmly planted on the boards. Yamaha did a great job on those in my opinion. Air flow on the bike for the driver was excellent. The wings on the side of the fairing are adjustable and I was able to get plenty of airflow onto my body to stay nice and comfortable. I was wearing a ventilated jacket and never once felt hot. There is also a air opening at the bottom of the fairing for air to your feet and these were open also. We also tested the 2 helmets in the travel trunk and found they fit with room to spare. Also the key fob has an emergency key attached to it for the ignition in case of the FOB losing power and unable to activate the bike. There is a key switch in the right saddle bag that the key fits into. The side pods with the louvers on the front are where the electronic are located and do not provide air flow to the engine as I thought they did. The louvers are just for show. The center screen for the GPS, Audio Controls, and bike information was large and well lit. I had no issues seeing it while on my ride. I was wearing sunglasses and at time I believe there was direct sunshine on it. There is a control button array on the left handlebar that allows the rider to move around as you are riding. I was also able to use the touch screen with my riding gloves on when needed. I know some touchscreen want to feel your skin for the heat to sense where you are touching. The bike information included present fuel MPG and average fuel MPG.. mine was indicating 34 by the way and had 1700 miles on the odometer.. I didnt get much more into the electronics other then to set up a radio station to listen too. The sounds was very good and easy to hear at speed on the ride. I guess the bottom line is I really likes the bike and felt very comfortable on it. I would be temped to buy one other then I have a hard time spending $27,000 on a motorcycle at this time. When they come on the use market, I would sure like to get one then. That is about all I can think of now but feel free to ask question and I will see if I can answer them for you but I think Yamaha has a winner here with this other then the cost. Thanks Rick F.
-
Looking like rain Thursday and Friday so I am looking at going to Red Wing on Saturday and riding a few bikes including the Venture I hope.. Rick F.
-
One thing that occurred with my last trip was a replacement clutch lever as we had a bike fall over and broke a chrome Ventureline clutch lever on our first day out. Yamaha dealer had nothing, but a used bike place had a lever that would work with a slight modification to it. I believe it was a parts unlimited handle. Without a clutch, it is hard to get the bike running. Luckly I was there with my VR and removed my handle and installed on my buddy's and was able to get it up to the garage where we were staying and then used it as a reference in looking for replacement.. Just a thought.. Rick F.
-
I am hoping to make the Red Wing event as that is the closest one to me. Sounds like they are moving the bikes to there when Star Days ends.. Rick F.
-
I ran across this on Facebook and thought I would post the link to an article on " What Virginia Tech learned about how and why we crash our motorcycles". Here is the link to the story.. https://www.revzilla.com/common-tread/what-virginia-tech-learned-about-how-and-why-we-crash-our-motorcycles?utm_campaign=boosted-posts|tpfn&utm_content=common-tread-how-to&utm_medium=social&utm_source=facebook&utm_term=what-virginia-tech-learned-about-how-and-why-we-crash-our-motorcycles-post-112116-|tpfn Sorry if this was posted here before but I didnt find it on a search on the site. Rick F.
-
What do you recommend?
cimmer replied to s.tyler58's topic in Venture and Venture Royale Tech Talk ('83 - '93)
One thought is to get a bottle of ABS glue from a hardware store and use to to glue the parts that are cracked back together for now. Then I would start searching for better pieces over the summer and fall and then replace them over the winter when you cant ride. Hope that helps.. Rick F. -
Just wanted to let everyone know that BrakeCrafters now has a kit for both front calipers for the 86-93 Ventures. He has it listed at $64.99 and that includes everything you will need to replace the seals in both front calipers. Here is the URL for the kit: https://brakecraftersusa.myshopify.com/collections/1989-yamaha-xvz13-d-series-venture-royale/products/1986-1993-yamaha-xvz1300-venture-front-brake-caliper-new-seal-kit I worked with Mark in making sure this kit worked and I was able to rebuild a pair of spare front calipers I had laying around with this kit. I found it so much easier to clean up the calipers when I could split them into and get to everything. I ended up spliting the calipers and then blowing the pistons out with air. I clamped them down to my wood topped bench and added a shim to stop them from blowing all the way out so that both would extend fully with out letting the pressure out. It seemed to work for me after I figured it out for the first one. Mark does supply the o-rings needed between the caliper halves and I torqued them to 20ft-lbs when reassembling them. I also found that if I got them tight, I could mount them on the fork and torque them a lot easier to the 20 ft-lbs then trying to hold them on the bench and doing it. Also he does offer a kit for the rear calipers also... BrakeCrafters offers a 15% welcome discount on your first order and free shipping.. It is nice to see an aftermarket company offering items for our older rides that is quality stuff. No Chinese stuff here, most is made in Europe and Japan.. Hope this helps when it comes to rebuild your brakes.. Rick F.
-
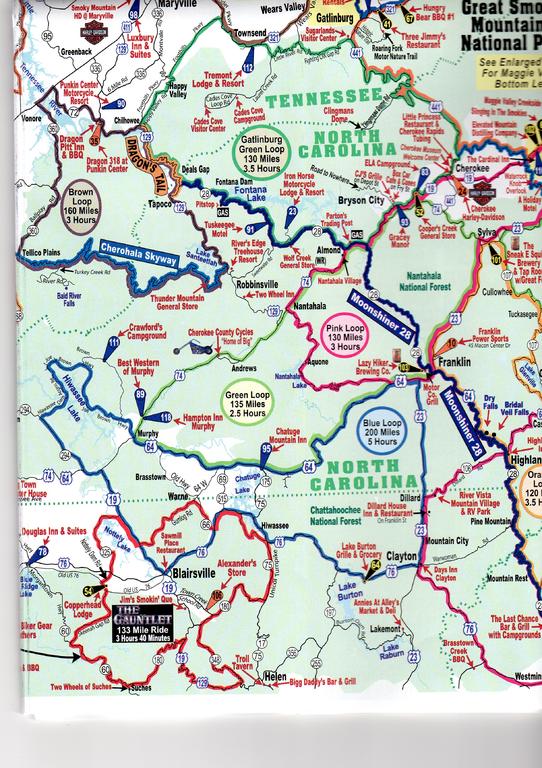
I was out in NC and Tenn riding the Dragon and other assorted ride and picked up a very nice touring map with a lot of the rides in the Tenn, NC, and surrounding states listed with mileage and estimate riding time. This was a free map I picked up at Bush's Beans visitor center off of hwy 441 in Tenn. There is a web address listed on the map, http://www.wildrides.info . The map might be available from many different locations as one side is nothing but adds for local places. I have also taken a sample scan of the map but it way too big to scan it all and post it here. Rick F.
-
92 venture royale
cimmer replied to mtcowboy's topic in Venture and Venture Royale Tech Talk ('83 - '93)
Another thought is that the air compressor only works when the ignition key is in the acc position and not the on position. Just throwing it out there in case you didnt know that.. Rick F. -
24mm hex bit socket for fork work
cimmer replied to cimmer's topic in Venture and Venture Royale Tech Talk ('83 - '93)
The 16mm coupling nut has an internal thread size of 16mm but the outer size of the hex nut is 24mm and therefore fit into the 24mm socket making a 24mm hex bit socket. Here is a picture of the tool. I ended up using masking tape to make sure the nut stayed in the socket. I tried the 13/16 sparkplug socket turned upside down but I didnt get a good bite with it. 24mm is about 15/16 so I went looking for something in those sizes and found this coupling nut. It is 2 inches long so there is enough room for it to grip and the cost was very reasonable. It was located in the Menards metric bolt section and has Handi-Pack part number 88319 on the package. Hope this clears things up a bit. Rick F.
-
I needed a 24mm hex bit socket to help in the removal and reinstall of the bolt that secures the fork dampers to the lower fork legs. The top of the fork damper uses a 24mm hex bit to hold the damper still as you tighten the lower 10mm hex drive bolt at the bottom of the forks. I ended up making one out of a 24mm 1/2 drive socket and a 16mm coupling nut I picked up from Menard's. I ended using masking tape just to hold it all together so I wouldnt leave anything behind and it worked like it was made for it. Total cost for the tool was about $7.00 I believe. I hope this help out some of you in your future fork work. Rick F.
-
No brake lights, fuse is good
cimmer replied to tertel's topic in Venture and Venture Royale Tech Talk ('83 - '93)
Break out the wiring diagram and start testing the circuit to see if you have power anywhere along it. I believe there is a connector under the seat that might be a good place to start. Also make sure the fuse is tight in the holders as they do get loose over time. A lot of us have upgraded to the newer fuse panels. Good luck. Rick F. -
This picture appears to be of a screw that is holding the carb to the rack that keeps the carbs aligned. I would remove all of the other screws with an impact driver as that will loosen the screws and they can be very tight with age. Once you have the other carbs off of the rack, I would use a drill and and easyout to remove what is left of the screw. Hope this helps. Rick F.
-
It appears that the first opportunity to ride the new Venture is Star Days at Treasure Island Casino in Minnesota. That listing states be one of the first to ride the new Venture and list it as one of the bikes. Guess I will have to get my name in the hat and get a ride on one not that I am thinking of getting one as my VR is doing just fine for me. Rick F.
.jpg.4344bcb282539a0c35e34084326fc777.jpg)
.jpg.cbbcb9fafe60daa38f7ce07432b89c3c.jpg)
.jpg.4eaa2fec697199541b3b39adf297d1b7.jpg)
