cimmer
-
Posts
977 -
Joined
-
Last visited
-
Days Won
7
Content Type
Profiles
Forums
Gallery
Events
Store
Everything posted by cimmer
-
Looking for an Opinion
cimmer replied to Chaharly's topic in Venture and Venture Royale Tech Talk ('83 - '93)
The only issue with the old clutch hoses is that they will expand when you put them under pressure. I ended up replacing all the hoses on my 89 a few years ago due to the fact when I applies the brakes I could feel the hose swell in my hands as I held it. I went with SS lines for everything but left in the hard lines since they shouldnt wear out. It made a big difference in how much quicker I could stop. I also rebuild the master cylinders and calipers as well and the clutch master and slave cylinders. if you are just rebuilding the slave cylinder for the clutch, make sure you get some new washers for the banjo connectors as you it is good practice not to reuse them. You will also need a Crankcase cover 2 gasket, 3JP-15461-01-00. You can do this without changing the oil as you will only loose a little bit of oil when you pull the cover. You will also notice a washer on the bottom bolt of the cover, if you remove this, it is also a drain for the oil in the transmission area. It will take a little time to get the slave cylinder out but it does come out, you just have to work with it and it doesnt need to be forced. There is one way it comes out and goes back in. Good luck. Rick F. -
Sorry, I was thinking you were looking for the drain screws for a 1st Gen Mk II, they do have an o-ring above the screws threads and are located where you can access them while the carbs are on the bike. Looking at the parts diagram, it appears these screws are located on the float bowl covers that face each other when mounted on the bike. Good Luck... Rick F.
-
I think I would not go higher then $500. There is a lot of work there and your time has to be worth something, specially if it takes you away from riding the hills. You are going to have to buy parts for the forks, carbs, ignition, battery, tires and who knows what else. Add it up and a low estimate is over $700 in parts for everything. This would be doing the job correctly in my mind so that I would feel comfortable taking it on a long trip.. If you want it to part out, saving some parts for yourself to add to your bike, then it might be worth a little more to you. Hope this help you out.. but in the end only you know what it is worth to you. Good luck Casey... Rick F.
-
Personally, since they are not available now, I would clean up the old ones and use those. These are accessible when the carbs are on the bike and could be replaced at a later time. With the drain hoses connected properly, all you would loose when changing them is the fuel in the float bowls. I am working on a set of carbs also with questionable drain plugs, but plan on using them and replacing them later if needed. As long as gas doesnt seep from around the o-ring, you can always just plug the drain line temporarily. Just a thought.. Rick F.
-
Check your local Uhaul as they have them available. I haved used them a few times. Sounds like a fair price for the VR to me. Rick F.
-
Welcome to the group and that is a nice looking blonde you have there. And you can bring all da Bears stuff you want to the rally.. Rick F.
-
Sounds like it could be a great deal for you. Offer him the low money and see how it goes, as you might be the only one that has contacted him about it and he might just want it gone. I did that for a friend on a bike, guy said no at first and called me back couple days latter and accepted the offer. Good luck. Rick F.
-
carb, plugs, gas, exhaust issues?
cimmer replied to tntviper1's topic in Venture and Venture Royale Tech Talk ('83 - '93)
another thought on this issue is to check the vacuum lines and make sure they are tight and no holes in the lines. Might be possible a mouse got hungry and took a bit of one. Also make sure the vacuum port caps are on tight and not cracked and leaking. I have done the shotgun cleaning in the past and it does help to clean up air passages that can get clogged as well as fuel passages. Good luck and let us know how it goes. Rick F. -
Yes trailer it home as you hate to back down between Wall and Murdo wouldnt you. And you know it would happen there in the middle of no where. It looks good and has a lot of Ventureline Chrome on it. I see it has the passenger arm rest with it plus all of the rear end chrome goodies. You might be able to recoup your cost on it fixing it up and selling it, but you know what the cost can be to fix the carbs. I would offer him less and go from there. When running properly with all the major issues resolved, I would think you could get $2000 or better with it all cleaned up and shiny. Good Luck Rick F.
-
Those ports are used to vacuum sync the carbs and should be capped at all other times except for carb 2 which should have a vacuum line running up to the TCI box. Also in that line is a restrictor with an arrow on it that I believe points to the TCI box. http://www.partshark.com/oemparts/a/yam/5107f835f870022108d65769/air-filter Check out items 11,12,13, 3 and 4. Let us know if you have more questions. Rick F.
-
funky carb issue!
cimmer replied to Venturerscott's topic in Venture and Venture Royale Tech Talk ('83 - '93)
Kinda sounds like the pilot screws are not properly adjust on carbs 2 and 4, the front pair. This could also be a clogged passageway for the fuel to get to them. I would recommend turning them all the way in, clockwise, gently till they are seated and turning them out 2 1/2 turns and trying starting it them. This might solve the issue if that is all that is wrong. You will also want to sync the carbs once you getting it running. Good luck and let us know what you find. Rick F. -
The Black Hills can be a lot of fun in June and early July, but by the middle of July they do get crowded. And yes avoid late July and early August due to Sturgis and is cast of crazies.. A trip to Devil's Tower via Belle Fourche and taking SD 34 to Wy is a nice ride especially when you include Spearfish Cannon on the way. I have added a link to a map of the Black Hills and surrounding area so you can plan accordingly. Enjoy your trip and if you would like a nice steak, try Elk Creek Steakhouse off of I90 near Piedmont. http://southdakotarides.com/images/data/files/MotorcycleSkillRatedMapBlackHills.pdf Rick F.
-
Carb needles Jets?
cimmer replied to cimmer's topic in Venture and Venture Royale Tech Talk ('83 - '93)
My understand is they both wear over time since it is metal on metal. I believe the needles would wear less the nozzles but with 45K on my bike, I just wanted to change them out. I am leaving towards the Yamaha Vmax needles since they are still available and just ordering them. I can try them out and if I dont like them switch them out for my old VR needles. Least it is easy to do then just about anything else on the carbs. Rick F. -
I have always thought that maybe the EFI system off of a FJR might be adaptable since it is also a 1300cc.. I think just splitting the rack in two would be the biggest challenge using it. It wont be a cheap conversion but I think it would be doable. I have seen the EFI racks on ebay but it might be cheaper to find a whole parts bike and use all the parts off of that.. Just my thought but good luck with it all and let us know how it goes.. Thanks Rick F.
-
Windshield mounting pic MKII
cimmer replied to CaseyJ955's topic in Venture and Venture Royale Tech Talk ('83 - '93)
I believe the windshield are the same for all 1st gen, just the trim piece is different is all.. I am not able to get you a picture of my 89 with out the chrome trim just now but I might be able to by Sunday evening if you still need it. Rick F. -
I am getting ready for a rebuild of my carbs for my 89 VR and am wondering what people are using for replacement needles? The factory needle for the 86-93 Venture is part number 1NL-1490J-00-00, which is Mikuni # 5DZ3, which of course is no longer available from Yamaha or anywhere else it appears. I have looked at the Canadian Yamaha site and see the 89 VR carbs use a part # 1UM-1490J-00-00, but it appears this also is not available anymore. I did order the Keyster Carb kit, K-1359YK, which is listed for the Vmax 1200 and the Venture 1300 and does include a needle in it. It is labeled Y338 but not sure what is specs actually are. Just curious as to what people are using when rebuilding their carbs. Thanks Rick F. [h=2][/h]
-
Sorry to hear you gave up on it but I totally understand.. some times it is the best thing for our sanity in the long run. Rick F.
-
One of the things you need to do when wet checking is to get the bike on the center stand and then use a jack to make sure the carbs are level. This most likely means jacking the bike up a bit in the front. If you have the service manual, I am seeing a description on the procedure on page 5-9 of the 86-93 Venture service manual. It also states the open the drain tube with the tube attached and warm up the engine. It doesnt really say, but I am wondering if you need to take the measurement with the engine idling so that you see the float and needle working to maintain the correct level? If I need to do this I think I would make marks on a clear tube for the center line of the slider and the level desired for the fuel to be at. Keep up informed of your progress if you would.. Thanks Rick F.
-
The issue with just picking needles is there need to be the correct size. Using the Yamaha parts listing for the different bikes doesnt tell us if they will actually fit. If we had the Mikuni part numbers from them might help us get something close that might work. I have the Keyster K-1359YK carb kit to use on my 4 carbs next month, has to warm up enough in the garage to work. It is made in Japan and does include a replacement needle, labeled as a Y-338, but I have no idea if it work with the Venture as I am guess it is more for the Vmax. I been searching the net for some replacement but not having much luck and am considering a set of Yamaha stock Vmax needles as they still sell them. They are close and might just work and if not, they are very easily changed out. Here are the measurement I have came up with so far from different sources online. Part no. Mark Slots Length Dist.1 Dia 1 Dia2 K1 K2 K3 K4 K5 K6 A1 A2 A3 A4 A5 A6 J8-5EZ43 5EZ43 1 50.600 3.000 3.000 0.000 16.400 39.400 0.000 0.000 0.000 0.000 1.15 10.00 0.00 0.00 0.00 0.00 Vmax 1200 J8-5DZ03 5DZ3 1 50.500 3.000 3.000 0.000 15.700 36.700 0.000 0.000 0.000 0.000 1.00 8.00 0.00 0.00 0.00 0.00 Venture 1300 J8-5GLZ37 5GLZ37 1 50.500 3.000 3.000 0.000 16.300 20.300 34.300 0.000 0.000 0.000 1.45 3.00 7.00 0.00 0.00 0.00 Venture 1200 Anyway if we can find out the part number of the needles in question, we might find something close to use. Rick F.
-
That does make sense on the aftermarket parts. I am going to keep on eye on them and see how it goes. I been looking for the correct replacement needles for the Venture but I am having no luck in locating them so I was thinking of the factory ones for the Vmax. It does have a different taper to it but it is close and might be worth a try.. Least the needles are easy to replace if needed.. Heck most of us here are wrenching on our rides cause we enjoy it and the challenge of keeping them running correctly.. Good luck and keep us informed.. and if we ever need help taking the carbs off, we know who to go to now.. Rick F.
-
new bike prep
cimmer replied to Venturerscott's topic in Venture and Venture Royale Tech Talk ('83 - '93)
Welcome.. the oil filter part number in Fram is a CA6002, with Yamaha's part number, 1J7-13441-10-00. It is the standard filter for most Yamaha that use the drop in one. Some of the plastic is still available from Yamaha but it is very hit and miss with mostly misses. You can sometimes find useful items on ebay or there are some motorcycle junk yards that still have items available. Here is a parts list that you can see what you need and what is available.. http://www.partshark.com/oemparts/a/yam/5107f83cf870022108d6578d/cowling-1 Sometime posting what you need in here in the groups, a member might have a good item they are willing to part with. You might want to also check the coolant in the bike and swap it out if you dont know how long it has been in there. These bikes do leak coolant in the cold winter months a bit so they usually need to be topped off each spring. I personally use seafoam in just about every tank of gas I out into the bike. About the only time I dont is when I am riding all day and I usually add it to my last tank before I park it. Do you have the service manual for the bike yet. If not it is located in the tech section here under 1st Gen and it a great source for doing maintenance on the bike. A former member made it into a PDF file for us to use. And when you get around to it.. We need pictures of your pic.. Ask away on anything and we will do our best to steer you in the right direction.. Rick F. -
Was just rereading the whole post and a couple of thoughts came to mind.. referring to the part diagram located here.. http://www.partshark.com/oemparts/a/yam/5107f835f870022108d6576a/carburetor-non-california-model Did you replace the o-ring, item 31 that goes between the main nozzle, item 32 and the jet block, item 30? Also did you use a new gasket, item 33? Make sure that there is a washer, item 27 on the screw, item 26, that cover the opening into the nozzle area. Just trying to eliminate possible issue here.. Did you replace the main nozzle and needle, item 8, also? I know that the needle is not longer available from Yamaha dang it.. I plan on using a Vmax needle in my replacement. It is possible that if the nozzle and needle were not replace that they as not sealing the opening in the nozzle tightly and it is allowing fuel to get by them and causing the flooding. They do wear and that causing the nozzle opening to get oblong instead of round. It they were tight then I would expect the fuel to rise in the float bowl but not seep out as it is appearing to do now. When you rebuilt your carbs, do you strip them all the way down and soak them in any carb cleaner? Did you blow out all the air passages after cleaning the carbs? I think you have the float levels correct so I am trying to think of what could cause the issue you are having and these things came to mind. I am planning a carb rebuild myself and have been working on getting all the parts I will need and plan on replacing a lot of the parts in the carbs. The ethanol in the gas today just wreck havoc on the parts in this old carb. I figured replace what I can and hopeful have another 20K of troublefree carbs. Good luck and let us know what you find and how it is going.. Rick F.
-
Mixture Screws - Replacements?
cimmer replied to mountainmanVR's topic in Venture and Venture Royale Tech Talk ('83 - '93)
Another trick to use to get them out is the straw that comes with a can of WD-40. It should fit into the hole of the oring and washer and you can pull it out that way. Or spray a little WD-40 in there with the straw all the way in can help also. Rick F. -
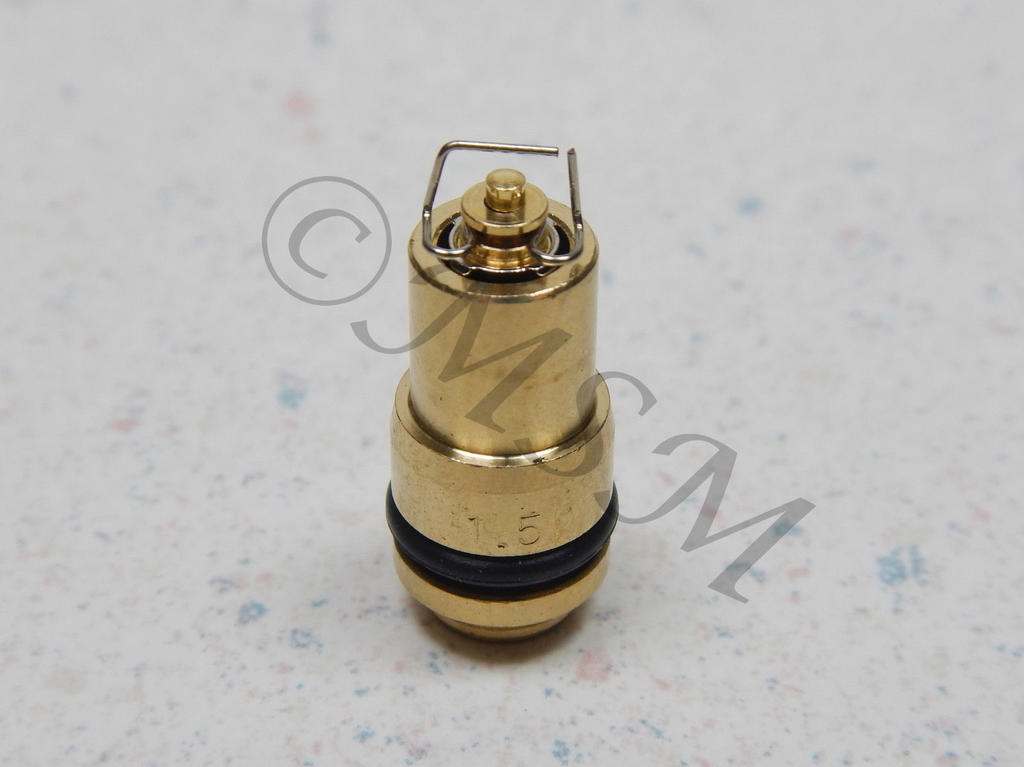
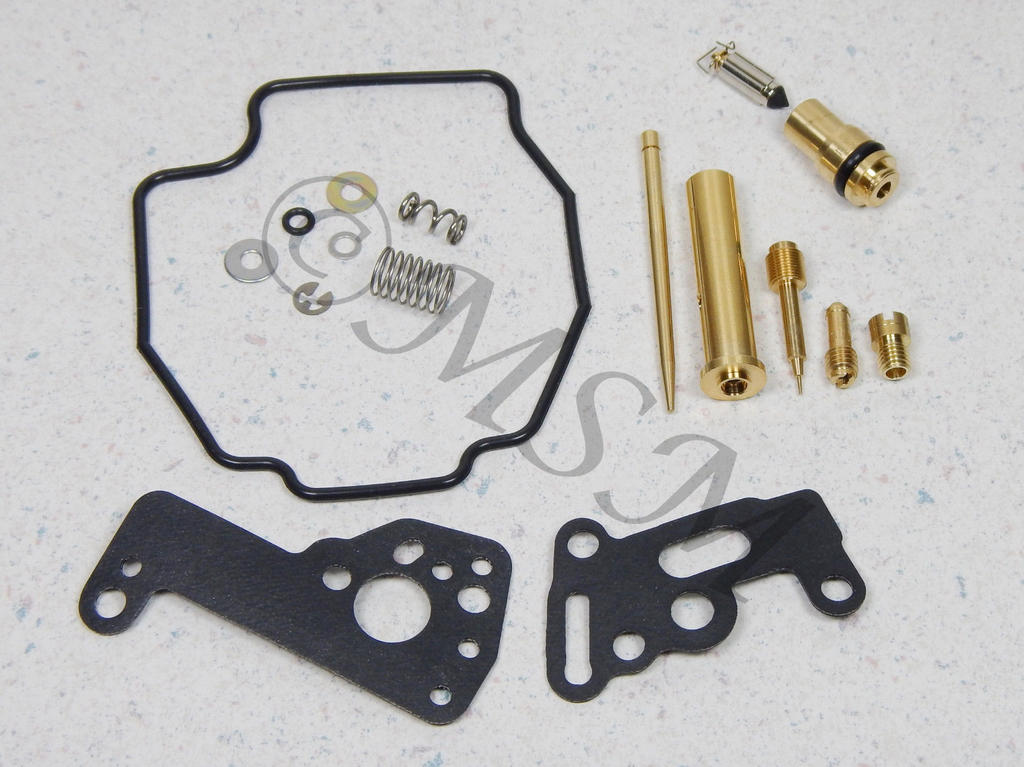
One thing comes to mind and just want to check with you... The needle valve for the fuel inlet has a wire attach to it that has a cut in the wire. Are you fitting the float tab into the cut of the wire. That is how it is suppose to go. I have included a photo of the Keyster Carb kit, K-1359YK. It is available on ebay or I ordered mine from http://www.siriusconinc.com. They also have a set of rubber plugs for the bottoms of the jet block for under $20 for all 8. I did order these also but I have tried them to see how they fit but I did just disassemble a carb tonight and can try them tomorrow for you and let you know. It is strange that the carbs are not venting out the tubes on top of the float bowl covers. I take it you can blow air thru those tubes as well. Sorry for some of the basic questions but just mentioning everything. Have you check to see if maybe you have a bad float. Setting the float height when dry is on thing but what about when they are wet. Before you disassemble the carbs again, do the wet float check on them with some clear tubing. The procedure is listed in the service manual and might be worth the time to do it. Least it let you know if the floats are good or if maybe one is sinking a bit and letting too much gas in. Let us know what you find and good luck. Rick F.

-
I always like that color combo... dont worry you will get those carbs ironed out and will be so pleased that you did when you go out for a cruise and twist that throttle a couple of times.. But I will warn you that your mileage will suck after you do that cause you cant stop doing it when ever you can.. Rick F.