cimmer
-
Posts
977 -
Joined
-
Last visited
-
Days Won
7
Content Type
Profiles
Forums
Gallery
Events
Store
Everything posted by cimmer
-
would bad spark plug(s) lead to other electronic issues ?
cimmer replied to bcleveland's topic in General Tech Talk
I would recommending checking the coils and the TCI unit as they could be causing your issues. Rick F. -
Greasing rear wheel pins and splines
cimmer replied to frankd's topic in Venture and Venture Royale Tech Talk ('83 - '93)
I have attached an URL to the Yamaha part fiche to use to explain this, https://www.partshark.com/oemparts/a/yam/5107f83bf870022108d65785/rear-wheel What we are talking about with fingers is the pins (#9) on the diagram and the hub clutch (#8). By removing the circlip (#12) you can pull out the hub clutch and pins and grease the pins. These are what transfer the power to the rear wheel from the pumpkin assembly. It is also a good time to grease all the joints in the a-arm assembly also as they need grease, especially if you dont have grease zerks installed in them and if not, you can also install them yourself as I believe there is a article in the tech library on how to do that. Hope this helps.. Rick F. -
What is happening when you push the piston into their openings? I would remove the seals and make sure the piston fit into their openings in the calipers with no seals in place and then see how the seals fit on the pistons. When the seals are in their grove, are they smooth with the cylinder bore or do they protrude out of the grove a lot. Maybe get us some pictures to check it out. I had no issues when I rebuilt mine last year. Rick F.
-
Just saw this on the facebook page and had to share it here. Hopefully you can see it as it is a facebook Video. https://www.facebook.com/JungleVT/videos/2763770517098106/ Enjoy Rick F.
-
Where to put those lights?
cimmer replied to videoarizona's topic in Royal Star Venture Tech Talk ('99 - '13)
I did the same on mine also to make the high beam indicator work. Swapped the bulbs in the dash, was too easy not too. Rick F. -
Air ride problems
cimmer replied to JimboSlice's topic in Venture and Venture Royale Tech Talk ('83 - '93)
On the air suspension system, as stated above it is only adjustable in the acc postion with the key. The auto system just set the air to predetermined levels where the manual setting lets you adjust the air to any level you want. I would check the hose connections and the solenoids for leaks. Also the silica can be dried in an oven or microwave to dry it out and reuse it or you can buy a bottle of it and replace it that way also. I would pay attention to how the parts come out as if I recall the service manual shows a part that isnt in the 89 VR drier housing. On the drive shaft, there is no lube in the drive shaft itself but the differential does have lube that also lubricates the gear on the end of the shaft. The onle thing to make sure of is the joints in the rear suspension are lubed and moving freely. It is possible that someone has added grease zerks to the a-arms and then you can just grease them that way. The drive shaft can be removed from the u-joint at the rear of the engine and some lube applied to the spines and then grease the pivot bears for the swing arm. If you dont have a service manual yet, there is one that can be download from the tech section that will assist you in keeping your VR running great. Enjoy the ride.. Rick F. -
The hazard switch MUST be in the circuit for the turn signals to work.. I found out the hard way that is how it must be.. Rick F.
-
Brake seal direction
cimmer replied to dna9656's topic in Venture and Venture Royale Tech Talk ('83 - '93)
I did have to clean out the grove they sit in with a pick to get all the crud out but they did slide in nice and tight. I applied the grease to them after I had them in place so the grease didnt apply any pressure to them when seating them in the grove. I had to run my fingers around the pressure seal to get it to seat properly. Hope that helps. Rick F. -
Brake seal direction
cimmer replied to dna9656's topic in Venture and Venture Royale Tech Talk ('83 - '93)
Are you using any of the supplied red grease on the seal and piston when you go to install them? Also make sure you have the seal area nice and clean so the new seals fit completely in them. Are this the double piston 83-85 calipers or the 4 piston 86-93 calipers we are dealing with here? Rick F. -
Staor and/or rectifier question
cimmer replied to luvmy40's topic in Venture and Venture Royale Tech Talk ('83 - '93)
do all the above cleaning but if you have an unsealed battery, double check the fluid levels in the battery also. Rick F. -
I for one would double check the kill switch and make sure you have the switch in the run position and the bike in neutral. How bright is the headlight when you turn the key to the start position and does it go out when you try to start the bike? You might want to make sure you have a good ground to the engine case. It is generally on the front lower right side of the case. The starter can be a pain to get out as you also need to drain the engine coolant and remove the thermostat housing to make clearance for the starter to come out. Let us know what you find out please.. Rick F.
-
I used the red grease from Brakecrafters when I rebuilt my calipers last year and it made a world of difference when sliding in the pistons. Without the grease they actually pulled the seals out of the groves but with the red grease they slide right in with no issues. I ended up applying it also to the seals that go between the caliper halves just to make sure they didnt dry out. Rick F.
-
MK1 Carb rebuild parts
cimmer replied to venturesome's topic in Venture and Venture Royale Tech Talk ('83 - '93)
Good source for the rubber carb plugs is SCI out of Canada. https://www.siriusconinc.com/search_result.php?make=2&model=Venture%20Royale&part=All&partno=&x=56&y=16&search=search&start=0 They sell all 8 plugs as a package for $15.13 plus have other parts. I am not a fan of the Keyster Carb kit they sell as it is more for a Vmax then the MKIIs. Hope this helps you out. Rick F. -
I just reread you post.. what you need to complete the kit with Yamaha parts is a Caliper Seal Kit 1NL-W0047-00-00 Hope that helps Rick F
-
It appears you have the calipers off of a MKII 86-93 Venture and they do use different sized caliper pistons in the left front caliper. Your easiest way to rebuild these caliper in my opinion is to buy this rebuild kit as they supply all the o-rings and seals for the MKII calipers. https://brakecraftersusa.myshopify.com/collections/1989-yamaha-xvz13-d-series-venture-royale/products/1986-1993-yamaha-xvz1300-venture-front-brake-caliper-new-seal-kit This kit comes with the o-rings that are used when you separate the caliper halves as you have done from the pictures. Yamaha does not supply those o-rings.. He also has a rebuild kit for the rear caliper and offers a 15% discount to new customers.. https://brakecraftersusa.myshopify.com/collections/1989-yamaha-xvz13-d-series-venture-royale/products/1986-1993-yamaha-venture-royal-brakecrafter-rear-brake-caliper-seal-kit I hope this helps you.. Rick F.
-
Will these spark plug caps work?
cimmer replied to Chaharly's topic in Venture and Venture Royale Tech Talk ('83 - '93)
When I replaced the caps on my 89VR, I used the Dennis Kirk catalog and order NGK 5K caps and nonresistance spark plug wires. https://www.denniskirk.com/parts-unlimited/spark-plug-wire-01-114-1.p2021.prd/2021.sku The wire appears to be available from any Parts-unlimited dealer but I would replace both wire and caps. I believe I was able to do all 4 wires with the 6 ft roll. They also have an assortment of NGK caps so you can pick out the angle that works best for each cylinder. On a side note, I have since swapped over to Coil on Plug, COP, and am happier with that set up then the stock coils and wires. Rick F. -
I used ride-on in my motorcycle tires last time I change them. http://www.ride-on.com/motorcycle-formula-mot.html I like the idea of them sealing a leak and providing some balancing to the tires. But honestly, it was the penetration protection I was after. I did find they did a good job with balancing and I do plan on using this again when it is time to change out my tires. I have not tried the beads and at this point most likely wont as I am happy with what I am using. Rick F.
-
Fork seals, again!
cimmer replied to CaseyJ955's topic in Venture and Venture Royale Tech Talk ('83 - '93)
30W does seem a little to heavy for fork oil. I am using 15W with my progressives springs and I use a little bit of air also.. seems to work nicely for me. But the level of the oil in the fork does make a difference.. Rick F. -
Is the battery indicator lite on the computer panel between the gauges? This appears to me to be someones attempt to supply the voltage to the sensor for the battery to keep the battery icon turned off. Yes it does appear to have been connected to the postive post of the battery or to the ignition side of the fuse panel. To check and see if you have a battery draw, pull the postive battery cable off and see it you get a spark. If so, then I would reconnect the batter and pull fuses and measure voltage across the terminal and see if you get a voltage reading. This should help you narrow it down as to what system is pulling the battery down. Good luck.. Rick F.
-
Fork seals, again!
cimmer replied to CaseyJ955's topic in Venture and Venture Royale Tech Talk ('83 - '93)
I believe those chrome fork protectors are an aftermarket item. I have seen them on a few Ventures and other bikes. I do know in 90 Yamaha started using the rubber fork boot to protect the forks from debris so they must have determined it was an issue that needed to be addressed. Hope you can figure it out but try running a dryer towel or microfiber cloth over the tubes to make sure you dont have a small nick and when apart, roll the tube along a flat surface to make sure if is straight. Good luck.. Rick F. -
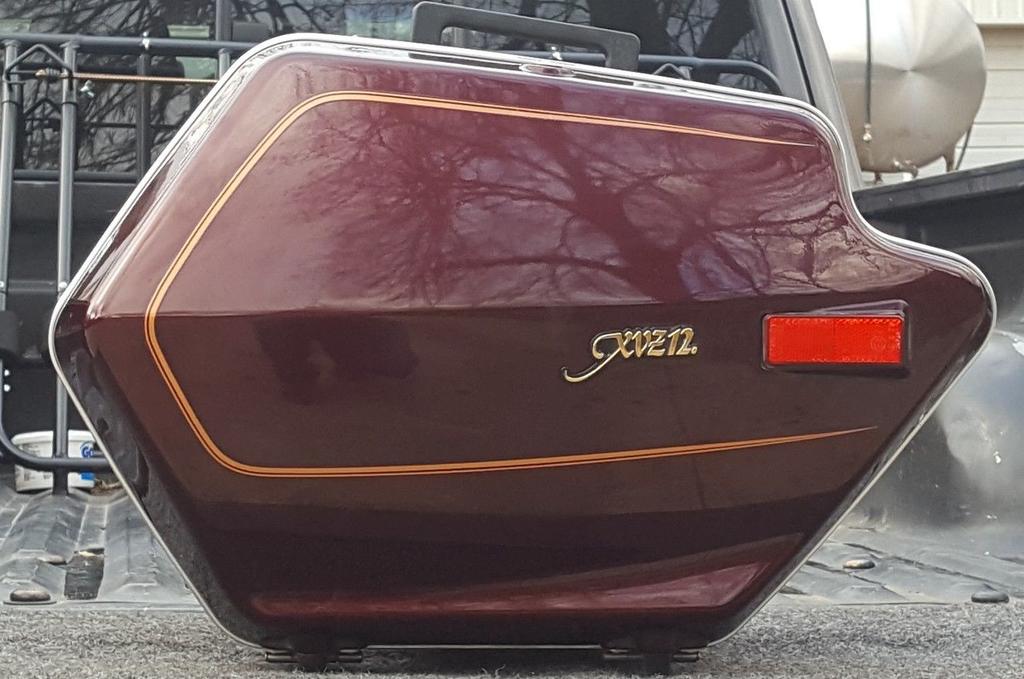
Ok guys, I found a picture of the saddle bag with the lettering on it and I was mistaken, it is not Vixen, but XVZ12 or XVZ13 that is on the base model.. My old eyes didnt read it correctly when doing a quick glance at it. Sorry for the confusion I cause.. Rick F.

-
NMD (New Motorcycle Day) has arrived!
cimmer replied to dna9656's topic in Venture and Venture Royale Tech Talk ('83 - '93)
I know that Skydoc has some steel briaded lines listed in the classifieds and I ordered mine from Buckeye Performance, http://www.buckeyeperformance.com/index.html, before Skydoc had his available. Buckeye has a kit that keeps the brakes linked as the factory designed it, and Skydoc delinks the left front and rear brake and has the front master cylinder operate both front calipers. I also order my caliper rebuild kits from Brakecrafters, https://brakecraftersusa.myshopify.com/collections/1989-yamaha-xvz13-d-series-venture-royale as they supply the o-ring that allows you to separates the calipers halves when you are cleaning and rebuilding your brakes. Hope this helps you.. Rick F. -
I was under the impression that the base model Venture was call the Vixen, I could be mistaken but isnt that what the badging has on the side of the saddle bags and on the tank cover on the base bikes. I thought when I was looking for my Venture I ran into a few of the non-Royale models and they had the Vixen name on them. Maybe DNA9656 can share what his bike has on its saddlebags. Rick F.
-
NMD (New Motorcycle Day) has arrived!
cimmer replied to dna9656's topic in Venture and Venture Royale Tech Talk ('83 - '93)
One thing to think about also is replacing the rubber brake hoses with steel braided hoses. What I found on my 89 was that when I applied pressure to the brakes or clutch and had my hand around the rubber hose I could feel it expand in my hand. I ended up rebuilding all the brake and clutch components and added the steel braided hoses and the bike was able to stop a lot quicker then before. There are a couple places to get them as a kit for the bike. Also you should download the service manual from the tech section as you will find that a lot of help in seeing how to work on these bikes. Good luck and let us know if you have any questions. Rick F. -
It does appear that they are discontinued for the 83 but still available for the 86-93 Ventures. It also helps us that the Vmax uses the same parts in their carbs also so we have a little longer availability run for the later Ventures. We can no longer get the needle set for the 86-93 Ventures as the Vmax uses a different needle set for their carbs. Rick F.