Patch
-
Posts
2,036 -
Joined
-
Last visited
-
Days Won
2
Content Type
Profiles
Forums
Gallery
Events
Store
Everything posted by Patch
-
Well my first thoughts on the news of the gen 3 having read a bit and heard what Canadian pricing was scheduled at was - the Cavalcade blunder repeated. In those days Reaganomics was to blame or so they said. The Cade failed not because is wasn't a successful design in its time but because they spent 5.5B getting it to market during a recession. It had two major hiccups one was fuel range and the other was a simple plug fix that unattended or not address could cause rear lockup. It was also the most expensive production bike anywhere, in its day. I haven't mentioned this before not wishing to spoil the splash of this new and beautiful machine but, likely I'm not the only one who has reflected on this tidbit of history. Personally I hope it pulls thru really is a hot looking option.
-
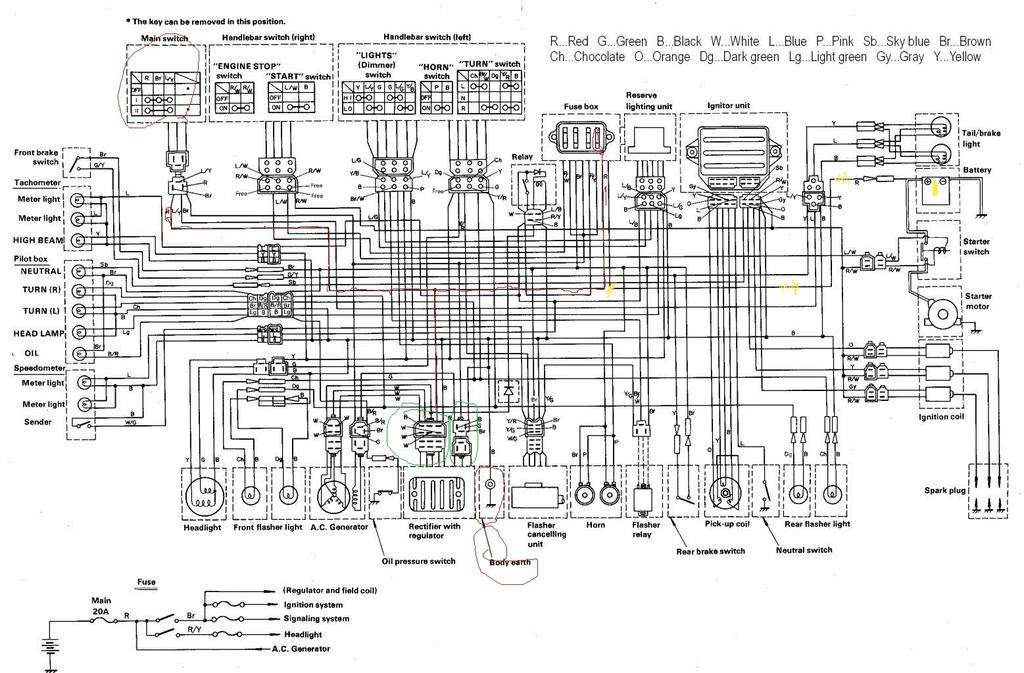
Like a bone chasing a dog I found this schematic. I am assuming the red wire trace I show is the problem. But also to be done with it I personally would open and clean the ing. switch. Also while you're at it inspect the ground as marked on the bottom center of schematic. labeled black at the frame connection/termination - Yellow trace is fuse box power source?? so an easy box to just swap out. Cheers

-
Are you saying the high voltage is gone?
-
Wow at 1st glance this looks like a an underground/map of Jeff's basement plumbing;) I'm going thu it but as mentioned follow the wire back from the headlight through the opened harness.
-
Certainly see I am out of post practice...my French really showing thru! Well I cleaned it up some hope it makes more sense.
-
So what i think is confusing you is that YOU THINK you are reading proper battery voltage at the lamp but I don't believe you are! Leaving aside the cheat I mentioned//// this circuit is shorted to the bikes charging system!? One thing I would like to know, likely others too, is the ign. coil voltage reading with rpm at the coils terminals? This will tell us if there's the cheat at play! Next thing is assuming you have the wiring diagram follow that circuit, you can also post the diagram used so we can play along with you. With or without the diagram what you should do is open the main harness by carefully removing the shielding tape and closely examine each wire for ripples or signs of excessive heating. Then follow the wire from the headlamp back thru the harness and to the fuse (what is the voltage at the fuse?) this may point you/us in a direction. High voltage at the fuse suggests the short is before the fuse block or potentially inline fuse! Regular volts reading at lamp fuse indicates short after fuse block! Remember bike has to be running and with charging rpms!!!!!!!!!! Let the club know whats the results are. I starting Monday am busy for a couple days but many members will be at their keyboards.
-
Thanks Mover, this video was new to me. Nice to see a happy owner after 12K on her. Also watched the Wing video right after, true in my case, can't stand looking thru a bike windscreen, through that vid I was tense just tripping over the reflections dancing around it, as well as the gauge shield.
-
Wow Redrider not fare and you cheated! While Red hit it right off by cheating Bongo is correct. At the moment you have interrupted the circuit by disconnecting the the Master Control and Front Radio Remote modules. So this assumes that the module is shorted and that may prove to be the case? If you swap out and it starts again you will need to follow through and find that short, which is the blue/white wire from the plug at the start switch at one end and the Radio Control the other end (pin to pin) So thinking this through, I got to thinking about avoiding this potential via a small relay between the circuit, when it hit me that if there was a short before the module,,, it would still be there dah.
-
I haven't read it but yes you can modulate time, pressure so resulting in volume displacement. Some are adjustable which would let you tweak to suit. You might lookup Pascals theory to use as a directional beacon, this may shed some light. My MK2 had no issues with lockup at all, running the stock setup.
-
So what everyone here is sayin is exactly right but there's a couple of us and Puc likely knows this one as well? Some time we cheat for the coils, this makes for an off road only but... what this does is exploit the X factor on the primary and secondary's If the PO (s) chose to do this cheat for the coils then likely he hid the patch through the harness? At least I would. If it were me I would expose the harness and disconnect each plug looking for anything out of normal, with the key on check voltage and grounds on each terminal. Always recheck battery voltage during procedures for changes in voltage, this gives you a clearer picture of gains or loses. It is possible that a patch has short to the head lamp wire. Or just run a new wire to the lamp.
-
I've read this a couple times now on the forum about the Gen 2s having lockup? Hmm I haven't given it much thought but, fist that comes to mind ii mechanical leverage, second is volume. Thinking along with you all I would first lower my peddle which for me would take some getting use to as I am very dependent on my peddle being quick to respond. I would be then, taking that feedback to determine what I might change at the slave? Meaning I would be looking to dampen hydraulic pressure via volume. There's more than one way to do so one way would be to fit an older gen slave? Another would be to shorten travel of the slaves piston in effect reducing displacement! The spring would then compensate for the shorten push. Let me know what you think about.... page: 7-27
-
I heard about the drone regs this week. This is in my opinion just the beginning and, taking the long view I would expect that soon these drones will need to be covered by insurance or added under ones house policy. It makes sense to me as there exists risk to property and personal injury. My personal bother with drones is intrusion of privacy. There is in present day way too much as it is; adding these drones is or will be pressing an already pressing issue; and so lends my agreement to regulating the drone rush! Invade and we can report, eventually a fine will be established, persist and we can then apply more use of existing laws. What about Ham radios and CBs, as far as I know Hams still require licences? Remember the days of CBs when some ego would erect a tower and whip with so much output that he alone controlled the airwaves for several blocks. RF so strong you couldn't catch TV unless cabled! Also now I recall that at the beginning of TV & AM radio, they also required licence here in Canada. Just a different prospective to this issue, one I think will settle down as the reasonable hobbyist form clubs and begin to share and educate members on responsible behavior in this new hobby which takes time so, expecting things to get worse before we find balance?
-
Found this on my utube home page, thought some might enjoy this fellows handy work.
-

Engine noise possibly timing chain slap?
Patch replied to sleadhed's topic in Royal Star Venture Tech Talk ('99 - '13)
It started very subtle and quiet then in a matter of 200-300 miles is much worse the best way i can describe the noise is timing chain slap. it is not rhythmic with RPMs. sound comes from both left and right sides more from the front. when I put a stethoscope on the engine it is loudest on the case half bolts under the water pump. It is not a grind type but an knock/slap metallic noise that has no tempo or rhythm. real bad at cold start and will quiet down some as it reaches operating temperature. When the noise first started I drained and changed oil. No sign of metal in oil. It runs smooth no miss or skips. It has progressed to the point I am afraid that if I continue to run it to try to isolate It will become catastrophic. "timing chain slap. real bad at cold start and will quiet down some as it reaches operating temperature." That is the opposite to a loose timing chain. "when I put a stethoscope on the engine" Wrong choice of weapon, thick handle long screwdriver is better for load knocks. "is loudest on the case half bolts under the water pump" Post 2 first place I'd look. Can't get over knowing you left her on a trailer, in the cold, without so much as a blanket, very sad! -
Hydrolock...second time in 12 years.
Patch replied to Gary N.'s topic in Royal Star Venture Tech Talk ('99 - '13)
I see the thread date but thought I may shed some light. 1st Puc is right. You can use compressed air or let it evap. Next is there seems to be an unknown in this mix? If the bike has been parked for long then the gas should have leaked past the rings - once the bowl is empty the volume has ceased (not so with a gravity feed) but because these are fed by pump. Likely: What you have is a jammed float needle which - remained open during the start attempt, lets think that thru, key on, kill to run, neutral switch to safe, fuel pump running till timed out, 3 carbs fill float needle closes 1 remains open filling the jug, hydro lock! This is never a case to be ignored or solved with seafoam. Is the repair required really or worth the effort? YES, every time! Here is the long view, you will have 1 jug running richer to the point of running wet. This will ware down that set of ring, honing, increase taper and wrist pin/boss! Not to mention breaking down the crankcase oil. Every long trip you will be able to measure a loss of jug life and compression. geterdone -
83 venture modified for solo riding
Patch replied to MoonShine's topic in Venture and Venture Royale Tech Talk ('83 - '93)
Good idea! Hopefully you can still move the rest back on the tray? If you are wondering about the welds, from here they appear cold which, may cause them to crack loose, so more heat.. -
Using a hammer? No wonder I could never get them to work ):
-
That's an old video; he finally traded that in for unit with a kick start.
-
Well I live on the South side of the street so no snow for me;) true I pay for this come July August. Assuming you base coated then cleared over, you will still realize the advantage of adding extra clear coats. For panels that factory finish has been completely removed, House of Colors has the best binder I have experienced and reasonably priced. Sounds like a Cochrane ice cream plan then a Bragg Creek coffee or visa versa.. Till Then Cheers
-
The mods you describe will produce this result at the cost of mid range where, flows need to be teased to produce higher torque curves. Air dumping is a crap shoot usually the dividends pay out up high, no balanced torque curve.
-
Well I am halfway there? Thinking the other half is a girlfriend older than I, one that understands I just hide my age well and, that napping is how I think best.
-
Wondering if you chose to strip the panels then repaint? I have found 2 or 3 additional clear coats go a long way in protecting the base color and finish; easy to touch up or buff out abrasions from add-on's (tank bags....) You can also mix a touch of flake in the first additional coat which will catch the sun and step her out of the crowed a bit yet be barely noticeable up close. Very easy step to do.. Was there much drive line work needed? I like the tread you chose, tough tough choice. They can be tricky when hot above 60 mph but certainly a versatile choice for enduro's. You're missing some nice weather here Calgary. Hope you're back before the deep chills pass or risk loosing your Canadian fur and mutating into a SnowBird;)
-
Long time no see, so an update
Patch replied to greg_in_london's topic in Venture and Venture Royale Tech Talk ('83 - '93)
Well that's good you can now see through the jest, right? I wrote you up a thingy but for the most part it behind you now. So here's the whats next stuff.. ...then the carb cleaner nozzle placed tight to the porting and you look for the spray pattern coming through the port to the barrel, then compressed air and one more shot of carb cleaner. Providing you see a clean spray pattern flowing through to the barrel, safe to bet that, that circuit is ready. You did go through this step? Next if you are reusing the jets remember that they are old and have just held back an army of chemicals and proctology students, she’s going to be cranky at idle, the jets may flow different to one another. Fortunately we can deal with this through tuning and the proper way to do this is with rpm, period! It does not have to be perfect at 900 rpm the engine is not in the performance curve, this circuit once on, stays on and, helps transition to the midrange circuit - that is what is important! Heat is why we give it that extra 1/8 – ¼ in or out turn after reaching maximum tuned rpm through the pilot screws: below is how I do it you do what works best for you. Set to 900 via large idle screw –cyl. 1 is dialed in then out with the Pilot screw moving past your starting point of say say 1 ¾ turns - follow the rpm as it increases slowly (this tells you you are turning the correct way) then listen for the rpm to start to decrease and stop – then apply more combustion heat by turning in ¼ turn – Reset the big idle screw to 900 rpms and move to #2 and repeat the process for all 4. The thread count will differ because the jugs may most likely be more or less efficient so don’t stress over this, they will change with some solid running down the road and you can then revisit for a final tune; try to keep the second tuning under half a turn, if you can’t then sync or jets are too mismatched or compression varies too much. None of the above works easily if you don’t bench sync the throttle plates before installing the carbs, an easy way is to use a drill bit between the casting and the plate, the bit should slide easily past each do all 4 - then using the large idle screw set throttle to start position above the pilot ports, a quick check should show them equal. And this too is done Syncing the carbs to the jugs can wait, this is a performance tune and the jugs will change after some pressure cycles from long rides.. Not sure where the clutch status is at the moment you mention it working fine? So I will assume you have replaced the required rubber bits! But what about the copper washers?????????????? -
Long time no see, so an update
Patch replied to greg_in_london's topic in Venture and Venture Royale Tech Talk ('83 - '93)
Look Bro, this isn't a piano;) Click on this link below. Do you have have anything like these or access to? https://www.mscdirect.com/industrialtools/weiler-brass-brushes.html Take the nose of the jet and bush it into the brass brush several times. You only need a small hole which can and will allow your cleaning chem to pass through, soften and clear the port. Place a cup of water in a frying pan add 2 tablespoons of Mr.Clean or what ever and simmer with a lid over top. If this doesn't clear the port then toss it, the carbon from too many cold short starts is too hard and not worth the effort. -
From my experience varnishing is an engine killer. I've always had a need to take things apart examine, repair and at times make things worse. But I have done this often enough to reconsider short comings in maintenance, design or poor practices. When Ajay's interest in my hobby grew I thought some rebuild projects would help him develop theory so we took on bikes, cars and what ever together. Oddly I was quite anxious to get him to the bone yards where I could teach him how to apply his senses to different engines, this included pulling covers, carbs, plugs and checking seals. Later I'd tune say -50% let him then tune the rest, then I would show him what ranges he missed. At the beginning on a running something we started as I started with a vacuum gauge and different lengths of screwdrivers, explaining what he was hearing and why it mattered. I found a bike I was always curious about years back, flew down and road it back; now if I say she was at best running on 3 that would be an exaggeration/ she was well below operating limits on the three that could fire. I used only chemicals to restore her limits; not stuff you buy on the shelves but concoctions that a blacksmith in the 70's had shown me and some of what the oldman had passed down as well. I was as a matter a fact about the results as I had done this many times before but I was taken back by Ajay's surprise at the results then others as I entered into what was new to me, forums. Here's some of what I know about old neglected engines: they are usually gummed up, they have had too many owners try to cheap out and give up, they have too many air and oil leaks, they have weak valve springs (high rpm issues) they usually can't seal compression, they are without hone, valve seats are contaminated and carbs well are just shells filled with ..... choices Lets start with the bearings: ball bearings, needle bearing, axial/thrust bearings, journal bearings... They share some common design tables for example, polished and honed or hatched surfaces combined. Why? Now I know we have at least one member that runs a machine shop perhaps he chine in and share some of his schooling? Another common is tempering, why in the same component do engineers mix tempering, and example here could be journals, harden steel crank bearing surface with a soft journal cap. Why? I remember a story my oldman told me about an old truck seizing the crank middle of nowhere. They were tractor towed to a farm and began the tear down, the story went on to how they were back on the road noon the next day. How they did that was by soaking an old leather harness they found hanging in the barn in oil and over night and cut it to render the bad cap and journal suitable to complete their trip. What they understood was they needed to maintain oil pressure to keep the piston rods from crashing and the cranks from seizing again. (1st time I share this) Honed surfaces hold oil molecules, these molecules reduce friction for whatever bears against them. On the cylinder walls the honing process develops a crosshatch, the angle of the crosshatch is a spec which does two things, hold oil molecules and causes ring rotation. Both are very important and neither can happen when the honing is coated with varnish. It doesn't have to be Seafoam as I mentioned I've used much more aggressive products with much faster results; but for a maintenance schedule I have trouble seeing the down side. Some years back I was involved with developing some heat energy trials, part of this was to better understand how we could direct more efficiently random and stalled heat for transfer. Patterns and surface texture combinations proved to be the key in my passive transfer which I implement with success. Take a cooling fin surface textured, once defined and shaped the texture provides a direction path this place the energy where it can be more effectively transferred into the exchange medium which on a bike is fluids and air movement. It is important to view the complete system even if the are walled off and or separate exchanges. If you chrome that same fin it will be less effective at transfer, tho likely more effective at attractive the bling bling chicks. Inside the engines most of the castings have bite/rough surfaces, its not just because of manufacturing cost but proven effective bot for liquids and air. So what happens to the dissolved byproducts after say adding Seafoam in the crankcase for maintenance purposes? It will flow with the oil through the system and, expected to only be out of.... when the system is drained; it will not get filtered by the oil filter the microns are to small. In the case of a clogged system that has many mile of neglect or unknown history, with signs of problems; then NO, this is just too passive. Just as it is to passive to unblock a carboned up pilot jet, a more hands on aggressive approach is needed. Washing out the bearings: you can't wash out the bearings in the crank case. They are wet bearing, some like the journals require high pressure to function. In this case what is important is that the tolerances be kept as close to spec as possible. When we loose the spec (exceeds limits) we loose oil pressure and the bearing surface is the oil and then is unable to resist the loads, (in other words - the oil refreshes to fast for lack of flow resistance!) (too slow oil begins to brake down around 200* and cokes above 300*) Stuck rings for example can increase the abrasive contaminants in the oil that then serves to ware down the tolerances, a sign of this effect can be measure by checking oil pressure. An other cause of this could be leaking gaskets that allow unfiltered air into the crankcase or a fancy eye candy air filter that filters less than it should, same for oil filters.