
.JPG.97d34da93fc67655234eb6371e3710e9.JPG)

Prairiehammer
-
Posts
3,621 -
Joined
-
Last visited
Content Type
Profiles
Forums
Gallery
Events
Store
Everything posted by Prairiehammer
-
 http://goldwingdocs.com/forum/viewtopic.php?t=81 BTW: to zero each gauge, remove the dial cover and tweek the exposed screw on the dial. http://goldwingdocs.com/images/HowTo/CarbSync/CarbSync02.jpg
 -
Brad, is it $1 shipping per each sticker or $1 per shipment (for instance I want 2 stickers; is that total $7 or $8?)
-
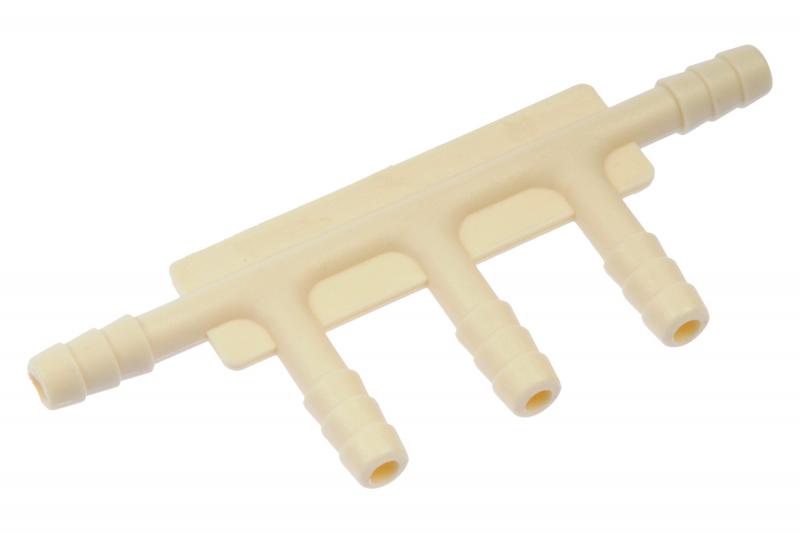
While you are at the auto parts store, pick up a five-way vacuum manifold or splitter. Connect a source of vacuum (a Mity-Vac is ideal) to one nipple and your four gauges to the other nipples. When you apply vacuum to the splitter, all gauges should read identically. If not, then perhaps there is some adjustment capability on the gauges.

-
Won't run
Prairiehammer replied to mralex714's topic in Venture and Venture Royale Tech Talk ('83 - '93)
There very well may be fuel in the bowls after the stall, but not enough fuel to feed the jets. Hook up a clear hose to the bowl drains. Note the fuel bowl level. Take the bike for a ride. After the stall, observe the fuel bowl level. -
Carb cleaning and discoveries
Prairiehammer replied to jimmy99's topic in Venture and Venture Royale Tech Talk ('83 - '93)
I can't help you with the E-clip position on the needle; the US carbs don't have an adjustable needle like your Canadian carbs. I would suggest that a medium high position would be a place to start. Perhaps the jets were changed as well? The apparently deliberate holes in the diaphragms are inexplicable. -
41r tci
Prairiehammer replied to Brenner's topic in Venture and Venture Royale Tech Talk ('83 - '93)
Recently, I did some research concerning Venture TCIs. This is what I have found as far as numbering. 1983 TCI: TID14-17, 26H-10 1984 TCI: TID14-28, 41R-10 1985 TCI: TID14-34, 41R-11 1986 TCI: TID14-34, 41R-11 1987 TCI: TID14-34, 41R-11 1988 TCI: TID14-34, 41R-11 1989 TCI: TID14-34, 41R-11 1990 TCI: TID14-94, 3JJ-00 (with the 55 mph glitch) 1991 TCI: TID14-94 B, 3JJ-10 1991 TCI: TID14-94 C, 3JJ-11 (EURO) I do not know the differences between the two 41R versions, however, I suggest that the later revision (41R-11) made some form of improvement to the 41R-10. Note that the TCI "TYPE" number is different (TID14-28 vs. TID14-34). Note also the difference in the various 1990-1993 TCI. (TID14-94, TID14-94B, TID14-94C). -
ruff running cutting out
Prairiehammer replied to thunder1295's topic in Venture and Venture Royale Tech Talk ('83 - '93)
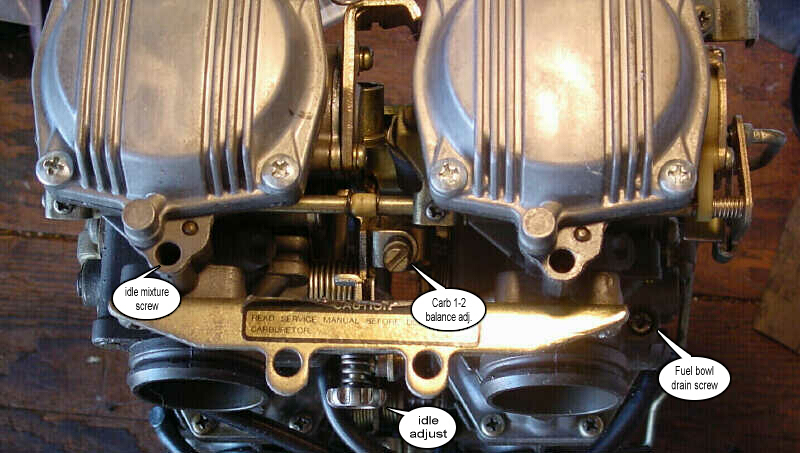
The pilot (idle mixture) screws (not to be confused with the pilot jets) are accessible without removing the carbs.
-
Never heard or seen that from Yamaha concerning a First Gen, but sellers can be very inventive. Does he say what makes it a "Limited Edition"?
-
Yep, agreed. (And I use a mercury manometer).
-
Brad, I would like two in silver. What is the current price that I should send via PayPal?
-
Luggage Rack
Prairiehammer replied to videoarizona's topic in Royal Star Venture Tech Talk ('99 - '13)
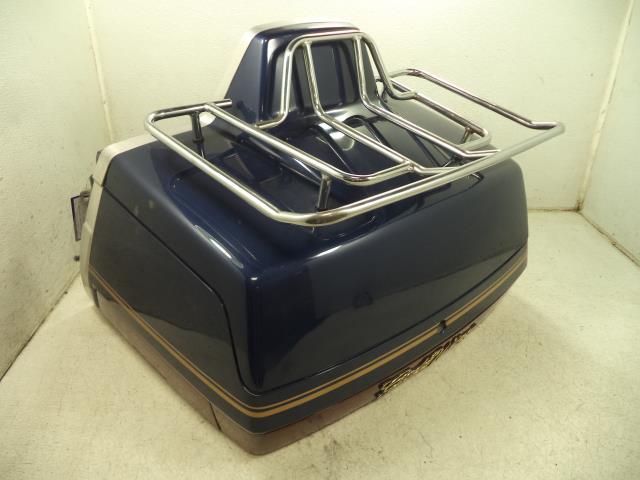
Maybe you could post a pic of your trunk rack installed? -
Luggage Rack
Prairiehammer replied to videoarizona's topic in Royal Star Venture Tech Talk ('99 - '13)
Perhaps that is true for certain racks intended for the GL, but the ShowChrome rack that I had was for a 1988-2000 GL1500, and it fit and worked nicely on @Semi-retired Second Gen.
-
Class Controller
Prairiehammer replied to Morev4's topic in Venture and Venture Royale Tech Talk ('83 - '93)
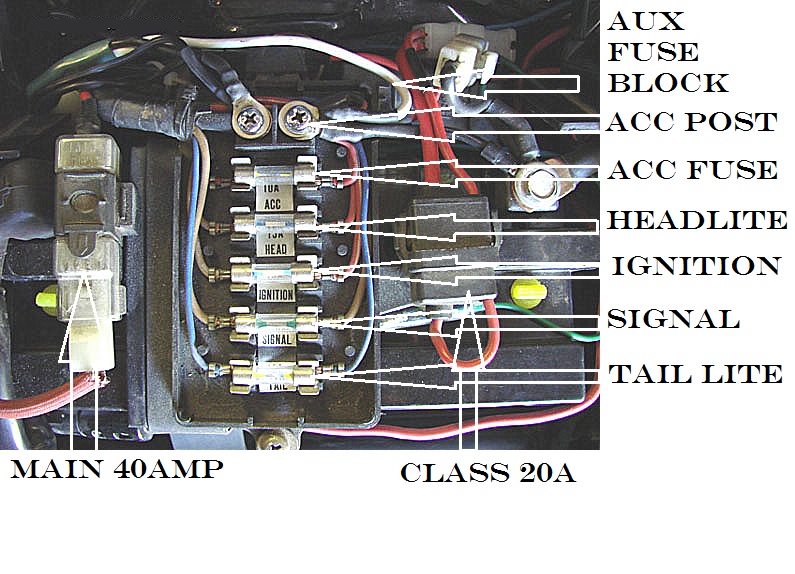
Jim, the PSI graphic is printed and permanently displayed. It is not a part of the LCD display. The CLASS only displays and operates when in the ACC position of the ignition switch. There is no display when the ignition switch is in the ON position. Have you checked the CLASS fuse?
-
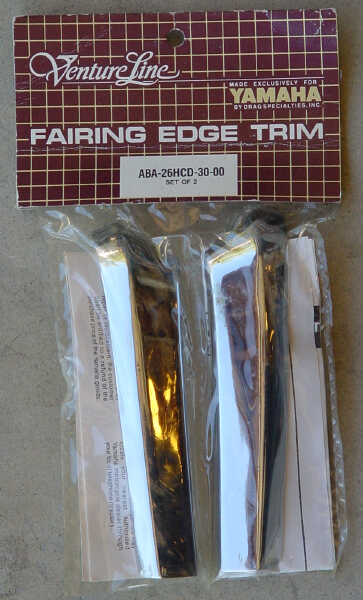
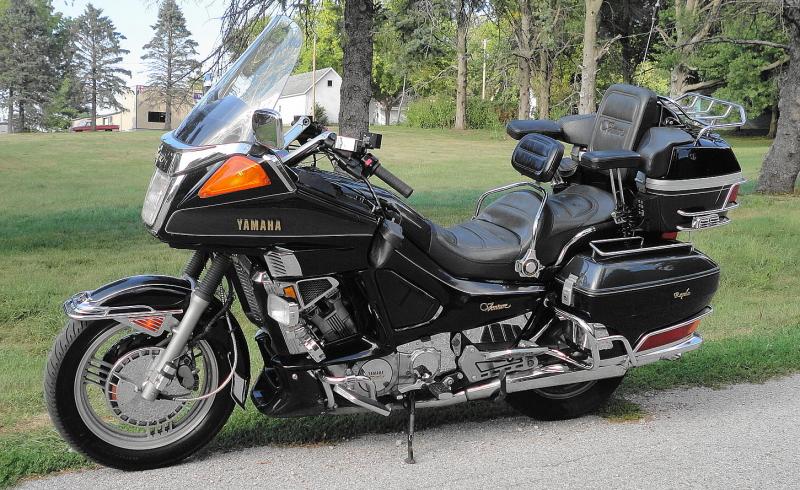
Unlikely you will be able make the fairing edge trim from these photos, but here is a set of pics off the bike and on the fairing.
-
While I am not @cimmer, I have played him on TV. Below are pics of the fairing edge guard on my 1990 and on my 1991 as well as a pic of NOS pieces that were on eBay some time ago.
-
Luggage Rack
Prairiehammer replied to videoarizona's topic in Royal Star Venture Tech Talk ('99 - '13)
Two things popped into my little head when I read the above: 1. Is he getting a RSV? Or has he already? 2. I gave a GL1500 trunk rack to @Semi-retired, and he says it fit his Second Gen splendidly. And I suspect that if Michael can install a trunk rack, you can to. 3. OK, three things. I installed a trunk rack on my pristine 1990, and after much trepidation, I drilled away. No sweat. Just follow @Eck advice. Remember! If it LOOKS right, it IS right. -
stripped oil drain
Prairiehammer replied to mike042's topic in Venture and Venture Royale Tech Talk ('83 - '93)
Well, Yamaha says that one should use a new crush washer everytime, but I have always reused the old one. In fact, on my 1990, I ran it for 25k miles, only to discover that I was missing the washer. No leaks. But I don't recommend that. One thing about replacing the crush washer every time, you may find that trying to get an already crushed washer to seal will cause you to over torque the plug, with the real possibility of stripping the oil pan threads. Yamaha wants you to torque the drain plug to (I think) 18 foot pounds. That is fine if you use a new crush washer/gasket, but it may be not enough torque if you reuse the already squashed gasket, and then you tighten it some more to stop it from leaking. Stripped! Any 14mm crush washer will work. The RSV is one, or as some have discovered, crush washers from the Honda automotive dealer, where one can buy a dozen for pennies per piece. -
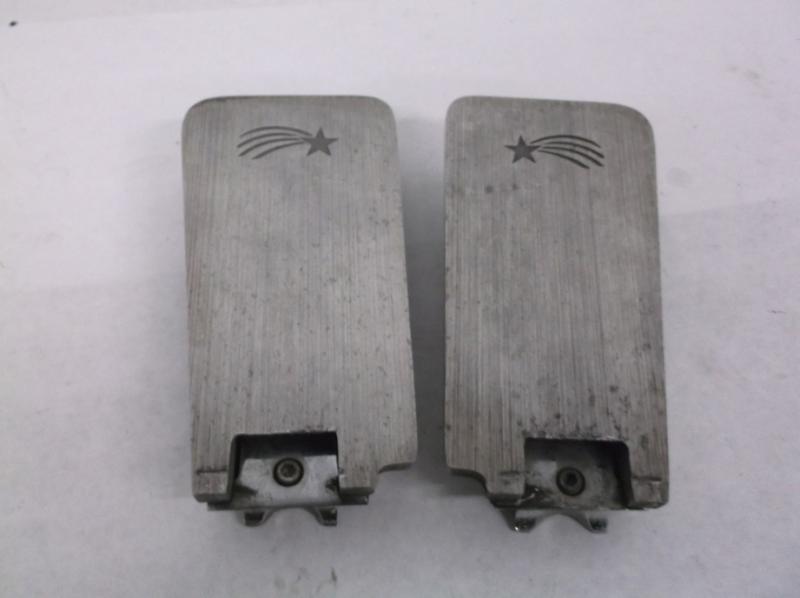
Rick, I had the passenger "footboard risers" on my 1990 and was able to salvage them (thanks to the towing company) and will install them on the 1991. Debbie thought they were very helpful, not because she is vertically challenged, but it provided alternatives to the factory foot boards. Her version of highway pegs. The passenger floorboards (made by Kriss and called 'Starsteps') mount to the saddlebag guards on a MKII. They fold up out of the way or can be laid out horizontally at three different heights. I found mine on eBay for $30 but I have seen them sold (or at least asking as much as $130). Mine were emblazoned with the Venture "V", marking tham as a VentureLine accessory, but Kriss also marketed them for the GL1200. I have seen a pair made to fit the Venture, but only with the Kriss StarStep logo instead of the Venture "V". A pair like that sold for just $9.99 on eBay last year. Some pics of the StarSteps on my 1990:
-
stripped oil drain
Prairiehammer replied to mike042's topic in Venture and Venture Royale Tech Talk ('83 - '93)
The Phillips screw holds the magnet assembly into the drain plug. Don't remove it. The oil will not drain through it. Get another drain plug (and crush washer) and then remove the drain plug with a Vice-Grips or pipe wrench and replace with the new plug and crush washer. The drain plug is common to many, many Yamaha models. Old PN: 3VD-13455-00-00, superceded by 90340-14132-00 (also used on many Yamaha models, including the RSV). But the 90340-14132-00 lacks the magnet. An ordinary M14 flange head bolt should work. Use a crush washer. If you want to get an original '3VD-13455' plug there are some on eBay: http://www.ebay.com/itm/NOS-Yamaha-FZR1000-XT600-XVZ1300-Oil-Drain-Plug-/220483499138?hash=item3355d73482&vxp=mtr (expensive!) -
Thank you, Jerran.
-
Well. Since others can get on, it must be my problem, but whenever I try to get there I get this error: Server not found Firefox can't find the server at www.worldschoolphotographs.com. Check the address for typing errors such as ww.example.com instead of www.example.com If you are unable to load any pages, check your computer's network connection. If your computer or network is protected by a firewall or proxy, make sure that Firefox is permitted to access the Web. I tried to get there with Internet Explorer, but with the same result.
-
The preceding comments regarding the carbs are valid, but the key diagnostic is the tachometer dropping out. This indicates an ignition issue, first and foremost. My opinion is that the TCI is defective. As the TCI warms, it is failing. No matter how dirty or defective the carbs are, the carbs will not cause the tach to quit.
-
Here is an article published in Road Rider Magazine from December 1991, in which the famous Michael Kneebone puts 10,000 miles on a new Venture.
-
Just picked up a December 1991 Road Rider. This photo is on the back page. This where you got your handle? @Zzyzx
-
Thank you for your contribution to the VIN registry, Gilbert.
.jpg.0b6a73b19a4617cb480a280fea47d0b5.jpg)
.jpg.d791e97a2efa7f75bfc9158b81f543d1.jpg)
.jpg.ec8870a0295d824615619567f9b4a457.jpg)
.jpg.cad8ea1b9662685f1615d3da9f0d02f0.jpg)
.jpg.a920681cbeb6236d10e845df710cfabe.jpg)
.jpg.b15fdd6d22f617c32bd9b04dac7558e1.jpg)
.jpg.b1c86137db4f9386695db5d36c9232b6.jpg)
.jpg.e765985526ed082c005ae6c021bc29d5.jpg)

.jpg.f75d23f38eeb1040e85408a8663c931b.jpg)
.jpg.767d908d25c92320e769a3fab58c5a31.jpg)
.jpg.df177ef299534a4efd5cb2042003002d.jpg)
.jpg.1cbe163d3efe0d57cf2e299c647005da.jpg)
.jpg.7c6031c6372847ad4e10631241586913.jpg)
.jpg.67da88ef630aafaf19bd088443f1f521.jpg)
.jpg.2644d1a9d1dace3c033e44ce8bd7d752.jpg)
.jpg.297964ca926d94f48a656ac10cbd53b5.jpg)
.jpg.0843707e747efb574111e80278a8895d.jpg)