.JPG.97d34da93fc67655234eb6371e3710e9.JPG)

Prairiehammer
-
Posts
3,621 -
Joined
-
Last visited
Content Type
Profiles
Forums
Gallery
Events
Store
Everything posted by Prairiehammer
-

'84 vsx1200 popping out carbs
Prairiehammer replied to garyS-NJ's topic in Venture and Venture Royale Tech Talk ('83 - '93)
Simple Green reports: Simple Green products have been successfully and safely used on aircraft, automotive, industrial and consumer aluminum items for over 20 years. However, caution and common sense must be used: Aluminum is a soft metal that easily corrodes with unprotected exposure to water. The aqueous-base and alkalinity of Simple Green or Crystal Simple Green can accelerate the corrosion process. Therefore, contact times of All-Purpose Simple Green and Crystal Simple Green with unprotected or unpainted aluminum surfaces should be kept as brief as the job will allow - never for more than 10 minutes. Large cleaning jobs should be conducted in smaller-area stages to achieve lower contact time. Rinsing after cleaning should always be extremely thorough - paying special attention to flush out cracks and crevices to remove all Simple Green/Crystal Simple Green residues. Unfinished, uncoated or unpainted aluminum cleaned with Simple Green products should receive some sort of protectant after cleaning to prevent oxidation. Look at the MSDS (Material Safety Data Sheets) of the cleaners and you will see the strong chemical contents of them. Just a FYI from the manufacturer. -
Can't help but feel my MPG sucks....
Prairiehammer replied to Great White's topic in General Tech Talk
Actually, the Venture gauge is pretty accurate, albeit, not especially linear. But, the fuel gauge sending units do suffer with age. The wiper on the sending unit sometimes gets dirty and the resistance coil that the wiper runs along sometimes becomes deformed to the point that the wiper does not make contact with the resistance coil/winding. There is a section in the service manual concerning the fuel gauge sending unit and the proper ohm reading through the range of operation. Back in the day (1985, yes, I keep the records) my 1983 Venture Royale attained high mpg of 53 and low of 46 mpg, solo. The same bike, but loaded and two up attained 42 to 39 mpg. All US gallons and miles. -
Anti dive bolts loose have leak
Prairiehammer replied to a topic in Venture and Venture Royale Tech Talk ('83 - '93)
On a 1986, the anti-dive has no connection to the brakes. The oil you observe is fork oil. (or someone is messing with you and squirting oil on the forks). There is a good chance that the leaking fork oil contaminated the brake pads. Replace or attempt to clean the pads AND rotors. After you fix the leak. -
You are welcome to ride along, but I'm not sure our proposed route is on your way. We plan on leaving my place @0600 Friday morning. Here's the route so far: https://goo.gl/maps/kKylM
-
'84 vsx1200 popping out carbs
Prairiehammer replied to garyS-NJ's topic in Venture and Venture Royale Tech Talk ('83 - '93)
The four brush PLATE will physically fit, but your starter won't work. There are four 'poles', meaning four field coils on a four brush starter. Entirely non compatible electrical theory. There are only two poles and two field coils on a two brush starter. If you go to all the trouble to remove the starter to mod the brush plate, you are more than half way toward installing a four brush starter. The four brush are not expensive used. Keep an eye on eBay. Often sold for $50 or so. -
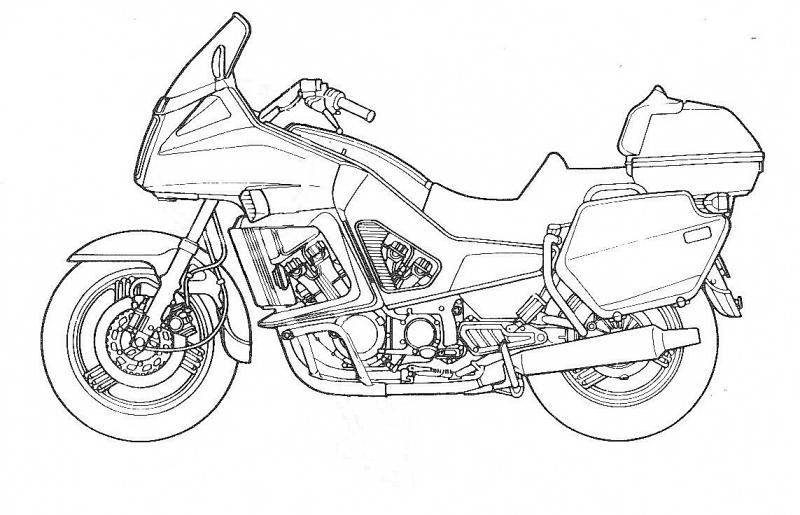
Well, THAT went over like a lead balloon. But, if anything I am persistent. So here is a line drawing of the First Gen MKI. Download, print and color. (You do know how to color...right?)

-
WALLEY, when you get the bike compare the VIN with the engine number. The VIN is on two locations: stamped into the steel of the steering head and on a white label on the lower frame beneath the brake pedal. The VIN will tell you (and me) what the year is as well as a build date. The engine number should match the VIN, ie, if it is a 1992, the VIN should read as "JYA1NLE0(x)NA045(xxx)" if it is a US49 state version and the engine number should be 1NL-045(xxx). If the bike is a California intended market Venture, the VIN will read "JYA1UNC0(x)NA011(xxx). The last three numbers of the engine should match the last three digits of the VIN.
-
That sounds like a plan. Meet you at "That Fifties Place" in Dwight (IL-17 and I-55) about 0815? @rbig1 will prolly have to eat and pee by then. Do you think we will get to Don's on time with this route?: https://goo.gl/maps/Fw4Xb
-
Sure thing, Rick. Be at my house at 0700 Friday morning. Unless you want to come up Thursday evening for supper and you and rbig1 can share a bed.
-
"...6mm Allen head socket with a long reach to access the damper bolt itself." http://www.venturerider.org/forum/showthread.php?57207-Changing-the-Fork-Oil
-
Carb Rebuild Kit?
Prairiehammer replied to Patmac6075's topic in Venture and Venture Royale Tech Talk ('83 - '93)
Berryman says their Chem Dip is safe for rubber and plastic. Their Chemtool may not be. Go to the link I posted for their site. -
Rick, Rodney and I talked on the phone yesterday and he is going to ride over to my place on Thursday, stay the night here. We plan to be leaving together bright and early Friday morning. I mean EARLY, like 0700 or earlier, because we are planning to go 'cross country' (no Interstate or Turnpike) and still want to get to Don's in time Friday afternoon to set up our tents and make it to the Quaker Steak before all the Canucks take all the tables.
-
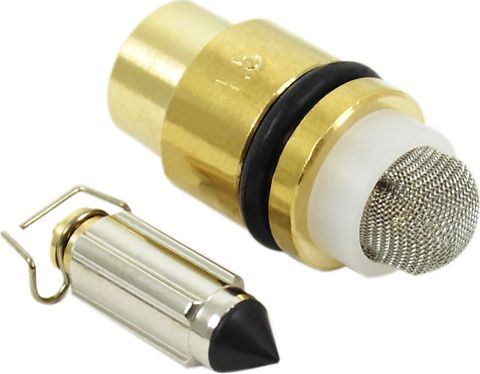
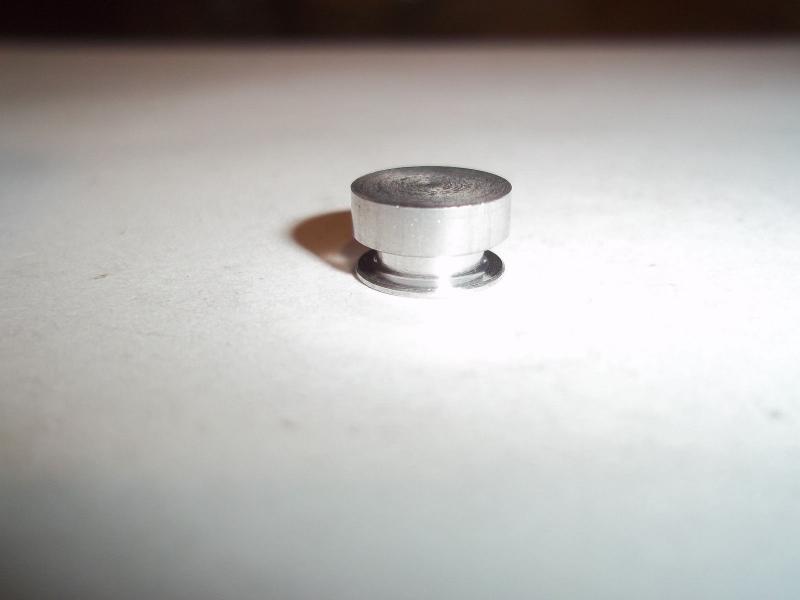
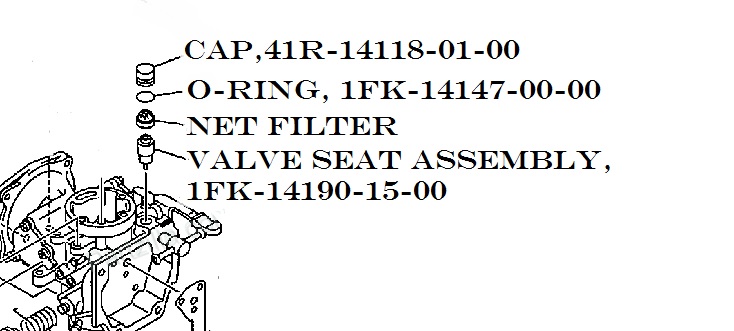
I thought you might want to save a bit of money by buying just the 1986 needle for $8 or so, instead of the $17-$20 for the 1983 needle and seat. The seat does have an O-ring, but to replace that O-ring, one has to remove the seat from the carb body. Some needle and seat assemblies include the seat O-ring, but some so do not. If the seat is removed from the carb, most likely you will also squash the net filter. The net filter is included with the seat on some, not included with other seat assemblies. Then there is the matter of the O-ring on the seat chamber cap. When the seat is removed from the carb, the cap is necessarily removed. The O-ring on the cap may be damaged when the cap is forced out of the carb by the seat. The seat is all brass. On the 1986 needle the tip is Viton ("rubber"). The Viton tip assists with seating the needle tip securely against the seat. Perhaps that Viton tip is the difference between the 1983 and the 1986 needle? The only modification needed MAY be to simply clip a corner off the needle spring clip to facilitate sliding the float on. Some of the needles have a closed loop spring clip and the prevents the float from engaging the needle.
-
Mike, Don't hold me to this, but I think if you replaced the 1983 float needle valve with the needle valve for the 1986+, that the 1986 needle will work with your 1983 float valve seat and 1983 float (also not available), BUT you may have to reset the fuel level and cut off part of the new float needle wire clip to accommodate the 1983 float. It appears from my research that while the 1983 and the 1986 float valve SEAT are the same size (1.5mm), the float valve needle is slightly different in length. Thus, if you put the 1986 float valve needle in place of the 1983 float valve needle, the actual fuel level in the float bowl will be different. Note that the fuel level spec for the 1983 is 14mm± 0.5mm, whereas the fuel level specification for the 1986 is IIRC 16.5mm. Again, don't blame me if it doesn't work out. YMMV.
-
'84 vsx1200 popping out carbs
Prairiehammer replied to garyS-NJ's topic in Venture and Venture Royale Tech Talk ('83 - '93)
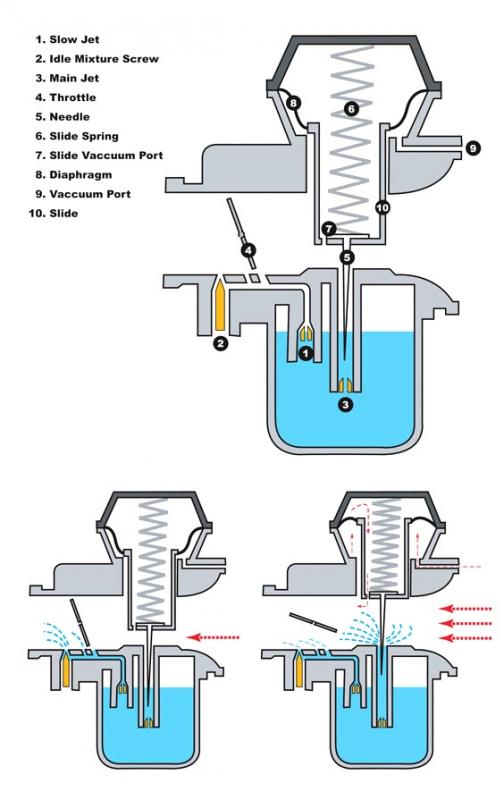
Examine the slide diaphragms carefully for tears and pinholes. Lightly stretch and straighten each diaphragm along with a strong backlight to reveal perforations. Closely examine each slide for cracks. Hold the slide upright (diaphragm up), plug the vacuum port (at the now bottom of the slide) with a finger tip and pour gasoline into the slide interior. Cracks will manifest as gasoline leaking (seeping) out the slide side. Clean the bore of carb body where the slide is supposed to, um, slide. Check all the diaphragm/slide return springs for identical at rest length. The vacuum path is fairly short and simple. Air passing through the venturi creates a negative pressure (vacuum). The vacuum port on the end of the slide allows vacuum to be applied to the outer diaphragm chamber. This raises the slide. Any leakage due to a perforated diaphragm or a cracked slide or misplaced diaphragm lip (allowing leakage to atmospheric pressure around the diaphragm cap) will mean there is not enough vacuum generated to overcome the return spring force. Since you mentioned the "pea shooter" method of cleaning, you are probably aware that there is a more thorough, but similar method, variously called "the shotgun" or "shotgunning". You apparently haven't tried the shotgun yet. There is a 50/50 chance that you may get the pilot jet (the real culprit) clean enough with the "shotgun".
-
Indeed the 1200 float valve assembly is unique to the 1983-1985. And to the 1987-1988 XV535. All use the Mikuni BDS34. Subsequent XVZ13 models use the Mikuni BDS35. The needle is apparently not available by itself. One seems to have to purchase the entire valve assembly, PN 22U-14190-15-00. Same assembly is used on the 1987 & 1988 Virago XV535. New assembly can be purchased from Yamaha or here: http://www.boats.net/parts/detail/yamaha/Y-22U-14190-15-00.html Doing a quick search on eBay for the above part number uncovered just ONE: http://www.ebay.com/itm/NEW-OEM-Yamaha-Needle-Valve-Virago-535-XVZ12-22U-14190-15-00-NOS-/261461717647?hash=item3ce055328f&vxp=mtr Let me do a bit more research and see if I can't find an alternative source for just the needle.
-
'84 vsx1200 popping out carbs
Prairiehammer replied to garyS-NJ's topic in Venture and Venture Royale Tech Talk ('83 - '93)
IF the engine is warmed up AND the pilot jets and pilot circuitry are clean, then it will idle and take some throttle but the throttle has to be applied slowly until you get into the midrange where the main jets are starting to feed. Notice that it died after he quit giving it gas? Trust me, it will run like crap without the airbox. It doesn't even run well (lots of bogging and stumbling) without the air filter installed but the air box buttoned up. -
'84 vsx1200 popping out carbs
Prairiehammer replied to garyS-NJ's topic in Venture and Venture Royale Tech Talk ('83 - '93)
Three characters. HA! -
Dash IC board
Prairiehammer replied to Patch's topic in Venture and Venture Royale Tech Talk ('83 - '93)
I note that your starter relay (solenoid) is (oddly) mounted upside down. Make sure that there is no interference with the posts on underside of the solenoid or damage to the wiring to and from it. Overall, it appears to have been potential for lots of shorts and bad connections, especially back there under the seat. I take it you transferred all the circuits from the old primary fuse block and the circuits from the old secondary fuse block to the new fuse block? Did you also put the CLASS power circuit into the new fuse block? What about the main fuse? If you retain the old main fuse, open it up and insure that the fuse mounting screws are tight and corrosion free. Also make sure that the main fuse had not blown sometime in the past and the PO inserted some kind of jumper to replace the old blown fusible link. -
Rodney, I am planning to go to the MD. But I am going to avoid I-80/94 at the Illinois/Indiana border by going cross country on Illinois 17 to Kankakee and then on to Westville, Indiana where I will pick up the Turnpike. If the day is nice and I have the time, I may not take the Turnpike at all. Figure on getting to Don's in time to set up my camp and then go to the Quaker Steak for supper with the gang. What time did you imagine you would be by here?
-
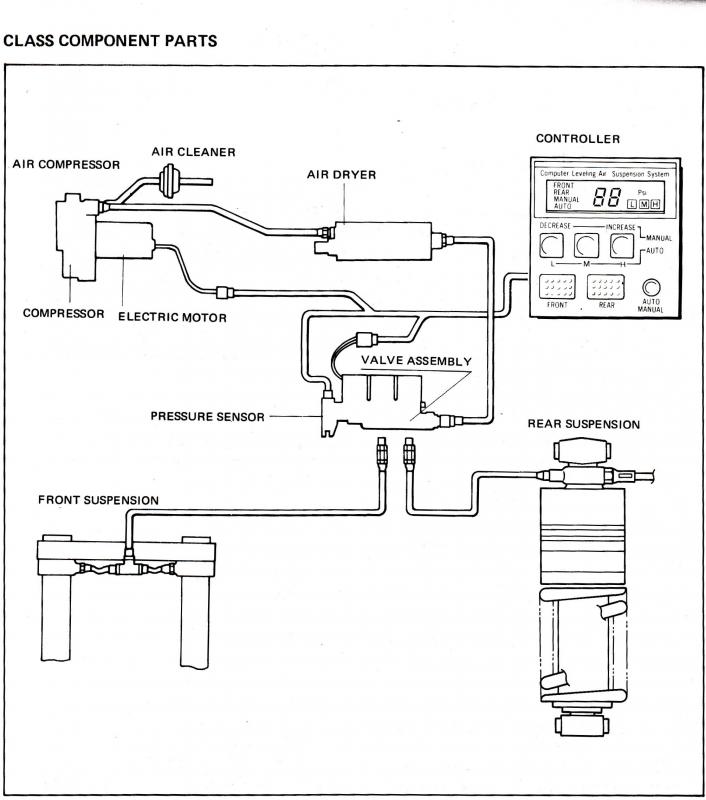
I believe that Yamaha was CYA. It takes a fair amount of time to cycle through the CLASS regimen. Time that your attention and eyes would not be on the road. From a practical stand point (not saying that not running into the truck stopped unexpectedly in front of you is not a practical consideration), the CLASS pressure sensor might be thrown off by the changing dynamics caused by the undulating road surface. The pressure would be in a flux. Properly, the CLASS is supposed to be adjusted while the suspension is unloaded, ie, with the bike on the centerstand. If one adjusts the CLASS when on the sidestand for instance, the actual pressure reading will be substantially different than if checked while on the centerstand.
-
oil filter adaptor
Prairiehammer replied to mike042's topic in Venture and Venture Royale Tech Talk ('83 - '93)
RIVCO has quit selling the spin-on oil filter adapter. This eBay seller offers one for the VMax and First Gen: http://www.ebay.com/itm/261045385834?ssPageName=STRK:MEWAX:IT -
It is not comparing apples to oranges. Both Ventures are intended as Luxury Long Distance Touring Machines. The two do have different ergonomics, but as for features, the First Gen beats the Second Gen. Seriously? No VOX? No passenger audio controls? Air up your suspension with a bicycle pump? No centerstand? No tachometer? Smaller trunk? Smaller saddlebags? Tell me SOMETHING that a Second Gen does better than a First Gen? Beuler? Anyone?
-
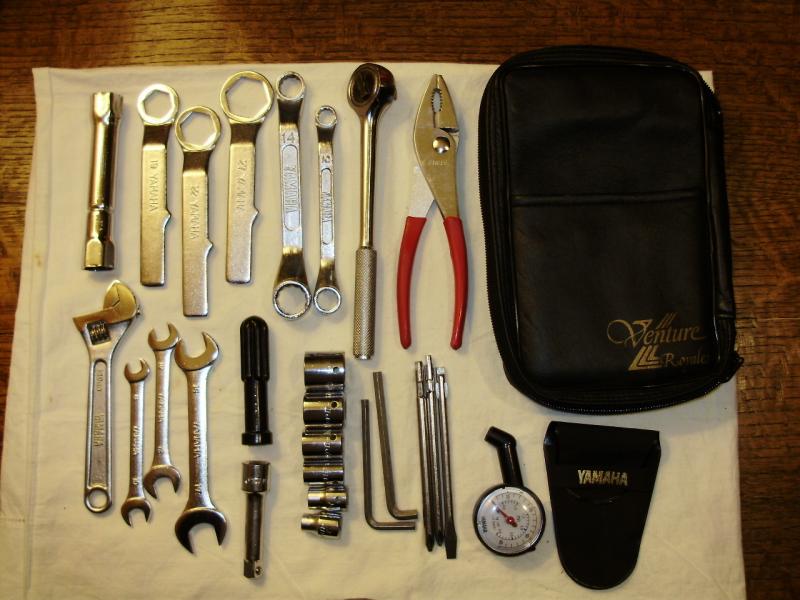
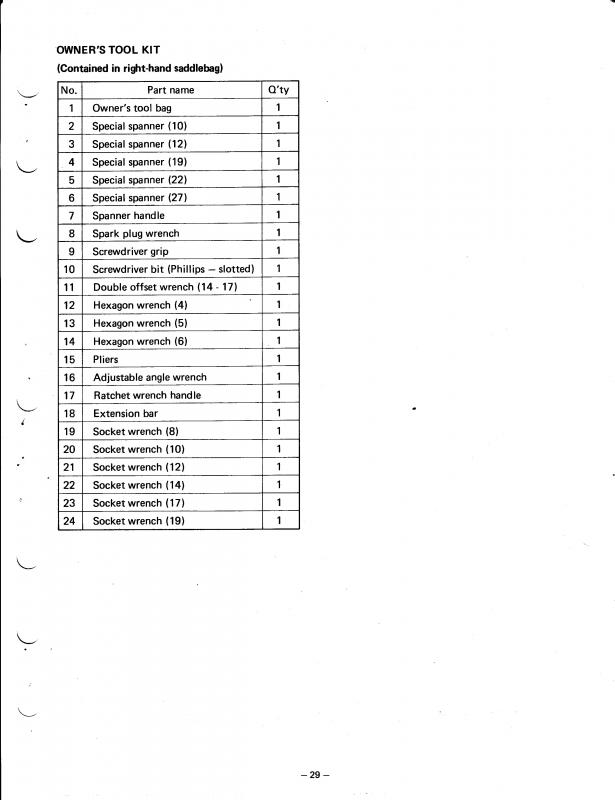
Another place that Yamaha cheapened the RSV: tool kit. Here is a pic of the RSV kit: And here is a pic of the First Gen Royale tool kit, followed by a list of the tools included on the 1990: And I should note that the QUALITY of the tools included in the First Gen is very good, on a par with Craftsman.
-
losing air
Prairiehammer replied to brian aber's topic in Venture and Venture Royale Tech Talk ('83 - '93)
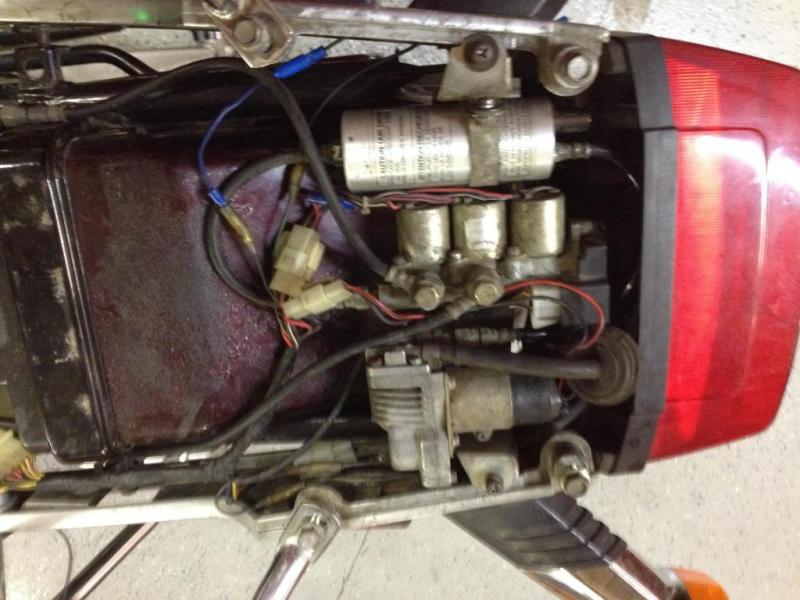
I am going to assume since you mentioned pumping the shocks up to "M" setting that you have the CLASS. There are a lot of joints in the CLASS system, any of which could leak at the fitting. Spray soapy water at all air hose joints you can find. Spray the soapy water around the air collars where the collars sit on the upper fork tubes. There is a pair of O-rings on each collar that could be leaking. Uncover the compressor and air valves under the trunk and check for leaks on the valve body and all fittings there. The fact that both front and rear go to "0" suggests a commonality to both front and rear. That commonality is the valve body. You may also be experiencing leaks in each branch, the front and the rear.
.jpg.231de6b8c2a3a66da952d6d7ce7c0646.jpg)
.jpg.54bde75e7e9c0e8cfa999e31c58fe218.jpg)