Vonwolf
-
Posts
197 -
Joined
-
Last visited
Content Type
Profiles
Forums
Gallery
Events
Store
Everything posted by Vonwolf
-
I did all the steps to get my CC in Fl back in 1989 after some clown emptied a 357 in me when I opened my door, but I never sent it in. I just don't like the idea of The Government haveing a list of law-abiding citizens who own guns, but every crook, murderer, nut or whatever they have no idea about. It might seem paranoid, but I don't have a great deal of trust in the Government
-
 I wasn't aware there were 2 diode's in the circuit, I'll have to find the other one and try again. This starter issue is like a quest o can't find any reason for it, the old 2 brush starter I think is the original culprit, it always turned the motor really slow. I'm pretty sure all that slow grinding cooked something, I just have to figure out what and my constant hammering on the solenoid has burned a few, that probably did my relays no good.
 -
While I am waiting on parts I figured I might as well follow the Service Manual Starter Circuit Diagnostics and try to solve this starter button problem I’ve had since 2010, when I finally gave up on it and let her sit. I found I had a bad starter circuit and side stand relays. I also found that my Diode had continuity in both directions on both circuits, but the resistance was good on the 3rd. I replaced the relays back in 2010, but I didn’t check the diode. I’m not real familiar with how this diode functions in the starter circuit, but I do know you should only have continuity in one direction, would this burn out my new relays, I’ve been hammering in the starter pretty hard trying to get that blue/white wire to do what it’s supposed to do so I might have cooked them I’m not sure. I’m replacing it all again along with the diode and praying the started button works
-
This is good to know, the parts books had me chasing my tail all night. If you look at them nothing had 4 brush starters till the VMax in 2009, but then I all the posts of everyone buying a RSV starter and they're happily installing them in their 1st gen's with no complaints, how the 2 brush starters have the screw in the center of the casing, the 4 brush had no screw so I buy a new starter for a VMax having no screws identifying it as a 4 brush and the vendor tells me it only has 2 brushes, the confusion sets in? So now here I sit, waiting for my starter to see if it's good or bad and watching all the known 4 brush units sitting on eBay, but I can't order them so I guess you could say I'm a bit on edge
-
There's 2 tang's back by the vent that match up with those holes, on yours on has the self-capture bolt on it the other side's missing that, so it's just a hole. That's why I said I wish mine looked as good as yours, Mine's all broke up. I know you can just use abs glue on them, but it will break off after a while. There's a lot of contours that are hard to match up with spare plastic, but I've used wire mesh as a bonding surface it curves around good. The copper wire just makes the joint a lot stronger, I still use glue, JB Weld, Bono or whatever I have laying around
-
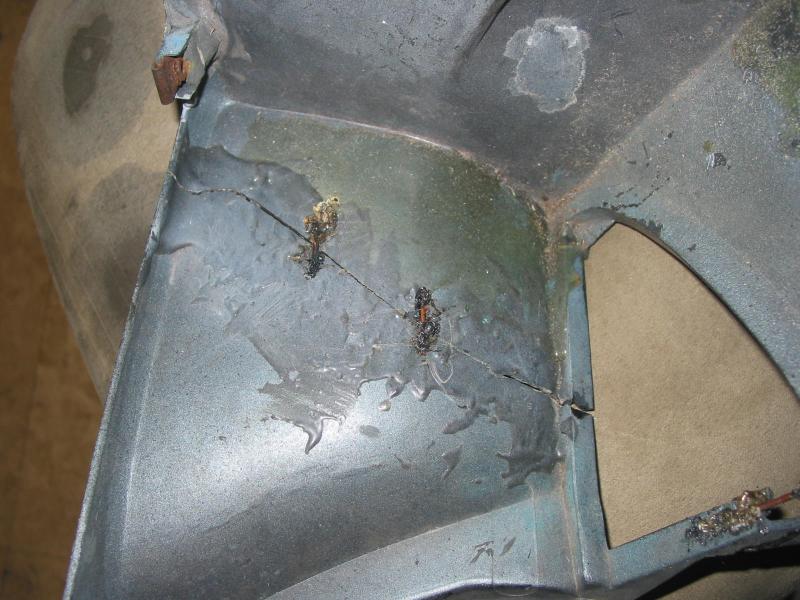
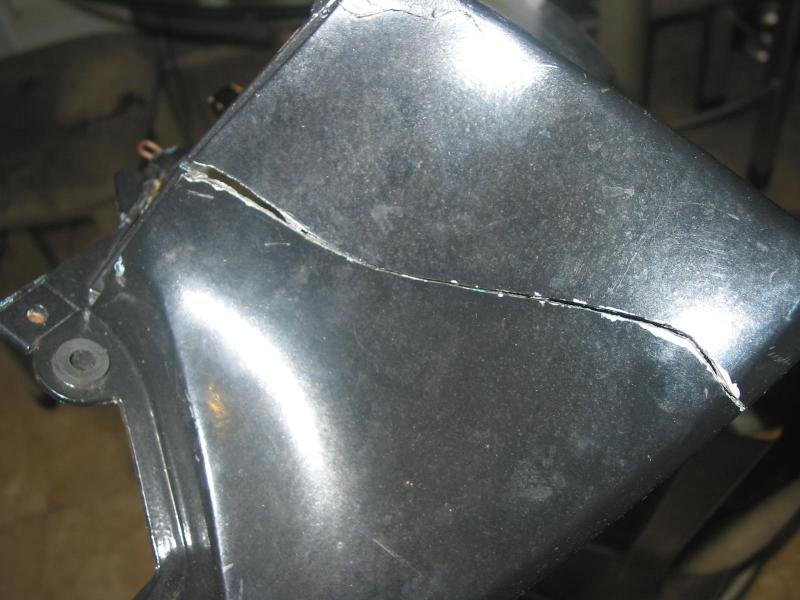
I use short pieces of copper wire usually the ground wire in a 12/2 Romex wire only because I have the laying around all over and a soldering iron, copper's a great heat conductor. I line up the broken pieces, set the copper across the break and heat it up with the soldering iron, the copper wire melts into the plastic, you stop when it's set 1/2 way through the take a plastic zip tie and melt it all together. It really makes a strong joint and if you stop in time it won't show thru the other side. After that, you can use JB Weld, Bondo or whatever to make it stronger. My whole bike is held together this way and I repair plastic parts on my 67 Buick GS this way, it works pretty well. I would like to hear how others repair their Plastics there's always a better mouse trap. ( I wish my Ferring looked that good, most the lower bolt tabs are long gone) Here is a Picture of my Ferring, it was broke right off, the PO repaired it with what looks like JB Weld, it didn't last I stitch it together with 2 wire's in the middle I'll be able to tighten it up with a couple more copper pieces and that gap will close right up

-
Thanks for the help, I bought a New starter for a VMax, it looks just like the one's off the RSV but I looked in the parts book and they supposedly didn't put 4 brush starters in VMax"s until '09, I called the vendor and he said it only had 2 brushes, the Parts book also puts 2 brush starters in all Gen 2 Ventures? I almost bought the 09 starter. but then I found out I canceled the VMax starter order too late, they said it was already shipped? I placed the order at around 1 AM and canceled 5 minutes later, that's some fast shipping at 1:05 AM, so now I have to wait to see the thing, check if its got 4 brushes and if it doesn't send it back and buy the 09 or whatever is left. I'll trust this form more than the parts book, but it did confuse the hell out of me for a time I must have had 50 windows open going back and forth, trying to make a decision. It was really getting on my nerves, I tend to over think things
-
I scrubbed the old needle valves and tried to WD them to keep them loose, but in the time I took to reinstall them they were stuck open, when I took them back off and looked at the needle valves they were welded in the seat, no way to save them. That's why I changed the valve and seats with only guessing as how to get the seats out and even better reading that nobody has ever had a reason to take them out, a real confidence builder. It all seems to be working fine now, but of course I burned my starter out so I won't know for sure, but I have hope. I'm haveing a real tough time finding a starter with 4 brushes, those original 2 brush starters are useless.
-
So if I buy the starter off the 2009 Royal Star Venture It will have 4 brushes, the picture looks just like the starter on the bottom, except it has the long bolts holding it together. The VMax starter looked like that too only in black but when I called the guy said it had 2 brushed; is he wrong? I canceled the order, but they already sent it (in a matter of 5 minutes) but I'm thinking I'll check it out before I send it back, I might get lucky
-
I'm haveing a hard time finding a 4 brush starter, all the ones I find on Ebay for VMax from what I can find are 2 brush starters. I looked in the Yamaha parts book and all VMaxes before 2009 are 2 brush starters, the book also shows the second gens as having a 2 brush starter. Am I getting bad information, the VMax starter I bought turned out to be a 2 brush unit when I called to check, I ordered a starter off a 2009 XVZ1300 but when I looked it up in the book it says it is only a 2 brush starter? I'm really haveing a hard time with this, can anyone point me in the right direction, is that 2009 starter really a 4 brush unit, or can anyone show a link to the starter I need? Thanks
-
I cleaned the carb's to within an inch of their life, blew air through any jet, hole and orifice I could find, I made sure the floats worked, reassembled everything and put them back on the bike. Fuel poured out the no 1 overflow, so of they come again. I checked the no. 1 needle valve and it was like someone soldered it in place, same with the other 3 needle valves, I can't say I was surprised the carb's have been soaking in ethanol for 5 years. I ordered new seat kits and had to remove the old seats, that was interesting taking a hammer to your nice clean carbs, but they came out ok. Now getting the new ones back in was even more of a thrill, I could not find anything on reinstalling them, most of what I found said don't take the old one's out their pressed in and there's no reason to take them out, it did not fill me with confidence. I got them back in after a little trial and error mostly error, but I didn't wreck them, everything works fine and hopefully I get the carb's back on the bike today
-
You got me there, its nothing like they have it up north, but I left the north and the cold a long time ago so it was colder than I wanted to be. I wasn't expecting the guts of the ignition to fall out when I took those 2 tiny screws out, I was thinking "man its cold" instead of watching what I was doing, so I wasn't real confident the ignition was going back together right. When I said the Brown wire was "hot" I only meant it had 12 volts going to it although the heat would have been nice at the time. In spite of the brutal cold I somehow managed to clean all the contacts, put the ignition switch back together and now I have power to all the circuits that were previously dead, the fuse block is still junk but at least one side has power
-
I checked for power at the ignition, the main red wire was good. When I turned the key to "on" the brown wire got hot but not the red/black or the Blue wires and when I turned to "ACC" I still get no power from the Red/Blue wire, so I'm guessing the key switch itself must have problems. Knowing nothing about the inner workings of the ignition switch I of course took it apart, they make that job quite difficult and it was cold as hell outside so I kind of rushed things. When I got those 2 screws out at the bottom I didn't expect all the internal parts to flop out, I hope the 3 pieces I saw come out was the whole thing, I didn't see any springs go flying out so once I figure what order and what faces up I'll have it made. The contacts are green so I'm hoping they weren't making contact and a good cleaning will solve my problems, I've read all kinds of ignition problems and bypasses but from what I can tell those problems were with the Gen II's I didn't see anything on the Gen I's, if this doesn't work I'll have to figure out some kind of bypass, but I'm pretty sure if I can get the ignition back together correctly I should have power that's the theory anyway
-
Thanks I forgot about the CLASS only having power in ACC position, I'll have to check that out. The Red/Black wire is giving me a hard time, but I'm sure I'll get it someday. The pictures of the solenoid is exactly what I needed, now I just have to undo my "workaround" and try to get the start button to work right, I hope I have mere success than I had the last time. Something is strange with this start button, it should be working, lots of fun
-
Project Ace Venture-a
Vonwolf replied to ResilientMonkey's topic in Venture and Venture Royale Tech Talk ('83 - '93)
If it helps any mine looks much worse off, I know I feel better, uh not really, looks like You got a nice bike to start with, GOOD LUCK -
I'm going to have to check the voltage, but I before I let it sit al those years I just bypassed all the starter switch and ran a 12v 12ga jumper to the + side of the solenoid directly to the + Battery terminal, if it didn't start right off then the wires melted. Now I can't remember what the correct way to wire up the solenoid, does anyone have a picture of the top of a solenoid it might jar some rocks loose in my brain
-
Thanks for the help, this is a major reason the bike sat for 5 years, well that and I had 4 different kinds of cancer, but I got better the bike is up to its old tricks. I have 12 V to the solenoid, but pushing the starter button does nothing. The flasher relay seems like a strange place to put the starting circuit cut off relay and I have no idea how to test it but I bought a used one off eBay in 2010, there is a chance it had the same problem as mine and I've been chasing the same bad relay as before, it's kind of unlikely but I'm not the luckiest guy in the world. I even bought the whole right-hand assembly from a trusted form member just to make sure the start button was good and still I push start and nothing, not a click, no lights dimming nothing at all. If the Cut-Off Relay in the Flasher Relay assembly was activated would it make a "clicking" sound, I really don't know but when I push start there is not a sound. I took the start switch apart to clean things up and with the key on I had continuity of the blue/white wire at the solenoid with the b/w wire at the start switch, when I pushed the starter button I had continuity at the ground wire and the B/W wire on the solenoid. I'm pretty confused here because I thought that's what the starter switch does, it grounds out the Blue/White wire and the solenoid is activated? I know I'm missing something here if anyone could point me in the right direction This post is kind of morphing into a list of electrical problems I'm running into and most importantly things I'm going to change to correct them. I'm taking Kevins advice and changing the fuse block out to the modern ATO 12 slot block. Much of my problems were caused be loose and corroded fuse connections. I still don't have power to the ACC or the CLASS fuses so I'll have to track them down. This starter issue has been a thorn in my side for almost as long as I've owned the bike and its kept me from using the bike very much. I want a dependable ride not something I have to worry about every time shut the motor off. I know these bikes can be great road bikes and thats what I'm looking for
-
Thanks for the Picture Kevin, mine looks somewhat like yours only no labels. heavy corrosion, fuses too long/short and nowhere as neat as yours. The labels are a huge help, it takes a lot of guesswork out of things. I do have to replace this fusebox with something, there's no doubt it's the source of manny of my intermittent power loss issues, so I agree it's best to do this sooner rather than later. I can see that the 2 screws are fed by the 10A ACC fuse but that's the one fuse I can't get power to. it looks like it's fed off the main switch so I have a place to start at least. I'm starting to make some sense out of the wiring. butI still have that nagging starter issue. mabee some other day
-
Do you know where the ACC fuse is? The 2 screws don't have power but after a great deal of cleaning I've got power to all but 1, the fuse block is shot and will be replaced soon I'll give all these a shot, I'm not really clear where the ignition fuse is because I don't think this is an original fuse block, it doesn't seem to match up to the RSV schematics I have. Eventually it's all going to have to be changed out but I have to actually hear the bike run before I sink too much money into it. Just a little history- I worked on the bike Saturday, I cleaned up some of the various connections as everything is really corroded, I checked for power at most of the relays, some had power to one side some didn't. After messing with the wires for a while I did a quick check on the fuel pump and it was working but now the dash lights didn't come on, no neutral light, computer test, volt meter or horn but the fuel pump works? The wiring on these bikes are some of the most difficult I've ever dealt with and the starter is all but useless if it doesn't fire right off you’re done. If the bike gets running good I will do either the ground wire mod or get a 2nd gen starter. I have to get the starter button to work be for I do anything, I have had to jump the solenoid to start the motor. I got it so I could hold the start button and jump the solenoid for just a second then the starter button would work, even that little workaround stopped working for a while, but it seems to magically work again. I don't really know what the PO did to these fuses, the block with the glass fuses has 5 mismatched fuses some too long and some too short, they don't always make contact. The fuse to the right is for the CLASS, but power seems to be intermittent. There is also a plastic blade 4 fuse holder that is really corroded, it’s taken some time but I’ve got power going across most of them, but I will change this mess out if the bike runs. From what I can see on the wiring schematic it looks like there should be a fuse block with 9 fuses on it plus the CLASS fuse, but like I said I have no idea what the Previous owners have done to the bike As of right now everything seems to be working, I have no idea why but I’ll take it. I know I have to clean every plug, union, relay and anything else I can find. The starter button is a complete mystery to me, I have tried everything I could read and I can’t get it to work, I have a switch that jumps the solenoid and as long as I have the start button pressed it works, once I let up on the start button nothing happens unless I give the solenoid a quick jump then the start button catches again. It’s not right so it bothers me, but it’s as close as I’ve been able to get to work normally, so I have to live with it for now
-
I rebuilt the front brake master cylinder and the break's almost bled themselves, I now have good front break's I'm not real sure about the back because I can't really push the back break and try to spin the rear wheel, I haven't tried to bleed the rear yet, I'm not too concerned about it till I know the bike runs. I haven't got the rebuild kit for the clutch yet but I took an old oil can, filled it ith break fluid, hooked it up using a clear plastic tube to the bleeder and filled the system up backwards and the clutch works fine, I'll still rebuild the master cylinder when it comes in but at least I know the clutch works. I could not get the clutch to bleed the normal way, kind of strange.
-
Diaphragm Install Info
Vonwolf replied to KIC's topic in Venture and Venture Royale Tech Talk ('83 - '93)
Just take the covers off and shine a light in there, the slide can be moved without removing the rubber diaphragm. Just hold the rubber and spin the hole in place -
$800.00 carb parts?
Vonwolf replied to H2O's topic in Venture and Venture Royale Tech Talk ('83 - '93)
Carb rebuild parts while not cheap,I can't see them costing anywhere near that much, There are probably Special Carb Tuners who build race bikes that are worth that but that sounds kind of expensive, but I'm cheap and try to do things whether I know what I'm doing or not Edit: I did order the 16 Philips head cap screws used in the 4 mounting brackets on my carb, mine were stripped out, cut up and ugly. They wanted $88 for them, for 16 ordinary chrome cap screws not even original? I didn't by them, I got chrome hex head cap screws for about $26, so Yamaha does have rather high opinion of the value the put on their parts -
My bike has been sitting for the last 5 years and I'm trying to get her back on the road. I removed the carbs to clean and check them and installed a new fuel filter. While I was waiting on parts I tackled the breaks and clutch, the plastics were already taken off the front of the bike. I didn't mess with the wiring at all other than moving the dangling plugs, wires, and TCI module so I could get to what was behind them, not too gracefully I'm sure. The pump worked fine before I took the carbs off and pulled the pump out to change the filter, now I turn the key on and nothing so I checked for power at the connection, none, the neutral light, computer test, volt meter and even the horn seem to work, but there is no power getting to the old glass fuse box, I checked at the 2 screws and 0 power, I pulled the fuse off to the right in that rubber coupler and the fuse was blown, even though there is no power there now. I put the spare fuse in just for the hell of it and it did nothing, of course. All these wires !! What did I hit, Pull, Yank? Things were working just fine then I work my magic and instant 12 volt hell. I'm hoping this sounds familiar to someone that can actually make sense of this spaghetti nightmare Thanks
-
Diaphragm Install Info
Vonwolf replied to KIC's topic in Venture and Venture Royale Tech Talk ('83 - '93)
Mine all looked OK but 1 was all tore up, and I wondered why it ran like crap? Well only doing 1 I can see how not to do it, the new one slides like silk, no sticking, uneven rough movement, now the 3 "OK" ones that seemed to work all right I know are going to be a problem, lesson learned I'll probably be replacing the other 3 soon. I indexed the hole in the slider to go on the intake side straight down the engine's intake, that's the way the other's where, but this carb was butchered up good so I don't really have faith in the alignment. -
Thank's I'll get on this today, I still can't beleave I did this I'm sure the clutch was working, just not like a break. I don't have any plastics on the bike so I sprayed the hell out of both reservoirs, blew air in them and things are really clean, but I was covered in fluid. I think I might get lucky and still have everything working, but luck is not my strong point so time will tell.