Vickersguy
-
Posts
173 -
Joined
-
Last visited
-
Days Won
6
Content Type
Profiles
Forums
Gallery
Events
Store
Everything posted by Vickersguy
-
Grocery shopping with Tippy = $45 BSA 6x24 Power Target Scope!!
Vickersguy replied to cowpuc's topic in Watering Hole
Rimfire Central is a lovely site, full of .22lr fans who have much the same depth and breadth of information about the 22lr as there is here for the Yamaha Venture motorcycles. I did not look it up but my memory is that for 500 yards the holdover becomes very dependent on the make of ammunition. Generally the holdover is between 8 and 12 feet at 500 yards. At 800 yards it is somewhere in the low to mid 30 foot range. Also, at those ranges the cone of probable hit opens up to 20 inches or more. It's very ammo dependent. Rimfire Central has a section on long range shooting of 22lr out to 1000 yards. -
Grocery shopping with Tippy = $45 BSA 6x24 Power Target Scope!!
Vickersguy replied to cowpuc's topic in Watering Hole
Glad to see you've mounted it on a .22lr. BSA scopes are a cut above Walmart Crossfire scopes but not by a huge margin. A BSA scope can be awesome in limited circumstances. For example, if you and your friends like going to the range and busting clay pigeon at 75 yards and you always shoot at 75 yards. If you shoot random distances between 30 and 200 yards or are shooting at dusk, this is not the scope you should have. Looking at your rifle, I think you have a good match. -
I saw a $58 price but the part # was 11-1114, not 11-1112.
-
Here's a possible source, https://minneapolis.craigslist.org/ram/mpo/d/83-yamaha-venture-parts/6746715611.html
-
Remove and replace tires at home
Vickersguy replied to dna9656's topic in Venture and Venture Royale Tech Talk ('83 - '93)
I use an ordinary 10 inch "C" clamp. They cost about $20 -
Thoughts on the valve shim tool
Vickersguy replied to Vickersguy's topic in Venture and Venture Royale Tech Talk ('83 - '93)
I hope I can talk someone into lending me one. I found the skydoc offer AFTER I ordered new valve cover gaskets. Maybe I can work something out with him anyway. -
Thoughts on the valve shim tool
Vickersguy replied to Vickersguy's topic in Venture and Venture Royale Tech Talk ('83 - '93)
I just wanted to avoid tying up my limited resources in a $60 tool I will use one time. I could sell it here and recoup most of the cost, I suppose. Or try to borrow one from a member. The ease of use of the Honda tool appealed to me also. I preferred the design and shim change process to the Yamaha procedure. -
Well I've seen the list of motorcycles that use the 25mm. shims and it includes the CBX. I had an '81 CBX and as I remember the shim tool rotated around the cam shaft and depressed the "bucket" the shim rests on, so you could remove the shim. I remember the tool did two valves at the same time. The Venture tool does two also, I think. While the distance the valve moves through might not be the same, the amount the tool would have to move the bucket would be the same. Just enough to remove the shim. The width would be the distance between the buckets. That might be different enough to make the Honda tool useless. There was a post years ago that mentioned the Suzuki/Seca valve tool. The one shaped like a question mark. Has anyone tried this ? The links given in that old post are mostly dead and no-one ever posted that " Yes, I use it all the time " post that would be so helpful. Except the guy who said he did it. Once. Before I rush off to buy that Suzuki/Seca tool, did anyone else try it ? I hate to waste my precious lucre on silly wild goose chases but this one tempts me greatly, even if I have to modify the tool slightly. If someone tried it and failed miserably, I'd love to know.
-
KB1MIQ, not very active since Florence took out my antenna. General class lic. here in North Carolina.
-
Header Pipes brick wall.
Vickersguy replied to Vickersguy's topic in Venture and Venture Royale Tech Talk ('83 - '93)
Well Doug, as you can see, they are better than mine by several orders of magnitude. I'll pm you about them...
-
Header Pipes brick wall.
Vickersguy replied to Vickersguy's topic in Venture and Venture Royale Tech Talk ('83 - '93)
Awesome Doug !!! Looking forward to seeing them. Somebody please tell me I don't have to take apart the fairing to get the carbs out ? To my surprise it took a crowbar to gently lift them off the boots. Those throttle cables are now 'In the way ". Perhaps if I take apart the twist grip.... LOL, putting this back together will be a b****. ! It has to be done. The slides are covered with foam particles from the degraded air cleaner seal, mixed with oil in a kind of paste. The pilot air orifices also have plenty of goo. What a mess. Perhaps if I re-installed the carbs with some sort of zipper... -
Header Pipes brick wall.
Vickersguy replied to Vickersguy's topic in Venture and Venture Royale Tech Talk ('83 - '93)
I love your suggestions but a rebuild of the tranny is not much of an option for me. Back in the day, when I was a little younger, I would have jumped on it. I'm 65 now, and the prospect of getting the motor out and then back in to the frame is.... daunting. I should have a job this winter which might provide some funds but I am retired and there are certain restraints in cash as well as physical limitations that were not an issue when I had my last Venture back in '97. I will not be hammering on the motor anyway. Not my riding style. My priorities will be good tires and brakes, careful and thorough inspection of the drive train, re-lube all bearings and such. I will spend some time keeping the bike looking sharp. My shop is fairly complete, but I do miss my milling machine and glass bead cabinet. I might have a lathe next spring but I'm not sure it's condition yet. I have a nice tig welder for the frame issue, should it arise. For this restoration, my approach will be....um...more sweat than cash. I guess that's the best way to put it. For example, instead of shopping around for a minty original trunk, I've glassed up the shattered lower trunk case. I did the same with the side covers. They look great. My biggest fear is age related failure of the various seals on the motor. The rubber of the brake lines, carburetor diaphragms, etc. are all at their "end of shelf life" stage. I've been wrenching on bikes for over 40 years so I've some idea what I'm doing. This is bike #20 for me. I don't imagine I'll put on more than 10K miles on it before I give up and retire from riding. I think this bike will be fine for my purposes, without a transmission rebuild. Though it would be fun... -
Header Pipes brick wall.
Vickersguy replied to Vickersguy's topic in Venture and Venture Royale Tech Talk ('83 - '93)
My Pipes are good candidates for a re-chrome job. No big scratches or dents, but the pitting is deep. Picking the direction forward is constrained by $. I am going to wait a bit and see what the options end up being. The brake and clutch systems are screaming for an overhaul. I was lucky enough to get the plug out of the rear brake reservoir without damaging it and was able to free up all the brake zirks as well. Brake pads are 1/4 worn. So far, so good. 2nd. gear works, as it should at 31K miles. -
Header Pipes brick wall.
Vickersguy replied to Vickersguy's topic in Venture and Venture Royale Tech Talk ('83 - '93)
Sorry, Ontario. I wonder if the shipping would be all that bad... -
Header Pipes brick wall.
Vickersguy replied to Vickersguy's topic in Venture and Venture Royale Tech Talk ('83 - '93)
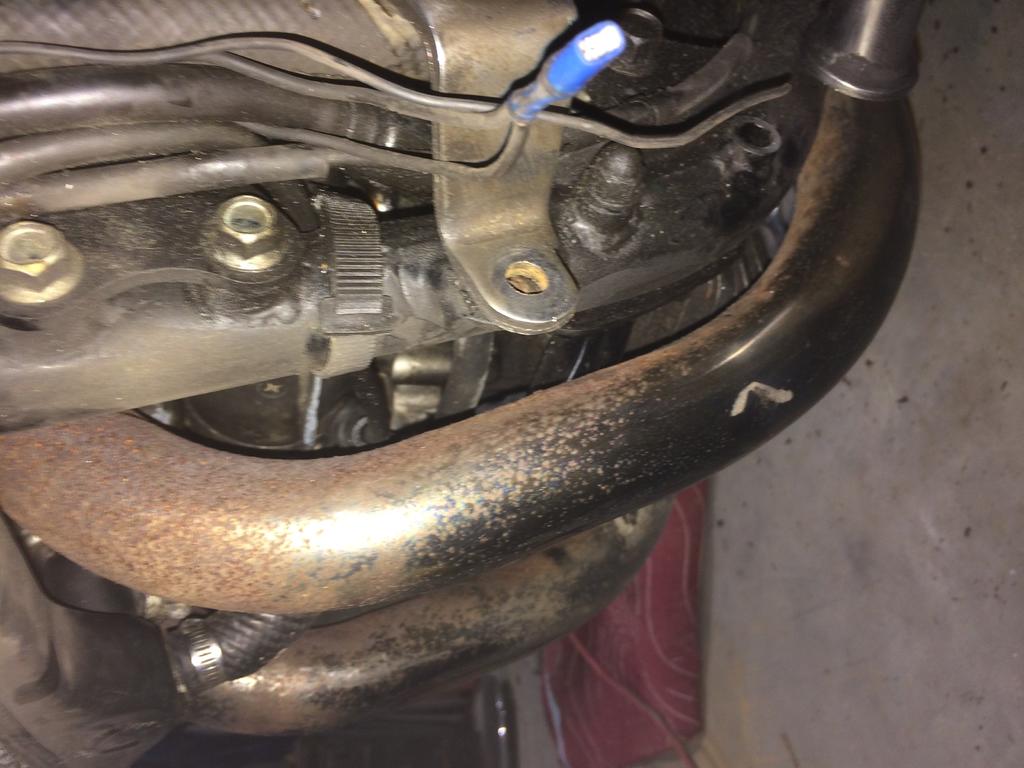
Very nice pipes there, Marcarl. Here's what I have, after a half hour trying to clean them up.... I also spent a half hour trying to get the pic rotated, to no effect. They are solid, but rusty and burned. Yours, even with the dings, are nicer. So you're in Washington ? Tacoma ? You're right, the shipping would suck. I'm going to look locally, but right now, your pipes will be hard to beat around here.
-
Header Pipes brick wall.
Vickersguy replied to Vickersguy's topic in Venture and Venture Royale Tech Talk ('83 - '93)
LOL, coverage is not an option. Like most restoration projects, one starts with a vision. The only deviation I plan from the original is that I would prefer the shorty windscreen. I'm willing to upgrade the ignition and so-forth, progressive springs and such, but the original Blond '83 is what I'm looking to create. ( Besides, I've already taken off 40 lbs. of chrome plated steel stuff bolted all over the machine. ) Good thought though. I can put them both back on if I have to. The radiator cover and chrome scoop are here in the parts box. I'll keep an eye out on e-bay and I bet a forum member might come forth. -
I usually don't have much trouble finding things on the net. This time, however... I've covered all the bases and I believe the restoration of my Blonde '83 VR should be straight forward but I've hit the wall on new front header pipes. Mine are in good shape aside from some corrosion, but I'd like to have them really nice. E-bay, Craigslist, Google, Bing, etc. have not provided productive leads. Anyone have a source for NOS pipes ? Alternatively, a place that will chrome older pipes ? Chrome shops usually will not do parts that have been exposed to oil at high temperatures as the oil has been baked into the metal and messes up the chrome solution tanks. As you folks have been doing this for some time, perhaps you have an angle on this. Lastly, will the 1300 cc. pipes fit on the 1200cc. engine ? This would double the pool of salvage pipes I'm probably going to have to "paw" through. I'd hate to do a classy restoration only to do the front pipes with barbecue flat black... that is so wrong...