dna9656
-
Posts
1,124 -
Joined
-
Last visited
Content Type
Profiles
Forums
Gallery
Events
Store
Everything posted by dna9656
-

Damper rod bolt size
dna9656 replied to 6pak's topic in Venture and Venture Royale Tech Talk ('83 - '93)
I used the 3/8" impact gun and didn't hold the damper rod, filled it with oil and it's not leaking.... Just sayin'. -
rear wheel bearing/seal order
dna9656 replied to dna9656's topic in Venture and Venture Royale Tech Talk ('83 - '93)
Thanks to all! I got the bearings and seals in tonight, I also replaced the "O" ring under the splines! I cleaned all, lightly greased all (including the "fingers") mating parts, and put it together! There was a day I was a pretty S/H mechanic but not so much any more. Again thank you all for your pats. with me. -
rear wheel bearing/seal order
dna9656 replied to dna9656's topic in Venture and Venture Royale Tech Talk ('83 - '93)
PERFECT!!!! THANK YOU SO MUCH! Y'all are up early! You and Marcarl!! -
rear wheel bearing/seal order
dna9656 replied to dna9656's topic in Venture and Venture Royale Tech Talk ('83 - '93)
Ya know, I USED to have that program but that was 2 computers ago and had forgotten what the program was! Now; thanks to you guys i can get it again! Will D/L tonight! THANKS! -
rear wheel bearing/seal order
dna9656 replied to dna9656's topic in Venture and Venture Royale Tech Talk ('83 - '93)
I don't have Word. So I can't see it. Doug -
rear wheel bearing/seal order
dna9656 replied to dna9656's topic in Venture and Venture Royale Tech Talk ('83 - '93)
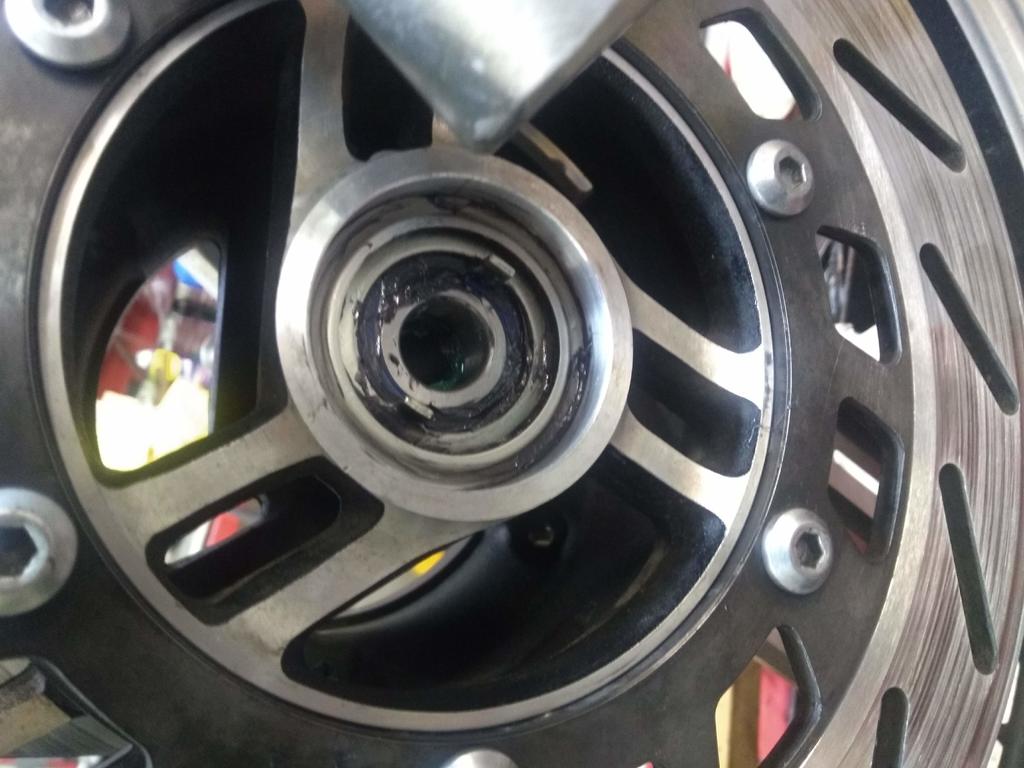
When I pulled the bearings the rest of what was in the wheel fell out of the hub, I had no chance to take a pic. Some things have to go inside the hub before the large bearing is installed so what's the first thing that goes into the wheel? I think it's the needle bearing? BTW is the grease in the needle bearing compatible with all greases or do we use that grease, do I not worry about it or what? There is no getting the factory installed grease out of that needle bearing without ruining the rubber seals on both sides so I was wondering.... What is next that goes into the hub? The flange? If so in what direction is the "open cup" side supposed to face, towards the rotor or no? How does it stay in pace inside the hub? Do I tap it onto the large bushing, if so how far? I think it has to be installed with the axle in place so that indicates to me there must be an order of install or proper technique that isn't obvious to me. OK Prarriehammer call me dense! Your pic above answers my questions; all except which way the "cup" side of the flange faces AND I take it the FLANGE is "pressed on" the long bushing but the bushing can't reside in the hub without the axle? How are the "fingers" removed for lubrication please? -
rear wheel bearing/seal order
dna9656 replied to dna9656's topic in Venture and Venture Royale Tech Talk ('83 - '93)
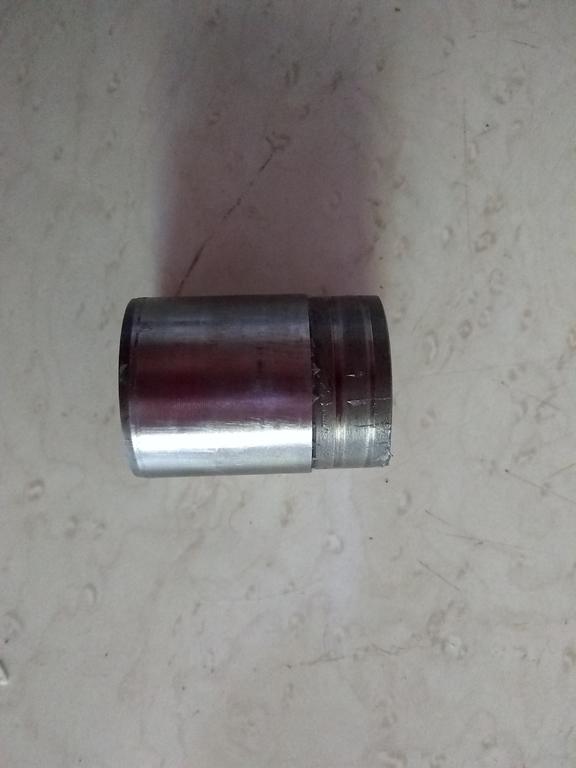
Is the part still serviceable with the lines in it?
-
I did a search for "Pinwall" on Ebay, Ebay asked "Did you mean: pinball (62,963 items)?" The dust cover goes for $17.?? on Ebay though....
-
rear wheel bearing/seal order
dna9656 replied to dna9656's topic in Venture and Venture Royale Tech Talk ('83 - '93)
PERFECT... as usual, now the order of placement please? and Ii have one piece I have to (another!) question. Is this piece ok? I think it is.... those lines that look like cracks are white grease that is packed in the bearing this fits into (I think) from the vendor. Nothing Yamaha has looks (not enough (apparently) for me anyway) like the items in the picture.
-
rear wheel bearing/seal order
dna9656 replied to dna9656's topic in Venture and Venture Royale Tech Talk ('83 - '93)
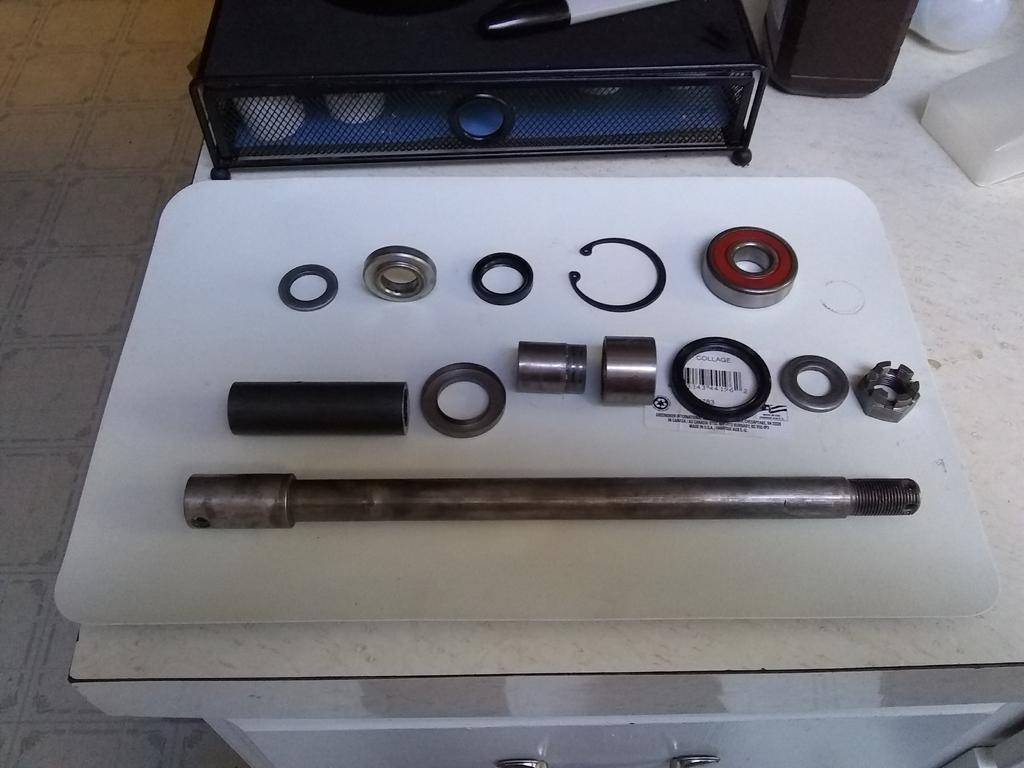
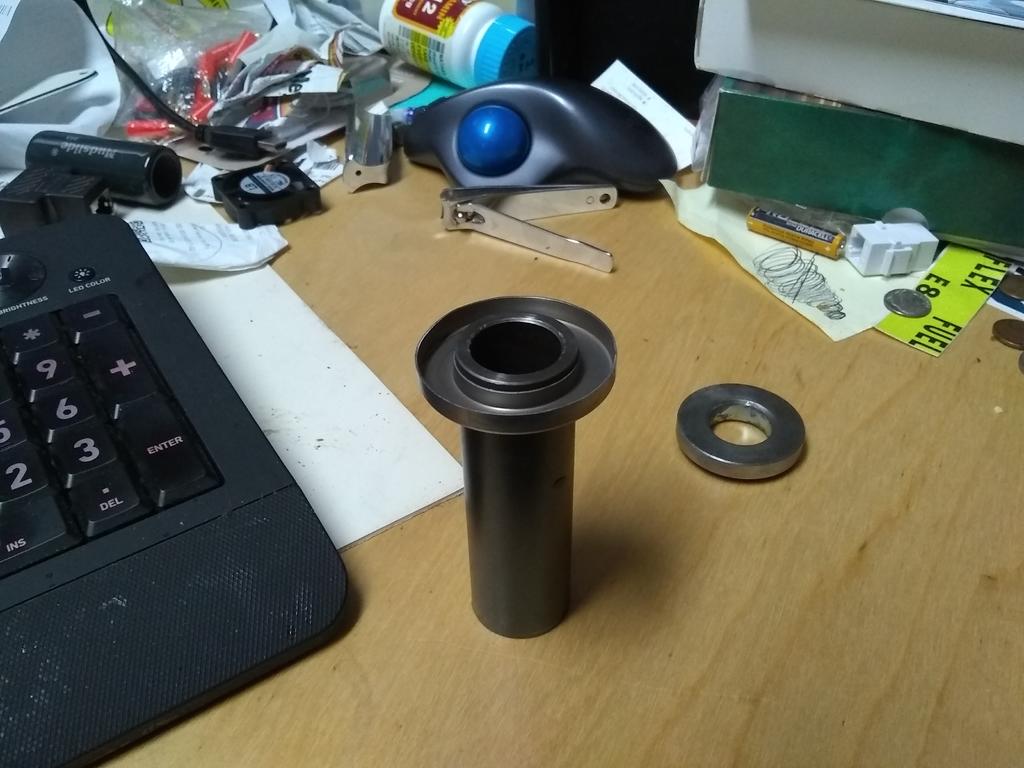
Very much so but ummm. There isn't anything that looks like this: I get the steel tube as a spacer, but the other is sheet metal and they call it a "flange, spacer" ,,,, and this is installed from the And the 2 are not coming apart without some sort of whacking involved.
-
rear wheel bearing/seal order
dna9656 replied to dna9656's topic in Venture and Venture Royale Tech Talk ('83 - '93)
Yeah, I looked at this and hoped to find a photo that showed more clarity than the blob-by drawing Yamaha gives us. Even on a 60" screen it looks like blobs. Thanks Carl! -
I had a new tire mounted on my front wheel at the local Triumph Dealer. $20.00 bucks to mount and balance the tire; a screamin' deal! Well I was the guy screamin' the next morning when the tire turned out to be flat and I was 28 miles from home and AAA was a 6 hour wait, so I removed the tire/wheel assembly and rolled on down (walked) to the nearest compressed air and upon filling the tire I put some mark 1 leak tester (spit) over the valve core, found the core in the valve loose; THAT'S when I started screamin'! I tightened that sucker up and it never gave me any issues after that. ALWAYS follow up on the work some one else does to your bike! Yep, you paid professional grade wages for the professional grade work but that's no guarantee you GOT that professional grade work. The only way you know is to check it out. A shame huh?
-
The book stinks! Does anyone have a clear, concise illustration or picture showing how everything goes in to the rear wheel?
-
"Of course I have been known to be wrong...." Don't let your wife see this post.... All kidding aside I imagine a tube would make it hard to balance too....Luckily O have 5 parts bikes....
-
For the 1300 Bikes: Brake Caliper Dust Cover (1NL-25836-00-00) $24.48 (Yamaha's price but Yamaha doesn't carry it any more soooo,) and $16.97 at Partszilla. Now tell me, who's gonna pay $17.00 (plus shipping) for a dust cover that's not going to keep dust OUT much less make the BRAKE dust not get on the caliper, wheel, rotor.... I have to give Partszilla it's due, they have a lot of parts at the least amount Web wide; but $17.00 plus shipping for a piece of plastic? REALLY?
-
All; Any reason we can't put a tube in the tire?
-
Fork seal rebuild
dna9656 replied to CrazyHorse's topic in Venture and Venture Royale Tech Talk ('83 - '93)
I was curious where you ordered them from because I looked for them on the Internet for 3 weeks and didn't find a supplier that had one let alone 2. -
Fork seal rebuild
dna9656 replied to CrazyHorse's topic in Venture and Venture Royale Tech Talk ('83 - '93)
May I ask who you ordered the plate, seat from? -
9/03 Since I have the kit from ALL BALLS Racing installed and front wheel re-installed, got wheel all cleaned up I'm ready to do the rear wheel; I removed the rear wheel yesterday. and I am attacking it this afternoon. The snap ring on the drive shaft is new to me; There is a lesson here, always check the manual on jobs you haven't done for a while or on a different year edition bike that you haven't worked on before, this bike is an is an '88, lots of changes from the '83/'85 model bikes I have worked on before. Replacing the wheel bearings/seals and a couple of O rings, I am changing the gear lube, the pins will get lubed,and cleaning the poor thing up!! This is a great time to clean up all those places you can't get to while the mufflers and saddle bags are on the bike. I like Never Dull polishing wads. If you aren't familiar with Never Dull it comes in a can, it's cotton wadding soaked in some sort of cleaner/polish. It'll remove road tar but I use lacquer thinner for tar on chrome plated parts, it's really cheap and it's FAST where the commercial road tar solvents is a lot tamer and commercial road tar solvents is what you should use on painted parts but the Never Dull works on painted stuff too, esp. the frame. Never Dull leaves a film on the part that you can buff off with a clean, soft rag. You toss out the wad when it's no longer effective; if it's still useable, put it back in the can. The stuff lasts a LONG time on the shelf, I can't remember when I bought this can but it was years ago! This also a good time to wire wheel some of the nuts, bolts, clamps and other hardware involved. As always inspect you bike for problems/issues while you have the saddle bags off, look at the frame for condition, paint. Look over everything you can't see when the saddle bags are installed.
-
Front wheel seals
dna9656 replied to dna9656's topic in Venture and Venture Royale Tech Talk ('83 - '93)
I looked at my parts bikes and found the right/hand, right side seal is NOT flush with the hub, it goes in a bit more than an 1/8" (0.125) and the beveled washer is installed so the smaller diameter side of the beveled washer goes toward the bearing, I compared how the speedo drive's "sat" in the installed position with the beveled washer installed both ways and with the smaller Diameter side of the beveled washer the speedo drive fit like the ones on my parts bike. The pics I took for the process don't show what I hoped they would show. Next time I have this apart I will do a better job and record what each pic shows. I installed the front wheel so that job is complete, now on to the rear wheel Thanks to all who helped, esp. Kevin, it was nice talking to you Sunday!
-
Front wheel seals
dna9656 replied to dna9656's topic in Venture and Venture Royale Tech Talk ('83 - '93)
I bet that's because you REALLY don't need them if you have SEALED bearings.....buuuut I like the extra protection and helps keep water out of the hub yes? I bet you must have found sealed bearings in the bikes you worked on.... -
I may have read before what I'm about to post here on our wonderful forum or elsewhere, but regardless I think it needs repeating. I wish I took pics yesterday while I performed this service! Based on what I have read here on the forum to remove the wheel bearings start on the right bearing (the one opposite of the speedo mechanism) you can use a drift and a hammer. Slide the spacer (located between the left and right bearing) away from the bearing you are removing and gently hammer (you'll need a drift with a sharp corner on the business end to catch the edge of the inner ace) the back side of the bearing you are removing at the inner most circumference of the bearing on the far side of the spacer. Then you can use a socket whose diameter is no less than that of the outside diameter of the spacer) and extension with your hammer against the spacer to drive the other bearing out from the same side the first bearing was removed from. I don't like the first part of the above method because 1) I don't have a drift long enough to reach, and 2) I don't have a square drift... I heated the hub around the bearing to expand the aluminum to allow the use of a Pilot Bearing Puller (sometimes called a Blind Hole Bearing Puller; you can borrow these at the local Auto Parts stores, I got mine from NAPA) and the bearing came out quick and easy! Then, I turned the wheel around, applied a squirt of WD-40 (I don't know if it really penetrated (helped) or not but I did it anyway) Then using my trusty Lisle bearing/seal driver set and 3/8" X 8" socket extension with the Legacy Force Applier (Hammer, w/short handle, 2.5 Lbs.) and with some light tapping drove the other bearing from it's home. To install the All Balls Racing Bearings, I reversed the process, BUT I left a LIGHT coating of grease inside and outside the spacer and shield assembly and each bearing's home for 2 reasons, the bearing and spacer are made of steel, the hub is made of aluminum, a sure recipe for corrosion should any humidity or water get in there. I saw NO CORROSION in the bearing homes but a little bit of grease is cheap rust insurance. The second reason I applied grease to the bearing home and the outer circumference of the bearing is to help the bearing move in the very tight home it sits in, I bet the machinists here on the forum would call the hole and bearing clearance an "Interference Fit" (if it's not it's AWFULLY CLOSE to one!) I installed the last bearing first using the tried and true hammer/driver method and (now this is important!) Next I installed the second bearing using grease and the aforementioned bearing driver set and hammer. TIP: Never install a bearing (roller or ball, sealed or not) by pushing or pulling on the inner race; always use the OUTER race or a bearing driver disk. The disk should be no smaller that the inner diameter of the outer race. Unless you're removing the old bearing; the mission there is to get the old bearing (you won't be reusing the old bearing) OUT, just don't screw up it's home! Use a LITTLE heat (especially on aluminum as it has a low melting temp.) to expand the housing hosting the bearing, the aluminum will heat faster than the steel bearing inside it. The bearing will come "right out" with minimum force. I suppose you should use heat to install the bearing too, it's prolly the preferred method....The Yamaha manual doesn't address HOW to remove/install the bearing, it just tells you to do it. Using heat Is one of those things that's "good shop practice" So on the rear wheel I will use the heat to install as well as remove the bearings. In my 36 years maintaining aircraft, cars/trucks and ships I personally have never seen heat used to install a bearing. From https://www.engineeringtoolbox.com/melting-temperature-metals-d_860.html [TABLE=class: medium] [TR] [TD][TABLE=class: medium] [TR] [TD]Iron, Gray Cast[/TD] [TD] 1127 - 1204c[/TD] [TD] 2060f - 2200f[/TD] [/TR] [/TABLE] [TABLE=class: medium] [TR] [TD]Magnesium 650c 1200f[/TD] [TD][/TD] [TD][/TD] [/TR] [/TABLE] [/TD] [/TR] [TR] [TD][TABLE=class: medium] [TR] [TD]Magnesium Alloy[/TD] [TD] 349 - 649c[/TD] [TD] 660 - 1200f (Ain't much is it?) The Oil Filter Cover is made of Magnesium.[/TD] [/TR] [/TABLE] [/TD] [TD][/TD] [TD][/TD] [/TR] [/TABLE] [TABLE=class: medium] [TR] [TD]Iron, Gray Cast[/TD] [TD] 1127c - 1204c [/TD] [TD] 2060f - 2200f[/TD] [/TR] [/TABLE] [TABLE=class: medium] [TR] [TD]Aluminum[/TD] [TD] 660c[/TD] [TD] 1220f (Ain't much is it?) Beer Cans?[/TD] [/TR] [/TABLE] [TABLE=class: medium] [TR] [TD]Aluminum Alloy[/TD] [TD] 463 - 671c[/TD] [TD] 865f - 1240f (For our purposes it's about the same as Non-Alloy Aluminum)[/TD] [/TR] [/TABLE]
-
Front wheel seals
dna9656 replied to dna9656's topic in Venture and Venture Royale Tech Talk ('83 - '93)
Well, that's the way I found the old ones, I suppose I could have looked at the other 3 Ventures in my shop but #1 .) The seals can't be seen from the outside; you have to remove the wheels to see the seals; #TWO .) The shop is a bloody mess, and THREE) I couldn't remember how I did it the last time 3 years ago! Besides I was done for the day! Now I get to remove the rear wheel, I will disassemble the wheel and inspect it for condition and if all is found to be serviceable l will change the bearings and lube the dickens out of everything that requires it! Thanks Kevin, You're the BEST! (As are all of my friends here on the forum!) Doug -
So how deep into the home does a front wheel bearing seal go? I do believe the large seal goes flush with the area outside of the circumference of the seal but what about the smaller seal?
-
Cylinder side covers
dna9656 replied to dna9656's topic in Venture and Venture Royale Tech Talk ('83 - '93)
OK... Maybe those streaks of oil was an old spill....I'll monitor the spots as she runs and keep all advised, but I pretty sure you're right.... Thanks my friend! PS There is NO coolant leak at that location, that'sfersure!
.jpg.9da4f3c3c2003809ee31d0f76229c5b6.jpg)