dna9656
-
Posts
1,124 -
Joined
-
Last visited
Content Type
Profiles
Forums
Gallery
Events
Store
Everything posted by dna9656
-
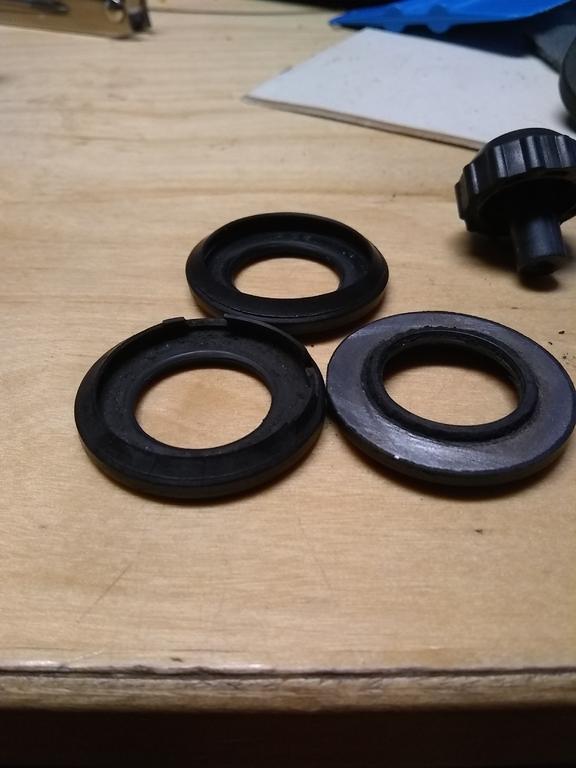
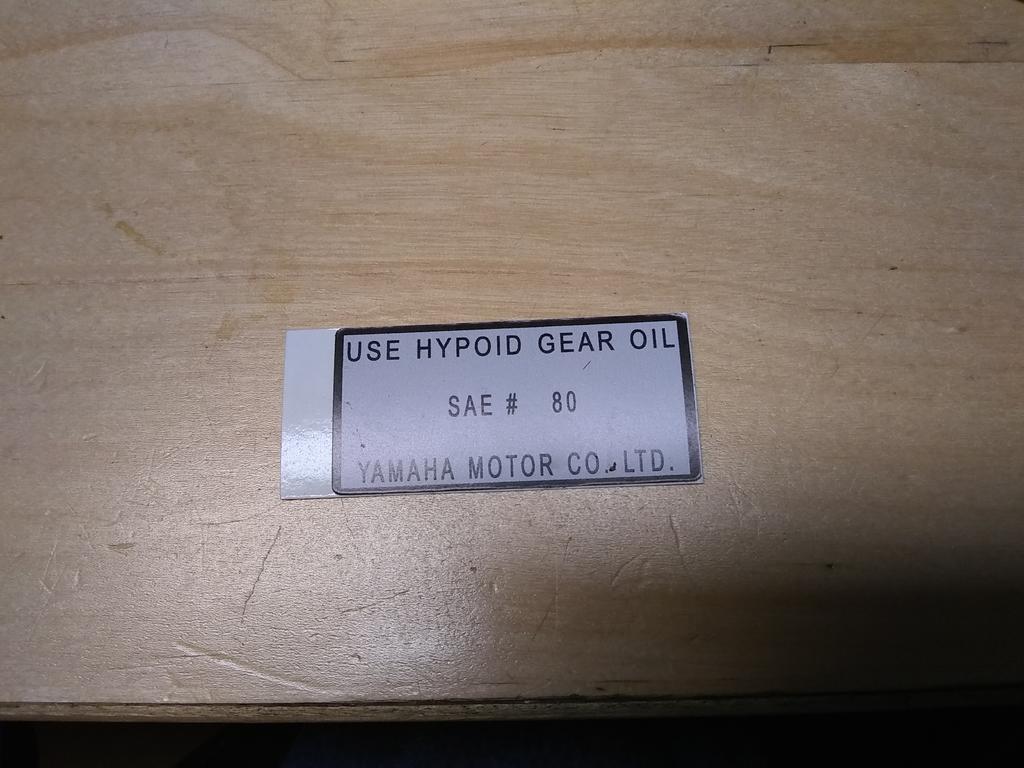
Seals on the back/underside! The Large seals are from the Swing Arm/Arm and Arm 1; I sure remember seeing the small ones but I hope some one here can help me figure (I think they are item # (s) 34 or 36 on the 1988 XVZ13U parts book) out where they came from! I know I need at least one large seal, can I get an opinion on the condition of the small seals please? Well I went out to the shop and did some cleaning and investigatin' And I learned where these dust covers go, How many here still (if you're aware you have them) have these on their bike? I'm thinking a bit of rubber sheet or leather on a washer would be almost as good, especially for the price they cost and the non availabilty from Yahama, are there any suitable substitutes? This pic shows some dust/thrust covers and the swing arm seals. Here are some more pics of JUST the dust and thrust covers.

-
OK thanks!
-
Did he answer yet? Did you ask by P/N?
-
 Food for thought; Most states limit the amount of lights you can mount, my state (Wa> has a 3 light limit, that being said there are guys here that run HIDs, some times 4 of them (no the law isn't enforced) and these lights (along with some LEDs) are not only bright but blind other drivers, esp. M/C drivers; (when mounted on a 4 wheel platform) as when they get behind (me any way) those lights are RIGHT in my mirrors and therefor right in my eyes and I can't see or the light "burns" my eyes. I'm sure others have been in this situation. All I'm saying is that we're not piloting aircraft; THEY NEED to see WAY down the runways (not that they could do anything about something in their path) but IMHO we don't need to see the color of the gravel in the concrete nor 3000 yards down the road. Another pet peeve: When you change your head light or aux lights be they the old school style or the new school type always re-aim the head light; production variances in the filiment placement add up when it comes to head lights, there is a standard for aiing the lights, it's set up to give max distance for the driver and minimum blinding to on-coming traffic. End of Rant
 -
Remove and replace tires at home
dna9656 replied to dna9656's topic in Venture and Venture Royale Tech Talk ('83 - '93)
I do not have a changer, I used but it got lost somehow. Now, that I have ordered this one (https://www.amazon.com/gp/product/B004MS9264/ref=od_aui_detailpages00?ie=UTF8&psc=1) my old changer will show up. I never used it....It was a cheapie... Note that unlike the cheaper version of this that the "legs between the circles bolted in place these are welded and it has welded tabs to bolt the thing down to a pallet or other foundation...It costs a few $ more than the one that has the steel "legs" that bolt in place (it looks like it might collapse) and it has no tabs to secure it in place. PLUS it's smaller that HF's set up. I can easily store it in garden shed and not in my shop! The local HF has an open box special on the M/C attachment ($15.00) that's missing the bar that goes through the center of the wheel, just as well because that bar is too big (could buy a iron pipe I suppose) for my bike anyway
-
Remove and replace tires at home
dna9656 replied to dna9656's topic in Venture and Venture Royale Tech Talk ('83 - '93)
I used to have a place that changed tires for $20.. so long as I brought the wheel(s) in; they closed up shop -
I called around today for a price to demount 2 tires and remount/balance one. $120.00 plus tax was the only quote I got before they all closed. I have a M/C manual tire stand but I have no way to break the bead; I have seen You tubes of a guy breaking the bead using 2' Xs and his truck, he jacks the truck up a bit, sets up the wheel under the hitch receiver or what ever... and places the 2" X between the bead of the tire and the truck, he lets the truck down and the bead pops free....Anyone know of a good way to do this at home? Is there a tool out there for this? HF used to have a tool for this but it's no longer available...
-
Has anyone carried a Gen 1 in the bed of a pick-up?
dna9656 replied to GaryZ's topic in Watering Hole
Tie the bike upright so it's not resting on the center stand or side stand, if shipped this way some thing isn't going to be the way it was at the beginning of the trip. I used two 2" X 12"s (nailed together underneath with cross members) and another 3 men to help, it was a bit scary too. Back up to some thing that will allow the ramp to be less steep, the flatter the ramp the better. The back of the truck is awfully high above the ground to be messing around with this amount of unstable weight, the flatter the ramp the better you'll like it. Trust me. -
I have the 4 wheelers 85 (no 2nd gear either) that hasn't started since the day after I bought it. It's goin got be the winter project. I installed the ignitec ignition in it and still no joy. What I wanted to add to this conversation is this: Just because a wire looks good (on the ends) doesn't mean it is good. Older wire can carry voltage (pass a continuity test) but won't pass current (or maybe it's the other way around?) due to green crud growing inside the insulation. Call it tarnish, call it mold, I don't know which it is. My '65 Suburban had a head light out, got a new head light and installed it, still no light. Tested the circuit's wires from first headlight in the circuit to the one that didn't work, (2nd head light in the system; with ONE light on each side of the truck) wire tested with the meter just fine, still no light. Checked the terminals, they were fine, started to install new terminals that came with new headlight plug and saw the green stuff in the wire strands, replaced all 3 wires in this end of the circuit with new wire, the light worked fine. Now I don't know if it was mold or corrosion but I do know that the wire LOOKED fine, was CLEAN at both ends and still DID NOT work so I would replace the battery ground with a stranded (the finer the strand the better IMHO) AWG #6 or #8 using new soldered lugs. I would clean all the switches, the kick stand, the ignition and then the kill switch. There are guides on how to do this in the tech section of this forum. THEN I would go hunting with my test light and meter. Good luck and please report your results; all would benefit from your exp.!
-
Windshield question
dna9656 replied to Beachbum's topic in Venture and Venture Royale Tech Talk ('83 - '93)
I got the bigger one and like it very much! Get their cleaner too. -
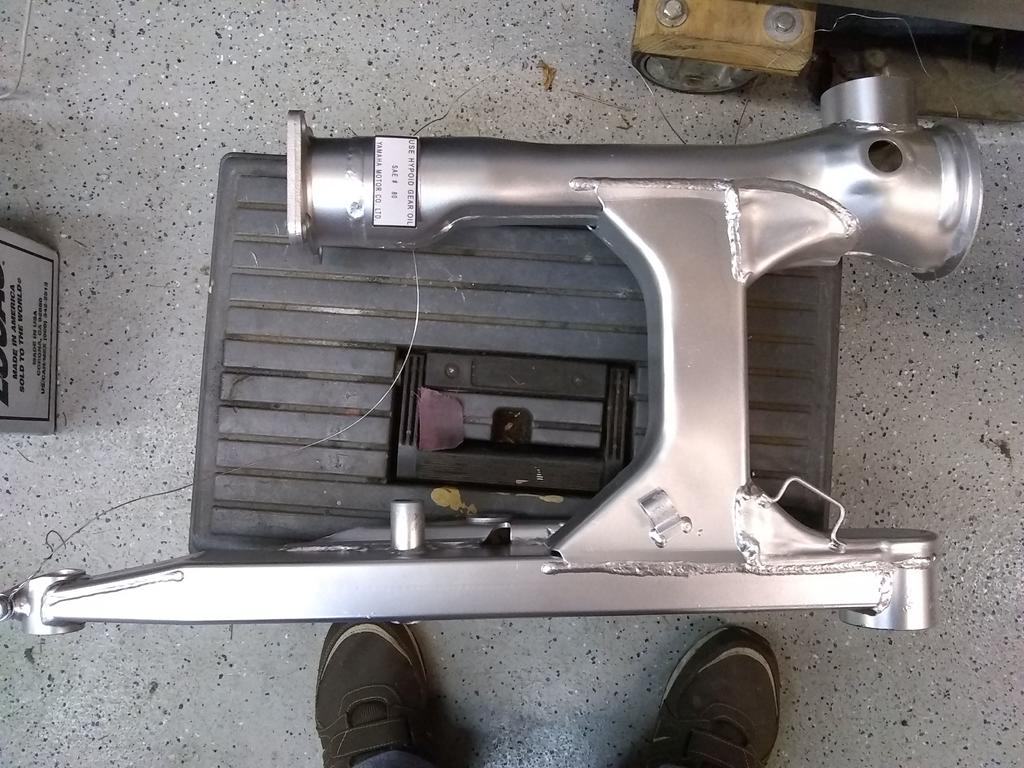
Swing arm/differential joint seal
dna9656 replied to dna9656's topic in Venture and Venture Royale Tech Talk ('83 - '93)
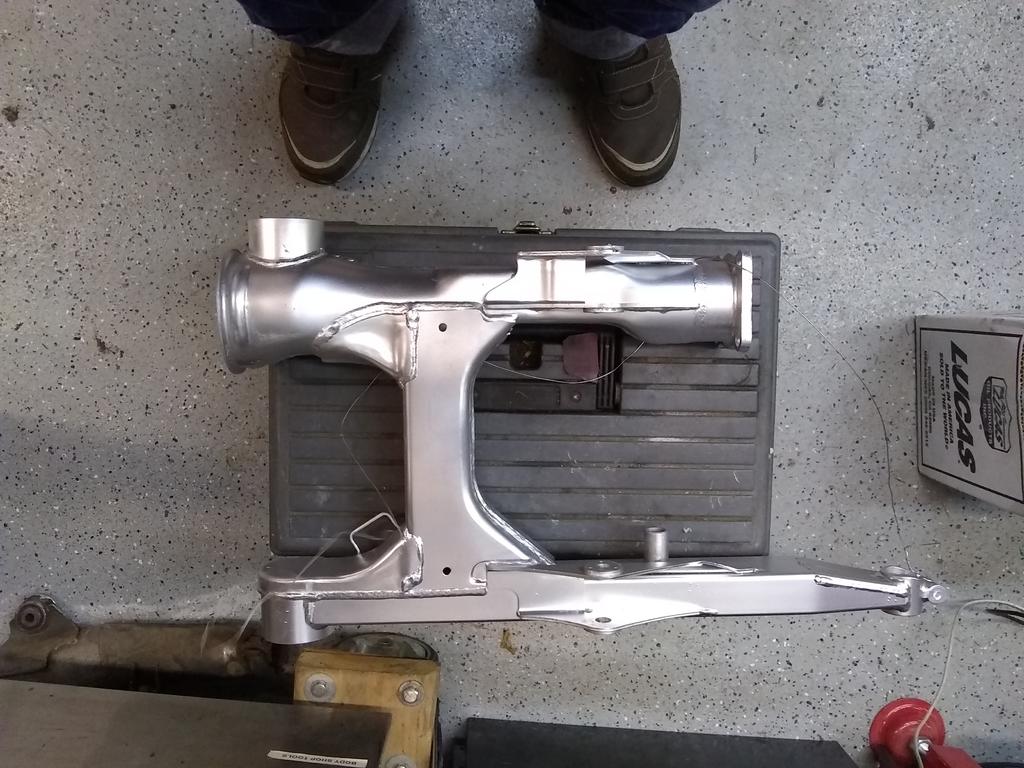
Anyone got a swing arm this clean? Off to get some self etching epoxy primer and some silver paint hopefully in epoxy as well.
-
All; IMHO https://www.brakecrafters.com/ is the best place to go; you get ALL the parts Here is the front application; now all the discriptions are Mark's, the man that runs the store. Call him with any questions, you'll find out right away he's not from these here parts.... The kit comes with everything you need: Bleeder, a sexy little dust cap for your sexy new bleeder, seals, red grease, copper washers. I bought my own tub of red grease (EBay) because I might have to buy a kit that doresn't provide the red grease some day...
-
Swing arm/differential joint seal
dna9656 replied to dna9656's topic in Venture and Venture Royale Tech Talk ('83 - '93)
Well my reason for asking about a sealed bearing is that if I could install those I wouldn't have to concern myself with those bearings for a good long while... That's all, just laziness! After I media blast and paint the swing arm I will repack and and re-install those bearings. I have a HF blaster here at the house, I just have to dig it out of the mess in the garage, move the Sebring and Avalanche out to the street, and blast it on the concrete in front of the shop, with a piece of plywood between the work and the concrete of course! I'll pick up some epoxy spray bombs (spray can paint) if my buddy can't powder coat the Swing Arm for me....I figure to coats of primer and 2 of top coat ought to do the job. -
Swing arm/differential joint seal
dna9656 replied to dna9656's topic in Venture and Venture Royale Tech Talk ('83 - '93)
Do you have any idea what the P/N might be on a sealed bearing for this application? -
Swing arm/differential joint seal
dna9656 replied to dna9656's topic in Venture and Venture Royale Tech Talk ('83 - '93)
You're a gem! -
Swing arm/differential joint seal
dna9656 replied to dna9656's topic in Venture and Venture Royale Tech Talk ('83 - '93)
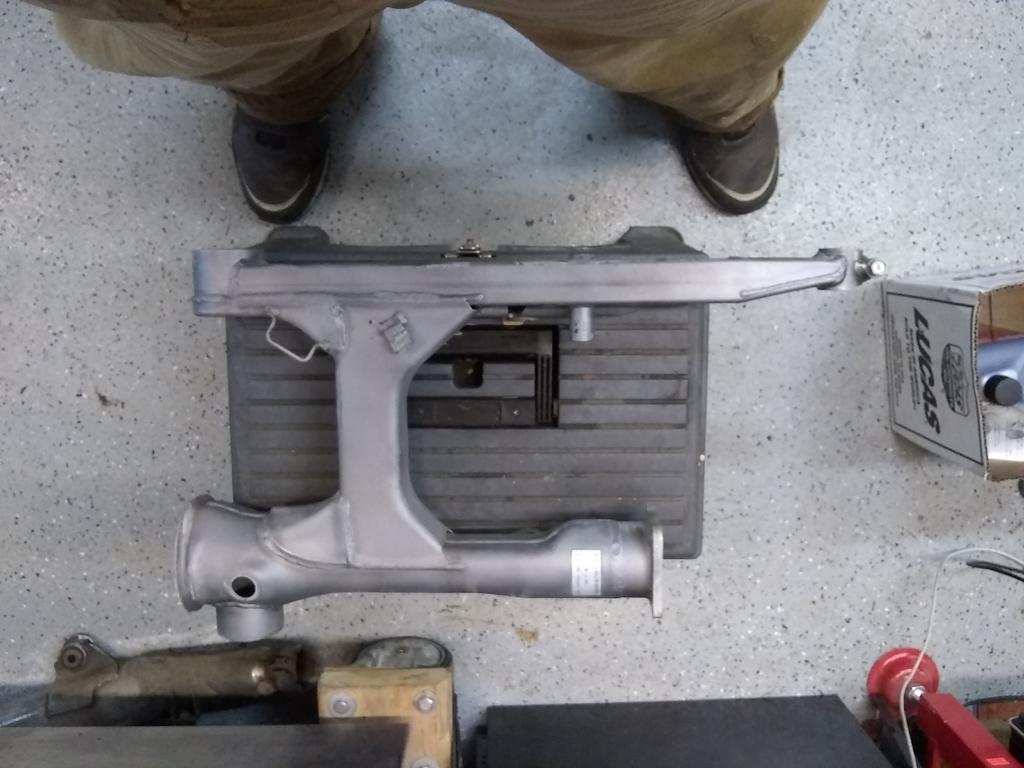
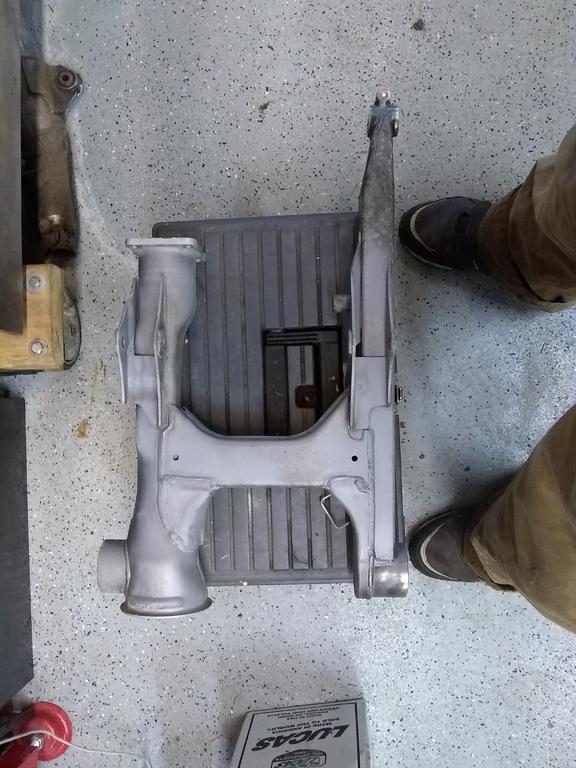
Well now that we're here in the Swing Arm, Final Drive Gear, Arm/Arm1 forward and to each side of the rear wheel area.... I got the Swing Arm, Arm 1 and the Relay Arm off the bike. I'm going to have to media blast it for paint as it hasn't much paint on it. Now to my concern, there is an arm of some name that links the shock to the Relay/Arm 1 assembly, I can't find it in the parts book so i cannot learn of it's proper nomenclature but in any event, apparently you have to remove the exhaust collector to get the bolt/pic out, well, screw that, I know better than to screw with used exhaust parts... So I did the best I could to lube that pin, I will pull the bearings out of the Swing Arm and media blast the Swing, Relay and Arm 1, prime and paint them and re-install the bearings/bushings unless i can pick them up new for very little (the bearing now in place don't seem to be bad) cost, there are oils seals as well.... Anyway that's what I got done this evening! So having removed the bearings in the Swing Arm... They are not pressed in but the races are... The bearings had what looked like enough grease for shipping purposes and that's all. Obviously they are not sealed bearings, only one side is a blind hole and the other (because of the drive shaft) is not. IMHO the should be sealed, a least the one on the drive shaft side should be. -
Swing arm/differential joint seal
dna9656 replied to dna9656's topic in Venture and Venture Royale Tech Talk ('83 - '93)
When I worked on Lockheed aircraft, my crew chief told me that engineering students wrote the service manuals for Lockheed (note: NOT English majors or experienced tech writers but STUDENTS) and therefore might "read" a little weird....Who writes for Yamaha? -
Swing arm/differential joint seal
dna9656 replied to dna9656's topic in Venture and Venture Royale Tech Talk ('83 - '93)
Well I must confess I did not do a word search on the manual, I can only talk about the page that's in front of me. Few of the on line (free) manuals are searchable, they have no pictures or page numbers, they are just an image. I'm taking the arm and arm 1 down to disassemble for greasing, THEN I'll be putting it all together! I sure appreciate Kevin's and your help (and everybody else!) viewpoint(s) on this, it makes me think things through! Is that why my head hurts? -
Swing arm/differential joint seal
dna9656 replied to dna9656's topic in Venture and Venture Royale Tech Talk ('83 - '93)
Thanks Kevin! As always you're wealth of knowledge! -
Swing arm/differential joint seal
dna9656 replied to dna9656's topic in Venture and Venture Royale Tech Talk ('83 - '93)
I believe the text is referring to the case haves that house the universal joint, and to set the drive shaft in place on the "middle case side"; The area your diagram refers to is forward of the area I am speaking of; where the swing arm and final gear drive come together and held tightly in place by 4 studs, nuts and washers. After I made the original post I got to thinking about your diagram so I re-thought my statement and edited it. -
Swing arm/differential joint seal
dna9656 replied to dna9656's topic in Venture and Venture Royale Tech Talk ('83 - '93)
I haven't got the Relay Arm/Arm 1 assembly (to lube the joints) off yet, I thought this model came with zirk grease fittings? Shafts 1 & 2 are being hard to get out... anyone got any tips besides an overnight soak in penetrating oil? Are they easier to remove once the assembly is off/out of the bike? The book says to replace the bushings in the Relay Arm/Arm 1 assembly, Only one bushing is available (P/N 90381-18068-00, $10.60 @ Partzilla and it calls for 4 of them) does this bushing go bad? What about the (P/N 90381-20069-00) bushing? Are there any suitable substitutes? Does anyone know anything about the bearings used in Swing Arm (P/N 93332-00051-00 $30.62) If you run the P/N at Amazon you get "Bearing, tapered #32 " I don't know what that means...There has to be a better place to buy that bearing.... -
Swing arm/differential joint seal
dna9656 replied to dna9656's topic in Venture and Venture Royale Tech Talk ('83 - '93)
I stand corrected. I wish people wouldn't refer me to the parts Fitch or service manual when(in my orig. post) I cited either publication to show I looked it up and I have a question; in an effort to avoid references (that I all ready looked into) and wasted time. I fully appreciate any response to my questions but all i ask is please don't refer me to a source I have previously indicated in my post. -
Swing arm/differential joint seal
dna9656 replied to dna9656's topic in Venture and Venture Royale Tech Talk ('83 - '93)
Your excellent graphic come from the '83 to '85 service manual correct? The '86 and up (the 1300s) have a different set up in the swing arm; but I believe the 2 bikes use the same final drive gear. -
As there is no gasket in the parts book for the swing arm/differential joint, I was wondering if anyone on the forum uses some sort of form-a-gasket type stuff on the swing arm/final drive gear?
-
So I got the diff cleaned up; nasty thick black crud. So, what are the inspection criteria? Are there any parts I should replace as a matter of course? No leakage was evident, I think (hope) the crud was from sloppy maintenance habits like not wiping brake fluid expended when bleeding the brakes, also WAY off topic: what fuel filter Not Yamaha's FILTER ASSY 1FK-24560-10-00. $17.00 for a fuel filter is a bit crazy! I'm thinking any fuel filter for a 4 cylinder engine (1300CC or better) that's the same dimensions as Yamaha's is good; what's the forum say?