Search the Community
Showing results for tags 'plate'.
-
 1999 RSV. I just installed the single light BackOff License Plate Frame with single LED. Real easy install. Lights up the rear a little better, but still needs improvement. The wiring is as follows: Bike ----- Plate Yellow----Red This is the Brake Light Blue------White This is the Running Light Black-----Black This is the Ground
 -
I am trying to find a better looking setup for the license plate bracket and inspection sticker for my RSTD. The inspection sticker goes on a plate above the license plate and is really ugly. It sticks up in the air and looks out of place. Any suggestions?
-
Yesterday I finally got around to re-packing my Bub mufflers. When I did the HD fishtail mod I found that all of the original packing had long gone and with the new tips there was now a 1/4" gap all around the rear baffle plate. I found this packing on e-bay http://cgi.ebay.com/ebaymotors/20-x-38-MOTORCYCLE-EXHAUST-MUFFLER-PACKING-WRAP_W0QQitemZ140148216528QQihZ004QQcategoryZ35573QQcmdZViewItem I pulled the baffles back out and I was able to use 1/2 of a sheet and get about 3 wraps on each baffle. I used some high heat RTV silicone to fill the gap left around the rear baffle plate. The muffs now have a deeper tone and are a lot quieter when cruising but still sound good when getting on the throttle. Here's a link to the post about the HD fishtail install. http://www.venturerider.org/forum/showthread.php?p=114428#post114428
-

SR2 Barnett Clutch Spring Kit
Guest posted a topic in Venture and Venture Royale Tech Talk ('83 - '93)
I noticed there is not a full set of teeth running round the clutch pressure plate, is that right. Original has this. Anyone seen this ? -
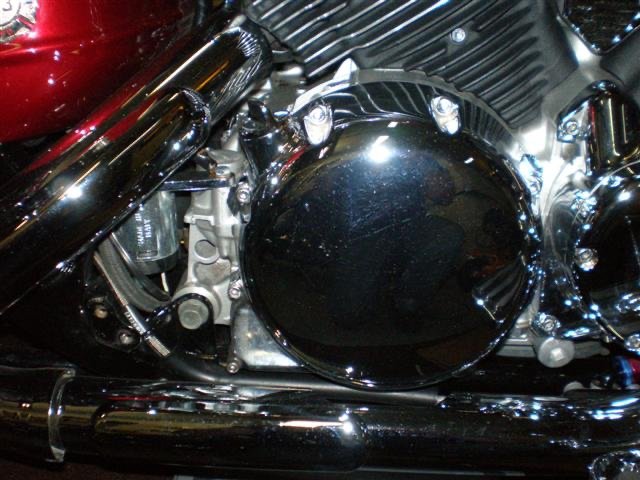
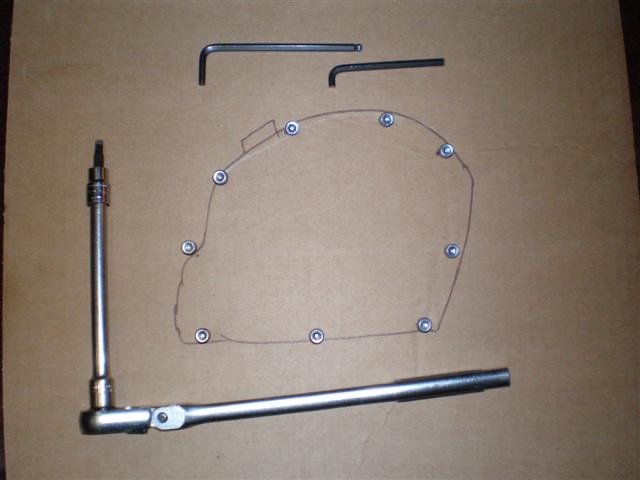
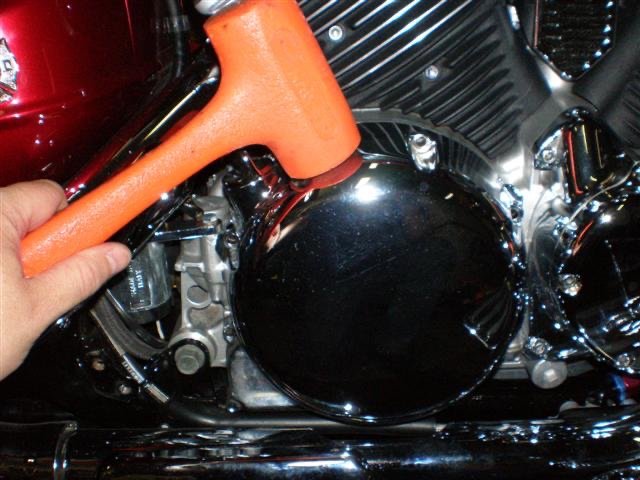
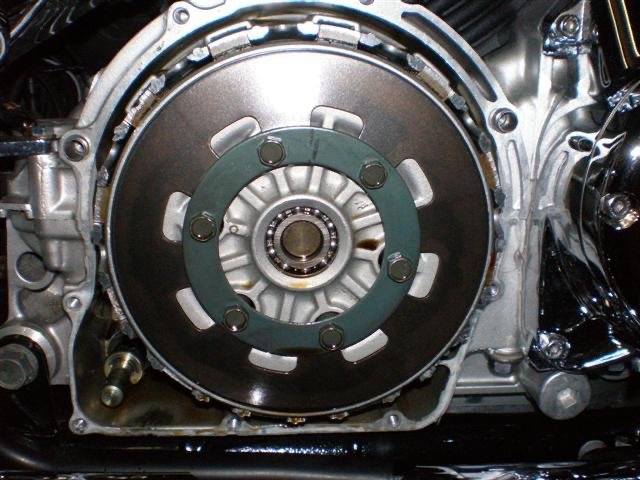
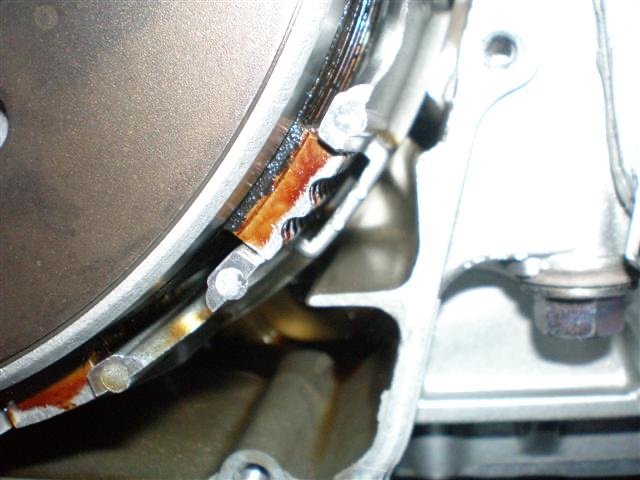
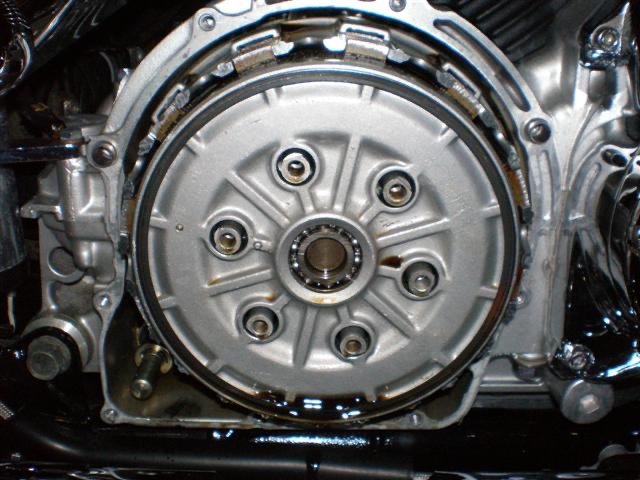
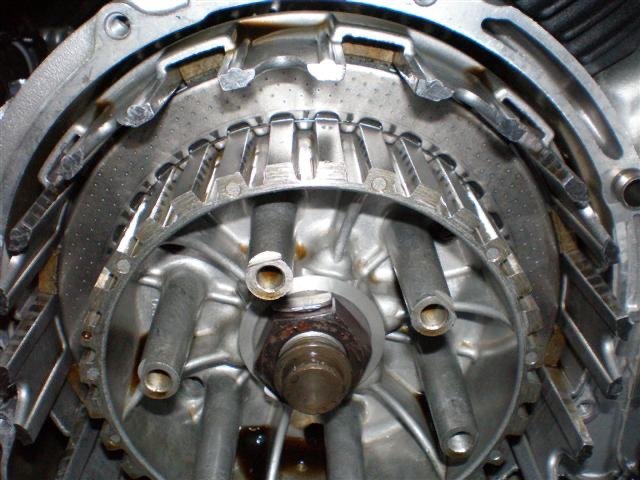
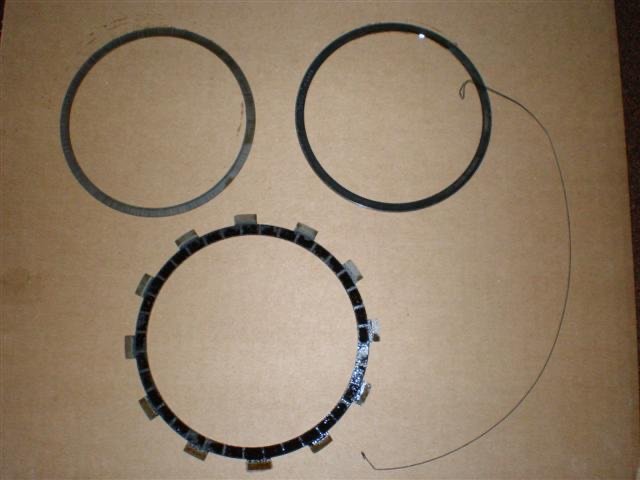
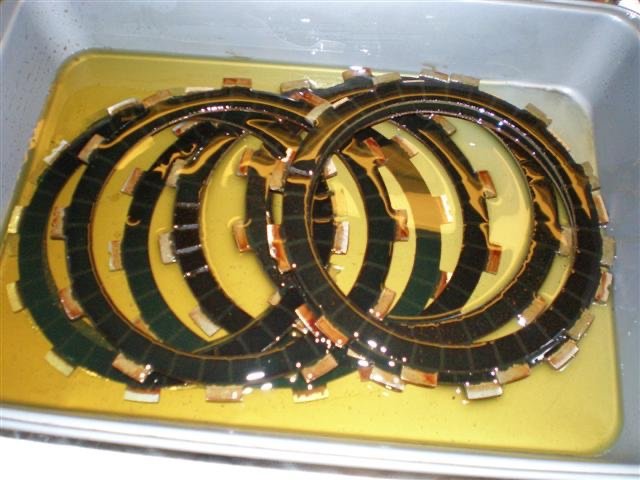
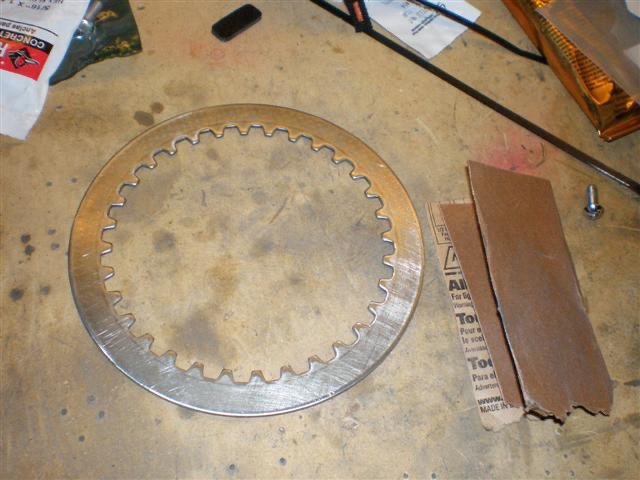
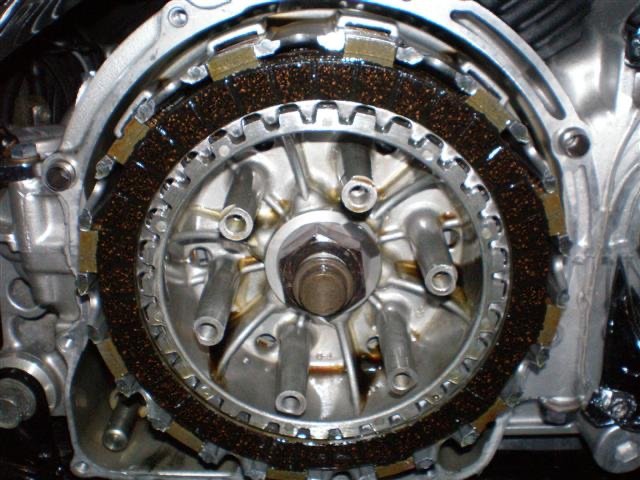
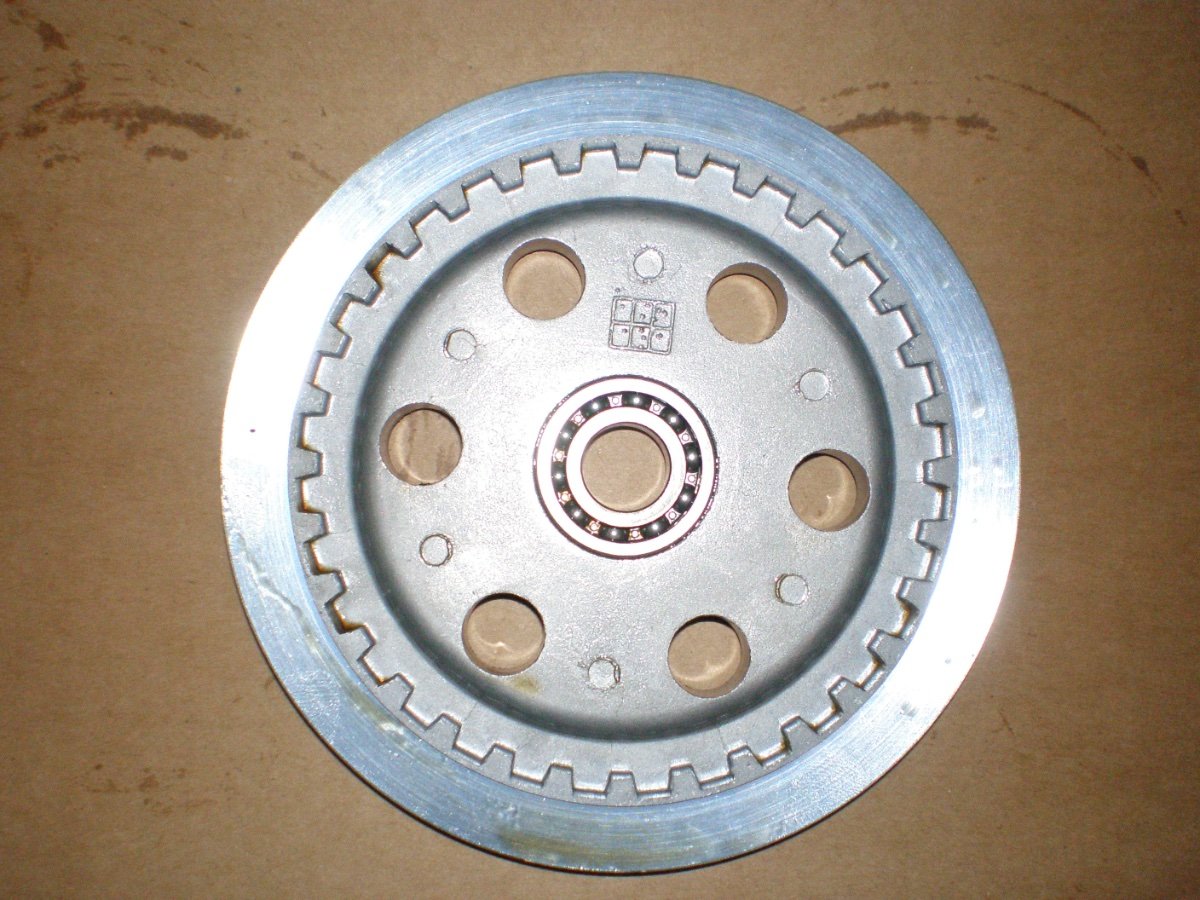
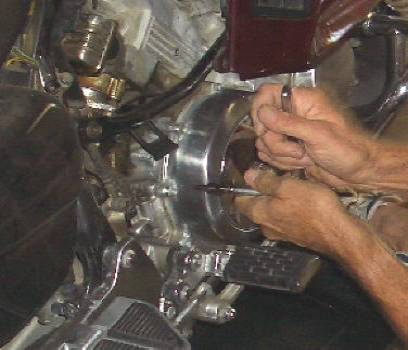
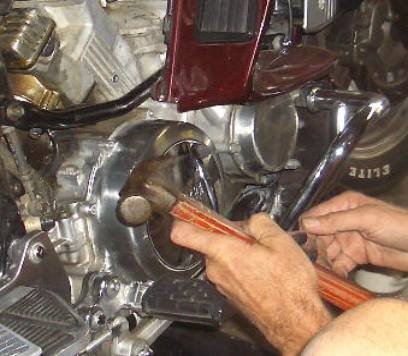
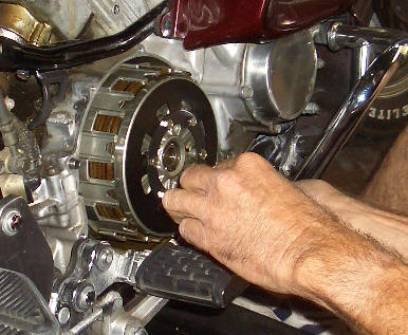
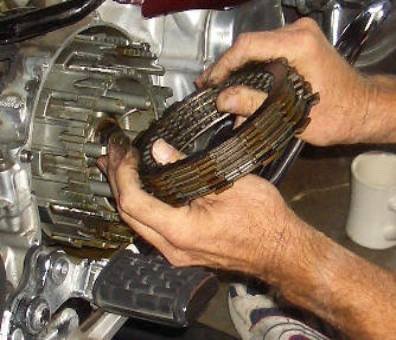
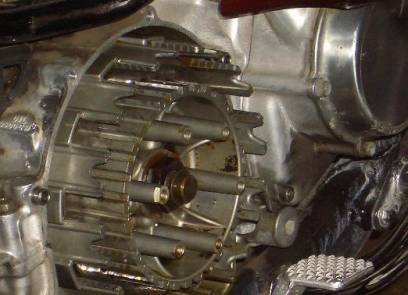
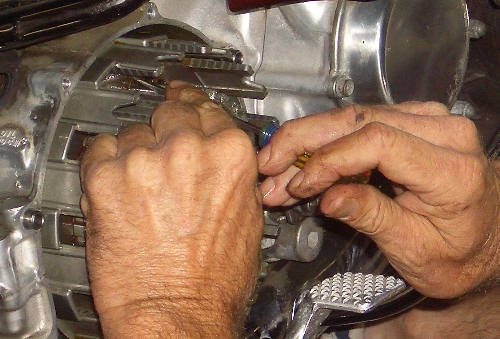
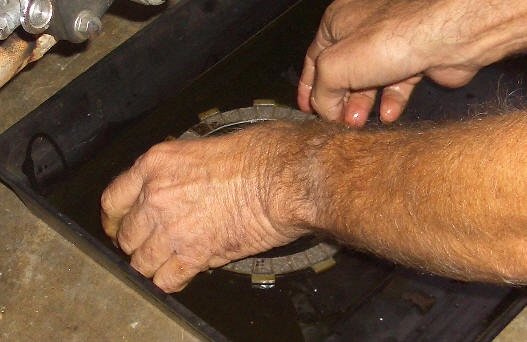
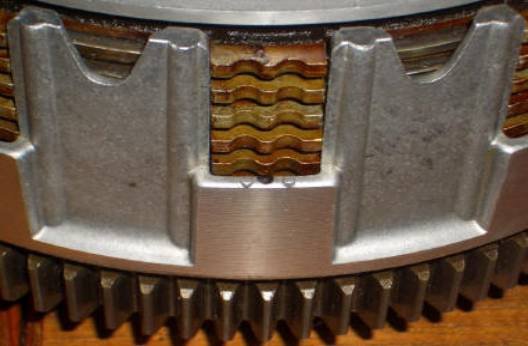
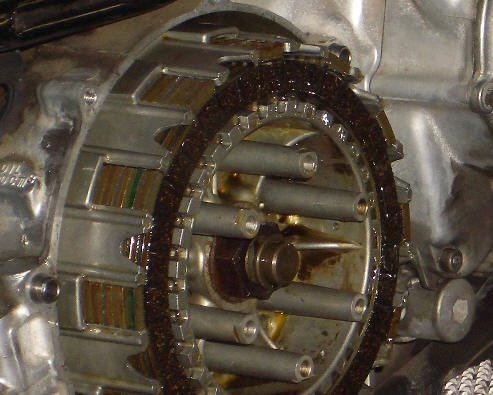
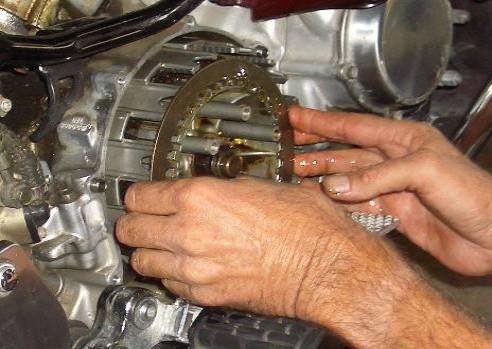
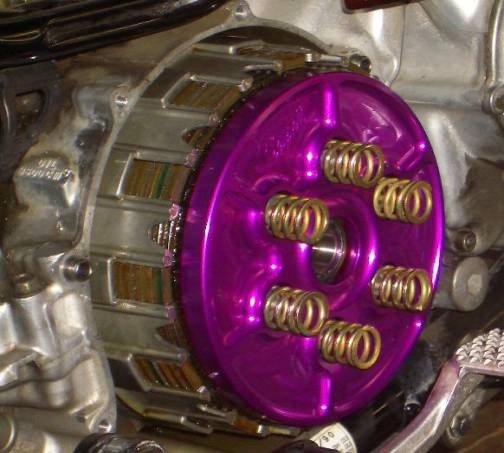
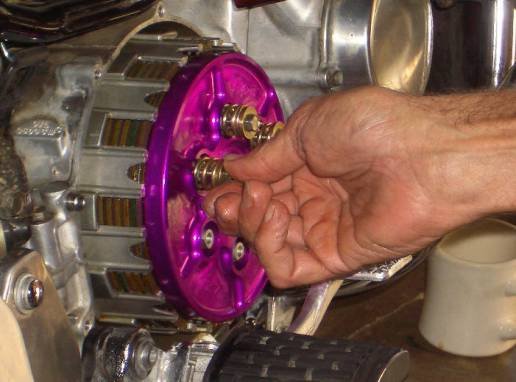
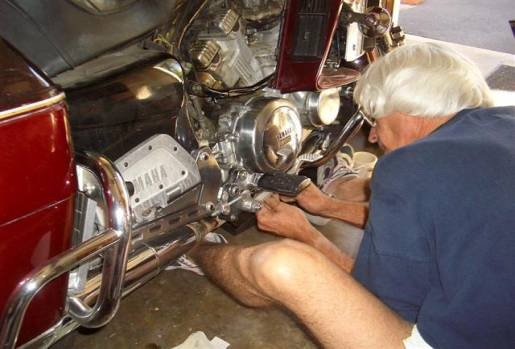
RSV Instructions for Clutch Removal, Install and Upgrade. Thanks to Tartan Terror for this GREAT article. These are instructions for replacing the clutch on a Royal Star Venture. As part of the install on my bike, I also did a clutch upgrade which involved removing several parts and installing an additional full size clutch disc. I found that with this upgrade, I was able to eliminate all of the slip that I was experiencing. At the time I did this upgrade, I also installed a heavier spring available from PCW Racing that also made the clutch more firm. With these instructions you will also be able to do a clutch on your bike completely to stock also. First you need to remove the cover located on the right side of the bike. It is the round cover just in front of the horn. You will need a 5mm Allen key to remove the bolts. In my case, I used a ratchet with a 5mm Allen bit and a ball head Allen key also. To make the removal easy, I also took an old 5mm Allen key and shortened it so that I could loosen the bolts behind the exhaust without removing or loosening the exhaust. When I removed all the bolts, I drew a shape of the cover on cardboard and place the bolts in holes placed in the cardboard so that the bolts will go back in the proper holes. Next you need to gently remove the cover. I did not need to drop any of the oil out of the engine. Although it is a wet clutch, when the engine is not running there is very little oil in the clutch area. Gently tap the cover with a dead blow hammer or something that will not mark your chrome. Remove the cover and clean the old gasket off the cover and surfaces on the block of the engine. When the cover is off, make note of the marks in the clutch basket and on the clutch friction plates. On the basket you will see at one point (5 o'clock position) there are two marks in the basket. You will also see that the with the discs in that all the discs have two marks also. At the 11 o'clock position you will also see one mark in the basket and the same mark on the friction plates. These marks are very important when you reinstall the friction discs. They MUST be lined up. Next you will need to remove the small plate on the outside of the clutch. It is held on by 6 bolts and you will need to use a 10mm socket or wrench. Remove the small plate and spring. Be careful because there is a small metal ring that sits in the pressure plate in a groove under the spring. You now need to remove the pressure plate. All you need to do is lift it off. After you do this, remove all the friction discs and steel plates from the clutch basket. All the way in on the cutch, you will see where you took the plates and friction discs out, a wire. Remove this wire. You will need to break it. This holds in a steel disc like all the others, a half disc and a spring washer. You need to take all of these out. These parts are the parts that you will trash if you choose to upgrade and put in a full size disc. If not, keep all these parts and take note how they come out so that you can return them as they came out. Make sure you get everything out. There is a flat steel washer in there that you have to work at getting out. It does come out and when you get it, the inner surface will be completely flat. Below is a picture of the parts that will be discarded in place of a full sized plate. The plate you will use is the same plate and part number as the rest. Whether you are installing new friction discs or just upgrading and installing one new one with all the others, they must be soaked in oil. As the RSV is a wet clutch, the discs are meant to absorb oil to work properly. Next you will need to prepare the steel plates to be reinstalled. At the recommendation of PCW Racing, I sanded the discs lightly in a crosshatch pattern so that the clutch has better grip. You can also bead blast them lightly as well. Now you are ready to reinstall the clutch. If you decide to use the original clutch parts (the small disc, washer and plate) do so now and install a wire in the groove to replace the one removed. If you are doing the upgrade like I did, you will now install the first friction plate, being careful to line up the grooves like specified so that the two notches match up to the marks on the basket at the 5 o'clock position and one notch at the 11 o'clock position. Install all the discs and plates alternating disc, plat, disc, plate. I also made it a point to spread extra oil on the discs and plates as I installed them. When they are all in, you will have a clutch disc on the outside and all the notches will line up. Next you will put on the pressure plate. The pressure plate has a punch mark on the front - make sure it lines up correctly with the single mark next to one of the bolt towers on the clutch basket. On the back side, you will see that the plate has splines that will match up with the teethe on the inner clutch basket. If these don't fit together correctly, the spring will not sit correctly. After you have this in then place the spring on next, making sure that the small ring is sitting in the groove on the front side of the pressure plate. Now install the spring. In my case, I installed a PCW spring which is heavier than the stock spring but of the same design. The stock spring is installed the same. If you use a Barnett pressure plate, follow the instructions that came with the kit. When installing the spring retainer plate and bolts, be careful not to tighten the 6 bolts too tight. Also, you will need to make sure that the spring is centered. There are notches on the towers that the 6 bolts tighten into that the finger on the center of the spring should rest on. Tighten evenly and crisscross your torqueing pattern. The torque is 5.8 ft lbs or 70 in.lbs. Reinstall the cover being careful not to crimp the new gasket and you are done. Like I said, I did the upgrade and I love it. It is better for pulling a trailer. One thing you will notice with the upgrade is the pull on your clutch lever is harder but not by much and you will adjust to it very quickly. I also recommend the upgrade if you are driving hard or have added stuff to get more power from your bike. Now get out and ride!!!

-
 Installing Harley Davidson License Plate Bracket Light Kit Submitted by Tartan Terror Anyone owning a Royal Star Venture knows full well the lack of good lighting on the rear of this motorcycle. Although I have seen may good ideas I chose the Harley Davidson license plate bracket with the incorperated taillights. Harley Davidson’s part number for this item is 68230-97A or 68230-97B. Both will work well and the only difference is that the “B” part number has a full backing behind the Plate portion. http://www.venturerider.org/hdlights/image002.jpg Step 1: Assemble the lamps onto the chrome bracket. The lamps are easily installed onto the frame and are held on by allen head bolts provided in the kit. You must also flatten the two raised nubs on the plate portion of the plate portion. After all assembled cut off the plug in connector as the Harley plug will not fit the RSV. http://www.venturerider.org/hdlights/image004.jpg Step 2: Remove the License Plate from the Venture and gently pull out the wires inside the pod behind the removed plate. Find the Blue and Yellow wires inside the pod. Next connect the Blue wire on the Harley lights to the to the Blue wire on the RSV. After doing this connect the Red wire on the Harley lights to the Yellow wire on the RSV. I connected the wires using a male female type of connector so I could take the lights off easily for repair or cleaning if need be. Note: If you test the lights after you have made these connections lights wont work. You must bolt the plate and lights to the bike to ground the lights! http://www.venturerider.org/hdlights/image006.jpg http://www.venturerider.org/hdlights/image008.jpg http://www.venturerider.org/hdlights/image010.jpg Step 3: Tuck wires into the pod carefully and Bolt plate frame to bike. Test lights at this point and if all is good you are finished! Lights will operate as brake and running lights and will add lots of great light on the rear! http://www.venturerider.org/hdlights/image012.jpg Here is the Finished product!!! (Sorry the Pic is a little dark)
 -
BARNETT CLUTCH CONVERSION INSTALLATION The parts were ordered from Rick at Buckeye Performance in Ohio. The fiber discs ONLY were replaced given the wear and mileage, the plates were reusable. Parts used: FRICTION PLATE #YA26H-16321-01-04 (notched/6 ea.) FRICTION PLATE #YA26H-16307-01-00 (un notch/1 ea.) Retaining wire BNT-SR-2 CONVERSION SR-2 SPRING CLUTCH (1 set) STARTING NOTE: This was done without removing the clutch pedal or linkage. Also note that with the bike on it's side stand, there is little or no loss of oil. 1. Remove the clutch housing cover. After removing the bolts the cover may need a bit of persuading to give it up. CAUTION! A rubber hammer is recommended, as one was not available when this was done, a hammer was employed along with a very thick towel to soften the taps to the housing. 2. With the cover removed the next step is removing the diaphragm and pressure plate. These items won't be used and can be discarded or stored. This time the 6 bolts were reused. Others have replaced them with new bolts. 3. Next remove the old friction plates and discs. Note: there is a set of 1 plate and 1 disc held at the very bottom of the clutch basket by a thin retaining wire. The wire is held in place by a couple of bent ends that are pushed through a hole in the basket. The wire needs to be removed and the last two pieces taken out. 4. The empty basket. Clean and get ready for reassembly. Check the edges of the uprights for any burrs or imperfections. NOTE: When inserting the discs make sure that you have the tang with the double notches aligned with the two 'dots' on the clutch basket. 5. Place one disc and then (the odd) friction plate (#YA26H-16321-01-00) and one re-used spacer into the base of the basket. Make sure they are soaked with fresh oil. (take note that there are no notches on the first disc) Place the NEW wire into the channel cut into the basket and into the notches of the basket uprights and secure it by pushing the bent ends into the hole. Be patient. A long thin screwdriver also facilitates the job. NOTE: You can never have enough oil on the new discs and plates. When inserting the discs and plates, double check to make sure that the notches are lined up with the two dots on the lip of the basket. NOTE: Here is what a full basket looks like. 6. The final plate goes in. 7. Place the Barnett Clutch pressure plate on the basket. The instructions with the Barnett show the "Barnett" label up, but you will probably need to rotate it until it fits right. Just rotate the plate until it is seated without any gap between the plate and the top disc. 8. With the plate sitting correctly in the basket and the ease of the spring compression to start the bolts. Torque the bolts at 8 lbs. 9. Put the new gasket on, the housing on and secure the cover. Time involved is about an hour to an hour and a half.
-
Clutch Hope this will explain all you will ever have to know about the clutch in your Venture, because sooner or later the tack will start going up faster then the speedometer when you punch it to pass. The one strange thing I have noticed about the Venture clutch is that you notice slippage in the higher gears not in first or second. The time it takes to inspect the clutch in your Venture before a long trip is well worth it. Things you will need before starting 5 mm Allen or hex socket, 6 new springs or diaphragm spring, a new clutch gasket, a 6 in ruler, a set of calipers or a 01 in micrometer. With the bike on the side stand the clutch cover can be removed with out loss of oil and if you start with a cold engine a novice should be able to complete the the inspection within two hours (one hr. at the Yamaha shop). After you have the cover off, remove the six bolts from the clutch and remove the driven plate (pressure plate), then remove the steel and fiber disks inspecting them for excessive wear and color. If the steel plates look blue or purple in spots or the knurling (diamond shaped indentations) are uneven replace them as they are warped. If they look good it might be a good idea to have them glass beaded or sand blasted to remove any glaze as they seem to cause slippage before the fiber plates are out of tolerance. You should now see the last metal plate held in with a long wire that goes all the way around the center of the clutch boss. This plate and the friction plate behind it need not be checked unless you intend to replace all of the metal plates. Have them de glazed if the clutch has been chattering, because they are, used as a damper. Now check the splines on the clutch boss for chafing where the plates run, as this can cause erratic operation. If the chafing (necks or grooves) are slight to moderate, you can carefully de-burr with a file or replace the boss. Now check all parts to see that they are within there ware limits listed. If the friction plates are ok it might be a good idea to de glaze them with a wire brush. I have listed the parts and there ware limits for both types of venture clutch. To reassemble start with one of the 6 friction plates that have the two round notches, alien the two notches with the two marks on the clutch housing, now place a metal plate on the clutch boss, repeat this until you have replaced the 6 plates then take the last plate with the large square notch and alien it with the two marks on the clutch housing . When you put the pressure plate on, alien the mark on the clutch boss with the hole or mark on the pressure plate then place the 6 springs or the diaphragm spring and retainer and tighten the 6 bolts evenly. replace the clutch cover and torque the 5 mm bolts to 8.7 ft-lb. most of the information in this article can be found in a Yamaha service manual that can be purchase through M.T.A. Remember to replace the hydraulic fluid with dot 3 once a year or if turns dark. Parts Standard clutch 1983-1985 6 springs #90501-24734-00 normal length 41.6 mm / 1.64 in minimum length 40.3 mm / 1.59 in replace if the springs are to short or you have over 30,000 miles on the clutch. 6 friction plates #26h-16307-00-00 1 friction plate #26h-16331-01-00 1 friction plate #26h-16321-00-00 thickness 2.9 to 3.1 mm / 0.1142 to 0.1220 minimum thickness 2.8 mm / 0.11 in 7 metal clutch plates #26h-16324-00-00 thickness 2.2 to 2.4 mm / 0.0866 to 0.0945 in no minimum listed warp limit 0.2 mm / 0.0079 in 1 clutch boss #26h-16371-00 1 gasket #26h-15462-00 1986-1991 venture / v-max diaphragm clutch 1 clutch spring #1fk-16334-00-00 6 friction plates #26h-16307-00-00* 1 friction plate #26h-16321-00-00* 1 friction plate #26h-16331-00-00* 7 metal clutch plates #26h-16324-00-00* 1 metal clutch plate #1fk-16352-00-00* 1 clutch boss #1fk-16371-00-00 1 gasket #26h-15462-00-00* *(parts are the same as 1983-85 clutch) Fred J. Vogt
-
If any of you had the unfortunate or helpless feeling as I have had when you try and take the saddlebag or trunk of the brackets and all the key and lock does is turn turn turn, really sucks!! Well, what I did was take the locking mechanism off the bag (in my case bags), unscrew plate on back remove circular tumbler (making sure not to lose the spring that holds pressure on latch), replace plate and install lock back on to bag. Now, to remove bag from bracket just take screwdriver or knife blade and push against front side of latch. Holding latch with blade push bag backwards. Not the best way to fix the problem but it works for me!!!