Search the Community
Showing results for tags 'master'.
-
Bought an '83 off eBay. It's in AZ near Flagstaff. Needs work; clutch master? according to previous owner. Picked up a master off eBay; planning a trip to pick it up. Plan A- ride the bus (20 hours), hop off, catch a ride to the place, swap out the clutch master, bleed the clutch & ride off into the sunrise. $ Plan B- drive out towing a trailer & #1 son, rest is the same except add a side trip to the Grand Canyon. $$ Plan C- catch someone driving east on I 40 with room on a trailer or in a pickup, pay for gas to haul it to OK. $ Plan D- pay to ship it to OK. $$$ I'm leaning toward plan A, but I'm an optimist. Plan B is more practical, and covers both likely scenarios- it runs well or it doesn't. Missed an opportunity for Plan C, but it could happen again. Thoughts? Maybe this oughtta be a poll...
-
Guys, I am helping a friend remove some accessories to be installed on another RSV later. And he has a Trip Master tach with a water temp gauge. Does anyone know if this gauge came with a replacement thermo switch? Thanks, Rick
-
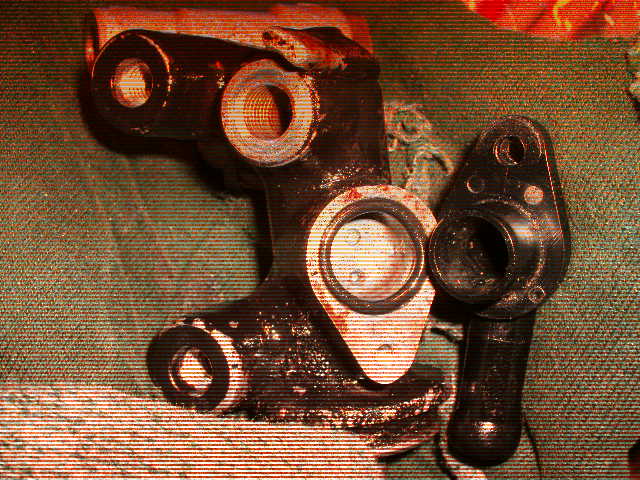
 Okay, if your on the road and your brakes stick on what do you do? I just finished solving this on my 1st Gen (83) and this may help you!! I am going to try and include pics with this!! I replaced my pads for a 10 day cross country ride coming up and ended up with a sticky Rear/front brake system.. If something like this happens to you here are some suggestions.. 1. If your bike feels like its lost power, is hard to push back and forth or if you just plain smell hot brakes - STOP and check them! 2. With a damp fingertip (spit works great) carefully touch the surface of your rotors (like testing a hot clothes iron). 3. If both left front and rear rotors are hot - its the rear system. If its just the right front its the front brake.. I am only dealing with the rear system at this time.. 4. If its the rear system, take an 8mm box end or a socket and open the bleeder on the front left caliper - have a rag hany cause if it is a stuck system your gonna get fluid out and you dont want it on your rotor.. 5. Push the bike back and forth or put it up on the center stand and see if the she rolls easy now.. If it does and the problem had effected both front and rear brake rotors (remember - your back brake pedal is activating both front left and rear calipers) check these items.. 6. Look at your master cylinder - at the bottom of it is a rod sticking out and an attachent for the pedal. Gently hold that rod between your thumb and finger and see if it has movement back and forth and a small amount up and down.. If it doesnt, you may need to clean the pivot for you pedal and/or adjust the freeplay screw to get play in it.. Now try your brakes - if still stickin go on to 7. 7. Pump your pedal HARD!! ALthough it is BEST to remove the rear brake master cylinder to do the following, so you can take it all apart and clean it thouroughly, I am going to give you some info for "on the road" fixen!! It also may be worth just doing this first BEFORE doing a complete take down - always start with lesser surgery first - I learned that from my NeuroSurgeon! 8. Expose the rear master. 9. Notice where the hose from the Fluid Resivore attaches to the Master. It is attached with a small phillips screw. Remove this screw. 10. Take a pair of pliers and squeeze the rubber line about 3/8th inch above the little plasic elbow that you just removed the screw from.. ITs best to have an extra set of hands there to do this as youwill want this line held closed during surgery. 11. Gently turn the hose back and forth to move the plastic "L" in its holder. Pull out while doing so.. The "L" is held in by an O-ring. 12. Make sure you dont loose the O-Ring when the L coomes out of the master - maintain squeeze on the hose (by the way, I carry a small set of surgical forcept pliers in my tool kit - VERY handy for all kinds of this stuff!) 13. Look at the pics I have attached - If you look closely you can see the little wire I have protruding from the return bleed hole back into the fluid res hose. This little hole is the hole that is on top of the cup that recieves the "L". 14. You WILL need a small wire to unplug this hole. I am using a bristle off a wire brush - someone who responded to my original thread about all this suggested this and it works GREAT!! I also use wire brush bristles for carb jet cleaning!! On the road I wouldnt be afraid to take a strand of wire from piece of wire (ya'll carry a little spool or wiring in your bag dont cha?).. 15. Push the wire into the top orfice and be prepared to get a SQUIRT! WHen I did this on my 83 it SQUIRTED out like a high pressure squirtgun!! 16. Work the wire in and out to clean out the orfice real good. 17. Wipe the insideof the cup where the L goes out real good. 18. Clean the surface of the "L" and the o-ring real good. 19. Relax the squeeze onthe hose and let a little fluid out. FLuid should RUSH out!! 20. If the fluid barely trickles. 21. Squeeze the hose again, point the opening of the L that goes into the Master down toward the ground. 22. Squeeze the hose above the pliers with your fingers. 23. Let go of the pliers a little so the fluid is forced out - you may be shocked what you get out of the hose - I WAS!! Re-Squeeze with the pliers as soon as it bleeds a shot!! 24. Replace the end of the L into the cup on the Master. 25. Release the pliers and squeeze the hose so fluid is gushing out around the L while pushing it in. 26. Replace the phillips screw!! 27. Pump your brakes and they should release and the wheels roll free. 28.. Put her back together and RIDE!!!!!!!!!!!! Oh yea, you might want to check your Brake Fluid first chance you get!! Special thanks to ALL who responded to my other thread about this!! Lots of GREAT info there folks!! "puc
-
 Folks, I’m finished with this project and I am happy to report that installing a proportioning valve in-line to the output side of the master cylinder, has exceeded my expectations. Attached is my analysis of this project. Rick